Technical Background
Page 37
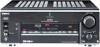
...upgrade 12-volt trigger outputs Multi-Zone/Room Capability 2nd Room output 3rd Room output On screen display Remote Features Preprogrammed LCD Learning & Macro 2-way Touch-screen Second-room remote STRDA7100ES 170 watts x7 Yes Yes Yes Yes Yes Yes Yes IIx Yes Yes 7.1-channel Yes Yes (...Yes Yes IIx Yes Yes 7.1-channel Yes Yes Yes Yes Yes Yes 7.1 -/2/1 4/2 5/2 To Component 3/1 2 Subwoofer Yes 1/1 Yes/Yes 1 2/2 Audio out Yes Yes Yes - ES Receivers v1.0 Page 37 Yes Yes Yes IIx Yes Yes 7.1-channel Yes Yes (Two) Yes Yes Yes Yes 7.1 -/2/1 5/2 5/2 To Component 5/2 2 7.1 channels Yes 1/2 Yes/Yes 3 3/3...
...upgrade 12-volt trigger outputs Multi-Zone/Room Capability 2nd Room output 3rd Room output On screen display Remote Features Preprogrammed LCD Learning & Macro 2-way Touch-screen Second-room remote STRDA7100ES 170 watts x7 Yes Yes Yes Yes Yes Yes Yes IIx Yes Yes 7.1-channel Yes Yes (...Yes Yes IIx Yes Yes 7.1-channel Yes Yes Yes Yes Yes Yes 7.1 -/2/1 4/2 5/2 To Component 3/1 2 Subwoofer Yes 1/1 Yes/Yes 1 2/2 Audio out Yes Yes Yes - ES Receivers v1.0 Page 37 Yes Yes Yes IIx Yes Yes 7.1-channel Yes Yes (Two) Yes Yes Yes Yes 7.1 -/2/1 5/2 5/2 To Component 5/2 2 7.1 channels Yes 1/2 Yes/Yes 3 3/3...
Technical Background
Page 38
... refer to the documentation that product contains an IEEE 1394 connector. Multi-brand remote may not communicate with each other trademarks are trademarks of their respective owners. 1. ES Receivers v1.0 Page 38 All other . Non-metric weights and measures are approximate Sony, Digital Cinema Sound, Direct Stream Digital and i.LINK are property of...
... refer to the documentation that product contains an IEEE 1394 connector. Multi-brand remote may not communicate with each other trademarks are trademarks of their respective owners. 1. ES Receivers v1.0 Page 38 All other . Non-metric weights and measures are approximate Sony, Digital Cinema Sound, Direct Stream Digital and i.LINK are property of...

Operating Instructions
Page 3
... U.S.A. For details on the use the controls on the receiver. STR-DA4ES RM-LP211: See the separate operating instructions supplied with the remote. This receiver incorporates Dolby* Digital and Pro Logic Surround and the DTS** Digital Surround System. * Manufactured under license from Dolby Laboratories. Check your remote: - STR-DA7ES RM-TP1: See the separate operating instructions supplied...
... U.S.A. For details on the use the controls on the receiver. STR-DA4ES RM-LP211: See the separate operating instructions supplied with the remote. This receiver incorporates Dolby* Digital and Pro Logic Surround and the DTS** Digital Surround System. * Manufactured under license from Dolby Laboratories. Check your remote: - STR-DA7ES RM-TP1: See the separate operating instructions supplied...
Operating Instructions
Page 5
Operations Using the Remote (STR-DA7ES only) Using the remote RM-US105A 66 Listening to the sound in another room 67 Additional Information Precautions 75 Troubleshooting 75 Specifications 78 Index Back cover 5GB
Operations Using the Remote (STR-DA7ES only) Using the remote RM-US105A 66 Listening to the sound in another room 67 Additional Information Precautions 75 Troubleshooting 75 Specifications 78 Index Back cover 5GB
Operating Instructions
Page 10
Satellite tuner OUTPUT DIGITAL OPTICAL E OUTPUT AUDIO OUT L R A ANTENNA 75Ω COAXIAL FM DIGITAL CD/SACD OPTICAL IN U IR REMOTE MONITOR TV/SAT DVD/LD VIDEO 2 IN STATUS IN OUT COMPONENT VIDEO CONTROL S AM TV/SAT IN DVD/LD IN MONITOR OUT S2 VIDEO S2 ...
Satellite tuner OUTPUT DIGITAL OPTICAL E OUTPUT AUDIO OUT L R A ANTENNA 75Ω COAXIAL FM DIGITAL CD/SACD OPTICAL IN U IR REMOTE MONITOR TV/SAT DVD/LD VIDEO 2 IN STATUS IN OUT COMPONENT VIDEO CONTROL S AM TV/SAT IN DVD/LD IN MONITOR OUT S2 VIDEO S2 ...
Operating Instructions
Page 11
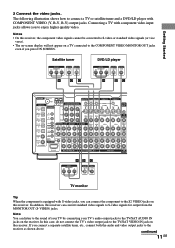
... Y OUTPUT VIDEO OUTPUT S VIDEO DVD/LD player OUTPUT COMPONENT R-Y B-Y Y OUTPUT S VIDEO OUTPUT VIDEO H CD H DC ANTENNA 75Ω COAXIAL FM DIGITAL CD/SACD OPTICAL IN U IR REMOTE MONITOR TV/SAT DVD/LD VIDEO 2 IN STATUS IN OUT COMPONENT VIDEO CONTROL S AM TV/SAT IN DVD/LD IN MONITOR OUT...to connect a TV or satellite tuner and a DVD/LD player with component video input jacks allows you press ON SCREEN. In addition, this receiver, the component video signals cannot be converted to S-video or standard video signals (or vice versa). • The on-screen display will ...
... Y OUTPUT VIDEO OUTPUT S VIDEO DVD/LD player OUTPUT COMPONENT R-Y B-Y Y OUTPUT S VIDEO OUTPUT VIDEO H CD H DC ANTENNA 75Ω COAXIAL FM DIGITAL CD/SACD OPTICAL IN U IR REMOTE MONITOR TV/SAT DVD/LD VIDEO 2 IN STATUS IN OUT COMPONENT VIDEO CONTROL S AM TV/SAT IN DVD/LD IN MONITOR OUT...to connect a TV or satellite tuner and a DVD/LD player with component video input jacks allows you press ON SCREEN. In addition, this receiver, the component video signals cannot be converted to S-video or standard video signals (or vice versa). • The on-screen display will ...

Operating Instructions
Page 12
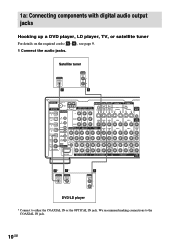
... with a DOLBY DIGITAL RF OUT jack via an RF demodulator (You cannot connect an LD player's DOLBY DIGITAL RF OUT jack directly to this receiver. 1a: Connecting components with the Super Audio CD player. • You cannot make digital recordings of digital multi channel surround signals. 12GB Refer ...DIGITAL OPTICAL IN OUT INPUT OUTPUT LINE LINE L R E OUT E A IN OUT A IN ç ç ç ç ANTENNA 75Ω COAXIAL FM DIGITAL CD/SACD OPTICAL IN U IR REMOTE MONITOR TV/SAT DVD/LD VIDEO 2 IN STATUS IN OUT COMPONENT VIDEO CONTROL S AM TV/SAT IN DVD/LD IN MONITOR OUT...
... with a DOLBY DIGITAL RF OUT jack via an RF demodulator (You cannot connect an LD player's DOLBY DIGITAL RF OUT jack directly to this receiver. 1a: Connecting components with the Super Audio CD player. • You cannot make digital recordings of digital multi channel surround signals. 12GB Refer ...DIGITAL OPTICAL IN OUT INPUT OUTPUT LINE LINE L R E OUT E A IN OUT A IN ç ç ç ç ANTENNA 75Ω COAXIAL FM DIGITAL CD/SACD OPTICAL IN U IR REMOTE MONITOR TV/SAT DVD/LD VIDEO 2 IN STATUS IN OUT COMPONENT VIDEO CONTROL S AM TV/SAT IN DVD/LD IN MONITOR OUT...

Operating Instructions
Page 13
... external multi channel decoder. Alternatively, the multi channel input jacks can connect them to this receiver's MULTI CHANNEL IN jacks to enjoy the sound of the component. ANTENNA 75Ω COAXIAL FM DIGITAL CD/SACD OPTICAL IN U IR REMOTE MONITOR TV/SAT DVD/LD VIDEO 2 IN STATUS IN OUT COMPONENT VIDEO CONTROL S AM...
... external multi channel decoder. Alternatively, the multi channel input jacks can connect them to this receiver's MULTI CHANNEL IN jacks to enjoy the sound of the component. ANTENNA 75Ω COAXIAL FM DIGITAL CD/SACD OPTICAL IN U IR REMOTE MONITOR TV/SAT DVD/LD VIDEO 2 IN STATUS IN OUT COMPONENT VIDEO CONTROL S AM...

Operating Instructions
Page 14
...jack on a TV connected to S-video or standard video signals (or vice versa). • The on-screen display will not appear on the receiver. Note You can convert standard video signals to enjoy higher quality video. DVD/LD player OUTPUT S VIDEO OUTPUT VIDEO OUTPUT COMPONENT R-Y B-Y Y... DC H TV monitor INPUT COMPONENT R-Y B-Y Y INPUT S VIDEO INPUT VIDEO H DC ANTENNA 75Ω COAXIAL FM DIGITAL CD/SACD OPTICAL IN U IR REMOTE MONITOR TV/SAT DVD/LD VIDEO 2 IN STATUS IN OUT COMPONENT VIDEO CONTROL S AM TV/SAT IN DVD/LD IN MONITOR OUT...
...jack on a TV connected to S-video or standard video signals (or vice versa). • The on-screen display will not appear on the receiver. Note You can convert standard video signals to enjoy higher quality video. DVD/LD player OUTPUT S VIDEO OUTPUT VIDEO OUTPUT COMPONENT R-Y B-Y Y... DC H TV monitor INPUT COMPONENT R-Y B-Y Y INPUT S VIDEO INPUT VIDEO H DC ANTENNA 75Ω COAXIAL FM DIGITAL CD/SACD OPTICAL IN U IR REMOTE MONITOR TV/SAT DVD/LD VIDEO 2 IN STATUS IN OUT COMPONENT VIDEO CONTROL S AM TV/SAT IN DVD/LD IN MONITOR OUT...

Operating Instructions
Page 15
... required cords (A-H), see page 9. continued 15GB MD/DAT deck Turntable INPUT OUTPUT LINE LINE L R A A OUT A IN ç ç ANTENNA 75Ω COAXIAL FM DIGITAL CD/SACD OPTICAL IN U IR REMOTE MONITOR TV/SAT DVD/LD VIDEO 2 IN STATUS IN OUT COMPONENT VIDEO CONTROL S AM TV/SAT IN DVD/LD IN MONITOR OUT...
... required cords (A-H), see page 9. continued 15GB MD/DAT deck Turntable INPUT OUTPUT LINE LINE L R A A OUT A IN ç ç ANTENNA 75Ω COAXIAL FM DIGITAL CD/SACD OPTICAL IN U IR REMOTE MONITOR TV/SAT DVD/LD VIDEO 2 IN STATUS IN OUT COMPONENT VIDEO CONTROL S AM TV/SAT IN DVD/LD IN MONITOR OUT...
Operating Instructions
Page 16
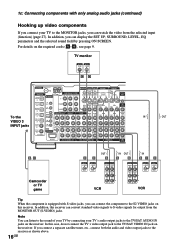
...connect the TV's video output jack to the TV/SAT VIDEO IN jack on the required cords (A-H), see page 9. For details on the receiver. In addition, this receiver can convert standard video signals to S-video signals for output from the selected input (function) (page 27). Note You can display the SET..., etc., connect both the audio and video output jacks to the receiver as shown above. 16GB TV monitor INPUT VIDEO INPUT S VIDEO CD To the VIDEO 3 INPUT jacks ANTENNA 75Ω COAXIAL FM DIGITAL CD/SACD OPTICAL IN U IR REMOTE MONITOR TV/SAT DVD/LD VIDEO 2 IN STATUS IN OUT COMPONENT ...
...connect the TV's video output jack to the TV/SAT VIDEO IN jack on the required cords (A-H), see page 9. For details on the receiver. In addition, this receiver can convert standard video signals to S-video signals for output from the selected input (function) (page 27). Note You can display the SET..., etc., connect both the audio and video output jacks to the receiver as shown above. 16GB TV monitor INPUT VIDEO INPUT S VIDEO CD To the VIDEO 3 INPUT jacks ANTENNA 75Ω COAXIAL FM DIGITAL CD/SACD OPTICAL IN U IR REMOTE MONITOR TV/SAT DVD/LD VIDEO 2 IN STATUS IN OUT COMPONENT ...
Operating Instructions
Page 17
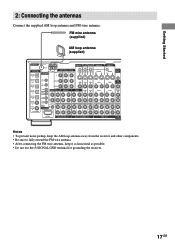
... (supplied) AM loop antenna (supplied) ANTENNA 75Ω COAXIAL FM DIGITAL CD/SACD OPTICAL IN U IR REMOTE MONITOR TV/SAT DVD/LD VIDEO 2 IN STATUS IN OUT COMPONENT VIDEO CONTROL S AM TV/SAT IN DVD/LD IN MONITOR OUT S2 VIDEO S2 ... VARIABLE 3RD ROOM Notes • To prevent noise pickup, keep the AM loop antenna away from the receiver and other components. • Be sure to fully extend the FM wire antenna. • After connecting the FM wire antenna, keep it as horizontal as possible. • Do not use the U SIGNAL GND terminal for...
... (supplied) AM loop antenna (supplied) ANTENNA 75Ω COAXIAL FM DIGITAL CD/SACD OPTICAL IN U IR REMOTE MONITOR TV/SAT DVD/LD VIDEO 2 IN STATUS IN OUT COMPONENT VIDEO CONTROL S AM TV/SAT IN DVD/LD IN MONITOR OUT S2 VIDEO S2 ... VARIABLE 3RD ROOM Notes • To prevent noise pickup, keep the AM loop antenna away from the receiver and other components. • Be sure to fully extend the FM wire antenna. • After connecting the FM wire antenna, keep it as horizontal as possible. • Do not use the U SIGNAL GND terminal for...

Operating Instructions
Page 26
... level of the test tone sounds the same from each speaker. on the remote or turn on the receiver. 2 Press TEST TONE on the receiver for the operation. Note When you select analog audio using "PHASE NOISE" ... is output from each speaker in the CUSTOMIZE menu to "AUTO OFF" (page 47). 26GB Use the remote for the adjustment. 4 Press TEST TONE again after adjustment. "TEST TONE" in the LEVEL menu appears in... sequence. 3 Adjust the speaker level and balance using the remote. 1 Press ?/1 on the remote to turn MASTER VOLUME on the receiver. • You can also use the jog dial on the...
... level of the test tone sounds the same from each speaker. on the remote or turn on the receiver. 2 Press TEST TONE on the receiver for the operation. Note When you select analog audio using "PHASE NOISE" ... is output from each speaker in the CUSTOMIZE menu to "AUTO OFF" (page 47). 26GB Use the remote for the adjustment. 4 Press TEST TONE again after adjustment. "TEST TONE" in the LEVEL menu appears in... sequence. 3 Adjust the speaker level and balance using the remote. 1 Press ?/1 on the remote to turn MASTER VOLUME on the receiver. • You can also use the jog dial on the...

Operating Instructions
Page 29
... loop antenna for optimum reception. You can also use the FUNCTION control on the supplied remote, refer to select the FM or AM band. STR-DA7ES Use the supplied remote RM-TP1. 1 Touch RM SELECT. For details on the receiver. 2 Select "FM/AM" from the FUNCTION list to switch the function to enter the frequency. If not...
... loop antenna for optimum reception. You can also use the FUNCTION control on the supplied remote, refer to select the FM or AM band. STR-DA7ES Use the supplied remote RM-TP1. 1 Touch RM SELECT. For details on the receiver. 2 Select "FM/AM" from the FUNCTION list to switch the function to enter the frequency. If not...
Operating Instructions
Page 30
...remote STR-DA7ES Use the supplied remote RM-TP1. 1 Touch RM SELECT. The RM SELECT screen appears. 2 Touch AMP. STR-DA4ES Use the supplied remote...3. 5 Press MEMORY again. Tuning to preset stations Using the receiver 1 Rotate FUNCTION to switch the function to select a preset number... 5 before you can easily tune in the display for operiting the receiver appears. 3 Touch TUNER. Do steps 4 to preset another station. If...out. 4 Press PRESET TUNING + or - The last received station is stored to enter the preset number. You can...receiver swiches to the TUNER input. 4 Touch B to return to 30...
...remote STR-DA7ES Use the supplied remote RM-TP1. 1 Touch RM SELECT. The RM SELECT screen appears. 2 Touch AMP. STR-DA4ES Use the supplied remote...3. 5 Press MEMORY again. Tuning to preset stations Using the receiver 1 Rotate FUNCTION to switch the function to select a preset number... 5 before you can easily tune in the display for operiting the receiver appears. 3 Touch TUNER. Do steps 4 to preset another station. If...out. 4 Press PRESET TUNING + or - The last received station is stored to enter the preset number. You can...receiver swiches to the TUNER input. 4 Touch B to return to 30...

Operating Instructions
Page 48
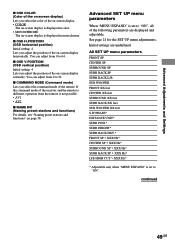
... V trigger for the 2nd room) x 12V TRIG.3RD (12 V trigger for the component to the Sony components connected via CONTROL A1 cords (page 61) automatically when the playback on . x AUTO FUNCTION (Control...page 57. 48GB Then set the 2 way remote control system for the 3rd room) (STR-DA7ES only) For details, see "Custom install mode" on the 2 way remote control system. You can enjoy high quality audio...be distorted when the power of the unnecessary video circuits automatically. Depending on . In this receiver to "ON". x DECODE FORMAT (Digital audio input decoding mode) Lets you keep the...
... V trigger for the 2nd room) x 12V TRIG.3RD (12 V trigger for the component to the Sony components connected via CONTROL A1 cords (page 61) automatically when the playback on . x AUTO FUNCTION (Control...page 57. 48GB Then set the 2 way remote control system for the 3rd room) (STR-DA7ES only) For details, see "Custom install mode" on the 2 way remote control system. You can enjoy high quality audio...be distorted when the power of the unnecessary video circuits automatically. Depending on . In this receiver to "ON". x DECODE FORMAT (Digital audio input decoding mode) Lets you keep the...
Operating Instructions
Page 49
... MODE (Command mode) Lets you select the command mode of the on-screen display horizontally. If the command mode of the receiver and the remote is different, operation from the remote is displayed in monochrome. x OSD V.POSITION (OSD vertical position) Initial setting: 4 Lets you adjust the position of the on-screen display vertically...
... MODE (Command mode) Lets you select the command mode of the on-screen display horizontally. If the command mode of the receiver and the remote is different, operation from the remote is displayed in monochrome. x OSD V.POSITION (OSD vertical position) Initial setting: 4 Lets you adjust the position of the on-screen display vertically...

Operating Instructions
Page 59
...to "4Ω". 59GB In this case, set the IMPEDANCE SELECTOR to the FRONT SPEAKERS A terminals. Tip To check the remaining time before the receiver turns off automatically at a specified time by using Sleep Timer, "SLEEP" lights up in the display. The speakers connected to both sets ... (A+B). STR-DA7ES Use the supplied remote RM-TP1. 1 Touch RM SELECT. 2 Touch AMP in the display. The sound field is on. STR-DA4ES Use the supplied remote RM-LP211. The remaining time appears in the RM SELECT screen. 3 Touch SLEEP while the power is automatically set to 2CH STEREO. The...
...to "4Ω". 59GB In this case, set the IMPEDANCE SELECTOR to the FRONT SPEAKERS A terminals. Tip To check the remaining time before the receiver turns off automatically at a specified time by using Sleep Timer, "SLEEP" lights up in the display. The speakers connected to both sets ... (A+B). STR-DA7ES Use the supplied remote RM-TP1. 1 Touch RM SELECT. 2 Touch AMP in the display. The sound field is on. STR-DA4ES Use the supplied remote RM-LP211. The remaining time appears in the RM SELECT screen. 3 Touch SLEEP while the power is automatically set to 2CH STEREO. The...
Operating Instructions
Page 61
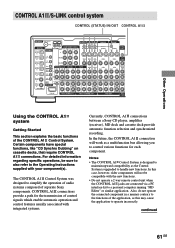
...In this may cause the application to the Operating Instructions supplied with integrated systems. Currently, CONTROL A1 connections between a Sony CD player, amplifier (receiver), MD deck and cassette deck provide automatic function selection and synchronized recording. continued 61GB For detailed information regarding specific operations... Other Operations CONTROL A1 /S-LINK control system CONTROL (STATUS) IN/OUT CONTROL A1 ANTENNA 75Ω COAXIAL FM DIGITAL CD/SACD OPTICAL IN U IR REMOTE MONITOR TV/SAT DVD/LD VIDEO 2 IN STATUS IN OUT COMPONENT VIDEO CONTROL S AM TV/SAT IN ...
...In this may cause the application to the Operating Instructions supplied with integrated systems. Currently, CONTROL A1 connections between a Sony CD player, amplifier (receiver), MD deck and cassette deck provide automatic function selection and synchronized recording. continued 61GB For detailed information regarding specific operations... Other Operations CONTROL A1 /S-LINK control system CONTROL (STATUS) IN/OUT CONTROL A1 ANTENNA 75Ω COAXIAL FM DIGITAL CD/SACD OPTICAL IN U IR REMOTE MONITOR TV/SAT DVD/LD VIDEO 2 IN STATUS IN OUT COMPONENT VIDEO CONTROL S AM TV/SAT IN ...
Operating Instructions
Page 66
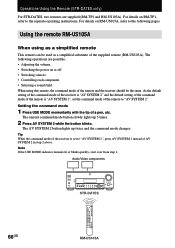
...momentarily with the tip of AV SYSTEM 2 in step 2 above. Tip When the command mode of the remote and the receiver should be used as a simplified remote This remote can be the same. Note If the USE MODE indicator remains lit or blinks quickly, start over from... command mode changes. The AV SYSTEM 2 button lights up 5 times. 2 Press AV SYSTEM 2 while the button blinks. Operations Using the Remote (STR-DA7ES only) For STR-DA7ES, two remotes are possible: • Adjusting the volume. • Switching the power on or off. • Switching sources. • Controlling each component...
...momentarily with the tip of AV SYSTEM 2 in step 2 above. Tip When the command mode of the remote and the receiver should be used as a simplified remote This remote can be the same. Note If the USE MODE indicator remains lit or blinks quickly, start over from... command mode changes. The AV SYSTEM 2 button lights up 5 times. 2 Press AV SYSTEM 2 while the button blinks. Operations Using the Remote (STR-DA7ES only) For STR-DA7ES, two remotes are possible: • Adjusting the volume. • Switching the power on or off. • Switching sources. • Controlling each component...


