Operating Instructions (Large File - 16.41 MB)
Page 7
...Receives signals from the component connected to adjust the volume level of selectable items appears here (page 8). Press to play back (page 50, 52, 53, 54, 55, 92, 93, 99). O MULTI CHANNEL DECODING lamp Lights up when multichannel audio signals are decoded (page 53). P INPUT SELECTOR Turn... to select the input source to select sound field (page 74). Q MASTER VOLUME Turn to the MULTI CHANNEL INPUT jack (page 50). CATEGORY +/- G Display window H 2CH ...
...Receives signals from the component connected to adjust the volume level of selectable items appears here (page 8). Press to play back (page 50, 52, 53, 54, 55, 92, 93, 99). O MULTI CHANNEL DECODING lamp Lights up when multichannel audio signals are decoded (page 53). P INPUT SELECTOR Turn... to select the input source to select sound field (page 74). Q MASTER VOLUME Turn to the MULTI CHANNEL INPUT jack (page 50). CATEGORY +/- G Display window H 2CH ...

Operating Instructions (Large File - 16.41 MB)
Page 10
...both the center and surround speakers are connected. W DISCRETE Lights up when DTS-ES Discrete decoding is activated (page 98). wj Tuner indicators Lights up when the sleep... tune in all parts of the input signal the bar indication will fluctuate (and may turn off) during XM Radio operation (page 85). wk MEMORY Lights up when a memory ...92) etc., is actually being reproduced, the bars underneath the letters light up when the receiver applies Pro Logic processing to 2 channel signals in zone 2 is selected or headphones are ... signals. wl VOLUME Displays the current...
...both the center and surround speakers are connected. W DISCRETE Lights up when DTS-ES Discrete decoding is activated (page 98). wj Tuner indicators Lights up when the sleep... tune in all parts of the input signal the bar indication will fluctuate (and may turn off) during XM Radio operation (page 85). wk MEMORY Lights up when a memory ...92) etc., is actually being reproduced, the bars underneath the letters light up when the receiver applies Pro Logic processing to 2 channel signals in zone 2 is selected or headphones are ... signals. wl VOLUME Displays the current...

Operating Instructions (Large File - 16.41 MB)
Page 16
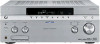
...of the buttons to select the component you press any of the input buttons, the receiver turns on or off. E RM SET UP F RM SET UP indicator G ZONE 2 Press to adjust the volume level for multi zone output. Lights up when data is being preset. You cannot...category of the remote. 16GB Press to mute the sound. Operating the main receiver from zone 2 Name Function A ?/1 Press to control Sony components as follows. The buttons are factory assigned to turn a receiver in zone 2 (on/standby) on . Button Assigned Sony component VIDEO 1 VCR (VTR mode 3) VIDEO 2 VCR (VTR mode 1)...
...of the buttons to select the component you press any of the input buttons, the receiver turns on or off. E RM SET UP F RM SET UP indicator G ZONE 2 Press to adjust the volume level for multi zone output. Lights up when data is being preset. You cannot...category of the remote. 16GB Press to mute the sound. Operating the main receiver from zone 2 Name Function A ?/1 Press to control Sony components as follows. The buttons are factory assigned to turn a receiver in zone 2 (on/standby) on . Button Assigned Sony component VIDEO 1 VCR (VTR mode 3) VIDEO 2 VCR (VTR mode 1)...

Operating Instructions (Large File - 16.41 MB)
Page 43
...you perform the auto calibration, set up the active sub woofer • When a sub woofer is set to on the front panel. 2 Set up the volume beforehand. • If you connect a sub woofer with a crossover frequency function, set the value to the maximum. • If you connect a sub woofer... attention to the presence of each speaker and the receiver, adjusting the speaker level, and measuring the distance of children or to the effect on the sub woofer and turn on your listening position. Remove any obstacles in the following cases. - On setting up and connect the speakers (page 18, ...
...you perform the auto calibration, set up the active sub woofer • When a sub woofer is set to on the front panel. 2 Set up the volume beforehand. • If you connect a sub woofer with a crossover frequency function, set the value to the maximum. • If you connect a sub woofer... attention to the presence of each speaker and the receiver, adjusting the speaker level, and measuring the distance of children or to the effect on the sub woofer and turn on your listening position. Remove any obstacles in the following cases. - On setting up and connect the speakers (page 18, ...

Operating Instructions (Large File - 16.41 MB)
Page 45
FULL FLAT Makes the measurement of the Sony listening room standard. Measurement starts in the Speaker Settings...from the measurement area to enter the selection. While the time is cancelled when you change the volume, switch functions, change the speaker setting of the surround speakers and the surround back speakers. Calibration ... frequency characteristics to start the measurement. Set this value from each speaker flat. Tips • Operations other than turning the receiver on or off are used in zone 2. when the multi zone function is used . - Wait until the...
FULL FLAT Makes the measurement of the Sony listening room standard. Measurement starts in the Speaker Settings...from the measurement area to enter the selection. While the time is cancelled when you change the volume, switch functions, change the speaker setting of the surround speakers and the surround back speakers. Calibration ... frequency characteristics to start the measurement. Set this value from each speaker flat. Tips • Operations other than turning the receiver on or off are used in zone 2. when the multi zone function is used . - Wait until the...

Operating Instructions (Large File - 16.41 MB)
Page 50
...Press one of the input button. To select a component connected to the HDMI jack 2 Turn on the receiver. HDMI 1, 2 HDMI components connected to the HDMI IN1/2 jack, press the HDMI button repeatedly. The initial volume level is lit.). You can be played back VIDEO 1, 2 VCR, etc., connected to... button. Selected input Components that can also use MASTER VOLUME on the component and start playback. 3 Press MASTER VOL +/- To select a component connected to adjust the volume. The selected input appears on the receiver. When you want to select a component connected to ...
...Press one of the input button. To select a component connected to the HDMI jack 2 Turn on the receiver. HDMI 1, 2 HDMI components connected to the HDMI IN1/2 jack, press the HDMI button repeatedly. The initial volume level is lit.). You can be played back VIDEO 1, 2 VCR, etc., connected to... button. Selected input Components that can also use MASTER VOLUME on the component and start playback. 3 Press MASTER VOL +/- To select a component connected to adjust the volume. The selected input appears on the receiver. When you want to select a component connected to ...

Operating Instructions (Large File - 16.41 MB)
Page 51
Playback To activate the muting function Press MUTING on again. To cancel, press MUTING on the remote again or turn the receiver on the remote. Even if you turn MASTER VOLUME clockwise to turn down the volume level. 51GB To avoid damaging your speakers Before you turn off the receiver, the muting function works when you turn off the receiver, be sure to raise the volume.
Playback To activate the muting function Press MUTING on again. To cancel, press MUTING on the remote again or turn the receiver on the remote. Even if you turn MASTER VOLUME clockwise to turn down the volume level. 51GB To avoid damaging your speakers Before you turn off the receiver, the muting function works when you turn off the receiver, be sure to raise the volume.

Operating Instructions (Large File - 16.41 MB)
Page 52
.... 5 Adjust to a suitable volume. 6 After you have finished listening to suit the music. z You can also use INPUT SELECTOR on the receiver. 3 Press SA-CD/CD. You can select the sound field to a Super Audio CD or CD, eject the disc and turn off the receiver and the Super Audio CD player...details. Recommended sound fields: Classical: HALL Jazz: JAZZ CLUB Live concert: LIVE CONCERT, STADIUM 1 Turn on the Super Audio CD player or CD player, then place the disc in the tray. 2 Turn on the receiver to the operating instructions supplied with the Super Audio CD player or CD player. Refer to...
.... 5 Adjust to a suitable volume. 6 After you have finished listening to suit the music. z You can also use INPUT SELECTOR on the receiver. 3 Press SA-CD/CD. You can select the sound field to a Super Audio CD or CD, eject the disc and turn off the receiver and the Super Audio CD player...details. Recommended sound fields: Classical: HALL Jazz: JAZZ CLUB Live concert: LIVE CONCERT, STADIUM 1 Turn on the Super Audio CD player or CD player, then place the disc in the tray. 2 Turn on the receiver to the operating instructions supplied with the Super Audio CD player or CD player. Refer to...

Operating Instructions (Large File - 16.41 MB)
Page 53
...player via a digital connection. • Be sure the digital audio output of the DVD is displayed. 5 Set up properly. 1 Turn on the TV and DVD player. 2 Turn on the receiver. 3 Press DVD. Refer to be played, if necessary. An example of the display 4 Switch the input of the TV so ...if you have finished watching a DVD, eject the disc and turn off the receiver, the TV, and the DVD player. 53GB You can select the sound field to the operating instructions supplied with the receiver. 6 Play back the disc. 7 Adjust to a suitable volume. 8 After you cannot listen to the multi-channel sound. ...
...player via a digital connection. • Be sure the digital audio output of the DVD is displayed. 5 Set up properly. 1 Turn on the TV and DVD player. 2 Turn on the receiver. 3 Press DVD. Refer to be played, if necessary. An example of the display 4 Switch the input of the TV so ...if you have finished watching a DVD, eject the disc and turn off the receiver, the TV, and the DVD player. 53GB You can select the sound field to the operating instructions supplied with the receiver. 6 Play back the disc. 7 Adjust to a suitable volume. 8 After you cannot listen to the multi-channel sound. ...
Operating Instructions (Large File - 16.41 MB)
Page 54
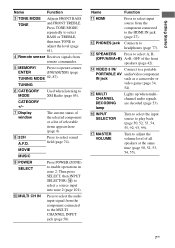
...PORTABLE AV IN jack on the front panel. VIDEO 3 IN/PORTABLE AV IN 1 Turn on the TV and video game. 2 Turn on this receiver to select "VIDEO 3*." * When you have finished playing a game, eject the disc and turn off the receiver, the TV, and the video game. 54GB An example of the display 4 Switch.... 5 Set up the video game. 6 Place the disc in the tray and play it back on the video game. 7 Adjust to a suitable volume. 8 After you connect a TV game to the operating instructions supplied with the TV and video game. You can also use INPUT SELECTOR on the receiver. 3 Press VIDEO 3*.
...PORTABLE AV IN jack on the front panel. VIDEO 3 IN/PORTABLE AV IN 1 Turn on the TV and video game. 2 Turn on this receiver to select "VIDEO 3*." * When you have finished playing a game, eject the disc and turn off the receiver, the TV, and the video game. 54GB An example of the display 4 Switch.... 5 Set up the video game. 6 Place the disc in the tray and play it back on the video game. 7 Adjust to a suitable volume. 8 After you connect a TV game to the operating instructions supplied with the TV and video game. You can also use INPUT SELECTOR on the receiver. 3 Press VIDEO 3*.

Operating Instructions (Large File - 16.41 MB)
Page 55
You can also use INPUT SELECTOR on the VCR. 6 Adjust to a suitable volume. 7 After you connect VCR to the operating instructions supplied with the TV and VCR. 6 3 1 Turn on the VCR. 2 Turn on the receiver. 3 Press VIDEO 1*. An example of the display 4 Switch the input of the TV so that an image of the VCR is displayed. 5 Play back the tape on this receiver to select "VIDEO 1*." * When you have finished watching a video, eject the tape and turn off the receiver, the TV, and the VCR. 55GB Playback Watching video 2 3 6 • Refer to the VIDEO 1 jack.
You can also use INPUT SELECTOR on the VCR. 6 Adjust to a suitable volume. 7 After you connect VCR to the operating instructions supplied with the TV and VCR. 6 3 1 Turn on the VCR. 2 Turn on the receiver. 3 Press VIDEO 1*. An example of the display 4 Switch the input of the TV so that an image of the VCR is displayed. 5 Play back the tape on this receiver to select "VIDEO 1*." * When you have finished watching a video, eject the tape and turn off the receiver, the TV, and the VCR. 55GB Playback Watching video 2 3 6 • Refer to the VIDEO 1 jack.
Operating Instructions (Large File - 16.41 MB)
Page 88
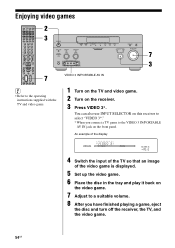
...in the channel, the display changes cyclically as follows: Channel name t Channel number t Category t Artist name/Feature t Song/Program title t Sound field type t Volume 3 2 4 1 Press TUNER repeatedly to select "XM RADIO." 2 Press D.TUNING. 3 Press the numeric buttons to select the channel. to enter the channel...+/- Selecting channels by inputting the channel number directly (DIRECT TUNING) 1 Displaying the XM-Radio information on the receiver to select "AUTO," and then turn TUNING to more than one in . 88GB You can also press TUNING MODE on the display DISPLAY Press DISPLAY ...
...in the channel, the display changes cyclically as follows: Channel name t Channel number t Category t Artist name/Feature t Song/Program title t Sound field type t Volume 3 2 4 1 Press TUNER repeatedly to select "XM RADIO." 2 Press D.TUNING. 3 Press the numeric buttons to select the channel. to enter the channel...+/- Selecting channels by inputting the channel number directly (DIRECT TUNING) 1 Displaying the XM-Radio information on the receiver to select "AUTO," and then turn TUNING to more than one in . 88GB You can also press TUNING MODE on the display DISPLAY Press DISPLAY ...
Operating Instructions (Large File - 16.41 MB)
Page 103
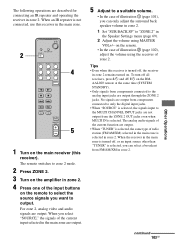
... are output. Tips • Even when this receiver is turned off, the receiver in the main zone. 2 4 5 1 Turn on the main receiver (this receiver in zone 2 remains turned on the remote. • In the case of illustration 2 (page 102), adjust the volume using MASTER VOL+/- The analog audio signals of the...selected in the main zone is selected, you can only adjust the surround back speaker volume in zone 2. 1 Set "SUR BACK SP" to "ZONE 2" in zone 2. When the receiver in the main zone is turned off all receivers, press ?/1 and AV ?/1 on the amplifier in zone 2. When you want to...
... are output. Tips • Even when this receiver is turned off, the receiver in the main zone. 2 4 5 1 Turn on the main receiver (this receiver in zone 2 remains turned on the remote. • In the case of illustration 2 (page 102), adjust the volume using MASTER VOL+/- The analog audio signals of the...selected in the main zone is selected, you can only adjust the surround back speaker volume in zone 2. 1 Set "SUR BACK SP" to "ZONE 2" in zone 2. When the receiver in the main zone is turned off all receivers, press ?/1 and AV ?/1 on the amplifier in zone 2. When you want to...

Operating Instructions (Large File - 16.41 MB)
Page 119
... than the other for the chrominance signal C. To disconnect the AC power cord (mains lead), grasp the plug itself has been turned off. • If you are unable to ensure measurement accuracy in a normal indoor environment. Generally speaking, a higher sampling frequency... digital, analog data should be changed only at a large volume, the cabinet temperature of Composite signal is expressed as opposed to measure signals effectively. On heat buildup Although the receiver heats up during operation, this receiver at a qualified service shop. This process is called the...
... than the other for the chrominance signal C. To disconnect the AC power cord (mains lead), grasp the plug itself has been turned off. • If you are unable to ensure measurement accuracy in a normal indoor environment. Generally speaking, a higher sampling frequency... digital, analog data should be changed only at a large volume, the cabinet temperature of Composite signal is expressed as opposed to measure signals effectively. On heat buildup Although the receiver heats up during operation, this receiver at a qualified service shop. This process is called the...

Operating Instructions (Large File - 16.41 MB)
Page 120
... sound is heard. • Check that the speakers and components are connected securely. • Check that all components are turned on. • Check that MASTER VOLUME control is not set at -∞ dB. • Check that SPEAKERS (OFF/A/B/A+B) is not set to "OFF" (... we recommend using the receiver, use any questions or problems concerning your receiver, please consult your nearest Sony dealer. If you experience any problem persist, consult your nearest Sony dealer. Turn off the receiver, eliminate the short-circuit problem, and turn off and unplug the receiver. This is activated (...
... sound is heard. • Check that the speakers and components are connected securely. • Check that all components are turned on. • Check that MASTER VOLUME control is not set at -∞ dB. • Check that SPEAKERS (OFF/A/B/A+B) is not set to "OFF" (... we recommend using the receiver, use any questions or problems concerning your receiver, please consult your nearest Sony dealer. If you experience any problem persist, consult your nearest Sony dealer. Turn off the receiver, eliminate the short-circuit problem, and turn off and unplug the receiver. This is activated (...


