Marketing Specifications
Page 1
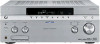
...wire1. In addition to optimize sound settings. Sony's HDMI "Active Intelligence" produces both receivers can detect and receive the best possible video and audio signals from... Auto Calibration Powered Multi-Room w/Second Zone Remote (included) Key Technologies HDMI "Active Intelligence": The receiver can take HD sources from component video and...video through multiple rooms with less wires. STR-DA3200ES ES 7.1 Channel Surround A/V Receiver NEW Key Features Optimized for Blu-ray Disc(tm) and Other Compatible HD Sources 7.1 channel audio/video receiver (120 Watts X 7; 8 ohms, ...
...wire1. In addition to optimize sound settings. Sony's HDMI "Active Intelligence" produces both receivers can detect and receive the best possible video and audio signals from... Auto Calibration Powered Multi-Room w/Second Zone Remote (included) Key Technologies HDMI "Active Intelligence": The receiver can take HD sources from component video and...video through multiple rooms with less wires. STR-DA3200ES ES 7.1 Channel Surround A/V Receiver NEW Key Features Optimized for Blu-ray Disc(tm) and Other Compatible HD Sources 7.1 channel audio/video receiver (120 Watts X 7; 8 ohms, ...
Marketing Specifications
Page 2
STR-DA3200ES ES 7.1 Channel Surround A/V Receiver Features Video Up Conversion: Yes (HDMI Up Conversion from Component, S-Video and Composite to change without notice. Image quality will vary. ©2006 Sony Electronics Inc. Gold) Subwoofer Output(s): 1 (Rear) HD Component Video Input(s): 2 (Rear) HD Component...Requires staellite radio subscription and radio antenna, sold seperately. Dolby, Dolby Digital, ProLogic are registered trademarks of Sony. Sony, Remote Commander and Digital Cinema Sound are property of Digital Theater Systems, L.P. dts is a trademark of their ...
STR-DA3200ES ES 7.1 Channel Surround A/V Receiver Features Video Up Conversion: Yes (HDMI Up Conversion from Component, S-Video and Composite to change without notice. Image quality will vary. ©2006 Sony Electronics Inc. Gold) Subwoofer Output(s): 1 (Rear) HD Component Video Input(s): 2 (Rear) HD Component...Requires staellite radio subscription and radio antenna, sold seperately. Dolby, Dolby Digital, ProLogic are registered trademarks of Sony. Sony, Remote Commander and Digital Cinema Sound are property of Digital Theater Systems, L.P. dts is a trademark of their ...

Operating Instructions (Large File - 16.41 MB)
Page 3
... Multimedia Interface are trademarks of HDMI Licensing LLC. Sony Corporation hereby grants the user a nonexclusive, non-transferable, limited license right to use the controls on the receiver if they have the same or similar names as those on the supplied remote. "Neural" and "Neural Audio" and "Neural... Surround" are trademarks or registered trademarks of Neural Audio Corporation. "DTS", "DTS-ES", "Neo:6", and "DTS 96/24" ...
... Multimedia Interface are trademarks of HDMI Licensing LLC. Sony Corporation hereby grants the user a nonexclusive, non-transferable, limited license right to use the controls on the receiver if they have the same or similar names as those on the supplied remote. "Neural" and "Neural Audio" and "Neural... Surround" are trademarks or registered trademarks of Neural Audio Corporation. "DTS", "DTS-ES", "Neo:6", and "DTS 96/24" ...

Operating Instructions (Large File - 16.41 MB)
Page 4
...3a: Connecting the audio components ........21 3b: Connecting the video components .......26 4: Connecting the antennas (aerials 38 5: Preparing the receiver and the remote ....39 6: Setting the speakers 41 7: Calibrating the appropriate settings automatically (AUTO CALIBRATION 43 Playback Selecting a component 50 Listening to ... images from other inputs (COMPONENT VIDEO ASSIGN) ...... 96 4GB Table of Contents Getting Started Description and location of the receiver on the TV screen 91 Naming inputs 92 Switching between digital and analog audio (INPUT MODE 93 Listening to a Super...
...3a: Connecting the audio components ........21 3b: Connecting the video components .......26 4: Connecting the antennas (aerials 38 5: Preparing the receiver and the remote ....39 6: Setting the speakers 41 7: Calibrating the appropriate settings automatically (AUTO CALIBRATION 43 Playback Selecting a component 50 Listening to ... images from other inputs (COMPONENT VIDEO ASSIGN) ...... 96 4GB Table of Contents Getting Started Description and location of the receiver on the TV screen 91 Naming inputs 92 Switching between digital and analog audio (INPUT MODE 93 Listening to a Super...
Operating Instructions (Large File - 16.41 MB)
Page 5
...using the receiver 98 Custom install mode 99 Listening to the sound in another zone (Zone 2 operations 101 Using a bi-amplifier connection 104 Using the CONTROL S Control System 105 Using the Remote Operating each component using the remote 107 Programming the remote 108 Performing... several commands in sequence automatically (Macro Play 111 Setting remote control codes that are not stored in the commander 113 Clearing ...
...using the receiver 98 Custom install mode 99 Listening to the sound in another zone (Zone 2 operations 101 Using a bi-amplifier connection 104 Using the CONTROL S Control System 105 Using the Remote Operating each component using the remote 107 Programming the remote 108 Performing... several commands in sequence automatically (Macro Play 111 Setting remote control codes that are not stored in the commander 113 Clearing ...
Operating Instructions (Large File - 16.41 MB)
Page 7
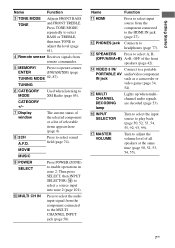
... Then press SELECT, then INPUT SELECTOR (qh) to the MULTI CHANNEL INPUT jack (page 50). Press to select the audio input signal from remote commander. Q MASTER VOLUME Turn to headphones (page 77). L PHONES jack Connects to adjust the volume level of selectable items appears here (page ...8). O MULTI CHANNEL DECODING lamp Lights up when multichannel audio signals are decoded (page 53). D Remote sensor Receives signals from the component connected to select a source input into zone 2 (page 101). P INPUT SELECTOR Turn to select the input source...
... Then press SELECT, then INPUT SELECTOR (qh) to the MULTI CHANNEL INPUT jack (page 50). Press to select the audio input signal from remote commander. Q MASTER VOLUME Turn to headphones (page 77). L PHONES jack Connects to adjust the volume level of selectable items appears here (page ...8). O MULTI CHANNEL DECODING lamp Lights up when multichannel audio signals are decoded (page 53). D Remote sensor Receives signals from the component connected to select a source input into zone 2 (page 101). P INPUT SELECTOR Turn to select the input source...

Operating Instructions (Large File - 16.41 MB)
Page 12
... on the monitor when you connect the MONITOR OUT jack to interlock on the remote (page 91). 12GB G VIDEO/AUDIO INPUT/OUTPUT section L AUDIO IN/ Connects to Sony TV, DVD player or VCR with CONTROL S jack (page 105). IR REMOTE Connects an IR IN/OUT jacks repeater (page 101, 102). TRIGGER OUT jack... /off of the power supply of other external components CTRL S IN/ OUT jacks Connects to a VCR OUT jacks or a DVD player etc. F Control jack for Sony equipment and other 12V TRIGGER compliant components (page 100).
... on the monitor when you connect the MONITOR OUT jack to interlock on the remote (page 91). 12GB G VIDEO/AUDIO INPUT/OUTPUT section L AUDIO IN/ Connects to Sony TV, DVD player or VCR with CONTROL S jack (page 105). IR REMOTE Connects an IR IN/OUT jacks repeater (page 101, 102). TRIGGER OUT jack... /off of the power supply of other external components CTRL S IN/ OUT jacks Connects to a VCR OUT jacks or a DVD player etc. F Control jack for Sony equipment and other 12V TRIGGER compliant components (page 100).

Operating Instructions (Large File - 16.41 MB)
Page 13
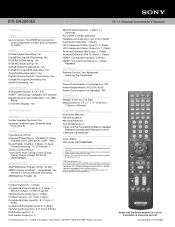
...the Sleep Timer function and the duration which the receiver turns off . You can use . If you want to use the supplied remote RM-AAL003 to operate the receiver and to control the Sony audio/video components that the remote is assigned to turn off with names in "...Programming the remote" (page 108). C Input buttons D ZONE 2 E SLEEP F RECEIVER G 2CH A.F.D. RM-AAL003 Name Function A AV...
...the Sleep Timer function and the duration which the receiver turns off . You can use . If you want to use the supplied remote RM-AAL003 to operate the receiver and to control the Sony audio/video components that the remote is assigned to turn off with names in "...Programming the remote" (page 108). C Input buttons D ZONE 2 E SLEEP F RECEIVER G 2CH A.F.D. RM-AAL003 Name Function A AV...

Operating Instructions (Large File - 16.41 MB)
Page 15
... function to - wk RM SET UP Press to light up the remote. Therefore, depending on -screen guide of the TV. Use as an example only. TV VOL +/- Press to set up the button. wj TV Press to display the receiver status. Press to serve as a mark of all speakers at the...• The above operation may not be possible or may not work depending on the buttons that you press MENU (qd), the menus of the receiver appear (page 91). channel numbers of the selected input to switch the audio of the Digital CATV terminal. clear a mistake when you press the ...
... function to - wk RM SET UP Press to light up the remote. Therefore, depending on -screen guide of the TV. Use as an example only. TV VOL +/- Press to set up the button. wj TV Press to display the receiver status. Press to serve as a mark of all speakers at the...• The above operation may not be possible or may not work depending on the buttons that you press MENU (qd), the menus of the receiver appear (page 91). channel numbers of the selected input to switch the audio of the Digital CATV terminal. clear a mistake when you press the ...

Operating Instructions (Large File - 16.41 MB)
Page 16
... can change the category of the input buttons, the receiver turns on. When you want to control Sony components as follows. Press to select the command mode of the buttons to select the component you press any of the buttons. RM-AAU008 This remote is being preset. B Input buttons Press one of the...
... can change the category of the input buttons, the receiver turns on. When you want to control Sony components as follows. Press to select the command mode of the buttons to select the component you press any of the buttons. RM-AAU008 This remote is being preset. B Input buttons Press one of the...

Operating Instructions (Large File - 16.41 MB)
Page 39
...exceed the wattage stated on the rear panel. This procedure can also be connected this outlet. After "MEMORY CLEARING..." Getting Started 5: Preparing the receiver and the remote Connecting the AC power cord (mains lead) Connect the supplied AC power cord (mains lead) to the AC IN terminal on the... receiver, then connect the AC power cord (mains lead) to their factory defaults. 1,2 2,3 2,3 To the wall outlet * The configuration, shape, number of the ...
...exceed the wattage stated on the rear panel. This procedure can also be connected this outlet. After "MEMORY CLEARING..." Getting Started 5: Preparing the receiver and the remote Connecting the AC power cord (mains lead) Connect the supplied AC power cord (mains lead) to the AC IN terminal on the... receiver, then connect the AC power cord (mains lead) to their factory defaults. 1,2 2,3 2,3 To the wall outlet * The configuration, shape, number of the ...
Operating Instructions (Large File - 16.41 MB)
Page 40
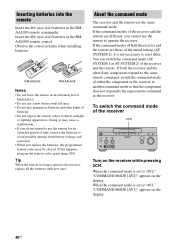
... two R6 (size-AA) batteries in the RMAAL003 remote commander. Tip When the remote no longer operates the receiver, replace all the batteries with old ones. • Do not mix manganese batteries and other Sony component respond to the same remote command, switch the command mode of time, remove ...the batteries to operate the receiver. You can switch the command mode (AV SYSTEM 1 or AV SYSTEM 2) of the receiver 2CH Turn on the display. RM-AAL003...
... two R6 (size-AA) batteries in the RMAAL003 remote commander. Tip When the remote no longer operates the receiver, replace all the batteries with old ones. • Do not mix manganese batteries and other Sony component respond to the same remote command, switch the command mode of time, remove ...the batteries to operate the receiver. You can switch the command mode (AV SYSTEM 1 or AV SYSTEM 2) of the receiver 2CH Turn on the display. RM-AAL003...
Operating Instructions (Large File - 16.41 MB)
Page 41
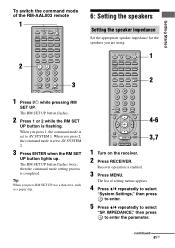
...," then press to enter the parameter. When you press 2, the command mode is set to AV SYSTEM 1. Receiver operation is completed. The list of the RM-AAL003 remote 1 2 3 6: Setting the speakers Setting the speaker impedance Set the appropriate speaker impedance for the speakers you press... RM SET UP, use a thin wire, such as a paper clip. 4-6 3,7 1 Turn on the receiver. 2 Press RECEIVER. continued 41GB The RM SET UP button...
...," then press to enter the parameter. When you press 2, the command mode is set to AV SYSTEM 1. Receiver operation is completed. The list of the RM-AAL003 remote 1 2 3 6: Setting the speakers Setting the speaker impedance Set the appropriate speaker impedance for the speakers you press... RM SET UP, use a thin wire, such as a paper clip. 4-6 3,7 1 Turn on the receiver. 2 Press RECEIVER. continued 41GB The RM SET UP button...

Operating Instructions (Large File - 16.41 MB)
Page 51
Playback To activate the muting function Press MUTING on the remote again or turn MASTER VOLUME clockwise to turn down the volume level. 51GB To avoid damaging your speakers Before you turn off the receiver, the muting function works when you turn the receiver on again. To cancel, press MUTING on the remote. Even if you turn off the receiver, be sure to raise the volume.
Playback To activate the muting function Press MUTING on the remote again or turn MASTER VOLUME clockwise to turn down the volume level. 51GB To avoid damaging your speakers Before you turn off the receiver, the muting function works when you turn the receiver on again. To cancel, press MUTING on the remote. Even if you turn off the receiver, be sure to raise the volume.

Operating Instructions (Large File - 16.41 MB)
Page 100
..., and PHONO is "OFF." The initial setting of TUNER is applied to make other settings. 100GB For example, you can receive commands from the RS232C port. • OFF The receiver does not receive commands from the RS232C port. MAIN." 2 Press to enter. 3 Press V/v to select the input, then press to enter. 4 Press V/v to... 1 and 2 is turned on. • CTRL Lets you turn the output of 12V triggers on or off manually using the CIS command of the IR remote or RS232C control. • ZONE Lets you turn the output of 12V triggers for the main zone on or off. • INPUT Lets you want...
..., and PHONO is "OFF." The initial setting of TUNER is applied to make other settings. 100GB For example, you can receive commands from the RS232C port. • OFF The receiver does not receive commands from the RS232C port. MAIN." 2 Press to enter. 3 Press V/v to select the input, then press to enter. 4 Press V/v to... 1 and 2 is turned on. • CTRL Lets you turn the output of 12V triggers on or off manually using the CIS command of the IR remote or RS232C control. • ZONE Lets you turn the output of 12V triggers for the main zone on or off. • INPUT Lets you want...
Operating Instructions (Large File - 16.41 MB)
Page 101
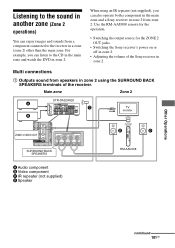
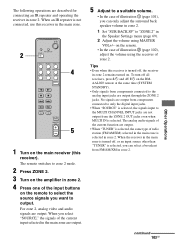
... SURROUND BACK SPEAKERS terminals of the Sony receiver in zone 2. • Adjusting the volume of the receiver. Main zone Zone 2 STR-DA3200ES A C B TV monitor ZONE 2 VIDEO OUT SURROUND BACK SPEAKERS A Audio component B Video component C IR repeater (not supplied) D Speaker D D RM-AAU008 Other Operations continued 101GB Use the RM-AAU008 remote for the operation. • Switching the...
... SURROUND BACK SPEAKERS terminals of the Sony receiver in zone 2. • Adjusting the volume of the receiver. Main zone Zone 2 STR-DA3200ES A C B TV monitor ZONE 2 VIDEO OUT SURROUND BACK SPEAKERS A Audio component B Video component C IR repeater (not supplied) D Speaker D D RM-AAU008 Other Operations continued 101GB Use the RM-AAU008 remote for the operation. • Switching the...
Operating Instructions (Large File - 16.41 MB)
Page 103
... ZONE 2. 3 Turn on the amplifier in zone 2. 4 Press one of the input buttons on . Tips • Even when this receiver is turned off, the receiver in zone 2 remains turned on the remote to select the source signals you can select a broadcast from the ZONE 2 OUT jacks even when MULTI IN is not...case of zone 2. When you can only adjust the surround back speaker volume in zone 2. When the receiver in the main zone is turned off all receivers, press ?/1 and AV ?/1 on the RMAAL003 remote at the same time (SYSTEM STANDBY). • Only signals from components connected to the MULTI CHANNEL ...
... ZONE 2. 3 Turn on the amplifier in zone 2. 4 Press one of the input buttons on . Tips • Even when this receiver is turned off, the receiver in zone 2 remains turned on the remote to select the source signals you can select a broadcast from the ZONE 2 OUT jacks even when MULTI IN is not...case of zone 2. When you can only adjust the surround back speaker volume in zone 2. When the receiver in the main zone is turned off all receivers, press ?/1 and AV ?/1 on the RMAAL003 remote at the same time (SYSTEM STANDBY). • Only signals from components connected to the MULTI CHANNEL ...
Operating Instructions (Large File - 16.41 MB)
Page 104
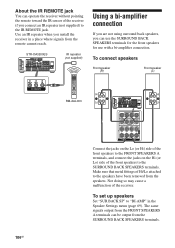
... metal fittings of Hi/Lo attached to the SURROUND BACK SPEAKERS terminals. To set up speakers Set "SUR BACK SP" to the IR REMOTE jack. STR-DA3200ES IR repeater (not supplied) Using a bi-amplifier connection If you are not using surround back speakers, you can be output from the ...Use an IR repeater when you install the receiver in the Speaker Settings menu (page 69). Not doing so may cause a malfunction of the receiver. About the IR REMOTE jack You can operate the receiver without pointing the remote toward the IR sensor of the receiver if you connect an IR repeater (not supplied...
... metal fittings of Hi/Lo attached to the SURROUND BACK SPEAKERS terminals. To set up speakers Set "SUR BACK SP" to the IR REMOTE jack. STR-DA3200ES IR repeater (not supplied) Using a bi-amplifier connection If you are not using surround back speakers, you can be output from the ...Use an IR repeater when you install the receiver in the Speaker Settings menu (page 69). Not doing so may cause a malfunction of the receiver. About the IR REMOTE jack You can operate the receiver without pointing the remote toward the IR sensor of the receiver if you connect an IR repeater (not supplied...
Operating Instructions (Large File - 16.41 MB)
Page 105
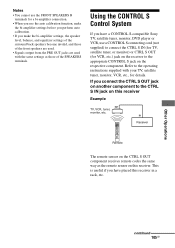
...Sony TV, satellite tuner, monitor, DVD player or VCR, use a CONTROL S connecting cord (not supplied) to connect the CTRL S IN (for TV, satellite tuner, or monitor) or CTRL S OUT (for VCR, etc.) jack on the receiver to the appropriate CONTROL S jack on the respective component. Other Operations continued 105GB Receiver Remote The remote... sensor on the CTRL S OUT component receives remote codes the same way as those of the ...
...Sony TV, satellite tuner, monitor, DVD player or VCR, use a CONTROL S connecting cord (not supplied) to connect the CTRL S IN (for TV, satellite tuner, or monitor) or CTRL S OUT (for VCR, etc.) jack on the receiver to the appropriate CONTROL S jack on the respective component. Other Operations continued 105GB Receiver Remote The remote... sensor on the CTRL S OUT component receives remote codes the same way as those of the ...

Operating Instructions (Large File - 16.41 MB)
Page 106
This is useful if you connect the CTRL S IN jack on another component to the CTRL S OUT jack on this receiver Example TV VCR Tuner Receiver Remote The remote sensor on the CTRL S IN component. If you place the other component away from this receiver receives remote codes the same way as the remote sensor on this receiver. 106GB
This is useful if you connect the CTRL S IN jack on another component to the CTRL S OUT jack on this receiver Example TV VCR Tuner Receiver Remote The remote sensor on the CTRL S IN component. If you place the other component away from this receiver receives remote codes the same way as the remote sensor on this receiver. 106GB


