
Technical Background
Page 37
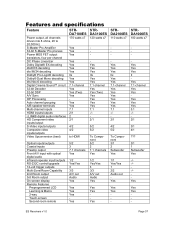
...Yes Yes Yes Yes 7.1 -/2/1 5/2 5/2 To Component 5/2 2 7.1 channels Yes 1/2 Yes/Yes 3 3/3 A/V out Audio Yes Yes Yes Yes STRDA2100ES 110 watts x7 - ES Receivers v1.0 Page 37 Features and specifications Feature Power output, all channels driven into 8 ohms, 20 to 20,000 Hz S-Master Pro Amplifier 32-bit S-Master...upgrade 12-volt trigger outputs Multi-Zone/Room Capability 2nd Room output 3rd Room output On screen display Remote Features Preprogrammed LCD Learning & Macro 2-way Touch-screen Second-room remote STRDA7100ES 170 watts x7 Yes Yes Yes Yes Yes Yes Yes IIx Yes Yes 7.1-channel Yes Yes ...
...Yes Yes Yes Yes 7.1 -/2/1 5/2 5/2 To Component 5/2 2 7.1 channels Yes 1/2 Yes/Yes 3 3/3 A/V out Audio Yes Yes Yes Yes STRDA2100ES 110 watts x7 - ES Receivers v1.0 Page 37 Features and specifications Feature Power output, all channels driven into 8 ohms, 20 to 20,000 Hz S-Master Pro Amplifier 32-bit S-Master...upgrade 12-volt trigger outputs Multi-Zone/Room Capability 2nd Room output 3rd Room output On screen display Remote Features Preprogrammed LCD Learning & Macro 2-way Touch-screen Second-room remote STRDA7100ES 170 watts x7 Yes Yes Yes Yes Yes Yes Yes IIx Yes Yes 7.1-channel Yes Yes ...
Technical Background
Page 38
...of Digital Theater Systems Corporation. i.LINK is a trademark of Sony used only to designate that comes with some brands or models. ES Receivers v1.0 Page 38 Blu-ray Disc is prohibited. Multi-brand remote may not communicate with each other trademarks are subject to the... for information on compatibility, operating conditions and proper connection. 2. Please refer to change without written permission is a trademark of Sony. All other . Features and specifciations are property of Dolby Laboratories Licensing Corporation. Dolby, Dolby Digital and Pro Logic are trademarks...
...of Digital Theater Systems Corporation. i.LINK is a trademark of Sony used only to designate that comes with some brands or models. ES Receivers v1.0 Page 38 Blu-ray Disc is prohibited. Multi-brand remote may not communicate with each other trademarks are subject to the... for information on compatibility, operating conditions and proper connection. 2. Please refer to change without written permission is a trademark of Sony. All other . Features and specifciations are property of Dolby Laboratories Licensing Corporation. Dolby, Dolby Digital and Pro Logic are trademarks...

Easy Setup Guide
Page 1
... Center speaker Enceinte centrale If no sound comes out Press INPUT MODE to the operating instructions supplied with the receiver. DIGITAL OUT COAXIAL DVD player Lecteur DVD OUTPUT R AUDIO L VIDEO TV Téléviseur INPUT VIDEO ... IN SA-CD/ CD COAXIAL IN DVD COAXIAL IN COMPONENT VIDEO CONTROL S FM AM IR REMOTE ASSIGNABLE OUT IN TV/SAT IN DVD IN MONITOR OUT S2 VIDEO S2 VIDEO...sound from the DVD player. "Play Station 2" is an example of Sony Computer Entertainment. 2-514-885-11(1) STR-DA3100ES Easy Setup Guide / Guide de réglage rapide English Franç...
... Center speaker Enceinte centrale If no sound comes out Press INPUT MODE to the operating instructions supplied with the receiver. DIGITAL OUT COAXIAL DVD player Lecteur DVD OUTPUT R AUDIO L VIDEO TV Téléviseur INPUT VIDEO ... IN SA-CD/ CD COAXIAL IN DVD COAXIAL IN COMPONENT VIDEO CONTROL S FM AM IR REMOTE ASSIGNABLE OUT IN TV/SAT IN DVD IN MONITOR OUT S2 VIDEO S2 VIDEO...sound from the DVD player. "Play Station 2" is an example of Sony Computer Entertainment. 2-514-885-11(1) STR-DA3100ES Easy Setup Guide / Guide de réglage rapide English Franç...

Operating Instructions
Page 3
... code R SURR BACK (3RD ZONE) L Any differences in operation, according to the area code, are trademarks of area code AA only". This receiver incorporates Dolby* Digital and Pro Logic Surround and the DTS** Digital Surround System. * Manufactured under license from Dolby Laboratories. "Dolby", "Pro Logic",...code of Dolby Laboratories. **"DTS", "DTS-ES Extended Surround", and "Neo:6" are clearly indicated in the text, for model STR-DA3100ES. Check your remote, see the illustration below). About This Manual • The instructions in this manual describe the controls on the...
... code R SURR BACK (3RD ZONE) L Any differences in operation, according to the area code, are trademarks of area code AA only". This receiver incorporates Dolby* Digital and Pro Logic Surround and the DTS** Digital Surround System. * Manufactured under license from Dolby Laboratories. "Dolby", "Pro Logic",...code of Dolby Laboratories. **"DTS", "DTS-ES Extended Surround", and "Neo:6" are clearly indicated in the text, for model STR-DA3100ES. Check your remote, see the illustration below). About This Manual • The instructions in this manual describe the controls on the...

Operating Instructions
Page 4
... to FM/AM radio 25 Presetting radio stations 26 Changing the display 27 About the indications in sequence automatically (Macro Play 66 Operations Using the Remote RM-US106A Before you use your remote 56 Remote button description 56 Selecting the command mode of the remote 61 Programming the remote 61 Learning the commands of the receiver 50...
... to FM/AM radio 25 Presetting radio stations 26 Changing the display 27 About the indications in sequence automatically (Macro Play 66 Operations Using the Remote RM-US106A Before you use your remote 56 Remote button description 56 Selecting the command mode of the remote 61 Programming the remote 61 Learning the commands of the receiver 50...

Operating Instructions
Page 7
...SAT OPTICAL IN DVD OPTICAL IN SA-CD/ CD COAXIAL IN DVD COAXIAL IN COMPONENT VIDEO CONTROL S FM AM IR REMOTE ASSIGNABLE OUT IN TV/SAT IN DVD IN MONITOR OUT S2 VIDEO S2 VIDEO S2 VIDEO Y IR ... do not connect the TV's video output jack to the TV/SAT AUDIO IN jacks on the receiver. Note You can listen to the sound of your TV by connecting your TV's audio output jacks ...to the TV/SAT VIDEO IN jack on the receiver. continued 7US Getting Started . 1a: Connecting components with digital audio output jacks Hooking up a DVD player...
...SAT OPTICAL IN DVD OPTICAL IN SA-CD/ CD COAXIAL IN DVD COAXIAL IN COMPONENT VIDEO CONTROL S FM AM IR REMOTE ASSIGNABLE OUT IN TV/SAT IN DVD IN MONITOR OUT S2 VIDEO S2 VIDEO S2 VIDEO Y IR ... do not connect the TV's video output jack to the TV/SAT AUDIO IN jacks on the receiver. Note You can listen to the sound of your TV by connecting your TV's audio output jacks ...to the TV/SAT VIDEO IN jack on the receiver. continued 7US Getting Started . 1a: Connecting components with digital audio output jacks Hooking up a DVD player...

Operating Instructions
Page 8
... MD/DAT OPTICAL IN TV/SAT OPTICAL IN DVD OPTICAL IN SA-CD/ CD COAXIAL IN DVD COAXIAL IN COMPONENT VIDEO CONTROL S FM AM IR REMOTE ASSIGNABLE OUT IN TV/SAT IN DVD IN MONITOR OUT S2 VIDEO S2 VIDEO S2 VIDEO Y IR OUT 1 PB/CB/B-Y IR ...R SURROUND L R SURR BACK (3RD ZONE) L H DC R-Y B-Y Y COMPONENT OUTPUT S VIDEO OUTPUT VIDEO OUTPUT Satellite tuner 8US 2 Connect the video jacks. are converted upward on this receiver, standard video signals can be converted to component video or S-video signals, and S-video signals can upconvert the video signals, and adjust the hue, etc...
... MD/DAT OPTICAL IN TV/SAT OPTICAL IN DVD OPTICAL IN SA-CD/ CD COAXIAL IN DVD COAXIAL IN COMPONENT VIDEO CONTROL S FM AM IR REMOTE ASSIGNABLE OUT IN TV/SAT IN DVD IN MONITOR OUT S2 VIDEO S2 VIDEO S2 VIDEO Y IR OUT 1 PB/CB/B-Y IR ...R SURROUND L R SURR BACK (3RD ZONE) L H DC R-Y B-Y Y COMPONENT OUTPUT S VIDEO OUTPUT VIDEO OUTPUT Satellite tuner 8US 2 Connect the video jacks. are converted upward on this receiver, standard video signals can be converted to component video or S-video signals, and S-video signals can upconvert the video signals, and adjust the hue, etc...

Operating Instructions
Page 9
... OPTICAL OUT MD/DAT OPTICAL IN TV/SAT OPTICAL IN DVD OPTICAL IN SA-CD/ CD COAXIAL IN DVD COAXIAL IN COMPONENT VIDEO CONTROL S FM AM IR REMOTE ASSIGNABLE OUT IN TV/SAT IN DVD IN MONITOR OUT S2 VIDEO S2 VIDEO S2 VIDEO Y IR OUT 1 PB/CB/B-Y IR OUT 2 ... R FRONT L A B R SURROUND L R SURR BACK (3RD ZONE) L E* F* A L DIGITAL DIGITAL OPTICAL COAXIAL OUTPUT OUTPUT R AUDIO OUT OUTPUT Super Audio CD/CD player * Connect to this receiver. Notes • No sound is output when playing a Super Audio CD disc on a Super Audio CD player connected to the SA-CD/CD COAXIAL IN...
... OPTICAL OUT MD/DAT OPTICAL IN TV/SAT OPTICAL IN DVD OPTICAL IN SA-CD/ CD COAXIAL IN DVD COAXIAL IN COMPONENT VIDEO CONTROL S FM AM IR REMOTE ASSIGNABLE OUT IN TV/SAT IN DVD IN MONITOR OUT S2 VIDEO S2 VIDEO S2 VIDEO Y IR OUT 1 PB/CB/B-Y IR OUT 2 ... R FRONT L A B R SURROUND L R SURR BACK (3RD ZONE) L E* F* A L DIGITAL DIGITAL OPTICAL COAXIAL OUTPUT OUTPUT R AUDIO OUT OUTPUT Super Audio CD/CD player * Connect to this receiver. Notes • No sound is output when playing a Super Audio CD disc on a Super Audio CD player connected to the SA-CD/CD COAXIAL IN...

Operating Instructions
Page 10
... OPTICAL OUT MD/DAT OPTICAL IN TV/SAT OPTICAL IN DVD OPTICAL IN SA-CD/ CD COAXIAL IN DVD COAXIAL IN COMPONENT VIDEO CONTROL S FM AM IR REMOTE ASSIGNABLE OUT IN TV/SAT IN DVD IN MONITOR OUT S2 VIDEO S2 VIDEO S2 VIDEO Y IR OUT 1 PB/CB/B-Y IR OUT 2 PR/CR... CH OUT SUB WOOFER DVD player, Super Audio CD player, Multi channel decoder, etc. Alternatively, the multi channel input jacks can connect it to this receiver's MULTI CH IN jacks to enjoy the multi channel sound. For details on the required cords (A-H), see page 6. Tip This connection also allows you can...
... OPTICAL OUT MD/DAT OPTICAL IN TV/SAT OPTICAL IN DVD OPTICAL IN SA-CD/ CD COAXIAL IN DVD COAXIAL IN COMPONENT VIDEO CONTROL S FM AM IR REMOTE ASSIGNABLE OUT IN TV/SAT IN DVD IN MONITOR OUT S2 VIDEO S2 VIDEO S2 VIDEO Y IR OUT 1 PB/CB/B-Y IR OUT 2 PR/CR... CH OUT SUB WOOFER DVD player, Super Audio CD player, Multi channel decoder, etc. Alternatively, the multi channel input jacks can connect it to this receiver's MULTI CH IN jacks to enjoy the multi channel sound. For details on the required cords (A-H), see page 6. Tip This connection also allows you can...

Operating Instructions
Page 11
...IN DVD OPTICAL IN SA-CD/ CD COAXIAL IN DVD COAXIAL IN COMPONENT VIDEO CONTROL S FM AM IR REMOTE ASSIGNABLE OUT IN TV/SAT IN DVD IN MONITOR OUT S2 VIDEO S2 VIDEO S2 VIDEO ...VCR etc. You can be distorted when the video player is turned on. Notes • On this receiver and then output to component video or S-video signals, and S-video signals can upconvert the video signals..., and adjust the hue, etc. are converted upward on this receiver, standard video signals can be converted to your TV, depending on the status of the converted ...
...IN DVD OPTICAL IN SA-CD/ CD COAXIAL IN DVD COAXIAL IN COMPONENT VIDEO CONTROL S FM AM IR REMOTE ASSIGNABLE OUT IN TV/SAT IN DVD IN MONITOR OUT S2 VIDEO S2 VIDEO S2 VIDEO ...VCR etc. You can be distorted when the video player is turned on. Notes • On this receiver and then output to component video or S-video signals, and S-video signals can upconvert the video signals..., and adjust the hue, etc. are converted upward on this receiver, standard video signals can be converted to your TV, depending on the status of the converted ...

Operating Instructions
Page 12
... OPTICAL OUT MD/DAT OPTICAL IN TV/SAT OPTICAL IN DVD OPTICAL IN SA-CD/ CD COAXIAL IN DVD COAXIAL IN COMPONENT VIDEO CONTROL S FM AM IR REMOTE ASSIGNABLE OUT IN TV/SAT IN DVD IN MONITOR OUT S2 VIDEO S2 VIDEO S2 VIDEO Y IR OUT 1 IR OUT 2 PB/CB/B-Y PR/CR...
... OPTICAL OUT MD/DAT OPTICAL IN TV/SAT OPTICAL IN DVD OPTICAL IN SA-CD/ CD COAXIAL IN DVD COAXIAL IN COMPONENT VIDEO CONTROL S FM AM IR REMOTE ASSIGNABLE OUT IN TV/SAT IN DVD IN MONITOR OUT S2 VIDEO S2 VIDEO S2 VIDEO Y IR OUT 1 IR OUT 2 PB/CB/B-Y PR/CR...

Operating Instructions
Page 13
... by pressing ON SCREEN on the required cords (A-H), see page 6. You can watch the video from the selected input (page 24). For details on the remote. TV monitor INPUT VIDEO INPUT S VIDEO CD ANTENNA DIGITAL SA-CD/ CD OPTICAL IN MD/DAT OPTICAL OUT MD/DAT OPTICAL IN TV/SAT OPTICAL... IN DVD OPTICAL IN SA-CD/ CD COAXIAL IN DVD COAXIAL IN COMPONENT VIDEO CONTROL S FM AM IR REMOTE ASSIGNABLE OUT IN TV/SAT IN DVD IN MONITOR OUT S2 VIDEO S2 VIDEO S2 VIDEO Y IR OUT 1 PB/CB/B-Y IR OUT 2 PR/CR...
... by pressing ON SCREEN on the required cords (A-H), see page 6. You can watch the video from the selected input (page 24). For details on the remote. TV monitor INPUT VIDEO INPUT S VIDEO CD ANTENNA DIGITAL SA-CD/ CD OPTICAL IN MD/DAT OPTICAL OUT MD/DAT OPTICAL IN TV/SAT OPTICAL... IN DVD OPTICAL IN SA-CD/ CD COAXIAL IN DVD COAXIAL IN COMPONENT VIDEO CONTROL S FM AM IR REMOTE ASSIGNABLE OUT IN TV/SAT IN DVD IN MONITOR OUT S2 VIDEO S2 VIDEO S2 VIDEO Y IR OUT 1 PB/CB/B-Y IR OUT 2 PR/CR...

Operating Instructions
Page 14
... OPTICAL OUT MD/DAT OPTICAL IN TV/SAT OPTICAL IN DVD OPTICAL IN SA-CD/ CD COAXIAL IN DVD COAXIAL IN COMPONENT VIDEO CONTROL S FM AM IR REMOTE ASSIGNABLE OUT IN TV/SAT IN DVD IN MONITOR OUT S2 VIDEO S2 VIDEO S2 VIDEO Y IR OUT 1 PB/CB/B-Y IR OUT 2 PR/CR... BACK (3RD ZONE) L Notes • To prevent noise pickup, keep the AM loop antenna away from the receiver and other components. • Be sure to fully extend the FM wire antenna. • After connecting the FM wire antenna, keep it as horizontal as possible. • Do not use the U SIGNAL GND terminal for...
... OPTICAL OUT MD/DAT OPTICAL IN TV/SAT OPTICAL IN DVD OPTICAL IN SA-CD/ CD COAXIAL IN DVD COAXIAL IN COMPONENT VIDEO CONTROL S FM AM IR REMOTE ASSIGNABLE OUT IN TV/SAT IN DVD IN MONITOR OUT S2 VIDEO S2 VIDEO S2 VIDEO Y IR OUT 1 PB/CB/B-Y IR OUT 2 PR/CR... BACK (3RD ZONE) L Notes • To prevent noise pickup, keep the AM loop antenna away from the receiver and other components. • Be sure to fully extend the FM wire antenna. • After connecting the FM wire antenna, keep it as horizontal as possible. • Do not use the U SIGNAL GND terminal for...

Operating Instructions
Page 23
..."MENU EXPAND" in the LEVEL menu to turn MASTER VOLUME on the remote to "FIX" (page 39). Tip The receiver employs a test tone with a frequency centered at the same time, ... adjust using the LEVEL menu so that the level of all speakers at 800 Hz. 1 Press ?/1 on the receiver. 4 Press TEST TONE again. "TEST TONE" in the LEVEL menu appears in the LEVEL menu (page 46).... 23US The test tone turns off. on the remote or turn on the receiver. 2 Press TEST TONE on the LEVEL menu settings, see page 39. Use the remote for the operation. Then select the two speakers you want...
..."MENU EXPAND" in the LEVEL menu to turn MASTER VOLUME on the remote to "FIX" (page 39). Tip The receiver employs a test tone with a frequency centered at the same time, ... adjust using the LEVEL menu so that the level of all speakers at 800 Hz. 1 Press ?/1 on the receiver. 4 Press TEST TONE again. "TEST TONE" in the LEVEL menu appears in the LEVEL menu (page 46).... 23US The test tone turns off. on the remote or turn on the receiver. 2 Press TEST TONE on the LEVEL menu settings, see page 39. Use the remote for the operation. Then select the two speakers you want...

Operating Instructions
Page 24
... front left and right speakers. 24US HEADPHONE (MULTI) - When a center speaker or sub woofer is output. To cancel, press MUTING on the remote again or turn on the receiver again. Surround effects are not activated when using headphones • When headphones are connected and you to enjoy high quality analog inputs like... audio source. Listening to select the input. Press MULTI CH IN to adjust the volume. The selected input appears in tuner Turntable SA-CD/CD FM or AM and frequency PHONO 2 Turn on the remote. HEADPHONE (2CH) -
... front left and right speakers. 24US HEADPHONE (MULTI) - When a center speaker or sub woofer is output. To cancel, press MUTING on the remote again or turn on the receiver again. Surround effects are not activated when using headphones • When headphones are connected and you to enjoy high quality analog inputs like... audio source. Listening to select the input. Press MULTI CH IN to adjust the volume. The selected input appears in tuner Turntable SA-CD/CD FM or AM and frequency PHONO 2 Turn on the remote. HEADPHONE (2CH) -

Operating Instructions
Page 25
..."MONO". press TUNING - Before operation, make sure you have connected the FM and AM antennas to the receiver (see page 76). to scan from low to high; In case of poor FM stereo reception If the FM stereo reception is set to 10 kHz.) If you want directly. Direct tuning ... "AM". 3 Press TUNING + or TUNING -. Automatic tuning 1 Rotate INPUT SELECTOR to select tuner ("FM" or "AM"). 2 Press FM/AM to select "FM" or "AM". Press TUNING + to scan from high to low. Use the remote for optimum reception. Example 1: FM 102.50 MHz Select 1 b 0 b 2 b 5 Example 2: AM 1,350 kHz Select 1 b 3 b ...
..."MONO". press TUNING - Before operation, make sure you have connected the FM and AM antennas to the receiver (see page 76). to scan from low to high; In case of poor FM stereo reception If the FM stereo reception is set to 10 kHz.) If you want directly. Direct tuning ... "AM". 3 Press TUNING + or TUNING -. Automatic tuning 1 Rotate INPUT SELECTOR to select tuner ("FM" or "AM"). 2 Press FM/AM to select "FM" or "AM". Press TUNING + to scan from high to low. Use the remote for optimum reception. Example 1: FM 102.50 MHz Select 1 b 0 b 2 b 5 Example 2: AM 1,350 kHz Select 1 b 3 b ...

Operating Instructions
Page 26
...Repeat steps 2 to 6 to preset another station. The station is stored to 6 before you want to switch the memory page, press SHIFT on the remote. If "MEMORY" goes out before the display goes out. 5 Press PRESET TUNING + or PRESET TUNING - repeatedly to select the preset station you want... radio stations You can select the preset station as follows: tA1yA2y...yA0yB1yB2y...yB0T tC0y...yC2yC1T Using the remote 1 Move the easy scroll key to select "TUNER", then press the key repeatedly to select "FM" or "AM". 2 Press PRESET/CH/D.SKIP +/- Presetting radio stations 1 Rotate INPUT SELECTOR to...
...Repeat steps 2 to 6 to preset another station. The station is stored to 6 before you want to switch the memory page, press SHIFT on the remote. If "MEMORY" goes out before the display goes out. 5 Press PRESET TUNING + or PRESET TUNING - repeatedly to select the preset station you want... radio stations You can select the preset station as follows: tA1yA2y...yA0yB1yB2y...yB0T tC0y...yC2yC1T Using the remote 1 Move the easy scroll key to select "TUNER", then press the key repeatedly to select "FM" or "AM". 2 Press PRESET/CH/D.SKIP +/- Presetting radio stations 1 Rotate INPUT SELECTOR to...

Operating Instructions
Page 47
...4 Rotate -/+ to select "ON" to activate 12V trigger or select "OFF" to select the parameter. Advanced Adjustments and Settings Custom install mode This receiver features the custom install modes described below . 3 Rotate -/+ to select the setting you intend to the analog input jacks are not output from components ...8226; Only signals from the RS232C port when the power is turned on output of the IR remote or RS232C control. • ZONE Lets you turn on output of 12V triggers even when the main receiver is turned on, depending on the front panel. 1 Select "INPUT" in "12V TRIG. ...
...4 Rotate -/+ to select "ON" to activate 12V trigger or select "OFF" to select the parameter. Advanced Adjustments and Settings Custom install mode This receiver features the custom install modes described below . 3 Rotate -/+ to select the setting you intend to the analog input jacks are not output from components ...8226; Only signals from the RS232C port when the power is turned on output of the IR remote or RS232C control. • ZONE Lets you turn on output of 12V triggers even when the main receiver is turned on, depending on the front panel. 1 Select "INPUT" in "12V TRIG. ...

Operating Instructions
Page 50
... turn on . The remaining time appears in the display. Changing the command mode of the receiver and the remote is different, you cannot use 2 Sony receivers in the same room. 1 Turn off the receiver. 2 Hold down INPUT MODE and press ?/1 to turn off , press ALT, then press SLEEP. Tip To ...check the remaining time before the receiver turns off automatically at a specified time by using Sleep Timer, "...
... turn on . The remaining time appears in the display. Changing the command mode of the receiver and the remote is different, you cannot use 2 Sony receivers in the same room. 1 Turn off the receiver. 2 Hold down INPUT MODE and press ?/1 to turn off , press ALT, then press SLEEP. Tip To ...check the remaining time before the receiver turns off automatically at a specified time by using Sleep Timer, "...

Operating Instructions
Page 53
... on . on the remote at the same time (SYSTEM STANDBY). • Only signals from components connected to adjust the volume of the current input are output. 5 Press MASTER VOL +/- Tips • Even when this receiver is -∞ dB (no sound output). To turn off , the receiver in the 2nd zone ... output. For the 3rd zone, only analog audio signals are output. The analog audio signals of the volume is turned off all receivers, press ?/1 and AV ?/1 on the remote to the analog input jacks are output. Skip step 3, if you connect the SPEAKERS to the SURR BACK (3RD ZONE) terminals....
... on . on the remote at the same time (SYSTEM STANDBY). • Only signals from components connected to adjust the volume of the current input are output. 5 Press MASTER VOL +/- Tips • Even when this receiver is -∞ dB (no sound output). To turn off , the receiver in the 2nd zone ... output. For the 3rd zone, only analog audio signals are output. The analog audio signals of the volume is turned off all receivers, press ?/1 and AV ?/1 on the remote to the analog input jacks are output. Skip step 3, if you connect the SPEAKERS to the SURR BACK (3RD ZONE) terminals....


