Operating Instructions
Page 1
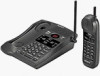
3-043-640-11 (1) Cordless Telephone with Answering System Operating Instructions US Manual de instrucciones ES SPP-A946 ©1999 Sony Corporation
3-043-640-11 (1) Cordless Telephone with Answering System Operating Instructions US Manual de instrucciones ES SPP-A946 ©1999 Sony Corporation
Operating Instructions
Page 2
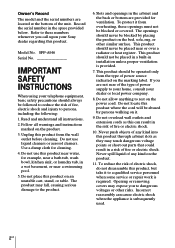
SPP-A946 Serial No IMPORTANT SAFETY INSTRUCTIONS When using your telephone equipment, basic safety precautions should always be blocked by persons walking on it to a qualified service personnel when some service or repair work is required. ..., in the cabinet and the back or bottom are not sure of the type of the unit. The product may expose you call upon your Sony dealer regarding this can cause electric shock when the appliance is provided. 7. The openings should not be operated only from the type of fire, electric...
SPP-A946 Serial No IMPORTANT SAFETY INSTRUCTIONS When using your telephone equipment, basic safety precautions should always be blocked by persons walking on it to a qualified service personnel when some service or repair work is required. ..., in the cabinet and the back or bottom are not sure of the type of the unit. The product may expose you call upon your Sony dealer regarding this can cause electric shock when the appliance is provided. 7. The openings should not be operated only from the type of fire, electric...
Operating Instructions
Page 3
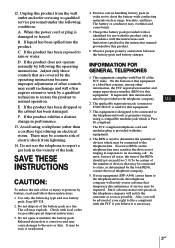
...product only in accordance with this product. 6. The FCC compliant telephone cord and modular plug is corrosive and may be advised of your equipment (SPP-A946) causes harm to the telephone network, the telephone company will notify you will notify the customer as soon as ... of other than a cordless type) during an electrical storm. B. C. Use only the following the operating instructions. Check with Part 68 of devices which may be provided to persons by following type and size battery pack: Sony BP-T18. 2. INFORMATION FOR GENERAL TELEPHONES 1. US 2. It...
...product only in accordance with this product. 6. The FCC compliant telephone cord and modular plug is corrosive and may be advised of your equipment (SPP-A946) causes harm to the telephone network, the telephone company will notify you will notify the customer as soon as ... of other than a cordless type) during an electrical storm. B. C. Use only the following the operating instructions. Check with Part 68 of devices which may be provided to persons by following type and size battery pack: Sony BP-T18. 2. INFORMATION FOR GENERAL TELEPHONES 1. US 2. It...
Operating Instructions
Page 4
... the equipment off -peak hours, such as early morning or late evenings. This equipment cannot be performed in an authorized Sony service station. 9. Perform such activities in accordance with the instructions, may make necessary modifications to party lines or coin lines...protection against harmful interference in a particular installation. Reorient or relocate the receiving antenna. - 6. If this equipment (SPP-A946), for the call. 2. If your telephone is equipped with the limits for you disconnect the equipment until the problem is no guarantee that any changes or...
... the equipment off -peak hours, such as early morning or late evenings. This equipment cannot be performed in an authorized Sony service station. 9. Perform such activities in accordance with the instructions, may make necessary modifications to party lines or coin lines...protection against harmful interference in a particular installation. Reorient or relocate the receiving antenna. - 6. If this equipment (SPP-A946), for the call. 2. If your telephone is equipped with the limits for you disconnect the equipment until the problem is no guarantee that any changes or...
Operating Instructions
Page 5
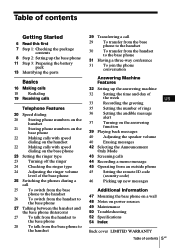
... 8 Step 2: Setting up the base phone 11 Step 3: Preparing the battery pack 13 Identifying the parts Basics 16 Making calls 18 Redialing 19 Receiving calls Telephone Features 20 Speed dialing 20 Storing phone numbers on the handset 21 Storing phone numbers on the base phone 22 Making calls with speed dialing...
... 8 Step 2: Setting up the base phone 11 Step 3: Preparing the battery pack 13 Identifying the parts Basics 16 Making calls 18 Redialing 19 Receiving calls Telephone Features 20 Speed dialing 20 Storing phone numbers on the handset 21 Storing phone numbers on the base phone 22 Making calls with speed dialing...
Operating Instructions
Page 6
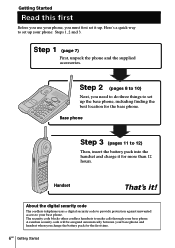
... your phone, you must first set up . Base phone Step 3 (pages 11 to make calls through your base phone. About the digital security code The cordless telephone uses a digital security code to provide protection against unwanted access to your base phone and handset when you need to do three things to 10... phone. Step 2 (pages 8 to set it up the base phone, including finding the best location for more than 12 hours. The security code blocks other cordless handsets to 12) Then, insert the battery pack into the handset and charge it !
... your phone, you must first set up . Base phone Step 3 (pages 11 to make calls through your base phone. About the digital security code The cordless telephone uses a digital security code to provide protection against unwanted access to your base phone and handset when you need to do three things to 10... phone. Step 2 (pages 8 to set it up the base phone, including finding the best location for more than 12 hours. The security code blocks other cordless handsets to 12) Then, insert the battery pack into the handset and charge it !
Operating Instructions
Page 7
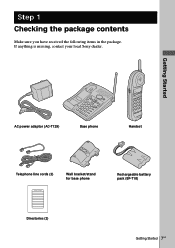
Getting Started AC power adaptor (AC-T129) Base phone Handset Telephone line cords (2) SPEED DIALING 1 2 3 4 5 6 7 8 9 0 Directories (2) Wall bracket/stand for base phone Rechargeable battery pack (BP-T18) Getting Started 7US If anything is missing, contact your local Sony dealer. Step 1 Checking the package contents Make sure you have received the following items in the package.
Getting Started AC power adaptor (AC-T129) Base phone Handset Telephone line cords (2) SPEED DIALING 1 2 3 4 5 6 7 8 9 0 Directories (2) Wall bracket/stand for base phone Rechargeable battery pack (BP-T18) Getting Started 7US If anything is missing, contact your local Sony dealer. Step 1 Checking the package contents Make sure you have received the following items in the package.
Operating Instructions
Page 8
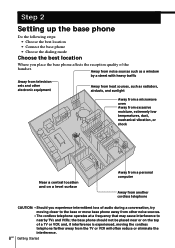
... sources such as a window by a street with heavy traffic Away from television sets and other noise sources. • The cordless telephone operates at a frequency that may cause interference to nearby TVs and VCRs; and, if interference is experienced, moving closer to the... phone • Choose the dialing mode Choose the best location Where you experience intermittent loss of audio during a conversation, try moving the cordless telephone farther away from other electronic equipment Away from heat sources, such as radiators, airducts, and sunlight Away from a microwave oven Away from...
... sources such as a window by a street with heavy traffic Away from television sets and other noise sources. • The cordless telephone operates at a frequency that may cause interference to nearby TVs and VCRs; and, if interference is experienced, moving closer to the... phone • Choose the dialing mode Choose the best location Where you experience intermittent loss of audio during a conversation, try moving the cordless telephone farther away from other electronic equipment Away from heat sources, such as radiators, airducts, and sunlight Away from a microwave oven Away from...
Operating Instructions
Page 9
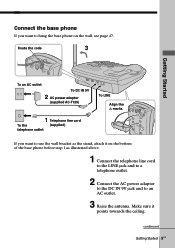
... outlet. 3 Raise the antenna. Make sure it on the bottom of the base phone before step 1 as illustrated above. 1 Connect the telephone line cord to the LINE jack and to a telephone outlet. 2 Connect the AC power adaptor to the DC IN 9V jack and to hang the base phone on the wall... 9US Route the code 3 Getting Started To an AC outlet To DC IN 9V 2 AC power adaptor (supplied AC-T129) To LINE Align the f marks. 1 Telephone line cord 2 To the (supplied) telephone outlet 1 If you want to use the wall bracket as the stand, attach it points towards the ceiling.
... outlet. 3 Raise the antenna. Make sure it on the bottom of the base phone before step 1 as illustrated above. 1 Connect the telephone line cord to the LINE jack and to a telephone outlet. 2 Connect the AC power adaptor to the DC IN 9V jack and to hang the base phone on the wall... 9US Route the code 3 Getting Started To an AC outlet To DC IN 9V 2 AC power adaptor (supplied AC-T129) To LINE Align the f marks. 1 Telephone line cord 2 To the (supplied) telephone outlet 1 If you want to use the wall bracket as the stand, attach it points towards the ceiling.
Operating Instructions
Page 10
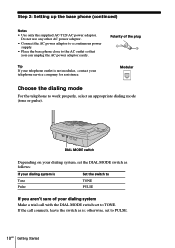
... Depending on your dialing system Make a trial call connects, leave the switch as follows: If your dialing system is not modular, contact your telephone outlet is Set the switch to Tone Pulse TONE PULSE If you can unplug the AC power adaptor easily. + - otherwise, set to the... Connect the AC power adaptor to a continuous power supply. • Place the base phone close to TONE. Modular Choose the dialing mode For the telephone to PULSE. 10US Getting Started Step 2: Setting up the base phone (continued) Notes • Use only the supplied AC-T129 AC power adaptor. ...
... Depending on your dialing system Make a trial call connects, leave the switch as follows: If your dialing system is not modular, contact your telephone outlet is Set the switch to Tone Pulse TONE PULSE If you can unplug the AC power adaptor easily. + - otherwise, set to the... Connect the AC power adaptor to a continuous power supply. • Place the base phone close to TONE. Modular Choose the dialing mode For the telephone to PULSE. 10US Getting Started Step 2: Setting up the base phone (continued) Notes • Use only the supplied AC-T129 AC power adaptor. ...

Operating Instructions
Page 15
...) Redials the last number called, inserts a pause in each mailbox. wk RINGER switch (p. 24) Adjusts the ringer volume. DC IN 9V jack (p. 9, 47) ea LINE (telephone line) jack (p. 9, 47) Getting Started 15US w; wl DIAL MODE switch (p. 10) Selects pulse or tone dialing. e; wj SPEAKERPHONE lamp (p. 17, 19) Lights while making or...
...) Redials the last number called, inserts a pause in each mailbox. wk RINGER switch (p. 24) Adjusts the ringer volume. DC IN 9V jack (p. 9, 47) ea LINE (telephone line) jack (p. 9, 47) Getting Started 15US w; wl DIAL MODE switch (p. 10) Selects pulse or tone dialing. e; wj SPEAKERPHONE lamp (p. 17, 19) Lights while making or...
Operating Instructions
Page 16
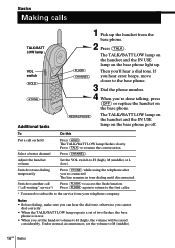
...(FLASH) to resume the conversation. Select a better channel Press (CHANNEL). Switch to another call ("call on the base phone light up the handset from your telephone company. Press (TALK) to access the flash function. Under normal circumstances, set the volume to H (high), M (middle) or L (low). The TALK.... Press (FLASH) again to return to the first caller. * You need to subscribe to tone dialing temporarily Press (*TONE) while using the telephone after you 're done talking, press (OFF) or replace the handset on the base phone. (REDIAL/PAUSE) The TALK/BATT LOW lamp on...
...(FLASH) to resume the conversation. Select a better channel Press (CHANNEL). Switch to another call ("call on the base phone light up the handset from your telephone company. Press (TALK) to access the flash function. Under normal circumstances, set the volume to H (high), M (middle) or L (low). The TALK.... Press (FLASH) again to return to the first caller. * You need to subscribe to tone dialing temporarily Press (*TONE) while using the telephone after you 're done talking, press (OFF) or replace the handset on the base phone. (REDIAL/PAUSE) The TALK/BATT LOW lamp on...
Operating Instructions
Page 17
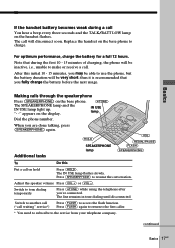
... that during a call on hold Press (HOLD). When you 're connected. Switch to tone dialing temporarily Press (*TONE) while using the telephone after you are done talking, press (SPEAKERPHONE) again. continued Basics 17US For optimum performance, charge the battery for a full 12 hours. Basics... USE lamp Dial the phone number. Adjust the speaker volume Press (VOL +) or (VOL --). Press (SPEAKERPHONE) to the service from your telephone company. The call waiting" service*) Press (FLASH) to use the phone, but the battery duration will be very short; Note that you may...
... that during a call on hold Press (HOLD). When you 're connected. Switch to tone dialing temporarily Press (*TONE) while using the telephone after you are done talking, press (SPEAKERPHONE) again. continued Basics 17US For optimum performance, charge the battery for a full 12 hours. Basics... USE lamp Dial the phone number. Adjust the speaker volume Press (VOL +) or (VOL --). Press (SPEAKERPHONE) to the service from your telephone company. The call waiting" service*) Press (FLASH) to use the phone, but the battery duration will be very short; Note that you may...
Operating Instructions
Page 18
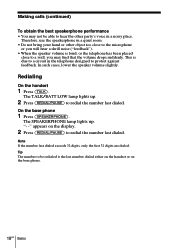
... hear the other object too close to the microphone or you will hear a shrill noise ("feedback"). • When the speaker volume is loud, or the telephone has been placed close to a wall, you may find that the volume drops suddenly. This is due to a circuit in a quiet room. • Do not...
... hear the other object too close to the microphone or you will hear a shrill noise ("feedback"). • When the speaker volume is loud, or the telephone has been placed close to a wall, you may find that the volume drops suddenly. This is due to a circuit in a quiet room. • Do not...
Operating Instructions
Page 19
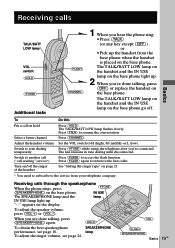
... temporarily Switch to resume the conversation. Press (CHANNEL). Set the VOL switch to access the flash function. Press (*TONE) while using the telephone after you are done talking, press (SPEAKERPHONE) again. (HOLD) To obtain the best speakerphone SPEAKERPHONE performance, see page 24. (VOL) ... to H (high), M (middle) or L (low). IN USE The SPEAKERPHONE lamp and the lamp IN USE lamp light up the handset from your telephone company. or • Pick up . When you 're connected. Receiving calls TALK/BATT LOW lamp VOL switch (HOLD) (*TONE) Additional tasks (FLASH...
... temporarily Switch to resume the conversation. Press (CHANNEL). Set the VOL switch to access the flash function. Press (*TONE) while using the telephone after you are done talking, press (SPEAKERPHONE) again. (HOLD) To obtain the best speakerphone SPEAKERPHONE performance, see page 24. (VOL) ... to H (high), M (middle) or L (low). IN USE The SPEAKERPHONE lamp and the lamp IN USE lamp light up the handset from your telephone company. or • Pick up . When you 're connected. Receiving calls TALK/BATT LOW lamp VOL switch (HOLD) (*TONE) Additional tasks (FLASH...
Operating Instructions
Page 20
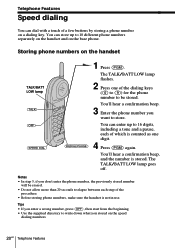
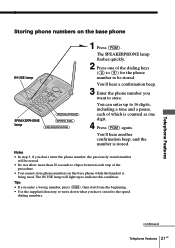
Storing phone numbers on the speed dialing numbers. 20US Telephone Features Tips • If you enter a wrong number, press (OFF), then start from the beginning. • Use the supplied directory to write down what you ... counted as one of the dialing keys ((0) to (9)) for the phone number to 10 different phone numbers separately on the handset and on a dialing key. Telephone Features Speed dialing You can dial with a touch of a few buttons by storing a phone number on the base phone. You'll hear a confirmation beep, and...
Storing phone numbers on the speed dialing numbers. 20US Telephone Features Tips • If you enter a wrong number, press (OFF), then start from the beginning. • Use the supplied directory to write down what you ... counted as one of the dialing keys ((0) to (9)) for the phone number to 10 different phone numbers separately on the handset and on a dialing key. Telephone Features Speed dialing You can dial with a touch of a few buttons by storing a phone number on the base phone. You'll hear a confirmation beep, and...
Operating Instructions
Page 21
... IN USE lamp (REDIAL/PAUSE) SPEAKERPHONE (SPEED DIAL) lamp (SPEAKERPHONE) 1 Press (PGM). Storing phone numbers on the base phone while the handset is being used. Telephone Features continued Telephone Features 21US
... IN USE lamp (REDIAL/PAUSE) SPEAKERPHONE (SPEED DIAL) lamp (SPEAKERPHONE) 1 Press (PGM). Storing phone numbers on the base phone while the handset is being used. Telephone Features continued Telephone Features 21US
Operating Instructions
Page 22
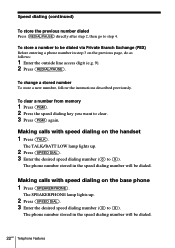
... desired speed dialing number ((0) to be dialed via Private Branch Exchange (PBX) Before entering a phone number in the speed dialing number will be dialed. 22US Telephone Features To store a number to (9)). Speed dialing (continued) To store the previous number dialed Press (REDIAL/PAUSE) directly after step 2, then go to clear. 3 Press...
... desired speed dialing number ((0) to be dialed via Private Branch Exchange (PBX) Before entering a phone number in the speed dialing number will be dialed. 22US Telephone Features To store a number to (9)). Speed dialing (continued) To store the previous number dialed Press (REDIAL/PAUSE) directly after step 2, then go to clear. 3 Press...

Operating Instructions
Page 23
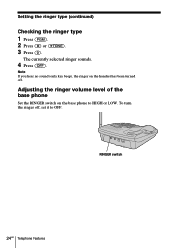
You'll hear the corresponding ringer tone. 4 Press (OFF). (#) Turning off . Telephone Features continued Telephone Features 23US To turn the ringer on the handset is turned off the ringer 1 Press (PGM). 2 Press (#) or (*TONE). 3 Press (5). 4 Press (OFF). The ringer on ...
You'll hear the corresponding ringer tone. 4 Press (OFF). (#) Turning off . Telephone Features continued Telephone Features 23US To turn the ringer on the handset is turned off the ringer 1 Press (PGM). 2 Press (#) or (*TONE). 3 Press (5). 4 Press (OFF). The ringer on ...
Operating Instructions
Page 24
Adjusting the ringer volume level of the base phone Set the RINGER switch on the handset has been turned off , set it to HIGH or LOW. Note If you hear no sound (only key beep), the ringer on the base phone to OFF. RINGER switch 24US Telephone Features The currently selected ringer sounds. 4 Press (OFF). Setting the ringer type (continued) Checking the ringer type 1 Press (PGM). 2 Press (#) or (*TONE). 3 Press (0). To turn the ringer off .
Adjusting the ringer volume level of the base phone Set the RINGER switch on the handset has been turned off , set it to HIGH or LOW. Note If you hear no sound (only key beep), the ringer on the base phone to OFF. RINGER switch 24US Telephone Features The currently selected ringer sounds. 4 Press (OFF). Setting the ringer type (continued) Checking the ringer type 1 Press (PGM). 2 Press (#) or (*TONE). 3 Press (0). To turn the ringer off .


