Operating Instructions
Page 2
...approved in the space provided below. Refer to these numbers whenever you call upon your Sony dealer regarding this phone. If this product near water, for a Class B digital device, pursuant to Part...help. They may be a remote risk of electric shock from exposing to RF electromagnetic energy. 1. SPP-A2770 Serial No 2US Caution You are located at the bottom of the unit. Reorient or relocate the receiving... may not be ensured when using a telephone (other than a cordless type) during telephone conversation. 2. Do not dispose of batteries in a fire. Operation is connected. -
...approved in the space provided below. Refer to these numbers whenever you call upon your Sony dealer regarding this phone. If this product near water, for a Class B digital device, pursuant to Part...help. They may be a remote risk of electric shock from exposing to RF electromagnetic energy. 1. SPP-A2770 Serial No 2US Caution You are located at the bottom of the unit. Reorient or relocate the receiving... may not be ensured when using a telephone (other than a cordless type) during telephone conversation. 2. Do not dispose of batteries in a fire. Operation is connected. -
Operating Instructions
Page 3
... customer as soon as determined by the Phone Company or Party Lines. 10.This equipment is USOC-RJ11C. 3. When programming emergency numbers and (or) making test calls to nationwide telephone network through a modular telephone jack which applicable certification jack (connector) ... notice isn't practical, the telephone company will be required. Perform such activities in an authorized Sony service station. 9. This equipment complies with this equipment (SPP-A2770), for this equipment (SPP-A2770) causes harm to the telephone network, the telephone company will provide advance notice ...
... customer as soon as determined by the Phone Company or Party Lines. 10.This equipment is USOC-RJ11C. 3. When programming emergency numbers and (or) making test calls to nationwide telephone network through a modular telephone jack which applicable certification jack (connector) ... notice isn't practical, the telephone company will be required. Perform such activities in an authorized Sony service station. 9. This equipment complies with this equipment (SPP-A2770), for this equipment (SPP-A2770) causes harm to the telephone network, the telephone company will provide advance notice ...
Operating Instructions
Page 6
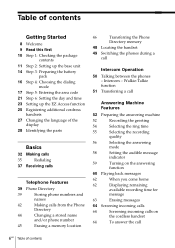
... on the cordless handset 64 To answer the call 6US Table of the display 28 Identifying the parts Basics 32 Making calls 35 Redialing 37 Receiving calls Telephone Features 39 Phone Directory 39 Storing phone numbers and names 42 Making calls from the Phone Directory 44... Changing a stored name and/or phone number 45 Erasing a memory location 46 Transferring the Phone Directory memory 48 Locating the handset...
... on the cordless handset 64 To answer the call 6US Table of the display 28 Identifying the parts Basics 32 Making calls 35 Redialing 37 Receiving calls Telephone Features 39 Phone Directory 39 Storing phone numbers and names 42 Making calls from the Phone Directory 44... Changing a stored name and/or phone number 45 Erasing a memory location 46 Transferring the Phone Directory memory 48 Locating the handset...
Operating Instructions
Page 7
...memo 66 Operating from an outside phone 66 Setting the remote ID code (security code) 67 Picking up new messages Caller ID Features 68 Understanding the Caller ID service 68 When you receive a call waiting" service Additional Information 78 Carrying the cordless handset by the belt clip 79... Notes on power sources 80 Maintenance 81 Troubleshooting 85 Specifications 86 Index Back cover LIMITED WARRANTY Table of the phone number 77 Using "Caller ID with call 69 Looking at ...
...memo 66 Operating from an outside phone 66 Setting the remote ID code (security code) 67 Picking up new messages Caller ID Features 68 Understanding the Caller ID service 68 When you receive a call waiting" service Additional Information 78 Carrying the cordless handset by the belt clip 79... Notes on power sources 80 Maintenance 81 Troubleshooting 85 Specifications 86 Index Back cover LIMITED WARRANTY Table of the phone number 77 Using "Caller ID with call 69 Looking at ...
Operating Instructions
Page 8
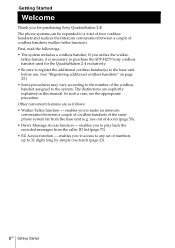
... access to any set of the cordless handset assigned to the system. talkie feature, it is necessary to purchase the SPP-H273 Sony cordless handset used for purchasing Sony QuadraStation 2.4! First, read the followings. • The system includes a cordless handset. If you to play back...; Direct Message Access function - The distinctions are as follows: • Walkie-Talkie function - The phone systems can be expanded to the base unit before use out of cordless handsets (walkie-talkie function). enables you for the QuadraStation 2.4 exclusively. • Be sure to register...
... access to any set of the cordless handset assigned to the system. talkie feature, it is necessary to purchase the SPP-H273 Sony cordless handset used for purchasing Sony QuadraStation 2.4! First, read the followings. • The system includes a cordless handset. If you to play back...; Direct Message Access function - The distinctions are as follows: • Walkie-Talkie function - The phone systems can be expanded to the base unit before use out of cordless handsets (walkie-talkie function). enables you for the QuadraStation 2.4 exclusively. • Be sure to register...
Operating Instructions
Page 9
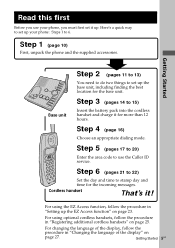
... function, follow the procedure in "Setting up . Here's a quick way to set up your phone, you use the Caller ID service. For using optional cordless handsets, follow the procedure in "Registering additional cordless handsets" on page 25. For changing the language of the display, follow the procedure in "Changing... (pages 17 to 20) Enter the area code to use your phone: Steps 1 to set it up the EZ Access function" on page 27. Getting Started Step 2 (pages 11 to 13) You need to do two things to 6. Cordless handset That's it for more than 12 hours. Base unit Step ...
... function, follow the procedure in "Setting up . Here's a quick way to set up your phone, you use the Caller ID service. For using optional cordless handsets, follow the procedure in "Registering additional cordless handsets" on page 25. For changing the language of the display, follow the procedure in "Changing... (pages 17 to 20) Enter the area code to use your phone: Steps 1 to set it up the EZ Access function" on page 27. Getting Started Step 2 (pages 11 to 13) You need to do two things to 6. Cordless handset That's it for more than 12 hours. Base unit Step ...

Operating Instructions
Page 17
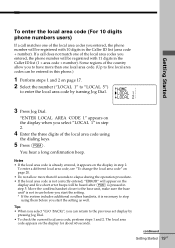
...digit dialing (area code + number) is required for all local calls in use. * If the system includes additional cordless handsets, it is accepted for local calls in your home area code" below. You cannot set the dialing mode while ... Dial again. Otherwise, you cannot use some functions of this phone and the Caller ID functions. See "To enter the local area code (For 10 digits phone number users)" on the cordless handset. Depending on the display. (ERASE) ENTER HOME AREA ...to other local areas can register up to 5 local area codes with this telephone to take advantage of this system.
...digit dialing (area code + number) is required for all local calls in use. * If the system includes additional cordless handsets, it is accepted for local calls in your home area code" below. You cannot set the dialing mode while ... Dial again. Otherwise, you cannot use some functions of this phone and the Caller ID functions. See "To enter the local area code (For 10 digits phone number users)" on the cordless handset. Depending on the display. (ERASE) ENTER HOME AREA ...to other local areas can register up to 5 local area codes with this telephone to take advantage of this system.
Operating Instructions
Page 18
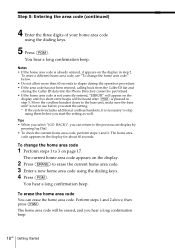
...use before you can erase the home area code. Tips • When you select "(GO BACK)", you start the setting. * If the system includes additional cordless handsets, it appears on the display for about 60 seconds. The current home area code appears on the display. 2 Press (ERASE) to 3 on the display... procedure. • If the area code has not been entered, calling back from the Caller ID list and storing the Caller ID data into the Phone Directory cannot be erased, and you start the setting as well. Step 5: Entering the area code (continued) 4 Enter the three digits of your home...
...use before you can erase the home area code. Tips • When you select "(GO BACK)", you start the setting. * If the system includes additional cordless handsets, it appears on the display for about 60 seconds. The current home area code appears on the display. 2 Press (ERASE) to 3 on the display... procedure. • If the area code has not been entered, calling back from the Caller ID list and storing the Caller ID data into the Phone Directory cannot be erased, and you start the setting as well. Step 5: Entering the area code (continued) 4 Enter the three digits of your home...
Operating Instructions
Page 19
...appears on page 20. • Do not allow more than one of the country allow you start the setting. * If the system includes additional cordless handsets, it is already entered, it appears on the display and five short error beeps will appear on the display in step 2. continued Getting ...Started 19US Some regions of the local area codes you can be entered in this phone.) 1 Perform steps 1 and 2 on page 17. 2 Select the number ("LOCAL 1" to "LOCAL 5") to elapse during the operation procedure. • If the local ...
...appears on page 20. • Do not allow more than one of the country allow you start the setting. * If the system includes additional cordless handsets, it is already entered, it appears on the display and five short error beeps will appear on the display in step 2. continued Getting ...Started 19US Some regions of the local area codes you can be entered in this phone.) 1 Perform steps 1 and 2 on page 17. 2 Select the number ("LOCAL 1" to "LOCAL 5") to elapse during the operation procedure. • If the local ...
Operating Instructions
Page 22
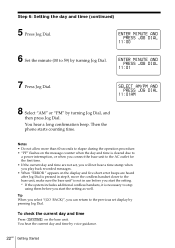
... day and time Press (DAY/TIME) on the display and five short error beeps are heard after Jog Dial is pressed in step 8, move the cordless handset closer to the base unit, make sure the base unit* is not in use before you start the setting. * If the system includes additional... cordless handsets, it is necessary to stop using them before you can return to 59) by pressing Jog Dial. Then the phone starts counting time. Step 6: Setting the day and time (continued) 5 Press Jog Dial. ENTER MIMUTE...
... day and time Press (DAY/TIME) on the display and five short error beeps are heard after Jog Dial is pressed in step 8, move the cordless handset closer to the base unit, make sure the base unit* is not in use before you start the setting. * If the system includes additional... cordless handsets, it is necessary to stop using them before you can return to 59) by pressing Jog Dial. Then the phone starts counting time. Step 6: Setting the day and time (continued) 5 Press Jog Dial. ENTER MIMUTE...
Operating Instructions
Page 23
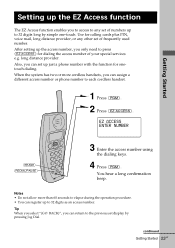
... for dialing the access number of your special services e.g. Tip When you select "(GO BACK)", you can assign a different access number or phone number to each cordless handset. Setting up the EZ Access function The EZ Access function enables you to access to any other set of frequently used number. When... the system has two or more than 60 seconds to elapse during the operation procedure. • You can set up just a phone number ...
... for dialing the access number of your special services e.g. Tip When you select "(GO BACK)", you can assign a different access number or phone number to each cordless handset. Setting up the EZ Access function The EZ Access function enables you to access to any other set of frequently used number. When... the system has two or more than 60 seconds to elapse during the operation procedure. • You can set up just a phone number ...
Operating Instructions
Page 24
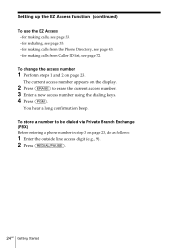
... the dialing keys. 4 Press (PGM). The current access number appears on the display. 2 Press (ERASE) to be dialed via Private Branch Exchange (PBX) Before entering a phone number in step 3 on page 23. To change the access number 1 Perform steps 1 and 2 on page 23, do as follows: 1 Enter the outside line access... EZ Access function (continued) To use the EZ Access -for making calls, see page 33. -for redialing, see page 35. -for making calls from the Phone Directory, see page 43. -for making calls from Caller ID list, see page 72.
... the dialing keys. 4 Press (PGM). The current access number appears on the display. 2 Press (ERASE) to be dialed via Private Branch Exchange (PBX) Before entering a phone number in step 3 on page 23. To change the access number 1 Perform steps 1 and 2 on page 23, do as follows: 1 Enter the outside line access... EZ Access function (continued) To use the EZ Access -for making calls, see page 33. -for redialing, see page 35. -for making calls from the Phone Directory, see page 43. -for making calls from Caller ID list, see page 72.
Operating Instructions
Page 25
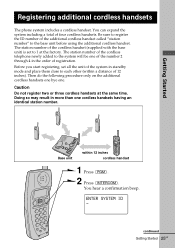
... and place them close to each other (within 12 inches cordless handset 1 Press (PGM). 2 Press (INTERCOM). Base unit within a distance of the cordless telephone newly added to register the ID number of four cordless handsets. The station number of 12 inches). Be sure to...one cordless handsets having an identical station number. Then do the following procedure only on the additional cordless handsets one bye one. Caution Do not register two or three cordless handsets at the factory. Getting Started Registering additional cordless handsets The phone system includes a cordless handset....
... and place them close to each other (within 12 inches cordless handset 1 Press (PGM). 2 Press (INTERCOM). Base unit within a distance of the cordless telephone newly added to register the ID number of four cordless handsets. The station number of 12 inches). Be sure to...one cordless handsets having an identical station number. Then do the following procedure only on the additional cordless handsets one bye one. Caution Do not register two or three cordless handsets at the factory. Getting Started Registering additional cordless handsets The phone system includes a cordless handset....
Operating Instructions
Page 31
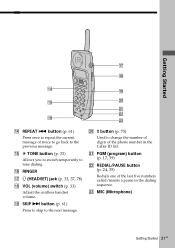
... the previous message. w; # button (p. 75) Used to tone dialing. wa PGM (program) button (p. 17, 39) ws REDIAL/PAUSE button (p. 24, 35) Redials one of the phone number in the dialing sequence. wd MIC (Microphone) Getting Started 31US Getting Started qj qk qf ql qg w; button (p. 61) Press once to repeat the... five numbers called/inserts a pause in the Caller ID list. qh RINGER qj I (HEADSET) jack (p. 33, 37, 78) qk VOL (volume) switch (p. 33) Adjust the cordless handset volume. wa ws qh wd qf REPEAT .
... the previous message. w; # button (p. 75) Used to tone dialing. wa PGM (program) button (p. 17, 39) ws REDIAL/PAUSE button (p. 24, 35) Redials one of the phone number in the dialing sequence. wd MIC (Microphone) Getting Started 31US Getting Started qj qk qf ql qg w; button (p. 61) Press once to repeat the... five numbers called/inserts a pause in the Caller ID list. qh RINGER qj I (HEADSET) jack (p. 33, 37, 78) qk VOL (volume) switch (p. 33) Adjust the cordless handset volume. wa ws qh wd qf REPEAT .
Operating Instructions
Page 32
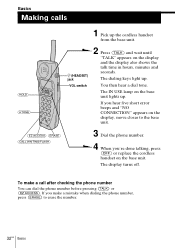
... light up . To make a mistake when dialing the phone number, press (ERASE) to the base unit. (EZ ACCESS) (ERASE) (CALL WAITING/FLASH) 3 Dial the phone number. 4 When you make a call after checking the phone number You can dial the phone number before pressing (TALK) or (EZ ACCESS). The... display turns off. If you 're done talking, press (OFF) or replace the cordless handset on the display and the display ...
... light up . To make a mistake when dialing the phone number, press (ERASE) to the base unit. (EZ ACCESS) (ERASE) (CALL WAITING/FLASH) 3 Dial the phone number. 4 When you make a call after checking the phone number You can dial the phone number before pressing (TALK) or (EZ ACCESS). The... display turns off. If you 're done talking, press (OFF) or replace the cordless handset on the display and the display ...
Operating Instructions
Page 33
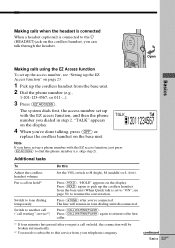
...to "ON"; Additional tasks To Adjust the cordless handset volume Put a call on the cordless handset, you can talk through the headset. Press (HOLD). Press (*TONE) after you put a call waiting" service*2) Do this service from the base unit. 2 Dial the phone number (e.g., 1-201-123-4567, or ...and then the phone number you dialed in tone dialing until disconnected. The system dials first, the access number set up with the EZ access function, just press (EZ ACCESS) to another call ("call on page 23. 1 Pick up the cordless handset from your telephone company. skip ...
...to "ON"; Additional tasks To Adjust the cordless handset volume Put a call on the cordless handset, you can talk through the headset. Press (HOLD). Press (*TONE) after you put a call waiting" service*2) Do this service from the base unit. 2 Dial the phone number (e.g., 1-201-123-4567, or ...and then the phone number you dialed in tone dialing until disconnected. The system dials first, the access number set up with the EZ access function, just press (EZ ACCESS) to another call ("call on page 23. 1 Pick up the cordless handset from your telephone company. skip ...

Operating Instructions
Page 35
...counted as one number of the total five registered numbers that can be redialed. • When dialing from a phone number with (EZ ACCESS), press (EZ ACCESS) instead of the long distance call by turning Jog Dial. 3...that name will be displayed in the list in (EZ ACCESS), the number cannot be redialed. The phone number will not be successful. • If you want to call is up to 15 digit, the.... • If an access number of above steps 3 and 4. Tips • Although the phone number displayed on the redial list is registered in step 2. Notes • The redial memory only registers...
...counted as one number of the total five registered numbers that can be redialed. • When dialing from a phone number with (EZ ACCESS), press (EZ ACCESS) instead of the long distance call by turning Jog Dial. 3...that name will be displayed in the list in (EZ ACCESS), the number cannot be redialed. The phone number will not be successful. • If you want to call is up to 15 digit, the.... • If an access number of above steps 3 and 4. Tips • Although the phone number displayed on the redial list is registered in step 2. Notes • The redial memory only registers...
Operating Instructions
Page 36
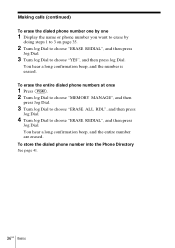
... a long confirmation beep, and the entire number are erased. To store the dialed phone number into the Phone Directory See page 41. 36US Basics Making calls (continued) To erase the dialed phone number one by one 1 Display the name or phone number you want to erase by doing steps 1 to 3 on page 35. 2 Turn... choose "ERASE REDIAL", and then press Jog Dial. 3 Turn Jog Dial to choose "ERASE REDIAL", and then press Jog Dial. To erase the entire dialed phone numbers at once 1 Press (PGM). 2 Turn Jog Dial to choose "MEMORY MANAGE", and then press Jog Dial. 3 Turn Jog Dial to choose "ERASE ALL RDL...
... a long confirmation beep, and the entire number are erased. To store the dialed phone number into the Phone Directory See page 41. 36US Basics Making calls (continued) To erase the dialed phone number one by one 1 Display the name or phone number you want to erase by doing steps 1 to 3 on page 35. 2 Turn... choose "ERASE REDIAL", and then press Jog Dial. 3 Turn Jog Dial to choose "ERASE REDIAL", and then press Jog Dial. To erase the entire dialed phone numbers at once 1 Press (PGM). 2 Turn Jog Dial to choose "MEMORY MANAGE", and then press Jog Dial. 3 Turn Jog Dial to choose "ERASE ALL RDL...
Operating Instructions
Page 37
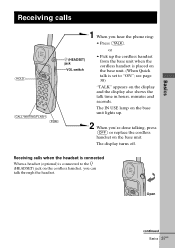
..., you can talk through the headset. The IN USE lamp on the base unit lights up the cordless handset from the base unit when the cordless handset is placed on the base unit. (When Quick talk is connected to "ON"; Receiving calls when the headset is connected When a headset (optional) is ...set to the I (HEADSET) jack VOL switch 1 When you 're done talking, press (OFF) or replace the cordless handset on the display and the display also shows the talk time in hours, minutes and seconds. see page 38) "TALK" appears on the base...
..., you can talk through the headset. The IN USE lamp on the base unit lights up the cordless handset from the base unit when the cordless handset is placed on the base unit. (When Quick talk is connected to "ON"; Receiving calls when the headset is connected When a headset (optional) is ...set to the I (HEADSET) jack VOL switch 1 When you 're done talking, press (OFF) or replace the cordless handset on the display and the display also shows the talk time in hours, minutes and seconds. see page 38) "TALK" appears on the base...

Operating Instructions
Page 38
...a call (see page 68). 38US Basics The ringer volume can still make calls, and also receive calls if another telephone connected to the same line rings to inform you receive a call on the cordless handset to H (high), M (middle) or L volume (low). You can be broken automatically. *2 You need... matches the number stored in by only picking Press (PGM). "HOLD" appears on the display if the call matches the number stored in the Phone Directory appears on the display. see page 68). • the ringer sound changes to resume the conversation. Receive a call by "call waiting"...
...a call (see page 68). 38US Basics The ringer volume can still make calls, and also receive calls if another telephone connected to the same line rings to inform you receive a call on the cordless handset to H (high), M (middle) or L volume (low). You can be broken automatically. *2 You need... matches the number stored in by only picking Press (PGM). "HOLD" appears on the display if the call matches the number stored in the Phone Directory appears on the display. see page 68). • the ringer sound changes to resume the conversation. Receive a call by "call waiting"...


