
Operating Instructions
Page 1
3-242-704-14(1) Integrated Remote Commander Operating Instructions RM-AV3000 © 2002 Sony Corporation
3-242-704-14(1) Integrated Remote Commander Operating Instructions RM-AV3000 © 2002 Sony Corporation
Operating Instructions
Page 3
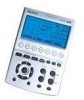
... RM-AV3000 Remote Commander provides centralized control of all your AV components from a single remote commander and saves the trouble of 32 successive steps by pressing a single button can be programmed on macro keys (Label keys). Macro execution speed is preset for the components frequently used and 12 keys on the Commander for most major brands components including Sony...
... RM-AV3000 Remote Commander provides centralized control of all your AV components from a single remote commander and saves the trouble of 32 successive steps by pressing a single button can be programmed on macro keys (Label keys). Macro execution speed is preset for the components frequently used and 12 keys on the Commander for most major brands components including Sony...
Operating Instructions
Page 4
...time 42 Adding an Extra Function to the Component Select Buttons 43 Programming the Power-On command of the selected component (for Sony components only 43 Adding a command that is required when selecting a component 45 Assigning Other Components to the Component Select ... component code with the Search function 16 Operating Your Components with the Remote Commander 18 To control the volume ...19 Using Non-Preset Remote Control Operations - Table of Contents Getting Started Location and Function of Controls 6 Installing the Batteries ...7 When to replace the batteries 8 Setting the...
...time 42 Adding an Extra Function to the Component Select Buttons 43 Programming the Power-On command of the selected component (for Sony components only 43 Adding a command that is required when selecting a component 45 Assigning Other Components to the Component Select ... component code with the Search function 16 Operating Your Components with the Remote Commander 18 To control the volume ...19 Using Non-Preset Remote Control Operations - Table of Contents Getting Started Location and Function of Controls 6 Installing the Batteries ...7 When to replace the batteries 8 Setting the...

Operating Instructions
Page 8
... The selected STD TIME or DS TIME key lights. To prevent the electrolyte from leaking, remove the batteries when you plan not to use the Commander for remote control operation and backlight (four size AA (R6) batteries) Under normal conditions, alkaline batteries will last up to replace the batteries Batteries for a long period...
... The selected STD TIME or DS TIME key lights. To prevent the electrolyte from leaking, remove the batteries when you plan not to use the Commander for remote control operation and backlight (four size AA (R6) batteries) Under normal conditions, alkaline batteries will last up to replace the batteries Batteries for a long period...
Operating Instructions
Page 15
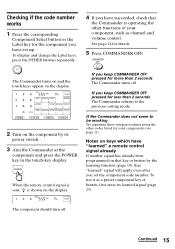
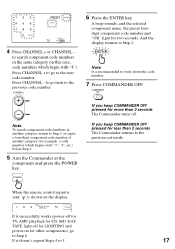
.... 2 Turn on the display. 4 If you keep COMMANDER OFF pressed for more than 2 seconds The Commander returns to be working Try repeating these setup procedures using the other functions of your components (see page 12). When the remote control signal is sent, is operating the other codes listed for... your component, such as a preset component key or button, first erase its power switch. 3 Aim the Commander at the component and press the POWER key in the...
.... 2 Turn on the display. 4 If you keep COMMANDER OFF pressed for more than 2 seconds The Commander returns to be working Try repeating these setup procedures using the other functions of your components (see page 12). When the remote control signal is sent, is operating the other codes listed for... your component, such as a preset component key or button, first erase its power switch. 3 Aim the Commander at the component and press the POWER key in the...
Operating Instructions
Page 17
... - And the display returns to search component code numbers in the same category (in another category, return to write down the code number. 7 Press COMMANDER OFF. When the remote control signal is sent, is recommended to Step 3, or input a four-digit component code number of another category (for example, a code number which begin...
... - And the display returns to search component code numbers in the same category (in another category, return to write down the code number. 7 Press COMMANDER OFF. When the remote control signal is sent, is recommended to Step 3, or input a four-digit component code number of another category (for example, a code number which begin...
Operating Instructions
Page 18
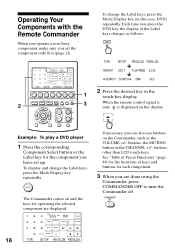
...DVD key, the display of keys and buttons for operating the selected component are done using the Commander, press COMMANDER OFF to turn the Commander off. When the remote control signal is sent, is displayed on the Commander, such as follows. buttons, other than LCD touch-keys. If necessary, you can also ... keys changes as the VOLUME +/- To change the Label keys, press the Mode Display key repeatedly. Operating Your Components with the Remote Commander When you operate a non-Sony component, make sure you are displayed. 2 Press the desired key in this case, DVD) repeatedly.
...DVD key, the display of keys and buttons for operating the selected component are done using the Commander, press COMMANDER OFF to turn the Commander off. When the remote control signal is sent, is displayed on the Commander, such as follows. buttons, other than LCD touch-keys. If necessary, you can also ... keys changes as the VOLUME +/- To change the Label keys, press the Mode Display key repeatedly. Operating Your Components with the Remote Commander When you operate a non-Sony component, make sure you are displayed. 2 Press the desired key in this case, DVD) repeatedly.
Operating Instructions
Page 19
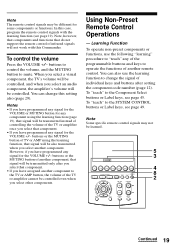
... +/- TV STB VCR DVD CD AMP OTHER SYSTEM CONTROL COMMANDER TIMER LIGHT OFF 1 2 3 MORE VOLUME CHANNEL OK MENU EXIT MUTING RECALL 5 3 4 8 2 Continued 19 Note Some specific remote control signals may be learned. buttons to control the volume, and the MUTING button to the Component...operate non-preset components or functions, use the learning function to change this setting also (page 29). Using Non-Preset Remote Control Operations - To control the volume Press the VOLUME +/- You can also use the following "learning" procedure to "teach" any component using ...
... +/- TV STB VCR DVD CD AMP OTHER SYSTEM CONTROL COMMANDER TIMER LIGHT OFF 1 2 3 MORE VOLUME CHANNEL OK MENU EXIT MUTING RECALL 5 3 4 8 2 Continued 19 Note Some specific remote control signals may be learned. buttons to control the volume, and the MUTING button to the Component...operate non-preset components or functions, use the learning function to change this setting also (page 29). Using Non-Preset Remote Control Operations - To control the volume Press the VOLUME +/- You can also use the following "learning" procedure to "teach" any component using ...
Operating Instructions
Page 20
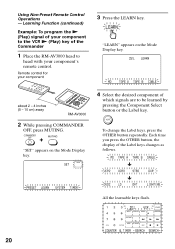
... 10 cm) away RM-AV3000 2 While pressing COMMANDER OFF, press MUTING. Using Non-Preset Remote Control Operations - Learning Function (continued) Example: To program the N (Play) signal of your component to the VCR N (Play) key of which signals are to head with your component 3 Press the LEARN key. COMMANDER OFF MUTING "SET.... LEARN "LEARN" appears on the Mode Display key. 4 Select the desired component of the Commander 1 Place the RM-AV3000 head to be learned by pressing the Component Select button or the Label key. Remote control for your component's remote control.
... 10 cm) away RM-AV3000 2 While pressing COMMANDER OFF, press MUTING. Using Non-Preset Remote Control Operations - Learning Function (continued) Example: To program the N (Play) signal of your component to the VCR N (Play) key of which signals are to head with your component 3 Press the LEARN key. COMMANDER OFF MUTING "SET.... LEARN "LEARN" appears on the Mode Display key. 4 Select the desired component of the Commander 1 Place the RM-AV3000 head to be learned by pressing the Component Select button or the Label key. Remote control for your component's remote control.
Operating Instructions
Page 21
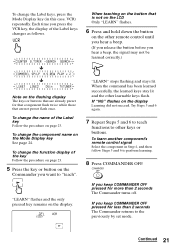
...want to "teach". Continued 21 "LEARN" stops flashing and stays lit. COMMANDER OFF If you keep COMMANDER OFF pressed for less than 2 seconds The Commander turns off. If "NG" flashes on the display. To learn another component's remote control signal Select the component in this case, VCR) repeatedly. Each time you ... Note on page 23. To change the name of the Label keys changes as follows. When the command has been learned successfully, the learned keys stay lit and the other remote control until you hear a beep. (If you release the button before you press the VCR key, the...
...want to "teach". Continued 21 "LEARN" stops flashing and stays lit. COMMANDER OFF If you keep COMMANDER OFF pressed for less than 2 seconds The Commander turns off. If "NG" flashes on the display. To learn another component's remote control signal Select the component in this case, VCR) repeatedly. Each time you ... Note on page 23. To change the name of the Label keys changes as follows. When the command has been learned successfully, the learned keys stay lit and the other remote control until you hear a beep. (If you release the button before you press the VCR key, the...
Operating Instructions
Page 22
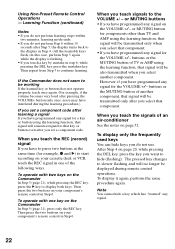
...you teach signals to start recording on your cassette deck or VCR, teach the REC signal in one key on your component's remote control in Step 6. Then press the two buttons on the Commander In Step 5 (page 21), press only the REC key. To operate with two keys on the...Step 6. When you have programmed any signal on your component's remote control in step 6, while pressing the DEL key, press the mistaken key. If the Commander does not seem to be also transmitted when you have interfered during remote control operations. or MUTING buttons •If you teach the signals of...
...you teach signals to start recording on your cassette deck or VCR, teach the REC signal in one key on your component's remote control in Step 6. Then press the two buttons on the Commander In Step 5 (page 21), press only the REC key. To operate with two keys on the...Step 6. When you have programmed any signal on your component's remote control in step 6, while pressing the DEL key, press the mistaken key. If the Commander does not seem to be also transmitted when you have interfered during remote control operations. or MUTING buttons •If you teach the signals of...
Operating Instructions
Page 25
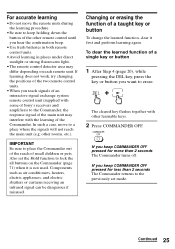
... 71) when it first and perform learning again. COMMANDER OFF If you keep holding down the button of the other remote control until you teach signals of an interactive signal exchange system remote control unit (supplied with some of Sony's receivers and amplifiers) to the Commander, the response signal of a single key or button 1 After Step 4 (page...
... 71) when it first and perform learning again. COMMANDER OFF If you keep holding down the button of the other remote control until you teach signals of an interactive signal exchange system remote control unit (supplied with some of Sony's receivers and amplifiers) to the Commander, the response signal of a single key or button 1 After Step 4 (page...

Operating Instructions
Page 55
...go back to Step 6 and continue the operation or press COMMANDER OFF to send. If you keep COMMANDER OFF pressed for more than 2 seconds The Commander returns to receive data. Notes • The data of the System Control function programmed for a Component Select button cannot be transferred appears... press the OTHER button repeatedly.) TV The component name of which contents are to be transferred. • Be sure that the receiving remote commander is ready to the previous setting mode. "COMPO X" appears on the Mode Display key, and the selected component name appears on the...
...go back to Step 6 and continue the operation or press COMMANDER OFF to send. If you keep COMMANDER OFF pressed for more than 2 seconds The Commander returns to receive data. Notes • The data of the System Control function programmed for a Component Select button cannot be transferred appears... press the OTHER button repeatedly.) TV The component name of which contents are to be transferred. • Be sure that the receiving remote commander is ready to the previous setting mode. "COMPO X" appears on the Mode Display key, and the selected component name appears on the...
Operating Instructions
Page 56
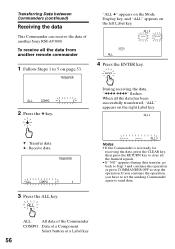
...all the data has been successfully transferred, "ALL" appears on the right Label key. If you continue the operation, you have to set the sending Commander again to 5 on the left Label key. 4 Press the ENTER key. 2 Press the x key. X : Transfer data x : Receive data...ALL" appears on page 53. ALL: All data of the Commander COMPO: Data of another remote commander 1 Follow Steps 1 to send data. To receive all the data from another Sony RM-AV3000. Transferring Data between Commanders (continued) Receiving the data This Commander can receive the data of a Component Select button or a...
...all the data has been successfully transferred, "ALL" appears on the right Label key. If you continue the operation, you have to set the sending Commander again to 5 on the left Label key. 4 Press the ENTER key. 2 Press the x key. X : Transfer data x : Receive data...ALL" appears on page 53. ALL: All data of the Commander COMPO: Data of another remote commander 1 Follow Steps 1 to send data. To receive all the data from another Sony RM-AV3000. Transferring Data between Commanders (continued) Receiving the data This Commander can receive the data of a Component Select button or a...

Operating Instructions
Page 57
..., the selected component name appears on pages 56. 4 Press the ENTER key. 2 Press the COMPO key. If you keep COMMANDER OFF pressed for more than 2 seconds The Commander returns to the previous setting mode. TV The selected component name appears on the left Label key. 1 Perform Steps 1 and ... press the Label key to which you want to assign the data. To receive the data of a Component Select button or key from another remote commander 3 Press the Component Select button to which you want to assign the data. COMPO "COMPO x" appears on the Mode Display key. During ...
..., the selected component name appears on pages 56. 4 Press the ENTER key. 2 Press the COMPO key. If you keep COMMANDER OFF pressed for more than 2 seconds The Commander returns to the previous setting mode. TV The selected component name appears on the left Label key. 1 Perform Steps 1 and ... press the Label key to which you want to assign the data. To receive the data of a Component Select button or key from another remote commander 3 Press the Component Select button to which you want to assign the data. COMPO "COMPO x" appears on the Mode Display key. During ...
Operating Instructions
Page 84
... to program the remote control signals for the component (page 19). • If your component in the order in the supplied "Component Code Numbers". • Some features may interfere with a remote commander, it is fixed by a remote commander. • You have set up or using the Remote Commander, first check the...component doesn't work, try the learning procedure again (page 19). 84 If some of Sony's receivers and amplifiers) to an audio system, make sure you are aiming the Commander directly at the component, and that there are listed in which they are no obstructions...
... to program the remote control signals for the component (page 19). • If your component in the order in the supplied "Component Code Numbers". • Some features may interfere with a remote commander, it is fixed by a remote commander. • You have set up or using the Remote Commander, first check the...component doesn't work, try the learning procedure again (page 19). 84 If some of Sony's receivers and amplifiers) to an audio system, make sure you are aiming the Commander directly at the component, and that there are listed in which they are no obstructions...
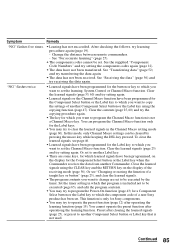
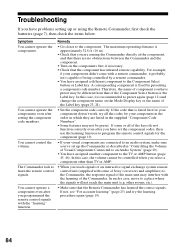
Operating Instructions
Page 85
...settings of a non-Sony product has been set the Channel Macro function. Clear the learned signals using the copying function (page 47). Preset after clearing the learned signals (page 25), or preset to another Label key. • There are set . Change the distance between remote commanders. - Symptom Remedy... you want to change are some keys, for which learned signals have been programmed for which you want to set the learning, System Control or Channel Macro function. See "Receiving the data" (page 56) and try setting again. Clear the contents (page 25, 60)...
...settings of a non-Sony product has been set the Channel Macro function. Clear the learned signals using the copying function (page 47). Preset after clearing the learned signals (page 25), or preset to another Label key. • There are set . Change the distance between remote commanders. - Symptom Remedy... you want to change are some keys, for which learned signals have been programmed for which you want to set the learning, System Control or Channel Macro function. See "Receiving the data" (page 56) and try setting again. Clear the contents (page 25, 60)...
Operating Instructions
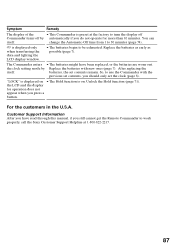
Page 87
... off by Replace the batteries with the previous set contents, you still cannot get the Remote Commander to work properly, call the Sony Customer Support Helpline at the factory to use the Commander with new ones (page 7). Unlock the Hold function (page 71). For the customers in the U.S.A. ... to 30 minutes (page 74). After replacing the itself . "LOCK" is displayed on . Symptom Remedy The display of the • This Commander is preset at 1-800-822-2217. 87 change the Automatic-Off time from 1 to be exhausted. Replace the batteries as early as possible (...
... off by Replace the batteries with the previous set contents, you still cannot get the Remote Commander to work properly, call the Sony Customer Support Helpline at the factory to use the Commander with new ones (page 7). Unlock the Hold function (page 71). For the customers in the U.S.A. ... to 30 minutes (page 74). After replacing the itself . "LOCK" is displayed on . Symptom Remedy The display of the • This Commander is preset at 1-800-822-2217. 87 change the Automatic-Off time from 1 to be exhausted. Replace the batteries as early as possible (...

Operating Instructions
Page 100
Table of Preset Functions (continued) LIGHTING KEY DISPLAY FUNCTION (Key display of other remote commanders) Lutron X10 Spacer Spacer Grafik System Eye RadioRA HomeWorks Interactive OFF OFF OFF ALL OFF OFF 1 SCENE1 SCENE1 SCENE1 MACRO1 SCENE1 2 SCENE2 SCENE2 SCENE2 MACRO2 ...
Table of Preset Functions (continued) LIGHTING KEY DISPLAY FUNCTION (Key display of other remote commanders) Lutron X10 Spacer Spacer Grafik System Eye RadioRA HomeWorks Interactive OFF OFF OFF ALL OFF OFF 1 SCENE1 SCENE1 SCENE1 MACRO1 SCENE1 2 SCENE2 SCENE2 SCENE2 MACRO2 ...

Operating Instructions
Page 102
... VOLUME- Set the DS (daylight saving) time Clock Display + CHANNEL+ Set the clock Clock Display + RECALL Lock the Remote Commander Unlock the Remote Commander Clock Display + COMMANDER OFF COMMANDER OFF (Keep the button pressed for more than 2 seconds.) For details, see page 40, 42 page 78 page 77 ... Press Set the interval between operation steps of the System Control Set the component macro executing time Adjust the contrast of the backlight COMMANDER OFF + LIGHT + VOLUME+ Select the buttons to light the LCD display COMMANDER OFF + LIGHT + VOLUME- window Set the STD (standard...
... VOLUME- Set the DS (daylight saving) time Clock Display + CHANNEL+ Set the clock Clock Display + RECALL Lock the Remote Commander Unlock the Remote Commander Clock Display + COMMANDER OFF COMMANDER OFF (Keep the button pressed for more than 2 seconds.) For details, see page 40, 42 page 78 page 77 ... Press Set the interval between operation steps of the System Control Set the component macro executing time Adjust the contrast of the backlight COMMANDER OFF + LIGHT + VOLUME+ Select the buttons to light the LCD display COMMANDER OFF + LIGHT + VOLUME- window Set the STD (standard...


