
Operating Instructions
Page 1
3-242-704-14(1) Integrated Remote Commander Operating Instructions RM-AV3000 © 2002 Sony Corporation
3-242-704-14(1) Integrated Remote Commander Operating Instructions RM-AV3000 © 2002 Sony Corporation
Operating Instructions
Page 3
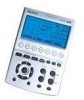
...control of Sony AV components with a single key Up to operate non-preset components or functions (page 19). Easy-to-operate touch key LCD with different remote control devices. All power on the LCD (displayed by setting their code numbers (page 12). If you can be available) (page 49). Features The RM-AV3000 Remote Commander provides centralized control... of all your AV components from a single remote commander and saves the trouble of operating different AV components with blue back light This Commander has a ...
...control of Sony AV components with a single key Up to operate non-preset components or functions (page 19). Easy-to-operate touch key LCD with different remote control devices. All power on the LCD (displayed by setting their code numbers (page 12). If you can be available) (page 49). Features The RM-AV3000 Remote Commander provides centralized control... of all your AV components from a single remote commander and saves the trouble of operating different AV components with blue back light This Commander has a ...
Operating Instructions
Page 4
... Components with the Remote Commander 18 To control the volume ...19 Using Non-Preset Remote Control Operations - System Control Functions 31 Programming a series of commands for the SYSTEM CONTROL buttons or the Label keys ...32 Notes on System Control Operations 37 Programming a series of commands for the Component ...time 42 Adding an Extra Function to the Component Select Buttons 43 Programming the Power-On command of the selected component (for Sony components only 43 Adding a command that is required when selecting a component 45 Assigning Other Components to the Component Select ...
... Components with the Remote Commander 18 To control the volume ...19 Using Non-Preset Remote Control Operations - System Control Functions 31 Programming a series of commands for the SYSTEM CONTROL buttons or the Label keys ...32 Notes on System Control Operations 37 Programming a series of commands for the Component ...time 42 Adding an Extra Function to the Component Select Buttons 43 Programming the Power-On command of the selected component (for Sony components only 43 Adding a command that is required when selecting a component 45 Assigning Other Components to the Component Select ...
Operating Instructions
Page 6
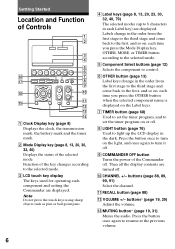
... mode. 3 LCD touch key display The keys used for operating each component and setting the Commander are turned off. 0 CHANNEL +/- Getting Started Location and Function of Controls 1 2 3 4 qk qj qh TV STB VCR DVD CD AMP OTHER SYSTEM CONTROL COMMANDER TIMER LIGHT OFF 1 2 3 MORE VOLUME CHANNEL OK 5 6 7 8 9 0 qg MENU EXIT MUTING RECALL qa qs...
... mode. 3 LCD touch key display The keys used for operating each component and setting the Commander are turned off. 0 CHANNEL +/- Getting Started Location and Function of Controls 1 2 3 4 qk qj qh TV STB VCR DVD CD AMP OTHER SYSTEM CONTROL COMMANDER TIMER LIGHT OFF 1 2 3 MORE VOLUME CHANNEL OK 5 6 7 8 9 0 qg MENU EXIT MUTING RECALL qa qs...
Operating Instructions
Page 7
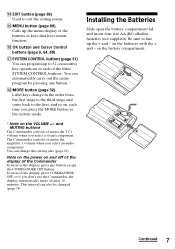
... sure to the first, and so on the battery compartment. Note on the power on and off the display, press COMMANDER OFF, or if you select a visual component. The Commander controls or mutes the amplifier's volume when you press the MORE button in the order from the first stage to the third... stage and come back to line up the menu display of the three SYSTEM CONTROL buttons . qk MORE button (page 32) Label...
... sure to the first, and so on the battery compartment. Note on the power on and off the display, press COMMANDER OFF, or if you select a visual component. The Commander controls or mutes the amplifier's volume when you press the MORE button in the order from the first stage to the third... stage and come back to line up the menu display of the three SYSTEM CONTROL buttons . qk MORE button (page 32) Label...

Operating Instructions
Page 8
... 5 months. Setting the Clock Setting the clock for the first time after installing batteries For the first time after installing batteries, the Commander is in the summer time. If the summer time (daylight saving time) is used in your area, press the DS TIME key...saving time). Installing the Batteries (continued) When to replace the batteries Batteries for remote control operation and backlight (four size AA (R6) batteries) Under normal conditions, alkaline batteries will last up to use the Commander for a long period of the battery compartment with a cloth and replace the old...
... 5 months. Setting the Clock Setting the clock for the first time after installing batteries For the first time after installing batteries, the Commander is in the summer time. If the summer time (daylight saving time) is used in your area, press the DS TIME key...saving time). Installing the Batteries (continued) When to replace the batteries Batteries for remote control operation and backlight (four size AA (R6) batteries) Under normal conditions, alkaline batteries will last up to use the Commander for a long period of the battery compartment with a cloth and replace the old...

Operating Instructions
Page 10
...setting the clock 2 button button The selected minute flashes. The clock starts from 0 seconds. 2 Press the Mode Display key (SET) twice. 10 COMMANDER OFF MUTING "SET" appears on the Mode Display key. 5 Press the SET key. The clock starts from 0 second. Note If you want to ...the clock is set then. Setting the Clock (continued) 4 Set the minute by pressing the or button. TV STB VCR DVD CD AMP OTHER SYSTEM CONTROL COMMANDER TIMER LIGHT OFF 1 2 3 MORE VOLUME CHANNEL OK MENU EXIT MUTING RECALL 3 1 Notes • If you press the button, the minute is...
...setting the clock 2 button button The selected minute flashes. The clock starts from 0 seconds. 2 Press the Mode Display key (SET) twice. 10 COMMANDER OFF MUTING "SET" appears on the Mode Display key. 5 Press the SET key. The clock starts from 0 second. Note If you want to ...the clock is set then. Setting the Clock (continued) 4 Set the minute by pressing the or button. TV STB VCR DVD CD AMP OTHER SYSTEM CONTROL COMMANDER TIMER LIGHT OFF 1 2 3 MORE VOLUME CHANNEL OK MENU EXIT MUTING RECALL 3 1 Notes • If you press the button, the minute is...

Operating Instructions
Page 11
... time mode is set then. "CLOCK" appears and flashes on one of the Label keys on page 9-10. The setting mode goes to Step 4. The Commander enters clock setting mode. If you press the SET key in Step 3 or 4, the clock is changed from STD TIME to DS TIME The time... of the clock advances by one hour. 3 Press the CLOCK key. To select STD TIME (standard time) or DS TIME (daylight saving time) When the Commander enters the clock setting mode when the clock is already set, the time mode previously set the clock, follow Steps 2 - 5 on the display.
... time mode is set then. "CLOCK" appears and flashes on one of the Label keys on page 9-10. The setting mode goes to Step 4. The Commander enters clock setting mode. If you press the SET key in Step 3 or 4, the clock is changed from STD TIME to DS TIME The time... of the clock advances by one hour. 3 Press the CLOCK key. To select STD TIME (standard time) or DS TIME (daylight saving time) When the Commander enters the clock setting mode when the clock is already set, the time mode previously set the clock, follow Steps 2 - 5 on the display.
Operating Instructions
Page 12
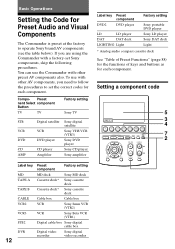
...each component. If you are using the Commander with other AV components, you need to follow the procedures to operate Sony brand AV components (see the table below). Setting a component code TV STB VCR DVD CD AMP OTHER SYSTEM CONTROL COMMANDER TIMER LIGHT OFF 1 2 3 MORE... VOLUME CHANNEL OK MENU EXIT MUTING RECALL 5 3 4 7 2 Compo- Preset nent Select component Button TV TV Factory setting Sony TV STB VCR DVD CD AMP Digital satellite VCR DVD player...
...each component. If you are using the Commander with other AV components, you need to follow the procedures to operate Sony brand AV components (see the table below). Setting a component code TV STB VCR DVD CD AMP OTHER SYSTEM CONTROL COMMANDER TIMER LIGHT OFF 1 2 3 MORE... VOLUME CHANNEL OK MENU EXIT MUTING RECALL 5 3 4 7 2 Compo- Preset nent Select component Button TV TV Factory setting Sony TV STB VCR DVD CD AMP Digital satellite VCR DVD player...
Operating Instructions
Page 13
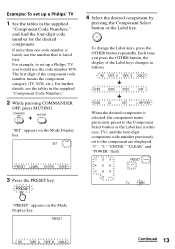
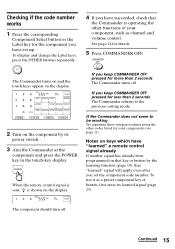
For further details, see the tables in the supplied "Component Code Numbers," and find the four-digit code number for the desired component. COMMANDER OFF MUTING "SET" appears on the Mode Display key. TV To change the Label keys, press the OTHER button repeatedly. "0" - "PRESET"... component are displayed. For example, to set up a Philips' TV 1 See the tables in the supplied "Component Code Numbers." 2 While pressing COMMANDER OFF, press MUTING. Each time you would use the number that is selected, the component name previously preset to the Component Select button or the...
For further details, see the tables in the supplied "Component Code Numbers," and find the four-digit code number for the desired component. COMMANDER OFF MUTING "SET" appears on the Mode Display key. TV To change the Label keys, press the OTHER button repeatedly. "0" - "PRESET"... component are displayed. For example, to set up a Philips' TV 1 See the tables in the supplied "Component Code Numbers." 2 While pressing COMMANDER OFF, press MUTING. Each time you would use the number that is selected, the component name previously preset to the Component Select button or the...
Operating Instructions
Page 14
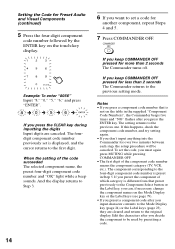
...(see page 79). • If you preset a component code after you want to set a code for more than 2 seconds The Commander returns to the first digit. To set is displayed, and the cursor returns to the previous setting mode. Edit the characters after you ..."5," "6," and press "ENTER". The fourdigit component code number previously set the code, you keep COMMANDER OFF pressed for less than 2 seconds The Commander turns off. COMMANDER OFF If you must again press MUTING while pressing COMMANDER OFF. • The first digit of the component code number means the component category (TV...
...(see page 79). • If you preset a component code after you want to set a code for more than 2 seconds The Commander returns to the first digit. To set is displayed, and the cursor returns to the previous setting mode. Edit the characters after you ..."5," "6," and press "ENTER". The fourdigit component code number previously set the code, you keep COMMANDER OFF pressed for less than 2 seconds The Commander turns off. COMMANDER OFF If you must again press MUTING while pressing COMMANDER OFF. • The first digit of the component code number means the component category (TV...
Operating Instructions
Page 15
...less than 2 seconds The Commander turns off . To use it as channel and volume control. Notes on keys which have "learned" a remote control signal already If another signal has already been programmed on that key or button by its learned signal (page 25). When the remote control signal is sent, is... shown on the component by the learning function (page 19), that the Commander is operating the other codes listed for your component, such as a preset component key ...
...less than 2 seconds The Commander turns off . To use it as channel and volume control. Notes on keys which have "learned" a remote control signal already If another signal has already been programmed on that key or button by its learned signal (page 25). When the remote control signal is sent, is... shown on the component by the learning function (page 19), that the Commander is operating the other codes listed for your component, such as a preset component key ...

Operating Instructions
Page 16
COMMANDER OFF MUTING 3 Select the desired component by pressing the Component Select button or the Label key. TV To change the Label keys, press the OTHER ... Label keys changes as in Step 4 on the Mode Display key. 2 4 TV STB VCR DVD CD AMP OTHER SYSTEM CONTROL COMMANDER TIMER LIGHT OFF 1 2 3 MORE VOLUME CHANNEL OK MENU EXIT MUTING RECALL 6 3 7 1 1 While pressing COMMANDER OFF, press MUTING. When the desired component is displayed. 16 TV, AMP: Power-on CD, MD, TAPE, DAT...
COMMANDER OFF MUTING 3 Select the desired component by pressing the Component Select button or the Label key. TV To change the Label keys, press the OTHER ... Label keys changes as in Step 4 on the Mode Display key. 2 4 TV STB VCR DVD CD AMP OTHER SYSTEM CONTROL COMMANDER TIMER LIGHT OFF 1 2 3 MORE VOLUME CHANNEL OK MENU EXIT MUTING RECALL 6 3 7 1 1 While pressing COMMANDER OFF, press MUTING. When the desired component is displayed. 16 TV, AMP: Power-on CD, MD, TAPE, DAT...
Operating Instructions
Page 17
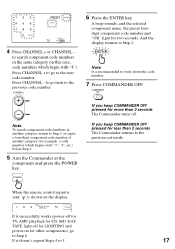
...display. 4 Press CHANNEL + or CHANNEL - Press CHANNEL - If you keep COMMANDER OFF pressed for less than 2 seconds The Commander turns off for other components), go back to the previous set mode. When the remote control signal is sent, is recommended to Step 3, or input a four-digit ...component code number of another category (for two seconds. COMMANDER OFF Note To search component code numbers in this case, code numbers ...
...display. 4 Press CHANNEL + or CHANNEL - Press CHANNEL - If you keep COMMANDER OFF pressed for less than 2 seconds The Commander turns off for other components), go back to the previous set mode. When the remote control signal is sent, is recommended to Step 3, or input a four-digit ...component code number of another category (for two seconds. COMMANDER OFF Note To search component code numbers in this case, code numbers ...
Operating Instructions
Page 18
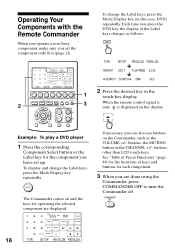
... are done using the Commander, press COMMANDER OFF to turn the Commander off. To change the Label keys, press the Mode Display key repeatedly. When the remote control signal is sent, is displayed on the Commander, such as follows. If...CONTROL COMMANDER TIMER LIGHT OFF 1 2 3 MORE VOLUME CHANNEL OK MENU EXIT MUTING RECALL 1 3 Example: To play a DVD player 1 Press the corresponding Component Select button or the Label key for the component you have set the component code first (page 12). Operating Your Components with the Remote Commander When you operate a non-Sony...
... are done using the Commander, press COMMANDER OFF to turn the Commander off. To change the Label keys, press the Mode Display key repeatedly. When the remote control signal is sent, is displayed on the Commander, such as follows. If...CONTROL COMMANDER TIMER LIGHT OFF 1 2 3 MORE VOLUME CHANNEL OK MENU EXIT MUTING RECALL 1 3 Example: To play a DVD player 1 Press the corresponding Component Select button or the Label key for the component you have set the component code first (page 12). Operating Your Components with the Remote Commander When you operate a non-Sony...
Operating Instructions
Page 19
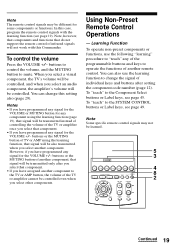
... 49. buttons or the MUTING button of the TV or amplifier cannot be learned. Using Non-Preset Remote Control Operations - TV STB VCR DVD CD AMP OTHER SYSTEM CONTROL COMMANDER TIMER LIGHT OFF 1 2 3 MORE VOLUME CHANNEL OK MENU EXIT MUTING RECALL 5 3 4 8 2 ...Continued 19 buttons to control the volume, and the MUTING button to change this Commander. Notes • If you select another remote control. However, if you select other components. To "teach" to operate the functions of infrared...
... 49. buttons or the MUTING button of the TV or amplifier cannot be learned. Using Non-Preset Remote Control Operations - TV STB VCR DVD CD AMP OTHER SYSTEM CONTROL COMMANDER TIMER LIGHT OFF 1 2 3 MORE VOLUME CHANNEL OK MENU EXIT MUTING RECALL 5 3 4 8 2 ...Continued 19 buttons to control the volume, and the MUTING button to change this Commander. Notes • If you select another remote control. However, if you select other components. To "teach" to operate the functions of infrared...
Operating Instructions
Page 20
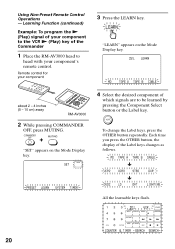
Remote control for your component to the VCR N (Play) key of the Label keys changes as follows. Each time you press the OTHER button, the display of the Commander 1 Place the RM-AV3000 head to be learned by pressing the Component Select button or the Label key. ...inches (5 - 10 cm) away RM-AV3000 2 While pressing COMMANDER OFF, press MUTING. VCR To change the Label keys, press the OTHER button repeatedly. All the learnable keys flash. 20 COMMANDER OFF MUTING "SET" appears on the Mode Display key. Using Non-Preset Remote Control Operations - LEARN "LEARN" appears ...
Remote control for your component to the VCR N (Play) key of the Label keys changes as follows. Each time you press the OTHER button, the display of the Commander 1 Place the RM-AV3000 head to be learned by pressing the Component Select button or the Label key. ...inches (5 - 10 cm) away RM-AV3000 2 While pressing COMMANDER OFF, press MUTING. VCR To change the Label keys, press the OTHER button repeatedly. All the learnable keys flash. 20 COMMANDER OFF MUTING "SET" appears on the Mode Display key. Using Non-Preset Remote Control Operations - LEARN "LEARN" appears ...
Operating Instructions
Page 21
...To learn another component's remote control signal Select the component in this case, VCR) repeatedly. VCR When teaching on the button that is not on the LCD Only "LEARN" flashes. 6 Press and hold down the button on the other learnable keys flash. COMMANDER OFF If you keep COMMANDER OFF pressed for that...changes as follows. To change the name of the Label key Follow the procedure on page 23. When the command has been learned successfully, the learned keys stay lit and the other remote control until you hear a beep. (If you release the button before you hear a beep, the signal may not...
...To learn another component's remote control signal Select the component in this case, VCR) repeatedly. VCR When teaching on the button that is not on the LCD Only "LEARN" flashes. 6 Press and hold down the button on the other learnable keys flash. COMMANDER OFF If you keep COMMANDER OFF pressed for that...changes as follows. To change the name of the Label key Follow the procedure on page 23. When the command has been learned successfully, the learned keys stay lit and the other remote control until you hear a beep. (If you release the button before you hear a beep, the signal may not...
Operating Instructions
Page 22
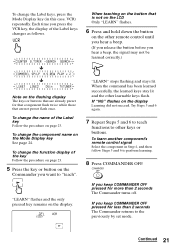
... by mistake in one key on the Commander In Step 5 (page 21), while pressing the REC key, press the B key to the VOLUME +/ - Then press the two buttons on the VOLUME +/- Note You cannot hide a key which has "learned" any signal on your component's remote control in Step 6. Then repeat from Step 5 to... any signal. 22 or MUTING buttons •If you have programmed any signal for the VOLUME +/- However, if you set a component code. Using Non-Preset Remote Control Operations - To operate with two keys on the Commander In Step 5 (page 21), press only the REC key.
... by mistake in one key on the Commander In Step 5 (page 21), while pressing the REC key, press the B key to the VOLUME +/ - Then press the two buttons on the VOLUME +/- Note You cannot hide a key which has "learned" any signal on your component's remote control in Step 6. Then repeat from Step 5 to... any signal. 22 or MUTING buttons •If you have programmed any signal for the VOLUME +/- However, if you set a component code. Using Non-Preset Remote Control Operations - To operate with two keys on the Commander In Step 5 (page 21), press only the REC key.
Operating Instructions
Page 23
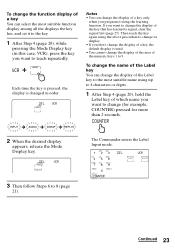
... of the Label key to the most suitable function display among all the displays the key has, and set it using the learning function. The Commander enters the Label Input mode. 3 Then follow Steps 6 to change (for example, COUNTER) pressed for more than 2 seconds. Notes • You can change the display...
... of the Label key to the most suitable function display among all the displays the key has, and set it using the learning function. The Commander enters the Label Input mode. 3 Then follow Steps 6 to change (for example, COUNTER) pressed for more than 2 seconds. Notes • You can change the display...


