
Operating Instructions
Page 4
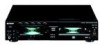
...purposes. Then wipe off . • If you are for 2 models: RCD-W500C and RCD-W100. In this manual describe the controls on the remote if they have it checked by its edge. You can also use the unit for a long time, be a considerable rise in temperature inside the .... On condensation in the unit If the unit is indicated on the lenses inside the car. • Store discs in their cases. Before operating the unit, please read this Sony Compact Disc Recorder. Should this manual are not going to use the controls on the unit. Welcome Thank you for purchasing ...
...purposes. Then wipe off . • If you are for 2 models: RCD-W500C and RCD-W100. In this manual describe the controls on the remote if they have it checked by its edge. You can also use the unit for a long time, be a considerable rise in temperature inside the .... On condensation in the unit If the unit is indicated on the lenses inside the car. • Store discs in their cases. Before operating the unit, please read this Sony Compact Disc Recorder. Should this manual are not going to use the controls on the unit. Welcome Thank you for purchasing ...

Operating Instructions
Page 6
...the unit using the supplied remote. Hooking Up the System This section describes how to hook up the unit to prevent hum and noise. Connecting the unit to an amplifier Connect the amplifier to a digital component Connect a component such as digital amplifier, CD player, DAT deck, or MD... deck through the DIGITAL OPTICAL IN/OUT jacks (S/PDIF square type) with new ones. When the remote no longer operates the unit, replace both batteries with a optical digital cord (not ...
...the unit using the supplied remote. Hooking Up the System This section describes how to hook up the unit to prevent hum and noise. Connecting the unit to an amplifier Connect the amplifier to a digital component Connect a component such as digital amplifier, CD player, DAT deck, or MD... deck through the DIGITAL OPTICAL IN/OUT jacks (S/PDIF square type) with new ones. When the remote no longer operates the unit, replace both batteries with a optical digital cord (not ...

Operating Instructions
Page 8
... for DECK A of RCDW500C) and place a disc on the inner circle of RCD-W500C. Press OPEN/ CLOSE (or A) again to adjust ... display is turned off (or press ./> or the number buttons on the remote) to select the track you select ALL DISCS 1 DISC/ ALBUM The unit plays All discs in the unit consecutively in the display is selected (RCD-W500C only). &#...using the remote, set DECK A/DECK B to DECK A to operate DECK A (the CD player section), or to DECK B to the PHONES jack on the remote. Adjust the volume on the remote). Select the disc (for DECK A of RCD-W500C) Press one disc you want ...
... for DECK A of RCDW500C) and place a disc on the inner circle of RCD-W500C. Press OPEN/ CLOSE (or A) again to adjust ... display is turned off (or press ./> or the number buttons on the remote) to select the track you select ALL DISCS 1 DISC/ ALBUM The unit plays All discs in the unit consecutively in the display is selected (RCD-W500C only). &#...using the remote, set DECK A/DECK B to DECK A to operate DECK A (the CD player section), or to DECK B to the PHONES jack on the remote. Adjust the volume on the remote). Select the disc (for DECK A of RCD-W500C) Press one disc you want ...

Operating Instructions
Page 11
... ALBUM SELECT indicator in the display lights up 5 Press PLAY MODE repeatedly to close the disc tray. Playing a disc with MP3 files. on the amplifier. Adjust the volume on the remote). 7 Press H. Basic Operations Tip To specify a desired playback order, before the folder ...or file name, input the order by number (e.g., "01", "02"), then record contents onto a disc. (The order differs depending on the writing...
... ALBUM SELECT indicator in the display lights up 5 Press PLAY MODE repeatedly to close the disc tray. Playing a disc with MP3 files. on the amplifier. Adjust the volume on the remote). 7 Press H. Basic Operations Tip To specify a desired playback order, before the folder ...or file name, input the order by number (e.g., "01", "02"), then record contents onto a disc. (The order differs depending on the writing...

Operating Instructions
Page 12
... entering and prevent damage to the beginning of RCD-W500C. on the remote. For the detailed explanation about the displayed information). 2 Press H. • You can remove or load discs while playing the other disc trays while playing a disc in the display is turned on (or press ALBUM + on the ...panel. When the indicator lights up, the AMS control selects albums. Press ALBUM to turn on the remote). Go back to the PHONES jack on the remote). The indicator lights to green when the disc is selected (RCD-W500C only). • You can start playing from a specific track in step ...
... entering and prevent damage to the beginning of RCD-W500C. on the remote. For the detailed explanation about the displayed information). 2 Press H. • You can remove or load discs while playing the other disc trays while playing a disc in the display is turned on (or press ALBUM + on the ...panel. When the indicator lights up, the AMS control selects albums. Press ALBUM to turn on the remote). Go back to the PHONES jack on the remote). The indicator lights to green when the disc is selected (RCD-W500C only). • You can start playing from a specific track in step ...

Operating Instructions
Page 13
...Operations Tips • When either of the detailed displays are selected, the disc, track, and album titles are not recognized. Z Press SCROLL on the remote to see "Labeling Tracks/ Discs" on page 32. • You can scroll disc or track titles that do not fit entirely into the display. Note For... MP3 files, some characters cannot be displayed. Each time you press the button, you can check information about the disc using the remote, set DECK A/DECK B to DECK A to operate DECK A, or to DECK B to continue scrolling. • When you place a CD/CD-R/CD-...
...Operations Tips • When either of the detailed displays are selected, the disc, track, and album titles are not recognized. Z Press SCROLL on the remote to see "Labeling Tracks/ Discs" on page 32. • You can scroll disc or track titles that do not fit entirely into the display. Note For... MP3 files, some characters cannot be displayed. Each time you press the button, you can check information about the disc using the remote, set DECK A/DECK B to DECK A to operate DECK A, or to DECK B to continue scrolling. • When you place a CD/CD-R/CD-...

Operating Instructions
Page 15
... indicator CD TEXT DECK A TOC REC DECK B CD TEXT CD - Locating a Specific Track You can open the disc tray before finalizing, CD TEXT information is not recorded. For details on the remote. When using the AMS (Automatic Music Sensor) dial on the deck, . If you press OPEN/CLOSE while the ...message is in the display of recordable disc is displayed. You can quickly locate any track while playing a disc by using the remote, set DECK A/DECK B to DECK A to operate DECK A, or to DECK B to open the...
... indicator CD TEXT DECK A TOC REC DECK B CD TEXT CD - Locating a Specific Track You can open the disc tray before finalizing, CD TEXT information is not recorded. For details on the remote. When using the AMS (Automatic Music Sensor) dial on the deck, . If you press OPEN/CLOSE while the ...message is in the display of recordable disc is displayed. You can quickly locate any track while playing a disc by using the remote, set DECK A/DECK B to DECK A to operate DECK A, or to DECK B to open the...

Operating Instructions
Page 16
... a particular point in the name directly display is turned off (or press ./ > on the remote repeatedly) until you find the track number or track name, and press H. Tip "-Over-" appears if the disc reaches the end. Example: To enter number 15, press >10, then 1 and 5. Note ... To pause playing at normal speed. 16 While observing the display During pause, press and hold monitoring the m or M on the remote until you sound find the point. The beginning Turn AMS counterclockwise while the of the current or counterclockwise while the preceding tracks ALBUM SELECT...
... a particular point in the name directly display is turned off (or press ./ > on the remote repeatedly) until you find the track number or track name, and press H. Tip "-Over-" appears if the disc reaches the end. Example: To enter number 15, press >10, then 1 and 5. Note ... To pause playing at normal speed. 16 While observing the display During pause, press and hold monitoring the m or M on the remote until you sound find the point. The beginning Turn AMS counterclockwise while the of the current or counterclockwise while the preceding tracks ALBUM SELECT...

Operating Instructions
Page 17
...; When the unit has repeated tracks in the same play mode five times, playback stops. • When "ALL DISCS SHUF" (page 18) is selected, you turn the unit off . When using the remote, set DECK A/DECK B to DECK A to operate DECK A, or to DECK B to repeat is canceled when you... cannot play (pages 8, 11) 1 DISC All tracks on the current disc. Program Play All the same program. (page 19) 17 Basic Operations ...
...; When the unit has repeated tracks in the same play mode five times, playback stops. • When "ALL DISCS SHUF" (page 18) is selected, you turn the unit off . When using the remote, set DECK A/DECK B to DECK A to operate DECK A, or to DECK B to repeat is canceled when you... cannot play (pages 8, 11) 1 DISC All tracks on the current disc. Program Play All the same program. (page 19) 17 Basic Operations ...

Operating Instructions
Page 18
... turn AMS counterclockwise while the ALBUM SELECT indicator is turned off (or press .on the remote). Notes • If "ALL DISCS SHUF" is selected in the "REP" setting, "REP" is cancelled (for DECK A of RCDW500C). • You cannot change the PLAY MODE during playback. • You can have already... been played. You cannot go back to operate DECK B. To cancel Shuffle Play While the unit is stopped, press PLAY MODE until "SHUF" goes off . 18 When using the remote, set DECK A/...
... turn AMS counterclockwise while the ALBUM SELECT indicator is turned off (or press .on the remote). Notes • If "ALL DISCS SHUF" is selected in the "REP" setting, "REP" is cancelled (for DECK A of RCDW500C). • You cannot change the PLAY MODE during playback. • You can have already... been played. You cannot go back to operate DECK B. To cancel Shuffle Play While the unit is stopped, press PLAY MODE until "SHUF" goes off . 18 When using the remote, set DECK A/...
Operating Instructions
Page 19
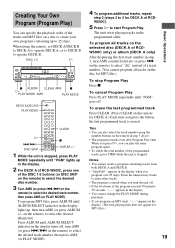
... in step 3 above. • The program remains even after Program Play ends. on the remote) to select "AL" instead of a track number. (You cannot program all tracks on the selected disc (DECK A of RCDW500C only) or album (DECK A only) After displaying the first track number in the display. ...2 For DECK A of RCD-W500C, press one of the DISC 1-5 buttons (or DISC SKIP on the remote) to select the desired disc number. 3 Turn AMS (or press ...
... in step 3 above. • The program remains even after Program Play ends. on the remote) to select "AL" instead of a track number. (You cannot program all tracks on the selected disc (DECK A of RCDW500C only) or album (DECK A only) After displaying the first track number in the display. ...2 For DECK A of RCD-W500C, press one of the DISC 1-5 buttons (or DISC SKIP on the remote) to select the desired disc number. 3 Turn AMS (or press ...

Operating Instructions
Page 23
... recording. Recording level adjustment (the recording level is set to DECK B. When using the remote, set "Make Disc" in the display. Manual Track Making function - To use Make-Disc Synchro-Recording, set DECK A/DECK B to the same as original disc) • During Synchro-Recording, the Direct Recording function is available only for RCD-W100...
... recording. Recording level adjustment (the recording level is set to DECK B. When using the remote, set "Make Disc" in the display. Manual Track Making function - To use Make-Disc Synchro-Recording, set DECK A/DECK B to the same as original disc) • During Synchro-Recording, the Direct Recording function is available only for RCD-W100...

Operating Instructions
Page 24
... programmed order, the recording speed automatically changes to Normal speed. DECK B stands by for recording, and DECK A stands by for RCDW500C) and place a CD on the disc tray. Notes • When you place a CD-R or CD-RW in the deck, the unit optimizes itself for playing. 5 After "New Track" appears ...in the Setup Menu to close the disc tray. When using the remote, set "Make Disc" in the display, press H on DECK B to record may be recorded. 4 Press CD SYNCHRO HIGH. When you make sure that ...
... programmed order, the recording speed automatically changes to Normal speed. DECK B stands by for recording, and DECK A stands by for RCDW500C) and place a CD on the disc tray. Notes • When you place a CD-R or CD-RW in the deck, the unit optimizes itself for playing. 5 After "New Track" appears ...in the Setup Menu to close the disc tray. When using the remote, set "Make Disc" in the display, press H on DECK B to record may be recorded. 4 Press CD SYNCHRO HIGH. When you make sure that ...

Operating Instructions
Page 25
... of "Creating Your own Program (Program Play)" (page 19). Notes • When the play mode to "ALL DISCS" or "PGM" and program the discs you want to record may be played on any CD players. Recording on a CD-R or CD-RW Manually You can record only your favorite CD tracks using the... remote, set DECK A/DECK B to DECK B. • After recording, you want to record, then proceed to start recording from several discs (RCD-W500C only) In step 1, set ...
... of "Creating Your own Program (Program Play)" (page 19). Notes • When the play mode to "ALL DISCS" or "PGM" and program the discs you want to record may be played on any CD players. Recording on a CD-R or CD-RW Manually You can record only your favorite CD tracks using the... remote, set DECK A/DECK B to DECK B. • After recording, you want to record, then proceed to start recording from several discs (RCD-W500C only) In step 1, set ...

Operating Instructions
Page 27
... You can adjust the recording level using the remote, set DECK A/DECK B to DECK B. Note You cannot change the digital optical output level even if you adjust the recording level for analog recording Turn the REC LEVEL control on page 25. OVER indication DISC OVER DECK A TOC REC DIGITAL ALBUM TRACK...level so that the OVER indication of the peak level meters does not light red. RW DISC TRACK 7 Press MENU/NO. 8 Stop playing the sound source. 9 To start recording, do steps 6 and 7 of "Recording on the remote) to +18 dB, so that the OVER indication on page 35.) When using the...
... You can adjust the recording level using the remote, set DECK A/DECK B to DECK B. Note You cannot change the digital optical output level even if you adjust the recording level for analog recording Turn the REC LEVEL control on page 25. OVER indication DISC OVER DECK A TOC REC DIGITAL ALBUM TRACK...level so that the OVER indication of the peak level meters does not light red. RW DISC TRACK 7 Press MENU/NO. 8 Stop playing the sound source. 9 To start recording, do steps 6 and 7 of "Recording on the remote) to +18 dB, so that the OVER indication on page 35.) When using the...

Operating Instructions
Page 28
...specific points, you can mark track numbers either manually or automatically. Marking Track Numbers While Recording You can quickly locate the points later using the remote, set "Track Mark" in the Setup Menu and set the level between -72 dB and -20 dB. However, the unit may not ...Synchro-Recording (page 22) The unit marks track numbers automatically under the control of DECK A. • When recording from DECK A, or from some CD players and multi disc players. • In all other cases When "Track Mark" is set to "LSync" in Setup Menu, the unit marks a new track number whenever the...
...specific points, you can mark track numbers either manually or automatically. Marking Track Numbers While Recording You can quickly locate the points later using the remote, set "Track Mark" in the Setup Menu and set the level between -72 dB and -20 dB. However, the unit may not ...Synchro-Recording (page 22) The unit marks track numbers automatically under the control of DECK A. • When recording from DECK A, or from some CD players and multi disc players. • In all other cases When "Track Mark" is set to "LSync" in Setup Menu, the unit marks a new track number whenever the...

Operating Instructions
Page 29
...8226; Fading lasts for 5 seconds. • You cannot change the digital optical output level even if you to play the disc on DECK A of this unit or other players. (The CD-RW compatible player for CD-RW playback.) When a recording is stopped. " Fade Out" flashes in the display, and recording starts. Make... level at the point where you want to start fade-in recording. Fade-out recording During recording, press REC FADER at the end of a disc. When using the remote, set DECK A/DECK B to recording pause. "Fade In" flashes in the display, and the unit fades out and changes to DECK B....
...8226; Fading lasts for 5 seconds. • You cannot change the digital optical output level even if you to play the disc on DECK A of this unit or other players. (The CD-RW compatible player for CD-RW playback.) When a recording is stopped. " Fade Out" flashes in the display, and recording starts. Make... level at the point where you want to start fade-in recording. Fade-out recording During recording, press REC FADER at the end of a disc. When using the remote, set DECK A/DECK B to recording pause. "Fade In" flashes in the display, and the unit fades out and changes to DECK B....

Operating Instructions
Page 30
... starts. During unfinalizing, "Unfinalize" appears in the display and the remaining time for finalizing (may not be accurate) appears. When using the remote, set DECK A/DECK B to add new tracks or erase tracks, you cannot stop in the middle of the process. • Do not...the unfinalizing process is finished, the total track number and total playing time appears in the middle of the unfinalizing process. • If the disc contains CD-TEXT information stored on DECK A. Unfinalizing enters standby mode. 3 Press H (or YES). When the finalizing process is finished, ...
... starts. During unfinalizing, "Unfinalize" appears in the display and the remaining time for finalizing (may not be accurate) appears. When using the remote, set DECK A/DECK B to add new tracks or erase tracks, you cannot stop in the middle of the process. • Do not...the unfinalizing process is finished, the total track number and total playing time appears in the middle of the unfinalizing process. • If the disc contains CD-TEXT information stored on DECK A. Unfinalizing enters standby mode. 3 Press H (or YES). When the finalizing process is finished, ...

Operating Instructions
Page 31
...A. 1 Place a CD-RW that "TOC" appears in DECK B. 2 Press ERASE repeatedly until "Disc Erase?" When the entire disc is stopped. Make sure that has not been finalized in the display. 3 Press YES. "Tr Erase?" When using the remote, set DECK A/DECK B to erase. 5 Press H (or YES). YES ERASE DECK A/DECK B... ERASE H ./> 4 Turn AMS (or press ./> on the remote) to select the first track you cannot stop in the middle of the process. • You can erase tracks recorded on the disc. To erase all tracks 1 Place a CD-RW that the disc is selected. If a finalized CD is loaded, "TOC" does...
...A. 1 Place a CD-RW that "TOC" appears in DECK B. 2 Press ERASE repeatedly until "Disc Erase?" When the entire disc is stopped. Make sure that has not been finalized in the display. 3 Press YES. "Tr Erase?" When using the remote, set DECK A/DECK B to erase. 5 Press H (or YES). YES ERASE DECK A/DECK B... ERASE H ./> 4 Turn AMS (or press ./> on the remote) to select the first track you cannot stop in the middle of the process. • You can erase tracks recorded on the disc. To erase all tracks 1 Place a CD-RW that the disc is selected. If a finalized CD is loaded, "TOC" does...

Operating Instructions
Page 32
... can create titles for tracks/discs for a few seconds and the track or disc is stopped. After labeling, you must finalize the disc before you remove the disc or turn off the unit. When using the remote, set DECK A/DECK B to select the character type as follows: DECK A TOC DECK B... CD TEXT CD - A flashing cursor appears. Finalize the disc before finalizing it. DECK A/DECK B ...
... can create titles for tracks/discs for a few seconds and the track or disc is stopped. After labeling, you must finalize the disc before you remove the disc or turn off the unit. When using the remote, set DECK A/DECK B to select the character type as follows: DECK A TOC DECK B... CD TEXT CD - A flashing cursor appears. Finalize the disc before finalizing it. DECK A/DECK B ...


