Operating Instructions
Page 1
PS-LX250H Serial No PS-LX250H © 1999 Sony Corporation 1GB Model No. Record the serial number in the space provided below. Refer to them whenever you call upon your Sony dealer regarding this product. 3-866-873-13(1) Stereo Turntable System Operating Instructions GB Mode d'emploi FR OWNER'S RECORD The model and serial numbers are located at the rear.
PS-LX250H Serial No PS-LX250H © 1999 Sony Corporation 1GB Model No. Record the serial number in the space provided below. Refer to them whenever you call upon your Sony dealer regarding this product. 3-866-873-13(1) Stereo Turntable System Operating Instructions GB Mode d'emploi FR OWNER'S RECORD The model and serial numbers are located at the rear.
Operating Instructions
Page 2
... outlet, even if the unit itself . • The unit is not disconnected from direct sunlight, extremes of time. is connected to be used for an extended period of temperature, and excessive dust and moisture. Precautions On safety • Before operating the unit, check that the operating voltage of your unit is identical with that of your local power supply. • Should any...
... outlet, even if the unit itself . • The unit is not disconnected from direct sunlight, extremes of time. is connected to be used for an extended period of temperature, and excessive dust and moisture. Precautions On safety • Before operating the unit, check that the operating voltage of your unit is identical with that of your local power supply. • Should any...
Operating Instructions
Page 3
... unit, please read this manual: Indicates hints and tips for making the task easier. TABLE OF CONTENTS Getting Started Unpacking 3 Assembling the Turntable 4 Hooking up the Turntable 4 Operations Playing a Record 5 Additional Information Maintenance 6 Troubleshooting 7 Specifications 7 Parts and Controls 8 GB Unpacking Check that you for future reference. Thank you received the following icon is used in this manual thoroughly and retain it for purchasing the Sony Stereo...
... unit, please read this manual: Indicates hints and tips for making the task easier. TABLE OF CONTENTS Getting Started Unpacking 3 Assembling the Turntable 4 Hooking up the Turntable 4 Operations Playing a Record 5 Additional Information Maintenance 6 Troubleshooting 7 Specifications 7 Parts and Controls 8 GB Unpacking Check that you for future reference. Thank you received the following icon is used in this manual thoroughly and retain it for purchasing the Sony Stereo...
Operating Instructions
Page 4
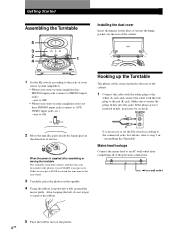
... the platter even if START is necessary to set the EQ switch according to step 1 in the direction of the cabinet. 1 Connect the cable with the white plug to the white (L) jack and connect the cable with the red plug to the red (R) jack. Make sure to remove the ribbon. For details, refer to the connected jacks. ON OFF 2 Move the metallic parts inside the larger gear...
... the platter even if START is necessary to set the EQ switch according to step 1 in the direction of the cabinet. 1 Connect the cable with the white plug to the white (L) jack and connect the cable with the red plug to the red (R) jack. Make sure to remove the ribbon. For details, refer to the connected jacks. ON OFF 2 Move the metallic parts inside the larger gear...
Operating Instructions
Page 5
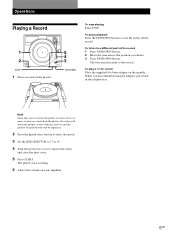
... UP/DOWN button to the record. To listen to a different part of reproduction will be impaired. 2 Press the Speed select button to select the speed. 3 Set the SIZE SELECTOR to 17 or 30. 4 Turn the protective cover to the position you have finished using the adaptor, put it back in the adaptor tray. The platter starts rotating. 6 Adjust the volume on...
... UP/DOWN button to the record. To listen to a different part of reproduction will be impaired. 2 Press the Speed select button to select the speed. 3 Set the SIZE SELECTOR to 17 or 30. 4 Turn the protective cover to the position you have finished using the adaptor, put it back in the adaptor tray. The platter starts rotating. 6 Adjust the volume on...
Operating Instructions
Page 6
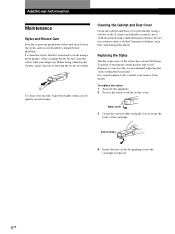
... stylus too much. To clean your records, we recommend replacing the stylus within this time limit. Do not use a cloth moistened with your nearest Sony dealer. Do not clean the stylus with a mild detergent solution. For a replacement stylus, consult your finger tip. Additional Information Maintenance Stylus and Record Care In order to remove, use solvents such as alcohol, benzine...
... stylus too much. To clean your records, we recommend replacing the stylus within this time limit. Do not use a cloth moistened with your nearest Sony dealer. Do not clean the stylus with a mild detergent solution. For a replacement stylus, consult your finger tip. Additional Information Maintenance Stylus and Record Care In order to remove, use solvents such as alcohol, benzine...
Operating Instructions
Page 7
... 50 dB (DIN-B) Tone Arm Type Effective arm length Dynamic balanced straight shaped with a commercially available record cleaning kit, or replace the record. Tempo is dirty or worn. The drive belt is broken. Additional Information Troubleshooting Before going through the check list below, first make sure that: • The power cord is securely connected. • The speaker cords are transmitted through the...
... 50 dB (DIN-B) Tone Arm Type Effective arm length Dynamic balanced straight shaped with a commercially available record cleaning kit, or replace the record. Tempo is dirty or worn. The drive belt is broken. Additional Information Troubleshooting Before going through the check list below, first make sure that: • The power cord is securely connected. • The speaker cords are transmitted through the...
Operating Instructions
Page 8
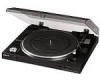
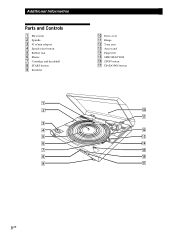
Additional Information Parts and Controls 1 EQ switch 2 Spindle 3 45 r/min adaptor 4 Speed select button 5 Rubber mat 6 Platter 7 Cartridge and headshell 8 START button 9 Insulator 0 Dust cover !¡ Hinge !™ Tone arm !£ Arm stand !¢ Finger lift !∞ SIZE SELECTOR !§ STOP button !¶ UP/DOWN button 1 2 0 !¡ 3 4 !™ 5 !£ 6 !¢ 7 !∞ 8 !§ 9 !¶ 8GB
Additional Information Parts and Controls 1 EQ switch 2 Spindle 3 45 r/min adaptor 4 Speed select button 5 Rubber mat 6 Platter 7 Cartridge and headshell 8 START button 9 Insulator 0 Dust cover !¡ Hinge !™ Tone arm !£ Arm stand !¢ Finger lift !∞ SIZE SELECTOR !§ STOP button !¶ UP/DOWN button 1 2 0 !¡ 3 4 !™ 5 !£ 6 !¢ 7 !∞ 8 !§ 9 !¶ 8GB


