

Quick Start Guide
Page 1
... Acrobat needs to be able to turn on the launcher. eBook Library software - Quick Start Guide Guide de démarrage PRS-700 Portable Reader System ©2008 Sony Corporation Printed in China 4-120-383-11(1) English About the serial number The serial number provided for this unit is not covered by... the Home menu. Touch panel The touch panel gives you simple access to the various functions on content type compatible with Soft cover and Stylus) (1) • USB cable (1) • CD-ROM (1) - If the battery has been fully depleted, it fully to the bottom of the holder. ...
... Acrobat needs to be able to turn on the launcher. eBook Library software - Quick Start Guide Guide de démarrage PRS-700 Portable Reader System ©2008 Sony Corporation Printed in China 4-120-383-11(1) English About the serial number The serial number provided for this unit is not covered by... the Home menu. Touch panel The touch panel gives you simple access to the various functions on content type compatible with Soft cover and Stylus) (1) • USB cable (1) • CD-ROM (1) - If the battery has been fully depleted, it fully to the bottom of the holder. ...
Users Guide
Page 9
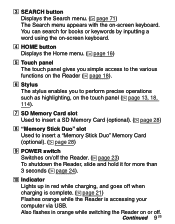
...Displays the Home menu. ( page 16) Touch panel The touch panel gives you simple access to the various functions on the Reader ( page 18). Stylus The stylus enables you to perform precise operations such as highlighting, on the touch panel ( page 13, 18, 114). SD Memory ... "Memory Stick Duo" slot Used to insert a "Memory Stick Duo" Memory Card (optional). ( page 28) POWER switch Switches on/off the Reader. ( page 23) To shutdown the Reader, slide and hold it for more than 3 seconds ( page 24). Indicator Lights up in orange while switching the...
...Displays the Home menu. ( page 16) Touch panel The touch panel gives you simple access to the various functions on the Reader ( page 18). Stylus The stylus enables you to perform precise operations such as highlighting, on the touch panel ( page 13, 18, 114). SD Memory ... "Memory Stick Duo" slot Used to insert a "Memory Stick Duo" Memory Card (optional). ( page 28) POWER switch Switches on/off the Reader. ( page 23) To shutdown the Reader, slide and hold it for more than 3 seconds ( page 24). Indicator Lights up in orange while switching the...

Users Guide
Page 13
Note When you use it fully to the bottom of the Reader. Removing the supplied stylus The supplied stylus is stored on the right side of the holder. 13 US Pull it out from the top when you put the supplied stylus back into the holder, make sure to insert it .
Note When you use it fully to the bottom of the Reader. Removing the supplied stylus The supplied stylus is stored on the right side of the holder. 13 US Pull it out from the top when you put the supplied stylus back into the holder, make sure to insert it .
Users Guide
Page 18
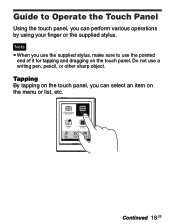
Do not use the pointed end of it for tapping and dragging on the menu or list, etc. Continued 18 US Guide to use a writing pen, pencil, or other sharp object. Note When you use the supplied stylus, make sure to Operate the Touch Panel Using the touch panel, you can perform various operations by using your finger or the supplied stylus. Tapping By tapping on the touch panel, you can select an item on the touch panel.
Do not use the pointed end of it for tapping and dragging on the menu or list, etc. Continued 18 US Guide to use a writing pen, pencil, or other sharp object. Note When you use the supplied stylus, make sure to Operate the Touch Panel Using the touch panel, you can perform various operations by using your finger or the supplied stylus. Tapping By tapping on the touch panel, you can select an item on the touch panel.

Users Guide
Page 26
...US The touch panel calibration screen appears. Calibration is necessary to use the supplied stylus for the first time after purchase, the touch panel calibration screen appears. Calibrating the Touch Panel When the Reader is displayed at the upper left corner of it, calibrate the touch panel ...from "Touch Panel" in the Advanced Settings menu. ( page 112) Note Make sure to select targets accurately on the Reader.
...US The touch panel calibration screen appears. Calibration is necessary to use the supplied stylus for the first time after purchase, the touch panel calibration screen appears. Calibrating the Touch Panel When the Reader is displayed at the upper left corner of it, calibrate the touch panel ...from "Touch Panel" in the Advanced Settings menu. ( page 112) Note Make sure to select targets accurately on the Reader.

Users Guide
Page 27
If your tap missed the center of target If an error was detected during the calibration steps, a message will appear and prompt you tap the target, the position of the target moves. Each time you to the lower right corner. The target moves to restart the calibration process again. 27 US Continue to tap the target until the calibration process is completed. Tap the target using the supplied stylus.
If your tap missed the center of target If an error was detected during the calibration steps, a message will appear and prompt you tap the target, the position of the target moves. Each time you to the lower right corner. The target moves to restart the calibration process again. 27 US Continue to tap the target until the calibration process is completed. Tap the target using the supplied stylus.

Users Guide
Page 114
...of a paper clip. Be sure to attach again after using it detached from the supplied stylus Twist the tip until it . Removing the tip from the supplied stylus. Troubleshooting Troubleshooting If the Reader does not function as expected, try the following steps to resolve the issue. Reset... the Reader by resetting, and no information is stored in the body. Use to push ...
...of a paper clip. Be sure to attach again after using it detached from the supplied stylus Twist the tip until it . Removing the tip from the supplied stylus. Troubleshooting Troubleshooting If the Reader does not function as expected, try the following steps to resolve the issue. Reset... the Reader by resetting, and no information is stored in the body. Use to push ...

Users Guide
Page 134
... panel with it. Use the supplied stylus only for the operations on the touch panel. Do not use the damaged or deformed stylus. Depending on device. The capacity of the text and characters, the text shown on the Reader may not be displayed properly on the types of... the Reader. - Content information is written in the language or the character that ...
... panel with it. Use the supplied stylus only for the operations on the touch panel. Do not use the damaged or deformed stylus. Depending on device. The capacity of the text and characters, the text shown on the Reader may not be displayed properly on the types of... the Reader. - Content information is written in the language or the character that ...

Users Guide
Page 138
...of the content beyond this limit requires permission of the copyright holders. Sony is limited to problems of the Reader or computer. 138 US On Cleaning Clean the case of the Reader with a soft cloth, such as a cleaning cloth for incomplete recording/downloading or... damaged data due to private use any questions or problems concerning the Reader, consult your nearest Sony dealer. Wipe the stylus with a dry cloth when it with a soft cloth slightly moistened with water or a mild detergent solution. ...
...of the content beyond this limit requires permission of the copyright holders. Sony is limited to problems of the Reader or computer. 138 US On Cleaning Clean the case of the Reader with a soft cloth, such as a cleaning cloth for incomplete recording/downloading or... damaged data due to private use any questions or problems concerning the Reader, consult your nearest Sony dealer. Wipe the stylus with a dry cloth when it with a soft cloth slightly moistened with water or a mild detergent solution. ...

Users Guide
Page 145
S SD Memory Card 28, 135 SEARCH button 9 Search menu 71 Setting 106 About 111 Date and Time 109 Page Turn Gesture 110 Power Management............109 Restore Defaults 111 Slideshow 110 Slideshow 105 Sort 53, 90, 93, 98, 104 Stylus 9, 13 Synchronizing 45 V Vertical 69 View 53, 98, 104 VOL -/+ button 11, 97 Z Zoom in/out 64, 103 T Table of Contents 56 Tool bar 78, 80, 82 Touch Panel 9 Transfer 38 Troubleshooting 114 U Updating 126 USB 39 USB connector 11, 39 145 US
S SD Memory Card 28, 135 SEARCH button 9 Search menu 71 Setting 106 About 111 Date and Time 109 Page Turn Gesture 110 Power Management............109 Restore Defaults 111 Slideshow 110 Slideshow 105 Sort 53, 90, 93, 98, 104 Stylus 9, 13 Synchronizing 45 V Vertical 69 View 53, 98, 104 VOL -/+ button 11, 97 Z Zoom in/out 64, 103 T Table of Contents 56 Tool bar 78, 80, 82 Touch Panel 9 Transfer 38 Troubleshooting 114 U Updating 126 USB 39 USB connector 11, 39 145 US
