
Operating Instructions
Page 2
... have any interference received, including interference that the product needs adjustment or modification. Thank you call : Sony Customer Information Services Center 1-800-222-7669 or http://www.sony.com/ Declaration of fire or electric shock, do not place lighted candles on the apparatus. Do not...ANY PRODUCT. Please consult with part 15 of the battery used to power this product. Product registration Please register this apparatus to rain or moisture. Owner's Record The model number is located at www.sony.com/productregistration Proper registration will also allow us to send ...
... have any interference received, including interference that the product needs adjustment or modification. Thank you call : Sony Customer Information Services Center 1-800-222-7669 or http://www.sony.com/ Declaration of fire or electric shock, do not place lighted candles on the apparatus. Do not...ANY PRODUCT. Please consult with part 15 of the battery used to power this product. Product registration Please register this apparatus to rain or moisture. Owner's Record The model number is located at www.sony.com/productregistration Proper registration will also allow us to send ...

Operating Instructions
Page 3
...METAL HYDRIDE BATTERIES Nickel Metal Hydride batteries are identical. You can radiate radio frequency energy and, if not installed and used rechargeable batteries to provide reasonable protection against harmful interference in a particular installation. If this equipment does cause harmful interference ...the equipment and receiver. - You are cautioned that any changes or modifications not expressly approved in this manual could void your used in Japan, the display indications may cause harmful interference to Part 15 of the following measures: - These limits are written...
...METAL HYDRIDE BATTERIES Nickel Metal Hydride batteries are identical. You can radiate radio frequency energy and, if not installed and used rechargeable batteries to provide reasonable protection against harmful interference in a particular installation. If this equipment does cause harmful interference ...the equipment and receiver. - You are cautioned that any changes or modifications not expressly approved in this manual could void your used in Japan, the display indications may cause harmful interference to Part 15 of the following measures: - These limits are written...

Operating Instructions
Page 4
...place the appliance in a confined space, such as a bookcase, or built-in the cabinet are unable to direct sunlight. Grounding or Polarization - Do not use - Use only a cart, stand, tripod, bracket, or table recommended by the cord. Follow the instructions below: • For the appliance with a polarized AC ... three-wire grounding type AC plug: This plug will fit into the outlet, try reversing the plug. Never pull the plug out by Sony. Do not place the appliance on the marking label. IMPORTANT SAFEGUARDS For your protection, please read these slots and openings must never be...
...place the appliance in a confined space, such as a bookcase, or built-in the cabinet are unable to direct sunlight. Grounding or Polarization - Do not use - Use only a cart, stand, tripod, bracket, or table recommended by the cord. Follow the instructions below: • For the appliance with a polarized AC ... three-wire grounding type AC plug: This plug will fit into the outlet, try reversing the plug. Never pull the plug out by Sony. Do not place the appliance on the marking label. IMPORTANT SAFEGUARDS For your protection, please read these slots and openings must never be...
Operating Instructions
Page 5
... the appliance due to perform routine safety checks (as specified by Sony, as the original parts. Improper adjustment of the appliance. Replacement parts - Lightning - Do not use liquid cleaners or aerosol cleaners. Use a cloth lightly dampened with water for this appliance during a lightning... service. - Unauthorized substitutions may touch dangerous voltage points or short out parts that it . Cleaning - Do not use attachments not recommended by Sony) to dangerous voltage or other hazards. Route the power cord so that could result in performance. - When the ...
... the appliance due to perform routine safety checks (as specified by Sony, as the original parts. Improper adjustment of the appliance. Replacement parts - Lightning - Do not use liquid cleaners or aerosol cleaners. Use a cloth lightly dampened with water for this appliance during a lightning... service. - Unauthorized substitutions may touch dangerous voltage points or short out parts that it . Cleaning - Do not use attachments not recommended by Sony) to dangerous voltage or other hazards. Route the power cord so that could result in performance. - When the ...

Operating Instructions
Page 7
Overview Getting Started Recording Operations after Recording Menu Operations Using the menu display ...34 Menu items ...35 REC MODE (Sampling frequency/quantifying bit number) LIMITER (Preventing distortion) 200Hz HPF (High ...) FORMAT (Initializing memory) LED (Indicator lighting) CLOCK (Date/time setting) MEMORY (Recording/playback memory) FOLDER (Recording/playback folder) Additional Information Using a "Memory Stick PRO (High Speed)" (not supplied 38 Maintenance ...40 Troubleshooting ...41 Specifications...46 File specifications ...48 Index...50 7 Menu Operations Additional ...
Overview Getting Started Recording Operations after Recording Menu Operations Using the menu display ...34 Menu items ...35 REC MODE (Sampling frequency/quantifying bit number) LIMITER (Preventing distortion) 200Hz HPF (High ...) FORMAT (Initializing memory) LED (Indicator lighting) CLOCK (Date/time setting) MEMORY (Recording/playback memory) FOLDER (Recording/playback folder) Additional Information Using a "Memory Stick PRO (High Speed)" (not supplied 38 Maintenance ...40 Troubleshooting ...41 Specifications...46 File specifications ...48 Index...50 7 Menu Operations Additional ...

Operating Instructions
Page 10
... mechanism and is positioned and the front and rear openings are positioned using the XY pattern and then angled toward each other with 100-micron level precision. This makes it possible to employ a highly sensitive microphone to nearly -30 kHz, achieving a sampling rate of motor noise.... The recorded sound has depth and perspective and projects a natural stereo image. 10 In addition, the frequency response of the microphone is used as a component. Peaks and dips in the microphone unit. This performance is barely affected even when the supplied windscreen is improved to be...
... mechanism and is positioned and the front and rear openings are positioned using the XY pattern and then angled toward each other with 100-micron level precision. This makes it possible to employ a highly sensitive microphone to nearly -30 kHz, achieving a sampling rate of motor noise.... The recorded sound has depth and perspective and projects a natural stereo image. 10 In addition, the frequency response of the microphone is used as a component. Peaks and dips in the microphone unit. This performance is barely affected even when the supplied windscreen is improved to be...
Operating Instructions
Page 12
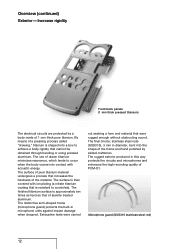
... surface of pure titanium material undergoes a process that cannot be obtained through bending or using pressed aluminum. Overview (continued) Exterior-Increase rigidity Front/back panels (1 mm thick pressed titanium) The electrical circuits are protected by skilled craftsmen. Microphone guard (SUS316 stainless steel rod) 12 By means of 1 mm thick pure titanium. The...
... surface of pure titanium material undergoes a process that cannot be obtained through bending or using pressed aluminum. Overview (continued) Exterior-Increase rigidity Front/back panels (1 mm thick pressed titanium) The electrical circuits are protected by skilled craftsmen. Microphone guard (SUS316 stainless steel rod) 12 By means of 1 mm thick pure titanium. The...

Operating Instructions
Page 18
... • CD-ROM ("DigiOnSound5"* and "Driver for the wrist strap on the right side of each application. • Operating Instructions (this book) To use the wrist strap Attach the wrist strap to 29), slip the cord(s) through the wrist strap and tighten the stopper as shown below. When an... optional headphone, external microphone, audio cable, etc., is connected to the recorder (pages 26 to the slit for Windows 2000") * For instructions, refer to the help function...
... • CD-ROM ("DigiOnSound5"* and "Driver for the wrist strap on the right side of each application. • Operating Instructions (this book) To use the wrist strap Attach the wrist strap to 29), slip the cord(s) through the wrist strap and tighten the stopper as shown below. When an... optional headphone, external microphone, audio cable, etc., is connected to the recorder (pages 26 to the slit for Windows 2000") * For instructions, refer to the help function...

Operating Instructions
Page 19
Battery case Getting Started 2 Connect the battery charger to 7. To use the recorder with the and ends in the right position. 7 Insert the battery case back into the recorder, and close the battery compartment ... the room temperature. (If the room temperature is low, the required charging time will be longer. Follow steps 4 to a wall outlet. Step 1: Preparing a power source Use the supplied size AA (LR06) nickel metal hydride rechargeable batteries after charging them. 1 Insert the four rechargeable batteries into the battery case. The CHARGE lamps...
Battery case Getting Started 2 Connect the battery charger to 7. To use the recorder with the and ends in the right position. 7 Insert the battery case back into the recorder, and close the battery compartment ... the room temperature. (If the room temperature is low, the required charging time will be longer. Follow steps 4 to a wall outlet. Step 1: Preparing a power source Use the supplied size AA (LR06) nickel metal hydride rechargeable batteries after charging them. 1 Insert the four rechargeable batteries into the battery case. The CHARGE lamps...

Operating Instructions
Page 20
... capacity decreases and battery life becomes shorter in memory. Getting Started (continued) When you turn on the AC power adaptor Use only the supplied AC power adaptor. The indicator also appears when using Sony size AA (LR06) batteries under a temperature of the rechargeable batteries drops to half the normal length, the batteries should...
... capacity decreases and battery life becomes shorter in memory. Getting Started (continued) When you turn on the AC power adaptor Use only the supplied AC power adaptor. The indicator also appears when using Sony size AA (LR06) batteries under a temperature of the rechargeable batteries drops to half the normal length, the batteries should...

Operating Instructions
Page 21
... battery inserted, the date and time change to start operating the clock. 21 Getting Started Step 2: Setting the clock Recorded audio files (tracks) are named using the date and time of the internal clock. Then press the ENTER button after setting the seconds to the default settings. By setting the...
... battery inserted, the date and time change to start operating the clock. 21 Getting Started Step 2: Setting the clock Recorded audio files (tracks) are named using the date and time of the internal clock. Then press the ENTER button after setting the seconds to the default settings. By setting the...

Operating Instructions
Page 22
...; 90º 100 Hz 400 Hz 1 kHz 4 kHz 180º Figure 1: Directivity of sound that the built-in microphones gather 22 Records sound from the left; Example: Placement when recording a musical performance using the built-in microphones For best results, place the recorder about 2 to 3 m (6.56 to the characteristics of the built-in...
...; 90º 100 Hz 400 Hz 1 kHz 4 kHz 180º Figure 1: Directivity of sound that the built-in microphones gather 22 Records sound from the left; Example: Placement when recording a musical performance using the built-in microphones For best results, place the recorder about 2 to 3 m (6.56 to the characteristics of the built-in...

Operating Instructions
Page 23
...the "20" position. Usually set it to the hole on the back of the recorder and the microphones more precisely. Attach the tripod to the "0" position. To position the recorder using the tripod (not supplied) By attaching the tripod (not supplied), you can adjust angles of the ... PLAY/ENTER DIVIDE POWER ON OFF Tripod (not supplied) Recording 23 To switch the microphone input sensitivity Use the MIC ATT switch. It also prevents noise caused when holding the recorder in microphones with the supplied windscreen, you can reduce noise caused by wind or breath that directly...
...the "20" position. Usually set it to the hole on the back of the recorder and the microphones more precisely. Attach the tripod to the "0" position. To position the recorder using the tripod (not supplied) By attaching the tripod (not supplied), you can adjust angles of the ... PLAY/ENTER DIVIDE POWER ON OFF Tripod (not supplied) Recording 23 To switch the microphone input sensitivity Use the MIC ATT switch. It also prevents noise caused when holding the recorder in microphones with the supplied windscreen, you can reduce noise caused by wind or breath that directly...

Operating Instructions
Page 25
... will not occur. (Recording level is -12 to -1dB.) Red: Recording level is output, distortion may be recorded if an object, such as percussive sound, use the peak meter to the magnitude of the display When recording sound that the human ear can check the recording level on the analog level...
... will not occur. (Recording level is -12 to -1dB.) Red: Recording level is output, distortion may be recorded if an object, such as percussive sound, use the peak meter to the magnitude of the display When recording sound that the human ear can check the recording level on the analog level...

Operating Instructions
Page 26
... • If you turn up the volume excessively or place the headphones near the microphone while monitoring recording, the microphone may pick up the sound from the headphones, causing acoustic feedback (howling sound). • For best results, use encapsulated-type headphones, which have less sound leakage. 26 The volume of the recorder to...
... • If you turn up the volume excessively or place the headphones near the microphone while monitoring recording, the microphone may pick up the sound from the headphones, causing acoustic feedback (howling sound). • For best results, use encapsulated-type headphones, which have less sound leakage. 26 The volume of the recorder to...

Operating Instructions
Page 27
... LINE IN jack of the microphone. External microphone (not supplied) Recording from a Super Audio CD/CD player, etc. 1 Connect the audio output jacks of external equipment to the MIC jack of the recorder, and adjust the position of the recorder by using an optional Sony audio cable. Super Audio CD.../ CD player to the MIC jack to the LINE IN jack 2 Follow steps 2 to 5 of the external equipment. 5 Press the PAUSE or PLAY button where you want to connected microphone (not suitable for recording...
... LINE IN jack of the microphone. External microphone (not supplied) Recording from a Super Audio CD/CD player, etc. 1 Connect the audio output jacks of external equipment to the MIC jack of the recorder, and adjust the position of the recorder by using an optional Sony audio cable. Super Audio CD.../ CD player to the MIC jack to the LINE IN jack 2 Follow steps 2 to 5 of the external equipment. 5 Press the PAUSE or PLAY button where you want to connected microphone (not suitable for recording...

Operating Instructions
Page 29
... track Press the FR button once. Fast reverse Press and hold the FF button. Go back to the beginning of the recorder using an optional Sony audio cable or optical digital cable. AV amplifier/player to Press the FR button previous tracks repeatedly. Operations after pausing, press the ...
... track Press the FR button once. Fast reverse Press and hold the FF button. Go back to the beginning of the recorder using an optional Sony audio cable or optical digital cable. AV amplifier/player to Press the FR button previous tracks repeatedly. Operations after pausing, press the ...

Operating Instructions
Page 30
... a removable storage device. "PC CONNECT" appears in a computer Connect the recorder to a computer to save recorded tracks to the name of a computer and the recorder using the supplied USB connecting cable. You cannot operate the recorder while it is connected to the hard disk drive of characters (227 bytes without ".WAV...
... a removable storage device. "PC CONNECT" appears in a computer Connect the recorder to a computer to save recorded tracks to the name of a computer and the recorder using the supplied USB connecting cable. You cannot operate the recorder while it is connected to the hard disk drive of characters (227 bytes without ".WAV...

Operating Instructions
Page 31
...screen for a computer to be connected to the recorder • IBM PC/AT or compatible 1) - Read through the contents carefully. To use Windows 2000 Installation of the supplied driver is not supported. USB port - System requirements for the supplied software appears, close the screen. ... Edition 2005/ Windows® XP Media Center Edition 2004/ Windows® XP Media Center Edition/ Windows® XP Professional/ Windows® XP Home Edition/ Windows® 2000 Professional 2)3) (You cannot connect the recorder with Windows® 98, Windows® 95, Windows® ME, or Windows...
...screen for a computer to be connected to the recorder • IBM PC/AT or compatible 1) - Read through the contents carefully. To use Windows 2000 Installation of the supplied driver is not supported. USB port - System requirements for the supplied software appears, close the screen. ... Edition 2005/ Windows® XP Media Center Edition 2004/ Windows® XP Media Center Edition/ Windows® XP Professional/ Windows® XP Home Edition/ Windows® 2000 Professional 2)3) (You cannot connect the recorder with Windows® 98, Windows® 95, Windows® ME, or Windows...

Operating Instructions
Page 32
... and track files, see page 48. Note on the recorder, the 10 folders for each recording. If you record audio on folder name Do not use the computer to delete the "FOLDER 01" through "FOLDER 10" or change these files. 32 For details about the specifications of audio files, recording date...
... and track files, see page 48. Note on the recorder, the 10 folders for each recording. If you record audio on folder name Do not use the computer to delete the "FOLDER 01" through "FOLDER 10" or change these files. 32 For details about the specifications of audio files, recording date...

