Operating Instructions (primary manual)
Page 2
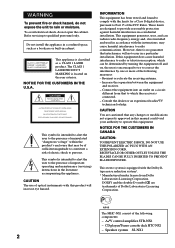
... separation between the equipment and receiver. - Connect the equipment into an outlet on a circuit different from Dolby Laboratories Licensing Corporation. This stereo system is intended to alert the user to qualified personnel only. Refer servicing to the presence of the following measures: - CAUTION You ...However, there is classified as a bookcase or built-in this equipment. NOTICE FOR THE CUSTOMERS IN THE U.S.A. The MHC-NX1 consist of important operating and maintenance (servicing) instructions in a residential installation. CD player/Stereo cassette deck HTC...
... separation between the equipment and receiver. - Connect the equipment into an outlet on a circuit different from Dolby Laboratories Licensing Corporation. This stereo system is intended to alert the user to qualified personnel only. Refer servicing to the presence of the following measures: - CAUTION You ...However, there is classified as a bookcase or built-in this equipment. NOTICE FOR THE CUSTOMERS IN THE U.S.A. The MHC-NX1 consist of important operating and maintenance (servicing) instructions in a residential installation. CD player/Stereo cassette deck HTC...

Operating Instructions (primary manual)
Page 4
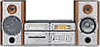
... tapes. 4 Getting Started Step 1: Hooking up the system Do the following procedure 1 to 5 to hook up the stereo system vertically Be sure to place the A/V control amplifier on top of the CD player/stereo cassette deck. If you set up your system using the supplied cords and accessories. FM antenna AM loop...
... tapes. 4 Getting Started Step 1: Hooking up the system Do the following procedure 1 to 5 to hook up the stereo system vertically Be sure to place the A/V control amplifier on top of the CD player/stereo cassette deck. If you set up your system using the supplied cords and accessories. FM antenna AM loop...
Operating Instructions (primary manual)
Page 8
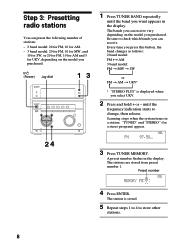
...Jog dial 13 - + 0 ) ≠ + - + g 24 n n 1 Press TUNER BAND repeatedly until the frequency indication starts to change, then release. Preset number TUNED STEREO 4 Press ENTER. The bands you can receive vary depending on the model you want appears in the display. Scanning stops when the system tunes in... the display. "TUNED" and "STEREO" (for UKV, depending on the model you press this button, the band changes as follows: 2 band model: FM ˜ AM 3 band...
...Jog dial 13 - + 0 ) ≠ + - + g 24 n n 1 Press TUNER BAND repeatedly until the frequency indication starts to change, then release. Preset number TUNED STEREO 4 Press ENTER. The bands you can receive vary depending on the model you want appears in the display. Scanning stops when the system tunes in... the display. "TUNED" and "STEREO" (for UKV, depending on the model you press this button, the band changes as follows: 2 band model: FM ˜ AM 3 band...

Operating Instructions (primary manual)
Page 9
... even if you erase a preset number, the preset number decreases by pressing 1/u. To cancel the Power Saving Mode Press DISPLAY. The clock display appears. 9 TUNED STEREO Saving the power in standby mode (U.S.A., Canadian and European models only) You can add a new preset number after the last preset number. When you unplug...
... even if you erase a preset number, the preset number decreases by pressing 1/u. To cancel the Power Saving Mode Press DISPLAY. The clock display appears. 9 TUNED STEREO Saving the power in standby mode (U.S.A., Canadian and European models only) You can add a new preset number after the last preset number. When you unplug...
Operating Instructions (primary manual)
Page 12
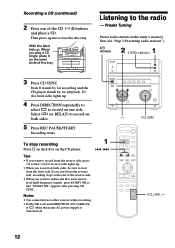
... on the CD player. 1 =/+ Tips • If you want to reduce the hiss noise in the tuner's memory first (see "Step 3: Presetting radio stations"). 1/u (Power) 2 1 STEREO/MONO 3 Press CD SYNC. If you want to start from the reverse side, press ª so that "DOLBY NR" appears after pressing CD SYNC. Recording...
... on the CD player. 1 =/+ Tips • If you want to reduce the hiss noise in the tuner's memory first (see "Step 3: Presetting radio stations"). 1/u (Power) 2 1 STEREO/MONO 3 Press CD SYNC. If you want to start from the reverse side, press ª so that "DOLBY NR" appears after pressing CD SYNC. Recording...
Operating Instructions (primary manual)
Page 13
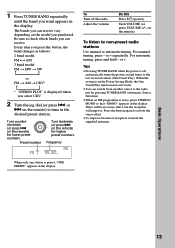
... or +. 1 Press TUNER BAND repeatedly until the band you want appears in the desired preset station. Every time you purchased. There will be no stereo effect, but the reception will improve. For automatic tuning, press and hold - on the model you press the button, the band changes as follows:... 2 band model: FM ˜ AM 3 band model: FM n MW n SW n or FM n AM n UKV* n * "STEREO PLUS" is noisy, press STEREO/ MONO so that "MONO" appears in the display. or + repeatedly. When the system is in the Power Saving Mode, the One Touch Play...
... or +. 1 Press TUNER BAND repeatedly until the band you want appears in the desired preset station. Every time you purchased. There will be no stereo effect, but the reception will improve. For automatic tuning, press and hold - on the model you press the button, the band changes as follows:... 2 band model: FM ˜ AM 3 band model: FM n MW n SW n or FM n AM n UKV* n * "STEREO PLUS" is noisy, press STEREO/ MONO so that "MONO" appears in the display. or + repeatedly. When the system is in the Power Saving Mode, the One Touch Play...
Operating Instructions (primary manual)
Page 14
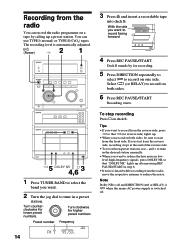
... at the end of the reverse side. • To record non-preset stations, use TYPE I (normal) or TYPE II (CrO2) tapes. Preset number Frequency TUNED STEREO MHz 14 3 Press § and insert a recordable tape into deck B. Recording starts. You can record the radio programme on both sides, be sure to start...
... at the end of the reverse side. • To record non-preset stations, use TYPE I (normal) or TYPE II (CrO2) tapes. Preset number Frequency TUNED STEREO MHz 14 3 Press § and insert a recordable tape into deck B. Recording starts. You can record the radio programme on both sides, be sure to start...
Operating Instructions (primary manual)
Page 38
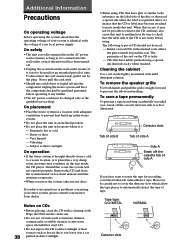
... connected to the wall outlet, even if the unit itself . • Should any solid object or liquid fall into the component, unplug the stereo system and have labels printed using . Never pull the cord itself has been turned off. • Unplug the system from the AC power source...cleaning cloth. CDs that the label side of the CD is not sticky before operating it any questions or problems concerning your stereo system, please consult your nearest Sony dealer. Cleaning the cabinet Use a soft cloth slightly moistened with adhesive tape. To remove the speaker grille Use both hands and...
... connected to the wall outlet, even if the unit itself . • Should any solid object or liquid fall into the component, unplug the stereo system and have labels printed using . Never pull the cord itself has been turned off. • Unplug the system from the AC power source...cleaning cloth. CDs that the label side of the CD is not sticky before operating it any questions or problems concerning your stereo system, please consult your nearest Sony dealer. Cleaning the cabinet Use a soft cloth slightly moistened with adhesive tape. To remove the speaker grille Use both hands and...

Operating Instructions (primary manual)
Page 39
... tape heads before you have contact with the tape every 20 to 30 hours of the speaker cord into any problem persist, consult your nearest Sony dealer. frequently. Should any problem using a tape longer than 90 minutes The tape is distorted - Redo the followings: - There is no ... during timer recording. 39 continued The tape may get entangled in the tape deck. the tape does not erase completely - When using this stereo system, use . the sound is very elastic. Troubleshooting If you run into the SPEAKER jack. Inserting the vinyl portion of the cleaning cassette...
... tape heads before you have contact with the tape every 20 to 30 hours of the speaker cord into any problem persist, consult your nearest Sony dealer. frequently. Should any problem using a tape longer than 90 minutes The tape is distorted - Redo the followings: - There is no ... during timer recording. 39 continued The tape may get entangled in the tape deck. the tape does not erase completely - When using this stereo system, use . the sound is very elastic. Troubleshooting If you run into the SPEAKER jack. Inserting the vinyl portion of the cleaning cassette...

Operating Instructions (primary manual)
Page 40
... CD is dirty. •The CD is in the direction of the system's sensor. •The batteries have reached the end of the CD player/stereo cassette deck. Press and hold 0 to turn off the power, leave the system turned off the TV set . Place the A/V control amplifier on after 15... to the stereo system. The remote does not function. •There is an obstacle between the remote and the system. •The remote is displayed. •You have...
... CD is dirty. •The CD is in the direction of the system's sensor. •The batteries have reached the end of the CD player/stereo cassette deck. Press and hold 0 to turn off the power, leave the system turned off the TV set . Place the A/V control amplifier on after 15... to the stereo system. The remote does not function. •There is an obstacle between the remote and the system. •The remote is displayed. •You have...
Operating Instructions (primary manual)
Page 41
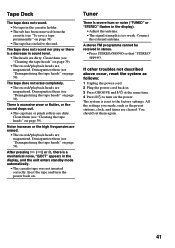
...as the preset stations, clock, and timer are dirty. The tape does not erase completely. • The record/playback heads are magnetized. A stereo FM programme cannot be received in the display). •Adjust the antenna. •The signal strength is reset to the end. Demagnetize them (..."Demagnetizing the tape heads" on page 39). Demagnetize them again. 41 There is severe hum or noise ("TUNED" or "STEREO" flashes in stereo. •Press STEREO/MONO so that "STEREO" appears. Tuner There is excessive wow or flutter, or the sound drops out. • The capstans or pinch rollers ...
...as the preset stations, clock, and timer are dirty. The tape does not erase completely. • The record/playback heads are magnetized. A stereo FM programme cannot be received in the display). •Adjust the antenna. •The signal strength is reset to the end. Demagnetize them (..."Demagnetizing the tape heads" on page 39). Demagnetize them again. 41 There is severe hum or noise ("TUNED" or "STEREO" flashes in stereo. •Press STEREO/MONO so that "STEREO" appears. Tuner There is excessive wow or flutter, or the sound drops out. • The capstans or pinch rollers ...
Operating Instructions (primary manual)
Page 42
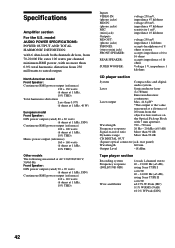
... 1 kHz, 10% THD) Inputs VIDEO IN: (phono jacks) MD IN: (phono jacks) MIC: (mini jack) Outputs MD OUT: (phono jacks) PHONES: (stereo mini jack) FRONT SPEAKER: REAR SPEAKER: SUPER WOOFER: voltage 250 mV, impedance 47 kilohms voltage 450 mV, impedance 47 kilohms sensitivity 1 mV, impedance 10 kilohms...-18 dBm Tape player section Recording system Frequency response (DOLBY NR OFF) Wow and flutter 4-track 2-channel stereo 40 - 13,000 Hz (±3 dB), using Sony TYPE I cassette 40 - 14,000 Hz (±3 dB), using Sony TYPE II cassette ±0.15% W.Peak (IEC) 0.1% W.RMS (NAB) ±0.2% W.Peak (DIN...
... 1 kHz, 10% THD) Inputs VIDEO IN: (phono jacks) MD IN: (phono jacks) MIC: (mini jack) Outputs MD OUT: (phono jacks) PHONES: (stereo mini jack) FRONT SPEAKER: REAR SPEAKER: SUPER WOOFER: voltage 250 mV, impedance 47 kilohms voltage 450 mV, impedance 47 kilohms sensitivity 1 mV, impedance 10 kilohms...-18 dBm Tape player section Recording system Frequency response (DOLBY NR OFF) Wow and flutter 4-track 2-channel stereo 40 - 13,000 Hz (±3 dB), using Sony TYPE I cassette 40 - 14,000 Hz (±3 dB), using Sony TYPE II cassette ±0.15% W.Peak (IEC) 0.1% W.RMS (NAB) ±0.2% W.Peak (DIN...
Operating Instructions (primary manual)
Page 43
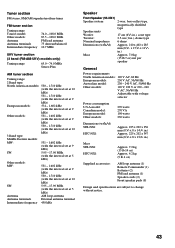
... MHz FM lead antenna 75 ohm unbalanced 10.7 MHz UKV tuner section (3 band (FM-AM-UKV) models only) Tuning range 65.0 - 74.0 MHz Stereo Plus AM tuner section Tuning range 2 Band type: North American models: 530 - 1,710 kHz (with the interval set at 10 kHz) 531 - 1,... Adjustable with voltage selector Power consumption U.S.A model: Canadian model: European model: Other models: 270 watts 270 VA 190 watts 230 watts Dimensions (w/h/d) STR-NX1: HTC-NX1: Mass STR-NX1: HTC-NX1: Approx. 225 x 202 x 356 mm (87/8 x 8 x 141/8 in.) Approx. 225 x 202 x 347 mm (87/8 x 8 x 133/4 in.) Approx. 7.2 ...
... MHz FM lead antenna 75 ohm unbalanced 10.7 MHz UKV tuner section (3 band (FM-AM-UKV) models only) Tuning range 65.0 - 74.0 MHz Stereo Plus AM tuner section Tuning range 2 Band type: North American models: 530 - 1,710 kHz (with the interval set at 10 kHz) 531 - 1,... Adjustable with voltage selector Power consumption U.S.A model: Canadian model: European model: Other models: 270 watts 270 VA 190 watts 230 watts Dimensions (w/h/d) STR-NX1: HTC-NX1: Mass STR-NX1: HTC-NX1: Approx. 225 x 202 x 356 mm (87/8 x 8 x 141/8 in.) Approx. 225 x 202 x 347 mm (87/8 x 8 x 133/4 in.) Approx. 7.2 ...
Service Manual
Page 5
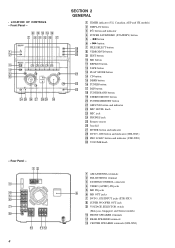
... button wa qd PLAY MODE button qf CD button qg DBFB button ws qh TUNER button wd qj DSP button qk TUNER BAND button ql STEREO/MONO button w; FRONT SPEAKER terminals qa REAR SPEAKER terminals qs CENTER SPEAKER terminals (STR-NX3) Front Panel - 8 q;
... button wa qd PLAY MODE button qf CD button qg DBFB button ws qh TUNER button wd qj DSP button qk TUNER BAND button ql STEREO/MONO button w; FRONT SPEAKER terminals qa REAR SPEAKER terminals qs CENTER SPEAKER terminals (STR-NX3) Front Panel - 8 q;
Service Manual
Page 9
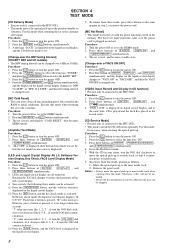
...[TUNER BAND] simultaneously. 3. if turn the JOG dial counterclockwise. "DVD 5.1CH" is displayed on the liquid crystal display. 5. Set to the HTC-NX1. • This mode can run the sled motor excessively, otherwise the gear can be unloaded. • Do not run the CD sled motor optionally.... set to turn the JOG dial clockwise to move the optical pick-up . Press three buttons of [ENTER] , [POWER SAVE/DEMO] , and [STEREO/MONO] simultaneously. 4. Press the ?/1 button to the customer. Procedure: 1. Press the [TUNER MEMORY] and ?/1 buttons simultaneously, and the display on ...
...[TUNER BAND] simultaneously. 3. if turn the JOG dial counterclockwise. "DVD 5.1CH" is displayed on the liquid crystal display. 5. Set to the HTC-NX1. • This mode can run the sled motor excessively, otherwise the gear can be unloaded. • Do not run the CD sled motor optionally.... set to turn the JOG dial clockwise to move the optical pick-up . Press three buttons of [ENTER] , [POWER SAVE/DEMO] , and [STEREO/MONO] simultaneously. 4. Press the ?/1 button to the customer. Procedure: 1. Press the [TUNER MEMORY] and ?/1 buttons simultaneously, and the display on ...
Service Manual
Page 25
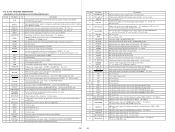
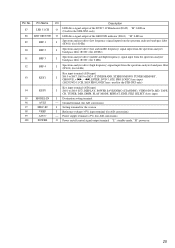
... XHOLD I 42 LCD SW O 43 STBY RELAY O 44 BASS FREQ O 45 OPT SEL O 46 XWR I 47 493 DATA O 48 493 CLK O 49 ST MUTE O 50 STEREO I 51 TUNED I 52 ST CE O 53 ST DOUT O 54 ST DIN I 55 ST CLK O 56 VC BYPASS O 57 PHONES DETECT I 58 LCD LAT O 59 LCD... bus line byte selection signal input terminal Fixed at "L" in this set 18 WAKE UP O Wakeup control signal output to the CPU on the HTC-NX1 "H" active 19 PHONES MUTE O Muting on/off (normal), "H": sync bass high Not used (open) Not used (open) Not used (fixed at "H") Serial data output to...
... XHOLD I 42 LCD SW O 43 STBY RELAY O 44 BASS FREQ O 45 OPT SEL O 46 XWR I 47 493 DATA O 48 493 CLK O 49 ST MUTE O 50 STEREO I 51 TUNED I 52 ST CE O 53 ST DOUT O 54 ST DIN I 55 ST CLK O 56 VC BYPASS O 57 PHONES DETECT I 58 LCD LAT O 59 LCD... bus line byte selection signal input terminal Fixed at "L" in this set 18 WAKE UP O Wakeup control signal output to the CPU on the HTC-NX1 "H" active 19 PHONES MUTE O Muting on/off (normal), "H": sync bass high Not used (open) Not used (open) Not used (fixed at "H") Serial data output to...
Service Manual
Page 26
..., MD, TAPE, CD, TUNER, DSB, DBFB, PLAY MODE, REPEAT, EDIT, FILE SELECT) keys input 95 MODEL-IN I S615 to S617, S619 to S624 (TUNER BAND, STEREO/MONO, TUNER MEMORY, GROOVE, + M, -
..., MD, TAPE, CD, TUNER, DSB, DBFB, PLAY MODE, REPEAT, EDIT, FILE SELECT) keys input 95 MODEL-IN I S615 to S617, S619 to S624 (TUNER BAND, STEREO/MONO, TUNER MEMORY, GROOVE, + M, -
Service Manual
Page 40
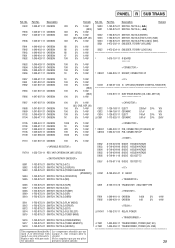
... SWITCH, TACTILE (EDIT) 1-762-875-21 SWITCH, TACTILE (FILE SELECT) 1-762-875-21 SWITCH, TACTILE (TUNER BAND) S616 S617 S619 1-762-875-21 SWITCH, TACTILE (STEREO/MONO) 1-762-875-21 SWITCH, TACTILE (TUNER MEMORY) 1-762-875-21 SWITCH, TACTILE (GROOVE) The components identified by mark 0 or dotted line with part number...
... SWITCH, TACTILE (EDIT) 1-762-875-21 SWITCH, TACTILE (FILE SELECT) 1-762-875-21 SWITCH, TACTILE (TUNER BAND) S616 S617 S619 1-762-875-21 SWITCH, TACTILE (STEREO/MONO) 1-762-875-21 SWITCH, TACTILE (TUNER MEMORY) 1-762-875-21 SWITCH, TACTILE (GROOVE) The components identified by mark 0 or dotted line with part number...


