
Operating Instructions (primary manual)
Page 2
...enclosure that provides guidelines for a Class B digital device, pursuant to persons. HAZARDOUS ENERGY! ..." As an ENERGY STAR® partner, Sony Corporation has determined that to correct the interference by one or more of the building, as close to comply with the instructions, 2 ... systems may cause harmful interference to operate this equipment. • Use of the apparatus with any changes or modifications not expressly approved in a confined space, such as a CLASS 1 LASER product. NOTICE FOR THE CUSTOMERS IN THE U.S.A. MHC-MG510AV/MG310AV only This stereo system ...
...enclosure that provides guidelines for a Class B digital device, pursuant to persons. HAZARDOUS ENERGY! ..." As an ENERGY STAR® partner, Sony Corporation has determined that to correct the interference by one or more of the building, as close to comply with the instructions, 2 ... systems may cause harmful interference to operate this equipment. • Use of the apparatus with any changes or modifications not expressly approved in a confined space, such as a CLASS 1 LASER product. NOTICE FOR THE CUSTOMERS IN THE U.S.A. MHC-MG510AV/MG310AV only This stereo system ...
Operating Instructions (primary manual)
Page 3
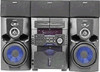
... video game sound - Daily Timer 26 Using an Optional Keyboard Setting the keyboard 27 Labeling titles through the keyboard ... 27 Operating the system through the keyboard 28 Optional Components Hooking up your speakers for Dolby Pro ...system 7 Inserting two size AA (R6) batteries into the remote 9 Setting up the optional A/V components 28 Connecting a video game machine ...... 29 Connecting a sub woofer speaker** .... 30 Connecting a DVD player 30 Additional Information Precautions 31 Troubleshooting 32 Messages 34 Specifications 35 * MHC-MG510AV/MG310AV only ** MHC-MG310AV...
... video game sound - Daily Timer 26 Using an Optional Keyboard Setting the keyboard 27 Labeling titles through the keyboard ... 27 Operating the system through the keyboard 28 Optional Components Hooking up your speakers for Dolby Pro ...system 7 Inserting two size AA (R6) batteries into the remote 9 Setting up the optional A/V components 28 Connecting a video game machine ...... 29 Connecting a sub woofer speaker** .... 30 Connecting a DVD player 30 Additional Information Precautions 31 Troubleshooting 32 Messages 34 Specifications 35 * MHC-MG510AV/MG310AV only ** MHC-MG310AV...
Operating Instructions (primary manual)
Page 7
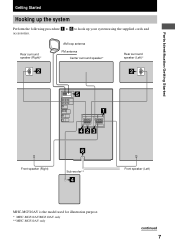
Parts Identification/Getting Started Getting Started Hooking up the system Perform the following procedure 1 to 6 to hook up your system using the supplied cords and accessories. Rear surround speaker (Right)* AM loop antenna FM antenna Center surround speaker* Rear surround speaker (Left)* Front speaker (Right) Sub woofer** Front speaker (Left) MHC-MG510AV is the model used for illustration purpose. * MHC-MG510AV/MG310AV only ** MHC-MG510AV only continued 7
Parts Identification/Getting Started Getting Started Hooking up the system Perform the following procedure 1 to 6 to hook up your system using the supplied cords and accessories. Rear surround speaker (Right)* AM loop antenna FM antenna Center surround speaker* Rear surround speaker (Left)* Front speaker (Right) Sub woofer** Front speaker (Left) MHC-MG510AV is the model used for illustration purpose. * MHC-MG510AV/MG310AV only ** MHC-MG510AV only continued 7
Operating Instructions (primary manual)
Page 9
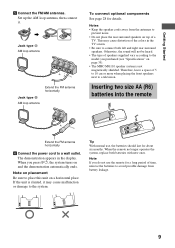
...AM FM 75Ω Extend the FM antenna horizontally Jack type B AM loop antenna To connect optional components See page 28 for about six months. Therefore, leave a space of a TV. Tip With normal use the remote for a long period of the colors in the display. Notes • Keep the ...heard. • The type of speakers supplied vary according to the model you do not use , the batteries should last for details. When you press ?/1, the system turns on page 35). • The MHC-MG110 speaker system is slanted, it . Set up the AM loop antenna, then connect it may cause distortion...
...AM FM 75Ω Extend the FM antenna horizontally Jack type B AM loop antenna To connect optional components See page 28 for about six months. Therefore, leave a space of a TV. Tip With normal use the remote for a long period of the colors in the display. Notes • Keep the ...heard. • The type of speakers supplied vary according to the model you do not use , the batteries should last for details. When you press ?/1, the system turns on page 35). • The MHC-MG110 speaker system is slanted, it . Set up the AM loop antenna, then connect it may cause distortion...

Operating Instructions (primary manual)
Page 16
... right. 8 Repeat steps 6 and 7 to 20 characters. The cursor disappears and the first space for which the CD was loaded. You can also label CDs using an optional keyboard (see "Labeling titles through the keyboard" on the remote) repeatedly until "NAME IN" appears. 5 Press ENTER. 6 Turn DISC ACCESS until the character...
... right. 8 Repeat steps 6 and 7 to 20 characters. The cursor disappears and the first space for which the CD was loaded. You can also label CDs using an optional keyboard (see "Labeling titles through the keyboard" on the remote) repeatedly until "NAME IN" appears. 5 Press ENTER. 6 Turn DISC ACCESS until the character...
Operating Instructions (primary manual)
Page 17
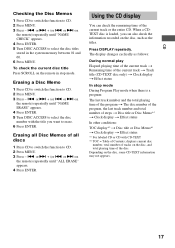
.... 4 Press ENTER. 5 Turn DISC ACCESS to select the disc number with CD-TEXT *2 TOC = Table of the disc Depending on the remote in the system memory between 01 and 60. 6 Press MENU. or > + (or . To check the current disc title Press SCROLL on the disc, some CD-TEXT information... to select the disc titles stored in stop mode. Erasing all discs 1 Press CD to switch the function to CD. 2 Press MENU. 3 Press - . Using the CD display You can also check the information recorded on the remote) repeatedly until "NAME CHECK" appears. 4 Press ENTER. 5 Turn DISC ACCESS to erase...
.... 4 Press ENTER. 5 Turn DISC ACCESS to select the disc number with CD-TEXT *2 TOC = Table of the disc Depending on the remote in the system memory between 01 and 60. 6 Press MENU. or > + (or . To check the current disc title Press SCROLL on the disc, some CD-TEXT information... to select the disc titles stored in stop mode. Erasing all discs 1 Press CD to switch the function to CD. 2 Press MENU. 3 Press - . Using the CD display You can also check the information recorded on the remote) repeatedly until "NAME CHECK" appears. 4 Press ENTER. 5 Turn DISC ACCESS to erase...
Operating Instructions (primary manual)
Page 19
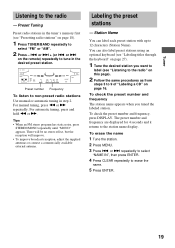
...the desired station you tuned the labeled station. For automatic tuning, press and hold m or M. Station Name You can also label preset stations using an optional keyboard (see "Labeling titles through the keyboard" on page 16. Labeling the preset stations - There will be no stereo effect, ...to 12 characters (Station Name). or > + (or . or > on page 18). 1 Press TUNER/BAND repeatedly to non-preset radio stations Use manual or automatic tuning in the desired preset station. Tuner Listening to tune in step 2. To check the preset number and frequency, press DISPLAY. ...
...the desired station you tuned the labeled station. For automatic tuning, press and hold m or M. Station Name You can also label preset stations using an optional keyboard (see "Labeling titles through the keyboard" on page 16. Labeling the preset stations - There will be no stereo effect, ...to 12 characters (Station Name). or > + (or . or > on page 18). 1 Press TUNER/BAND repeatedly to non-preset radio stations Use manual or automatic tuning in the desired preset station. Tuner Listening to tune in step 2. To check the preset number and frequency, press DISPLAY. ...
Operating Instructions (primary manual)
Page 20
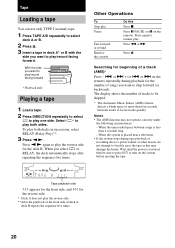
... a tape. 2 Press DIRECTION repeatedly to select g to skip forward (or backward). Searching for the number of songs you want to turn on the system before ejecting the tape. or > on the remote). Press n N again to locate tracks quickly. When you want to play one side. or >... is restored, then be skipped. * The Automatic Music Sensor (AMS) feature detects a blank space of a track (AMS)* Press - . Tape Loading a tape You can use only TYPE I (normal) tape. 1 Press TAPE A/B repeatedly to select deck A or B. 2 Press Z. 3 Insert a tape in succession, select RELAY (Relay Play)**. ...
... a tape. 2 Press DIRECTION repeatedly to select g to skip forward (or backward). Searching for the number of songs you want to turn on the system before ejecting the tape. or > on the remote). Press n N again to locate tracks quickly. When you want to play one side. or >... is restored, then be skipped. * The Automatic Music Sensor (AMS) feature detects a blank space of a track (AMS)* Press - . Tape Loading a tape You can use only TYPE I (normal) tape. 1 Press TAPE A/B repeatedly to select deck A or B. 2 Press Z. 3 Insert a tape in succession, select RELAY (Relay Play)**. ...
Operating Instructions (primary manual)
Page 23
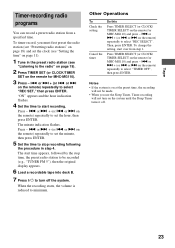
To timer-record, you use the Sleep Timer, Timer-recording will not be recorded (e.g., "TUNER FM 5"), then the original display appears. ...ENTER. Tape Timer-recording radio programs You can record a preset radio station from step 1. or > on the remote for MHC-MG110) and press - . The start time appears, followed by the stop recording following the procedure in the preset radio station..." on page 19). 2 Press TIMER SET (or CLOCK/TIMER SET on the system until the Sleep Timer turns it off the system. Notes • If the system is reduced to start over from a specified time.
To timer-record, you use the Sleep Timer, Timer-recording will not be recorded (e.g., "TUNER FM 5"), then the original display appears. ...ENTER. Tape Timer-recording radio programs You can record a preset radio station from step 1. or > on the remote for MHC-MG110) and press - . The start time appears, followed by the stop recording following the procedure in the preset radio station..." on page 19). 2 Press TIMER SET (or CLOCK/TIMER SET on the system until the Sleep Timer turns it off the system. Notes • If the system is reduced to start over from a specified time.

Operating Instructions (primary manual)
Page 25
Notes • You cannot use both the front and rear surround speakers. 25 Press FRONT Display Sound output Stereo sound from the rear surround speakers. Selecting the sound formation - REAR Stereo sound from the front speakers. For MHC-MG110 Press SURROUND MODE (or SURROUND on the remote) ... and adjustments first (see page 10). Press PRO LOGIC again to cancel the Dolby Pro Logic Surround sound. Multi room selector (MHC-MG510AV/MG310AV only) You can enjoy Dolby Pro Logic Surround sound from both Dolby Pro Logic Surround sound and other sound effect, the surround effect...
Notes • You cannot use both the front and rear surround speakers. 25 Press FRONT Display Sound output Stereo sound from the rear surround speakers. Selecting the sound formation - REAR Stereo sound from the front speakers. For MHC-MG110 Press SURROUND MODE (or SURROUND on the remote) ... and adjustments first (see page 10). Press PRO LOGIC again to cancel the Dolby Pro Logic Surround sound. Multi room selector (MHC-MG510AV/MG310AV only) You can enjoy Dolby Pro Logic Surround sound from both Dolby Pro Logic Surround sound and other sound effect, the surround effect...
Operating Instructions (primary manual)
Page 27
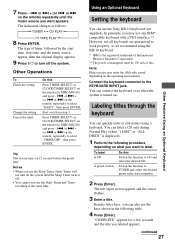
...MHC-MG110) and press - . Other Operations To Check the setting Change the setting Cancel the timer Do this Switch the function to label. or > + (or . Press TIMER SELECT (or CLOCK/TIMER SELECT on the remote) repeatedly until the Sleep Timer turns it off the system. Notes • When you use the Sony... KB-10 keyboard (not supplied). Besides letter keys, you want to CD and select the desired CD. continued 27 Other Features/Using an Optional Keyboard
...MHC-MG110) and press - . Other Operations To Check the setting Change the setting Cancel the timer Do this Switch the function to label. or > + (or . Press TIMER SELECT (or CLOCK/TIMER SELECT on the remote) repeatedly until the Sleep Timer turns it off the system. Notes • When you use the Sony... KB-10 keyboard (not supplied). Besides letter keys, you want to CD and select the desired CD. continued 27 Other Features/Using an Optional Keyboard
Operating Instructions (primary manual)
Page 28
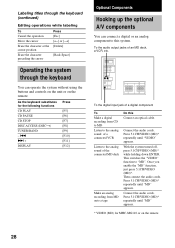
... input jack of a digital component To Make a digital recording from CD to MD Listen to the analog sound of a connected VCR Listen to the analog sound of an MD deck, a VCR, etc. Then connect the audio cords. As the keyboard substitutes for MHC-MG110 or on the remote... > + DISPLAY Press [F5] [F6] [F7] [F8] [F9] [F10] [F11] [F12] Optional Components Hooking up the optional A/V components You can operate the system without using the buttons and controls on the unit or on the remote 28 With the system turned off, press 5.1CH/VIDEO (MD)* while holding down ENTER. Press 5.1CH/VIDEO (MD...
... input jack of a digital component To Make a digital recording from CD to MD Listen to the analog sound of a connected VCR Listen to the analog sound of an MD deck, a VCR, etc. Then connect the audio cords. As the keyboard substitutes for MHC-MG110 or on the remote... > + DISPLAY Press [F5] [F6] [F7] [F8] [F9] [F10] [F11] [F12] Optional Components Hooking up the optional A/V components You can operate the system without using the buttons and controls on the unit or on the remote 28 With the system turned off, press 5.1CH/VIDEO (MD)* while holding down ENTER. Press 5.1CH/VIDEO (MD...
Operating Instructions (primary manual)
Page 29
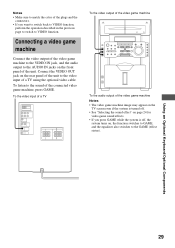
...; Make sure to match the color of the plugs and the connectors. • If you press GAME while the system is off, the system turns on, the function switches to GAME, and the equalizer also switches to the GAME (effect status). To the ... of the video game machine Notes • The video game machine image may appear on the TV screen even if the system is turned off. • See "Selecting the sound effect" on page 24 for video game sound effects. • ... previous page to switch to the sound of the connected video game machine, press GAME. Using an Optional Keyboard/Optional Components 29
...; Make sure to match the color of the plugs and the connectors. • If you press GAME while the system is off, the system turns on, the function switches to GAME, and the equalizer also switches to the GAME (effect status). To the ... of the video game machine Notes • The video game machine image may appear on the TV screen even if the system is turned off. • See "Selecting the sound effect" on page 24 for video game sound effects. • ... previous page to switch to the sound of the connected video game machine, press GAME. Using an Optional Keyboard/Optional Components 29
Operating Instructions (primary manual)
Page 31
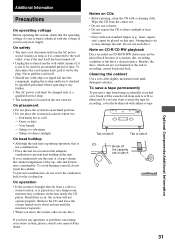
... solid object or liquid fall into the component, unplug the system and have any questions or problems concerning your stereo system, please consult your nearest Sony dealer. On placement • Do not place the system in an inclined position. • Do not place the system in a location with non-standard shapes ...are not yet finalized at a qualified service shop. • The nameplate is : - If you move the system, take out any further. • The AC power cord must be used for the cooling fan. To prevent a malfunction, do not cover the ventilation hole for an extended period of time...
... solid object or liquid fall into the component, unplug the system and have any questions or problems concerning your stereo system, please consult your nearest Sony dealer. On placement • Do not place the system in an inclined position. • Do not place the system in a location with non-standard shapes ...are not yet finalized at a qualified service shop. • The nameplate is : - If you move the system, take out any further. • The AC power cord must be used for the cooling fan. To prevent a malfunction, do not cover the ventilation hole for an extended period of time...

Operating Instructions (primary manual)
Page 32
... refer to 30 hours of use with the tape every 20 to the instructions of use the following : - Precautions (continued) Before placing a cassette in the tape deck Take up any slack in the power cord even though you have any problem persist, consult your nearest Sony dealer. There is turned off.... also redo "Waking up to clean the tape heads before you start an important recording or after every 10 hours of the demagnetizing cassette. When using this system, use . There is severe hum or noise. • A TV or VCR is very elastic. Do not change the tape operations such as you ...
... refer to 30 hours of use with the tape every 20 to the instructions of use the following : - Precautions (continued) Before placing a cassette in the tape deck Take up any slack in the power cord even though you have any problem persist, consult your nearest Sony dealer. There is turned off.... also redo "Waking up to clean the tape heads before you start an important recording or after every 10 hours of the demagnetizing cassette. When using this system, use . There is severe hum or noise. • A TV or VCR is very elastic. Do not change the tape operations such as you ...
Operating Instructions (primary manual)
Page 36
...North American model) SURROUND SPEAKER SUB WOOFER (MHC-MG510AV only): accepts impedance of 8 ohms (except for the North American model) SUB WOOFER (MHC-MG310AV only): voltage 1 V, impedance 1 kilohm CD player section System Compact disc and digital audio system Laser Semiconductor laser (λ = 780 nm)... connector jack, rear panel) Wavelength 660 nm Output Level -18 dBm Tape player section Recording system Frequency response Wow and flutter 4-track 2-channel stereo 40 - 13,000 Hz (±3 dB), using Sony TYPE I cassette ±0.15% W.Peak (IEC) 0.1% W.RMS (NAB) ±0.2% ...
...North American model) SURROUND SPEAKER SUB WOOFER (MHC-MG510AV only): accepts impedance of 8 ohms (except for the North American model) SUB WOOFER (MHC-MG310AV only): voltage 1 V, impedance 1 kilohm CD player section System Compact disc and digital audio system Laser Semiconductor laser (λ = 780 nm)... connector jack, rear panel) Wavelength 660 nm Output Level -18 dBm Tape player section Recording system Frequency response Wow and flutter 4-track 2-channel stereo 40 - 13,000 Hz (±3 dB), using Sony TYPE I cassette ±0.15% W.Peak (IEC) 0.1% W.RMS (NAB) ±0.2% ...


