Operating Instructions (primary manual)
Page 1
4-233-902-12(3) Mini Hi-Fi Component System Operating Instructions Owner's Record The model and serial numbers are located on the rear panel. Refer to them whenever you call upon your Sony dealer regarding this product. Model No Serial No MHC-MG510AV MHC-MG310AV MHC-MG110 © 2001 Sony Corporation 1 Record the serial number in the space provided below.
4-233-902-12(3) Mini Hi-Fi Component System Operating Instructions Owner's Record The model and serial numbers are located on the rear panel. Refer to them whenever you call upon your Sony dealer regarding this product. Model No Serial No MHC-MG510AV MHC-MG310AV MHC-MG110 © 2001 Sony Corporation 1 Record the serial number in the space provided below.

Operating Instructions (primary manual)
Page 2
...to Part 15 of cable entry as the injurious wastes. Reorient or relocate the receiving antenna. - As an ENERGY STAR® partner, Sony Corporation has determined that may present a shock or fire hazard. are trademarks of important operating and maintenance (servicing) instructions in a confined ...building, as close to qualified personnel only. Connect the equipment into an outlet on a circuit different from Dolby Laboratories. MHC-MG510AV/MG310AV only This stereo system is intended to alert the user to constitute a risk of FCC Rules. To avoid electrical shock, do not place ...
...to Part 15 of cable entry as the injurious wastes. Reorient or relocate the receiving antenna. - As an ENERGY STAR® partner, Sony Corporation has determined that may present a shock or fire hazard. are trademarks of important operating and maintenance (servicing) instructions in a confined ...building, as close to qualified personnel only. Connect the equipment into an outlet on a circuit different from Dolby Laboratories. MHC-MG510AV/MG310AV only This stereo system is intended to alert the user to constitute a risk of FCC Rules. To avoid electrical shock, do not place ...
Operating Instructions (primary manual)
Page 3
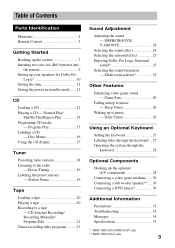
...an Optional Keyboard Setting the keyboard 27 Labeling titles through the keyboard ... 27 Operating the system through the keyboard 28 Optional Components Hooking up your speakers for Dolby Pro Logic 10 Setting the time 11 Saving the ...system 7 Inserting two size AA (R6) batteries into the remote 9 Setting up the optional A/V components 28 Connecting a video game machine ...... 29 Connecting a sub woofer speaker** .... 30 Connecting a DVD player 30 Additional Information Precautions 31 Troubleshooting 32 Messages 34 Specifications 35 * MHC-MG510AV/MG310AV only ** MHC-MG310AV...
...an Optional Keyboard Setting the keyboard 27 Labeling titles through the keyboard ... 27 Operating the system through the keyboard 28 Optional Components Hooking up your speakers for Dolby Pro Logic 10 Setting the time 11 Saving the ...system 7 Inserting two size AA (R6) batteries into the remote 9 Setting up the optional A/V components 28 Connecting a video game machine ...... 29 Connecting a sub woofer speaker** .... 30 Connecting a DVD player 30 Additional Information Precautions 31 Troubleshooting 32 Messages 34 Specifications 35 * MHC-MG510AV/MG310AV only ** MHC-MG310AV...
Operating Instructions (primary manual)
Page 4
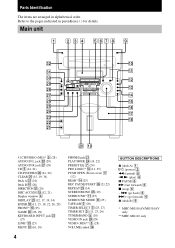
... IN jack wl (29) VIDEO (MD)** 5 (28) VOLUME control qh BUTTON DESCRIPTIONS Z (deck A) 1 =/1 (power) 2 m (rewind) 6 n N (play) 6 X PAUSE 6 M (fast forward) 6 x (stop) 6 - . (go back) 6 > + (go forward) 6 Z (deck B) 9 * MHC-MG510AV/MG310AV only ** MHC-MG110 only Parts Identification The items are arranged in parentheses ( ) for details. Refer to the pages indicated in alphabetical order.
... IN jack wl (29) VIDEO (MD)** 5 (28) VOLUME control qh BUTTON DESCRIPTIONS Z (deck A) 1 =/1 (power) 2 m (rewind) 6 n N (play) 6 X PAUSE 6 M (fast forward) 6 x (stop) 6 - . (go back) 6 > + (go forward) 6 Z (deck B) 9 * MHC-MG510AV/MG310AV only ** MHC-MG110 only Parts Identification The items are arranged in parentheses ( ) for details. Refer to the pages indicated in alphabetical order.
Operating Instructions (primary manual)
Page 5
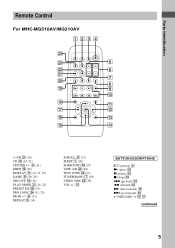
qg BUTTON DESCRIPTIONS @/1 (power) 4 N (play) 0 X (pause) 0 x (stop) 0 . (go back) 0 m (rewind) 0 M (fast forward) 0 > (go forward) 0 TDISC/DISCt qs qj continued 5 Parts Identification Remote Control For MHC-MG510AV/MG310AV 1 234 wf wd 5 ws 6 wa 7 w; 8 ql 9 0 qk qa qj qs qh qd qg qf 5.1CH wa (30) CD ql (14, 21) CENTER +/- 5 (11) DBFB qd (...
qg BUTTON DESCRIPTIONS @/1 (power) 4 N (play) 0 X (pause) 0 x (stop) 0 . (go back) 0 m (rewind) 0 M (fast forward) 0 > (go forward) 0 TDISC/DISCt qs qj continued 5 Parts Identification Remote Control For MHC-MG510AV/MG310AV 1 234 wf wd 5 ws 6 wa 7 w; 8 ql 9 0 qk qa qj qs qh qd qg qf 5.1CH wa (30) CD ql (14, 21) CENTER +/- 5 (11) DBFB qd (...
Operating Instructions (primary manual)
Page 6
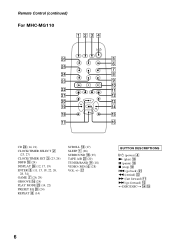
... w; (24) REPEAT 8 (14) SCROLL qd (17) SLEEP 1 (26) SURROUND qk (25) TAPE A/B wd (20) TUNER/BAND 9 (18) VIDEO (MD) 6 (28) VOL +/- Remote Control (continued) For MHC-MG110 1 23 4 wh 5 6 wg 7 wf 8 wd 9 0 ws qa wa qs w;
... w; (24) REPEAT 8 (14) SCROLL qd (17) SLEEP 1 (26) SURROUND qk (25) TAPE A/B wd (20) TUNER/BAND 9 (18) VIDEO (MD) 6 (28) VOL +/- Remote Control (continued) For MHC-MG110 1 23 4 wh 5 6 wg 7 wf 8 wd 9 0 ws qa wa qs w;
Operating Instructions (primary manual)
Page 7
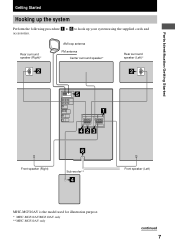
Rear surround speaker (Right)* AM loop antenna FM antenna Center surround speaker* Rear surround speaker (Left)* Front speaker (Right) Sub woofer** Front speaker (Left) MHC-MG510AV is the model used for illustration purpose. * MHC-MG510AV/MG310AV only ** MHC-MG510AV only continued 7 Parts Identification/Getting Started Getting Started Hooking up the system Perform the following procedure 1 to 6 to hook up your system using the supplied cords and accessories.
Rear surround speaker (Right)* AM loop antenna FM antenna Center surround speaker* Rear surround speaker (Left)* Front speaker (Right) Sub woofer** Front speaker (Left) MHC-MG510AV is the model used for illustration purpose. * MHC-MG510AV/MG310AV only ** MHC-MG510AV only continued 7 Parts Identification/Getting Started Getting Started Hooking up the system Perform the following procedure 1 to 6 to hook up your system using the supplied cords and accessories.
Operating Instructions (primary manual)
Page 8
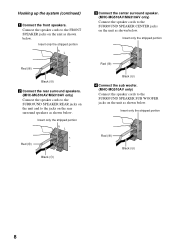
... portion + Red (3) - Black (#) 8 Insert only the stripped portion + Red (3) - Hooking up the system (continued) 1 Connect the front speakers. Black (#) 4 Connect the sub woofer. (MHC-MG510AV only) Connect the speaker cords to the SURROUND SPEAKER CENTER jacks on the unit as shown below . Insert... only the stripped portion R L + Red (3) - Black (#) 3 Connect the center surround speaker. (MHC-MG510AV/MG310AV only) Connect the speaker cords to the SURROUND SPEAKER SUB WOOFER jacks on the unit as shown below . Connect the speaker cords...
... portion + Red (3) - Black (#) 8 Insert only the stripped portion + Red (3) - Hooking up the system (continued) 1 Connect the front speakers. Black (#) 4 Connect the sub woofer. (MHC-MG510AV only) Connect the speaker cords to the SURROUND SPEAKER CENTER jacks on the unit as shown below . Insert... only the stripped portion R L + Red (3) - Black (#) 3 Connect the center surround speaker. (MHC-MG510AV/MG310AV only) Connect the speaker cords to the SURROUND SPEAKER SUB WOOFER jacks on the unit as shown below . Connect the speaker cords...
Operating Instructions (primary manual)
Page 9
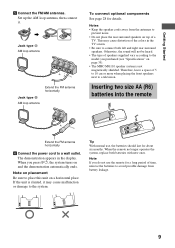
Getting Started 5 Connect the FM/AM antennas. When you purchased (see "Specifications" on page 35). • The MHC-MG110 speaker system is slanted, it . Note If you do not use , the batteries should last for about six months. Jack type A AM loop antenna AM FM 75&#...8486; Extend the FM antenna horizontally Jack type B AM loop antenna To connect optional components See page 28 for a long period of speakers supplied vary according to the model you press ?/1, the system turns on a horizontal place. Otherwise, the sound will not be heard. • The type of time...
Getting Started 5 Connect the FM/AM antennas. When you purchased (see "Specifications" on page 35). • The MHC-MG110 speaker system is slanted, it . Note If you do not use , the batteries should last for about six months. Jack type A AM loop antenna AM FM 75&#...8486; Extend the FM antenna horizontally Jack type B AM loop antenna To connect optional components See page 28 for a long period of speakers supplied vary according to the model you press ?/1, the system turns on a horizontal place. Otherwise, the sound will not be heard. • The type of time...
Operating Instructions (primary manual)
Page 10
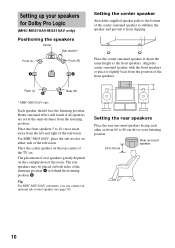
...on either side of the room. Better surround effect will result if all speakers are set . For MHC-MG510AV, place the sub woofer on the configuration of the television. Tip For MHC-MG310AV customers, you can connect an optional sub woofer speaker (see page 30). Setting the rear speakers ...90 cm Rear surround speaker 10 Place the center surround speaker at about 60 to 90 cm above your speakers for Dolby Pro Logic (MHC-MG510AV/MG310AV only) Positioning the speakers Center Sub woofer* Front (L) Front (R) Setting the center speaker Attach the supplied speaker pads to the bottom ...
...on either side of the room. Better surround effect will result if all speakers are set . For MHC-MG510AV, place the sub woofer on the configuration of the television. Tip For MHC-MG310AV customers, you can connect an optional sub woofer speaker (see page 30). Setting the rear speakers ...90 cm Rear surround speaker 10 Place the center surround speaker at about 60 to 90 cm above your speakers for Dolby Pro Logic (MHC-MG510AV/MG310AV only) Positioning the speakers Center Sub woofer* Front (L) Front (R) Setting the center speaker Attach the supplied speaker pads to the bottom ...
Operating Instructions (primary manual)
Page 11
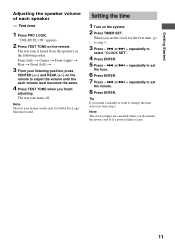
.... 7 Press - . or > + repeatedly to change the time, start over from the speakers in the following order. "DOLBY PL ON" appears. 2 Press TEST TONE on the system. 2 Press TIMER SET. or > + repeatedly to select "CLOCK SET". 4 Press ENTER. 5 Press - . Setting the time 1 Turn on the remote. Getting Started Adjusting the speaker volume...
.... 7 Press - . or > + repeatedly to change the time, start over from the speakers in the following order. "DOLBY PL ON" appears. 2 Press TEST TONE on the system. 2 Press TIMER SET. or > + repeatedly to select "CLOCK SET". 4 Press ENTER. 5 Press - . Setting the time 1 Turn on the remote. Getting Started Adjusting the speaker volume...
Operating Instructions (primary manual)
Page 12
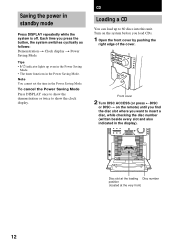
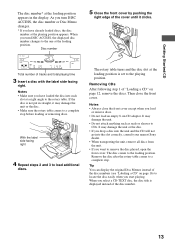
... once to show the demonstration or twice to 60 discs into this unit. Front cover 2 Turn DISC ACCESS (or press TDISC or DISCt on the system before you want to insert a disc, while checking the disc number (written beside every slot and also indicated in the Power Saving Mode. Saving the... power in the Power Saving Mode. Note You cannot set the time in standby mode Press DISPLAY repeatedly while the system is off. Turn on the remote) until you find the disc slot where you load CDs. 1 Open the front cover by pushing the right edge...
... once to show the demonstration or twice to 60 discs into this unit. Front cover 2 Turn DISC ACCESS (or press TDISC or DISCt on the system before you want to insert a disc, while checking the disc number (written beside every slot and also indicated in the Power Saving Mode. Saving the... power in the Power Saving Mode. Note You cannot set the time in standby mode Press DISPLAY repeatedly while the system is off. Turn on the remote) until you find the disc slot where you load CDs. 1 Open the front cover by pushing the right edge...
Operating Instructions (primary manual)
Page 13
... sure you turn DISC ACCESS, the disc number or Disc Memo changes. * If you have loaded the disc into the slot correctly, consult your nearest Sony dealer. • When transporting the unit, remove all discs from the unit. • If you select a CD-TEXT disc, the disc title is displayed instead...
... sure you turn DISC ACCESS, the disc number or Disc Memo changes. * If you have loaded the disc into the slot correctly, consult your nearest Sony dealer. • When transporting the unit, remove all discs from the unit. • If you select a CD-TEXT disc, the disc title is displayed instead...
Operating Instructions (primary manual)
Page 14
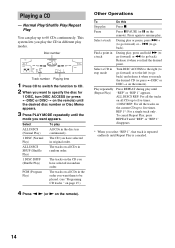
... play . Playing a CD - Pause Press X PAUSE (or X on the current CD up to go forward) or m (to five times. REP 1*: For a single track only. This system lets you want appears. Select a track During play up to 60 CDs continuously. Select a CD in a track During play the CD in the order you...
... play . Playing a CD - Pause Press X PAUSE (or X on the current CD up to go forward) or m (to five times. REP 1*: For a single track only. This system lets you want appears. Select a track During play up to 60 CDs continuously. Select a CD in a track During play the CD in the order you...
Operating Instructions (primary manual)
Page 15
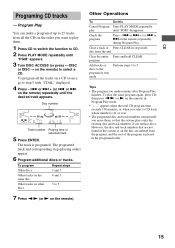
... erase them, so that are deleted from the program, and the rest of the program is programed. However, the disc and track numbers that the system plays only the existing disc and track numbers if you made remains after Program Play finishes. or > on the disc are not found in stop... the same disc 4 and 5 Other tracks on a CD at once, go to select a CD. Check the program Press - . Clear a track or Press CLEAR in the system or on the remote) repeatedly until "PGM" disappears.
... erase them, so that are deleted from the program, and the rest of the program is programed. However, the disc and track numbers that the system plays only the existing disc and track numbers if you made remains after Program Play finishes. or > on the disc are not found in stop... the same disc 4 and 5 Other tracks on a CD at once, go to select a CD. Check the program Press - . Clear a track or Press CLEAR in the system or on the remote) repeatedly until "PGM" disappears.

Operating Instructions (primary manual)
Page 16
The cursor disappears and the first space for which the CD was loaded. You can label up to 20 characters. Repeat steps 2 to 9 to complete the labeling procedure. Tip When you replace a disc with titles of up to 60 CDs with a CD-TEXT disc, the Disc Memo of the CD-TEXT disc is flashing. Note that slot. 16 The character you want to complete the entire title. Re-enter the Disc Memo when loading a new CD into that you want appears. Disc Memo You can input the following characters: • Upper cases (A - Notes • You cannot label a CD for the disc title ...
The cursor disappears and the first space for which the CD was loaded. You can label up to 20 characters. Repeat steps 2 to 9 to complete the labeling procedure. Tip When you replace a disc with titles of up to 60 CDs with a CD-TEXT disc, the Disc Memo of the CD-TEXT disc is flashing. Note that slot. 16 The character you want to complete the entire title. Re-enter the Disc Memo when loading a new CD into that you want appears. Disc Memo You can input the following characters: • Upper cases (A - Notes • You cannot label a CD for the disc title ...
Operating Instructions (primary manual)
Page 17
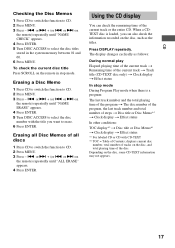
... the remote) repeatedly until "ALL ERASE" appears. 4 Press ENTER. Using the CD display You can also check the information recorded on the remote in the system memory between 01 and 60. 6 Press MENU. or > on the disc, some CD-TEXT information may not appears. 17 or > + (or . displays current disc number...
... the remote) repeatedly until "ALL ERASE" appears. 4 Press ENTER. Using the CD display You can also check the information recorded on the remote in the system memory between 01 and 60. 6 Press MENU. or > on the disc, some CD-TEXT information may not appears. 17 or > + (or . displays current disc number...
Operating Instructions (primary manual)
Page 18
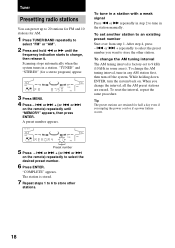
or > on the remote) repeatedly until the frequency indication starts to change the AM tuning interval, tune in any AM station first, then turn the system back on the remote) repeatedly to tune in step 2 to select the desired preset number. 6 Press ENTER. After step 4, press - . While... > + (or . A preset number appears. or > + repeatedly to store the other stations. 18 To change , then release it. Scanning stops automatically when the system tunes in some areas). "TUNED" and "STEREO" (for half a day even if you want to select the preset number you unplug the power cord or...
or > on the remote) repeatedly until the frequency indication starts to change the AM tuning interval, tune in any AM station first, then turn the system back on the remote) repeatedly to tune in step 2 to select the desired preset number. 6 Press ENTER. After step 4, press - . While... > + (or . A preset number appears. or > + repeatedly to store the other stations. 18 To change , then release it. Scanning stops automatically when the system tunes in some areas). "TUNED" and "STEREO" (for half a day even if you want to select the preset number you unplug the power cord or...
Operating Instructions (primary manual)
Page 19
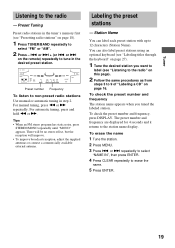
or > on page 18). 1 Press TUNER/BAND repeatedly to erase the name. 5 Press ENTER. 19 Preset number Frequency To listen to tune in the tuner's memory first (see "Presetting radio stations" on the remote) repeatedly to non-preset radio stations Use manual or automatic tuning in step 2. For manual tuning, press m or M repeatedly. To check the preset number and frequency The station name appears when you want to label (see "Labeling titles through the keyboard" on page 27). 1 Tune the desired station you tuned the labeled station. To erase the name 1 Tune the station. 2 Press MENU....
or > on page 18). 1 Press TUNER/BAND repeatedly to erase the name. 5 Press ENTER. 19 Preset number Frequency To listen to tune in the tuner's memory first (see "Presetting radio stations" on the remote) repeatedly to non-preset radio stations Use manual or automatic tuning in step 2. For manual tuning, press m or M repeatedly. To check the preset number and frequency The station name appears when you want to label (see "Labeling titles through the keyboard" on page 27). 1 Tune the desired station you tuned the labeled station. To erase the name 1 Tune the station. 2 Press MENU....
Operating Instructions (primary manual)
Page 20
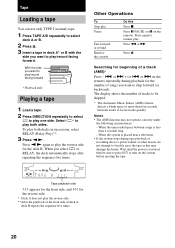
..., the deck automatically stops after repeating the sequence five times. Press n N again to play both sides. Press Z. When the system is placed near a television. • If the system stops during playback for the front side, and Tape playback side >>> appears for the number of tracks to be sure to press... ?/1 to turn on the system before ejecting the tape. Press again to resume play Pause Fast-forward or rewind Remove the cassette Do this may not operate correctly under the...
..., the deck automatically stops after repeating the sequence five times. Press n N again to play both sides. Press Z. When the system is placed near a television. • If the system stops during playback for the front side, and Tape playback side >>> appears for the number of tracks to be sure to press... ?/1 to turn on the system before ejecting the tape. Press again to resume play Pause Fast-forward or rewind Remove the cassette Do this may not operate correctly under the...