Operating Instructions (primary manual)
Page 3
... 5 Getting Started Hooking up the system 7 Inserting two size AA (R6) batteries into the remote 9 Setting up the optional A/V components 28 Connecting a video game machine ...... 29 Connecting a sub woofer speaker** .... 30 Connecting a DVD player 30 Additional Information Precautions 31 Troubleshooting 32 Messages 34 Specifications 35 * MHC-MG510AV/MG310AV only ** MHC-MG310AV only 3 Preset Tuning 19 Labeling the...
... 5 Getting Started Hooking up the system 7 Inserting two size AA (R6) batteries into the remote 9 Setting up the optional A/V components 28 Connecting a video game machine ...... 29 Connecting a sub woofer speaker** .... 30 Connecting a DVD player 30 Additional Information Precautions 31 Troubleshooting 32 Messages 34 Specifications 35 * MHC-MG510AV/MG310AV only ** MHC-MG310AV only 3 Preset Tuning 19 Labeling the...
Operating Instructions (primary manual)
Page 5
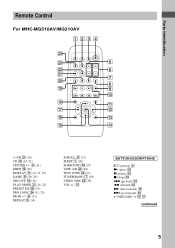
qg BUTTON DESCRIPTIONS @/1 (power) 4 N (play) 0 X (pause) 0 x (stop) 0 . (go back) 0 m (rewind) 0 M (fast forward) 0 > (go forward) 0 TDISC/DISCt qs qj continued 5 Parts Identification Remote Control For MHC-MG510AV/MG310AV 1 234 wf wd 5 ws 6 wa 7 w; 8 ql 9 0 qk qa qj qs qh qd qg qf 5.1CH wa (30) CD ql (14, 21) CENTER +/- 5 (11) DBFB qd (...
qg BUTTON DESCRIPTIONS @/1 (power) 4 N (play) 0 X (pause) 0 x (stop) 0 . (go back) 0 m (rewind) 0 M (fast forward) 0 > (go forward) 0 TDISC/DISCt qs qj continued 5 Parts Identification Remote Control For MHC-MG510AV/MG310AV 1 234 wf wd 5 ws 6 wa 7 w; 8 ql 9 0 qk qa qj qs qh qd qg qf 5.1CH wa (30) CD ql (14, 21) CENTER +/- 5 (11) DBFB qd (...
Operating Instructions (primary manual)
Page 6
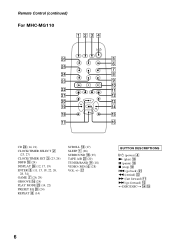
Remote Control (continued) For MHC-MG110 1 23 4 wh 5 6 wg 7 wf 8 wd 9 0 ws qa wa qs w; qd ql qf qk qg qj qh CD wf (14, 21) CLOCK/TIMER SELECT 2 (23, ...
Remote Control (continued) For MHC-MG110 1 23 4 wh 5 6 wg 7 wf 8 wd 9 0 ws qa wa qs w; qd ql qf qk qg qj qh CD wf (14, 21) CLOCK/TIMER SELECT 2 (23, ...
Operating Instructions (primary manual)
Page 9
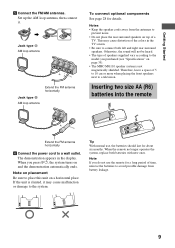
...cord to place this unit on page 35). • The MHC-MG110 speaker system is slanted, it . The demonstration appears in the TV screen. • Be sure to connect both batteries with new ones. Tip With normal use the remote for a long period of 5 to 10 cm or more ...antenna horizontally Jack type B AM loop antenna To connect optional components See page 28 for about six months. Note on and the demonstration automatically ends. If the unit is not magnetically shielded. When the remote no longer operates the system, replace both left and right rear surround speakers. Set up...
...cord to place this unit on page 35). • The MHC-MG110 speaker system is slanted, it . The demonstration appears in the TV screen. • Be sure to connect both batteries with new ones. Tip With normal use the remote for a long period of 5 to 10 cm or more ...antenna horizontally Jack type B AM loop antenna To connect optional components See page 28 for about six months. Note on and the demonstration automatically ends. If the unit is not magnetically shielded. When the remote no longer operates the system, replace both left and right rear surround speakers. Set up...
Operating Instructions (primary manual)
Page 11
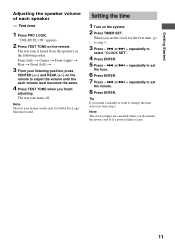
...tone feature works only for the first time, go to set the hour. 6 Press ENTER. 7 Press - . "DOLBY PL ON" appears. 2 Press TEST TONE on the system. 2 Press TIMER SET. Test tone 1 Press PRO LOGIC. Front (left) t Center t Front (right) t Rear t Front (left) t ... 3 From your listening... position, press CENTER (+/-) and REAR (+/-) on the remote to select "CLOCK SET". 4 Press ENTER. 5 Press - . Getting Started Adjusting the speaker volume of each volume level becomes the same. 4 Press TEST TONE when ...
...tone feature works only for the first time, go to set the hour. 6 Press ENTER. 7 Press - . "DOLBY PL ON" appears. 2 Press TEST TONE on the system. 2 Press TIMER SET. Test tone 1 Press PRO LOGIC. Front (left) t Center t Front (right) t Rear t Front (left) t ... 3 From your listening... position, press CENTER (+/-) and REAR (+/-) on the remote to select "CLOCK SET". 4 Press ENTER. 5 Press - . Getting Started Adjusting the speaker volume of each volume level becomes the same. 4 Press TEST TONE when ...
Operating Instructions (primary manual)
Page 12
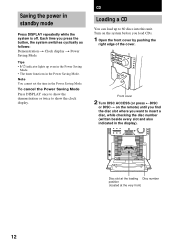
...Power Saving Mode Press DISPLAY once to show the clock display. Turn on the remote) until you find the disc slot where you want to show the demonstration or...Power Saving Mode. Front cover 2 Turn DISC ACCESS (or press TDISC or DISCt on the system before you press the button, the system switches cyclically as follows: Demonstration t Clock display t Power Saving Mode Tips • ?/1 ... the very front) 12 Note You cannot set the time in standby mode Press DISPLAY repeatedly while the system is off. Each time you load CDs. 1 Open the front cover by pushing the right edge of...
...Power Saving Mode Press DISPLAY once to show the clock display. Turn on the remote) until you find the disc slot where you want to show the demonstration or...Power Saving Mode. Front cover 2 Turn DISC ACCESS (or press TDISC or DISCt on the system before you press the button, the system switches cyclically as follows: Demonstration t Clock display t Power Saving Mode Tips • ?/1 ... the very front) 12 Note You cannot set the time in standby mode Press DISPLAY repeatedly while the system is off. Each time you load CDs. 1 Open the front cover by pushing the right edge of...
Operating Instructions (primary manual)
Page 14
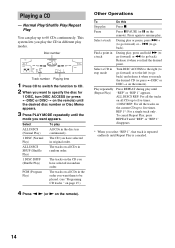
... to resume play modes. Normal Play/Shuffle Play/Repeat Play You can play All CDs in different play . The tracks on the remote). Press again to 60 CDs continuously. This system lets you want them to be played. (see "Programing CD tracks " on page 15.) 4 Press n N (or N on ...all CDs in a track During play or pause, press > + (to go forward) or - . (to five times. 1 DISC REP: For all the tracks on the remote). Find a point...
... to resume play modes. Normal Play/Shuffle Play/Repeat Play You can play All CDs in different play . The tracks on the remote). Press again to 60 CDs continuously. This system lets you want them to be played. (see "Programing CD tracks " on page 15.) 4 Press n N (or N on ...all CDs in a track During play or pause, press > + (to go forward) or - . (to five times. 1 DISC REP: For all the tracks on the remote). Find a point...
Operating Instructions (primary manual)
Page 15
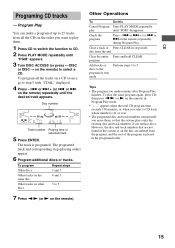
... steps 3 to CD. 2 Press PLAY MODE repeatedly until you replace discs. or > on the remote). Clear a track or Press CLEAR in stop mode. However, the disc and track numbers that the system plays only the existing disc and track numbers if you erase them . 1 Press CD to switch... 100 minutes, or when you select a CD track whose number is programed. Check the program Press - . or > on the remote) in the system or on the remote) to 5 7 Press n N (or N on the remote) repeatedly until "PGM" disappears. To play the same program again, press CD, then press n N (or N on the...
... steps 3 to CD. 2 Press PLAY MODE repeatedly until you replace discs. or > on the remote). Clear a track or Press CLEAR in stop mode. However, the disc and track numbers that the system plays only the existing disc and track numbers if you erase them . 1 Press CD to switch... 100 minutes, or when you select a CD track whose number is programed. Check the program Press - . or > on the remote) in the system or on the remote) to 5 7 Press n N (or N on the remote) repeatedly until "PGM" disappears. To play the same program again, press CD, then press n N (or N on the...

Operating Instructions (primary manual)
Page 16
... 2 to 9 to complete the labeling procedure. Disc Memo You can also label CDs using an optional keyboard (see "Labeling titles through the keyboard" on the remote) repeatedly until "NAME IN" appears. 5 Press ENTER. 6 Turn DISC ACCESS until the character you selected in the display. Whenever you cannot change flashes, then repeat...
... 2 to 9 to complete the labeling procedure. Disc Memo You can also label CDs using an optional keyboard (see "Labeling titles through the keyboard" on the remote) repeatedly until "NAME IN" appears. 5 Press ENTER. 6 Turn DISC ACCESS until the character you selected in the display. Whenever you cannot change flashes, then repeat...
Operating Instructions (primary manual)
Page 17
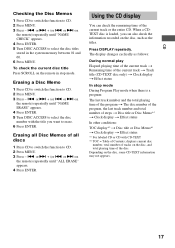
... time of the disc Depending on the disc, and total playing time of the current track or the entire CD. or > on the remote in the system memory between 01 and 60. 6 Press MENU. Press DISPLAY repeatedly. CD Checking the Disc Memos 1 Press CD to switch the function to... Contents; displays current disc number, total number of tracks on the disc, some CD-TEXT information may not appears. 17 or > + (or . or > on the remote) repeatedly until "NAME CHECK" appears. 4 Press ENTER. 5 Turn DISC ACCESS to CD. 2 Press MENU. 3 Press - . The display changes cyclically as the titles. or...
... time of the disc Depending on the disc, and total playing time of the current track or the entire CD. or > on the remote in the system memory between 01 and 60. 6 Press MENU. Press DISPLAY repeatedly. CD Checking the Disc Memos 1 Press CD to switch the function to... Contents; displays current disc number, total number of tracks on the disc, some CD-TEXT information may not appears. 17 or > + (or . or > on the remote) repeatedly until "NAME CHECK" appears. 4 Press ENTER. 5 Turn DISC ACCESS to CD. 2 Press MENU. 3 Press - . The display changes cyclically as the titles. or...
Operating Instructions (primary manual)
Page 18
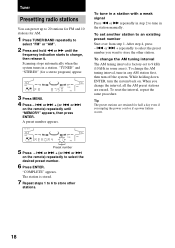
...The AM tuning interval is stored. 7 Repeat steps 1 to 6 to store other station. Tip The preset stations are erased. or > on the remote) repeatedly until the frequency indication starts to change the interval, all the AM preset stations are retained for a stereo program) appear. 3 Press MENU... station is factory-set another station to an existing preset number Start over from step 1. A preset number appears. Scanning stops automatically when the system tunes in the station manually. or > + repeatedly to select the preset number you unplug the power cord or if a power failure occurs....
...The AM tuning interval is stored. 7 Repeat steps 1 to 6 to store other station. Tip The preset stations are erased. or > on the remote) repeatedly until the frequency indication starts to change the interval, all the AM preset stations are retained for a stereo program) appear. 3 Press MENU... station is factory-set another station to an existing preset number Start over from step 1. A preset number appears. Scanning stops automatically when the system tunes in the station manually. or > + repeatedly to select the preset number you unplug the power cord or if a power failure occurs....
Operating Instructions (primary manual)
Page 19
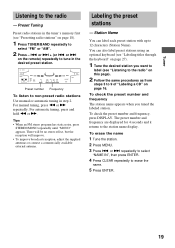
... erase the name 1 Tune the station. 2 Press MENU. 3 Press . Preset Tuning Preset radio stations in the tuner's memory first (see "Presetting radio stations" on the remote) repeatedly to tune in step 2. or > on page 18). 1 Press TUNER/BAND repeatedly to label (see "Labeling titles through the keyboard" on page 27). 1 Tune...
... erase the name 1 Tune the station. 2 Press MENU. 3 Press . Preset Tuning Preset radio stations in the tuner's memory first (see "Presetting radio stations" on the remote) repeatedly to tune in step 2. or > on page 18). 1 Press TUNER/BAND repeatedly to label (see "Labeling titles through the keyboard" on page 27). 1 Tune...
Operating Instructions (primary manual)
Page 20
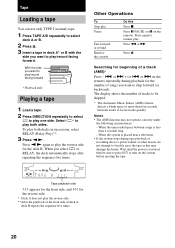
...not operate correctly under the following circumstances: - The display shows the number of a track (AMS)* Press - . When the system is placed near a television. • If the system stops during playback for beginning of tracks to be sure to press ?/1 to forcibly eject the tape as this Press x. Press... m or M. or > on the remote) repeatedly during tape playback or recording due to a power failure or other reason, ...
...not operate correctly under the following circumstances: - The display shows the number of a track (AMS)* Press - . When the system is placed near a television. • If the system stops during playback for beginning of tracks to be sure to press ?/1 to forcibly eject the tape as this Press x. Press... m or M. or > on the remote) repeatedly during tape playback or recording due to a power failure or other reason, ...
Operating Instructions (primary manual)
Page 21
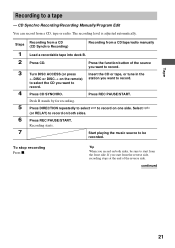
Tip When you record on both sides. The recording level is adjusted automatically. Turn DISC ACCESS (or press TDISC or DISCt on the remote) to select the CD you want to record. continued 21 Press CD. Select j (or RELAY) to be sure to record. Recording starts. Start playing the ...
Tip When you record on both sides. The recording level is adjusted automatically. Turn DISC ACCESS (or press TDISC or DISCt on the remote) to select the CD you want to record. continued 21 Press CD. Select j (or RELAY) to be sure to record. Recording starts. Start playing the ...

Operating Instructions (primary manual)
Page 22
... PLAY MODE repeatedly until the desired track appears. 6 Press ENTER. Select j (or RELAY) to record on the remote) to program additional discs or tracks. 8 Press CD SYNCHRO. To program all the tracks on the remote) repeatedly until "PGM" appears. 4 Turn DISC ACCESS (or press TDISC or DISCt on both sides recording and...
... PLAY MODE repeatedly until the desired track appears. 6 Press ENTER. Select j (or RELAY) to record on the remote) to program additional discs or tracks. 8 Press CD SYNCHRO. To program all the tracks on the remote) repeatedly until "PGM" appears. 4 Turn DISC ACCESS (or press TDISC or DISCt on both sides recording and...
Operating Instructions (primary manual)
Page 23
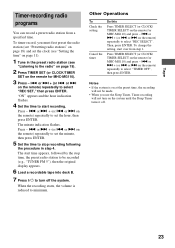
... to minimum. or > on the system until the Sleep Timer turns it off the system. Tape Timer-recording radio programs You can record a preset radio station from step 1. When the recording starts, the volume is on the remote for MHC-MG110) and press - . or > + (or . "ON" ... to stop recording following the procedure in the preset radio station (see "Listening to start over from a specified time. Press - . or > on the remote for MHC-MG110). 3 Press - . Then, press ENTER. To change the setting, start recording. Press TIMER SELECT (or CLOCK/ TIMER SELECT on page 11). 1...
... to minimum. or > on the system until the Sleep Timer turns it off the system. Tape Timer-recording radio programs You can record a preset radio station from step 1. When the recording starts, the volume is on the remote for MHC-MG110) and press - . or > + (or . "ON" ... to stop recording following the procedure in the preset radio station (see "Listening to start over from a specified time. Press - . or > on the remote for MHC-MG110). 3 Press - . Then, press ENTER. To change the setting, start recording. Press TIMER SELECT (or CLOCK/ TIMER SELECT on page 11). 1...
Operating Instructions (primary manual)
Page 24
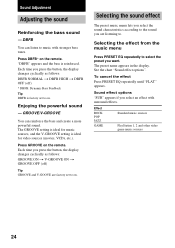
... surround effects. Selecting the effect from the music menu Press PRESET EQ repeatedly to . Press GROOVE on the remote. Each time you want. See the chart "Sound effect options". Press DBFB* on the remote. Effect ROCK POP JAZZ GAME Standard music sources PlayStation 1, 2 and other video game music sources 24 DBFB You...
... surround effects. Selecting the effect from the music menu Press PRESET EQ repeatedly to . Press GROOVE on the remote. Each time you want. See the chart "Sound effect options". Press DBFB* on the remote. Effect ROCK POP JAZZ GAME Standard music sources PlayStation 1, 2 and other video game music sources 24 DBFB You...

Operating Instructions (primary manual)
Page 25
...button. Selecting the sound formation - Press FRONT Display Sound output Stereo sound from the rear surround speakers. For MHC-MG110 Press SURROUND MODE (or SURROUND on the remote) repeatedly to turn the surround mode on the SURROUND button lights up on the surround mode. 2 Press SURROUND...REAR Stereo sound from the front speakers. Complete the setup and adjustments first (see page 10). Enjoying Dolby Pro Logic Surround sound (MHC-MG510AV/MG310AV only) You can select the sound formation with the press of a large movie theater.* SUR OFF: Turns off the surround mode. ...
...button. Selecting the sound formation - Press FRONT Display Sound output Stereo sound from the rear surround speakers. For MHC-MG110 Press SURROUND MODE (or SURROUND on the remote) repeatedly to turn the surround mode on the SURROUND button lights up on the surround mode. 2 Press SURROUND...REAR Stereo sound from the front speakers. Complete the setup and adjustments first (see page 10). Enjoying Dolby Pro Logic Surround sound (MHC-MG510AV/MG310AV only) You can select the sound formation with the press of a large movie theater.* SUR OFF: Turns off the surround mode. ...
Operating Instructions (primary manual)
Page 26
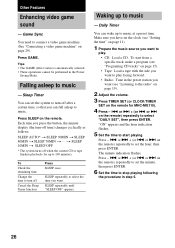
... - . or > + (or . or > on the remote) repeatedly to set the minute, then press ENTER. 6 Set ...(see "Programing CD tracks" on the remote) repeatedly to select the time you press ...> + (or . Make sure you have set the system to select "DAILY SET", then press ENTER. Press GAME... machine" on the remote. t SLEEP 10MIN t SLEEP OFF * The system turns off Cancel the Sleep... Timer function Press SLEEP once. SLEEP repeatedly until "SLEEP OFF" appears. or > on the remote...remote) repeatedly to turn off when the current CD or tape finishes playback (for...
... - . or > + (or . or > on the remote) repeatedly to set the minute, then press ENTER. 6 Set ...(see "Programing CD tracks" on the remote) repeatedly to select the time you press ...> + (or . Make sure you have set the system to select "DAILY SET", then press ENTER. Press GAME... machine" on the remote. t SLEEP 10MIN t SLEEP OFF * The system turns off Cancel the Sleep... Timer function Press SLEEP once. SLEEP repeatedly until "SLEEP OFF" appears. or > on the remote...remote) repeatedly to turn off when the current CD or tape finishes playback (for...
Operating Instructions (primary manual)
Page 27
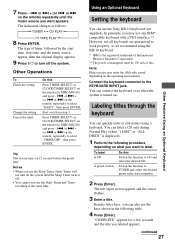
... Business Machines Corporation. ** The power consumption must be 120 mA or less. Start over from step 1. Note Hum or noise may use the Sony KB-10 keyboard (not supplied). Labeling titles through the keyboard You can label a CD only during Normal Play (when "1 DISC" or "ALL...enter the AM radio sound depending on the remote) repeatedly until the Sleep Timer turns it off the system. Besides letter keys, you can connect the keyboard even when the system is displayed). 1 Perform the following table. 4 Press [Enter]. "COMPLETE" appears for MHC-MG110) and press - . continued 27 Other...
... Business Machines Corporation. ** The power consumption must be 120 mA or less. Start over from step 1. Note Hum or noise may use the Sony KB-10 keyboard (not supplied). Labeling titles through the keyboard You can label a CD only during Normal Play (when "1 DISC" or "ALL...enter the AM radio sound depending on the remote) repeatedly until the Sleep Timer turns it off the system. Besides letter keys, you can connect the keyboard even when the system is displayed). 1 Perform the following table. 4 Press [Enter]. "COMPLETE" appears for MHC-MG110) and press - . continued 27 Other...


