Operating Instructions
Page 4
...information of controls 8 Main unit 8 Card remote commander RM-X166 10 Getting Started Installing the unit and the optional monitor 12 Resetting the unit 12 Preparing the card ... 39 System setup 40 Basic operation of visual setup 36 Language setup for Super Audio CD 31 Selecting a playback layer 31 Selecting the sound quality 32 Advanced Operations - Table... karaoke 29 Listing up tracks/images/video files - DVD level 24 Magnifying pictures 24 Adjusting the picture quality - Radio Storing and receiving stations 32 Storing automatically - Discs Playing DivX®/JPEG...
...information of controls 8 Main unit 8 Card remote commander RM-X166 10 Getting Started Installing the unit and the optional monitor 12 Resetting the unit 12 Preparing the card ... 39 System setup 40 Basic operation of visual setup 36 Language setup for Super Audio CD 31 Selecting a playback layer 31 Selecting the sound quality 32 Advanced Operations - Table... karaoke 29 Listing up tracks/images/video files - DVD level 24 Magnifying pictures 24 Adjusting the picture quality - Radio Storing and receiving stations 32 Storing automatically - Discs Playing DivX®/JPEG...
Operating Instructions
Page 5
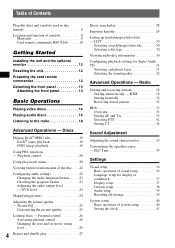
Using Optional Equipment Auxiliary audio equipment 43 CD changer 44 Rotary commander RM-X4S 45 Additional Information Precautions 46 Notes on discs 46 Playback order of MP3/WMA/JPEG/DivX® files 47 About MP3 files 47 About WMA files 47 About JPEG files 47 About DivX® files 47 Maintenance 48 Removing the unit 48 Specifications 49 Troubleshooting 50 Error displays/Messages 52 Glossary 53 Language code/area code list 55 Index 56 For installation and connections, see the supplied installation/connections manual. 5
Using Optional Equipment Auxiliary audio equipment 43 CD changer 44 Rotary commander RM-X4S 45 Additional Information Precautions 46 Notes on discs 46 Playback order of MP3/WMA/JPEG/DivX® files 47 About MP3 files 47 About WMA files 47 About JPEG files 47 About DivX® files 47 Maintenance 48 Removing the unit 48 Specifications 49 Troubleshooting 50 Error displays/Messages 52 Glossary 53 Language code/area code list 55 Index 56 For installation and connections, see the supplied installation/connections manual. 5
Operating Instructions
Page 12
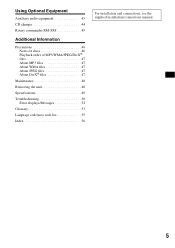
For details, see the supplied installation/ connections manual. Note that appear on both unit and/or optional monitor. This unit can... (page 13) and press the RESET button with a pointed object, such as a ball-point pen. Note Be sure to install the optional monitor safely, and in a place where it does not obstruct the driver's view. 12 RESET button Note Pressing the...manual includes instructions concerning displays on the unit and/or the optional monitor. Getting Started Installing the unit and the optional monitor Firstly, install and connect the unit and the optional monitor.
For details, see the supplied installation/ connections manual. Note that appear on both unit and/or optional monitor. This unit can... (page 13) and press the RESET button with a pointed object, such as a ball-point pen. Note Be sure to install the optional monitor safely, and in a place where it does not obstruct the driver's view. 12 RESET button Note Pressing the...manual includes instructions concerning displays on the unit and/or the optional monitor. Getting Started Installing the unit and the optional monitor Firstly, install and connect the unit and the optional monitor.
Operating Instructions
Page 48
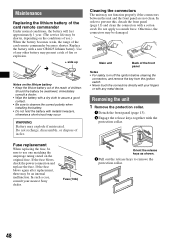
... off the ignition before cleaning the connectors, and remove the key from the ignition switch. • Never touch the connectors directly with your nearest Sony dealer. Cleaning the connectors The unit may be damaged. If the fuse blows, check the power connection and replace the fuse. Fuse (10A) Orient... properly if the connectors between the unit and the front panel are not clean. WARNING Battery may be sure to observe the correct polarity when installing the battery. • Do not hold the battery with a new CR2025 lithium battery. Main unit Back of in fire. Do not apply too...
... off the ignition before cleaning the connectors, and remove the key from the ignition switch. • Never touch the connectors directly with your nearest Sony dealer. Cleaning the connectors The unit may be damaged. If the fuse blows, check the power connection and replace the fuse. Fuse (10A) Orient... properly if the connectors between the unit and the front panel are not clean. WARNING Battery may be sure to observe the correct polarity when installing the battery. • Do not hold the battery with a new CR2025 lithium battery. Main unit Back of in fire. Do not apply too...
Operating Instructions
Page 49
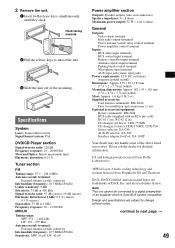
... are subject to change without notice. continue to a digital preamplifier or an equalizer which is Sony BUS system compatible. Hook facing inwards. 2 Pull the release keys to -noise ratio: 67...kg (3 lb 2 oz) Supplied accessories: Card remote commander: RM-X166 Parts for installation and connections (1 set) Optional accessories/equipment: Rotary commander: RM-X4S BUS cable (supplied with an RCA pin cord): RC-61 (1...for detailed information. Specifications System Laser: Semiconductor laser Signal format system: PAL DVD/CD Player section Signal-to-noise ratio: 120 dB Frequency response: 10 - 20,000...
... are subject to change without notice. continue to a digital preamplifier or an equalizer which is Sony BUS system compatible. Hook facing inwards. 2 Pull the release keys to -noise ratio: 67...kg (3 lb 2 oz) Supplied accessories: Card remote commander: RM-X166 Parts for installation and connections (1 set) Optional accessories/equipment: Rotary commander: RM-X4S BUS cable (supplied with an RCA pin cord): RC-61 (1...for detailed information. Specifications System Laser: Semiconductor laser Signal format system: PAL DVD/CD Player section Signal-to-noise ratio: 120 dB Frequency response: 10 - 20,000...

Operating Instructions
Page 50
...page 48). The unit is turned on the DVD. Sound There is no picture/picture noise occurs. • A connection has not been made correctly. • The DVD output level is too low (page 24)....such as DTS). t Install the unit at an angle of the car. • The MP3 file sampling rate is not 16, 22.05, 24, 32, 44.1, or 48 kHz. • The WMA file sampling rate is ... printed wiring boards. • Halogenated flame retardants are not used for a 2-speaker system. • The CD changer is incompatible with the remote commander. t Store again into the memory. • The power supply lead...
...page 48). The unit is turned on the DVD. Sound There is no picture/picture noise occurs. • A connection has not been made correctly. • The DVD output level is too low (page 24)....such as DTS). t Install the unit at an angle of the car. • The MP3 file sampling rate is not 16, 22.05, 24, 32, 44.1, or 48 kHz. • The WMA file sampling rate is ... printed wiring boards. • Halogenated flame retardants are not used for a 2-speaker system. • The CD changer is incompatible with the remote commander. t Store again into the memory. • The power supply lead...

Operating Instructions
Page 52
...consult your nearest Sony dealer. t See the supplied installation/connections manual to some problem. • The data is not finalized. The local seek mode is not a music file. NO DISC The disc is not written in the CD changer. NO INFO Text information is not inserted in the MP3/WMA/ JPEG/DivX ... another disc. • The disc is no alternative frequency for available TP stations. Depending on the disc structure, it on the disc. The DVD playback is dirty or inserted upside down.*2 t Clean or insert the disc correctly. • A blank disc has been inserted. • The...
...consult your nearest Sony dealer. t See the supplied installation/connections manual to some problem. • The data is not finalized. The local seek mode is not a music file. NO DISC The disc is not written in the CD changer. NO INFO Text information is not inserted in the MP3/WMA/ JPEG/DivX ... another disc. • The disc is no alternative frequency for available TP stations. Depending on the disc structure, it on the disc. The DVD playback is dirty or inserted upside down.*2 t Clean or insert the disc correctly. • A blank disc has been inserted. • The...


