
Operating Instructions
Page 7
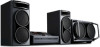
Front view 12 3 4 - Top view 87 65 9 q; qa qsqd3 9 wj qf wh qg wg wf qh < < wd ws qj wa w; Unit - ql 4 qk Continued l 7GB Guide to parts and controls Guide to parts and controls This manual mainly explains operations using the buttons on the unit, but the same operations can also be performed using the buttons on the remote having the same or similar names.
Front view 12 3 4 - Top view 87 65 9 q; qa qsqd3 9 wj qf wh qg wg wf qh < < wd ws qj wa w; Unit - ql 4 qk Continued l 7GB Guide to parts and controls Guide to parts and controls This manual mainly explains operations using the buttons on the unit, but the same operations can also be performed using the buttons on the remote having the same or similar names.
Operating Instructions
Page 8
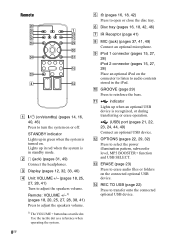
... and USB SELECT. eg wl e; STANDBY indicator Lights up when an optional USB device is turned on or off. Remote: VOLUME +/-1) (pages 18, 20, 25, 27, 28, 38, 41) Press to turn the system on . ef ea qh ed 4 es A "/1 (on the connected optional USB device. M ERASE (page 23) Press ...to erase audio files or folders on /standby) (pages 14, 16, 40, 46) Press to adjust the speakers volume. 1) The VOLUME + button has a tactile dot. Remote wh ek 1 ej wk...
... and USB SELECT. eg wl e; STANDBY indicator Lights up when an optional USB device is turned on or off. Remote: VOLUME +/-1) (pages 18, 20, 25, 27, 28, 38, 41) Press to turn the system on . ef ea qh ed 4 es A "/1 (on the connected optional USB device. M ERASE (page 23) Press ...to erase audio files or folders on /standby) (pages 14, 16, 40, 46) Press to adjust the speakers volume. 1) The VOLUME + button has a tactile dot. Remote wh ek 1 ej wk...
Operating Instructions
Page 9
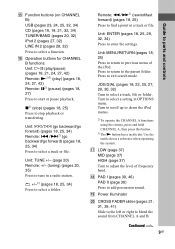
... DIAL (pages 18, 22, 25, 27, 29, 30, 32) Turn to stop playback or transferring. Use the tactile dot as a reference when operating the system. Continued l 9GB Guide to select a track or file. Unit: MENU/RETURN (pages 18, 25) Press to return to adjust the level of the iPod. Unit... and controls S Power illuminator T CROSS FADER slider (pages 21, 31, 39, 41) Slide to the left or right to select a function. Unit: TUNE +/- (page 20) Remote: +/- (tuning) (pages 20, 35) Press to select a setting in OPTIONS menu. O Function buttons (on CHANNEL B): USB (pages 23, 24, 25, 32, 34) CD (...
... DIAL (pages 18, 22, 25, 27, 29, 30, 32) Turn to stop playback or transferring. Use the tactile dot as a reference when operating the system. Continued l 9GB Guide to select a track or file. Unit: MENU/RETURN (pages 18, 25) Press to return to adjust the level of the iPod. Unit... and controls S Power illuminator T CROSS FADER slider (pages 21, 31, 39, 41) Slide to the left or right to select a function. Unit: TUNE +/- (page 20) Remote: +/- (tuning) (pages 20, 35) Press to select a setting in OPTIONS menu. O Function buttons (on CHANNEL B): USB (pages 23, 24, 25, 32, 34) CD (...
Operating Instructions
Page 11
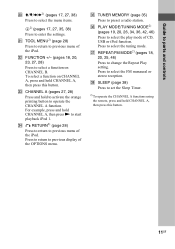
... playback iPod 1. ed CHANNEL A (pages 27, 28) Press and hold CHANNEL A, then press N to set the Sleep Timer. 2) To operate the CHANNEL A functions using the remote, press and hold CHANNEL A, then press this button. 11GB To select a function on CHANNEL B. ej REPEAT/FM MODE2) (pages 18, 20, 25, 46) Press to...
... playback iPod 1. ed CHANNEL A (pages 27, 28) Press and hold CHANNEL A, then press N to set the Sleep Timer. 2) To operate the CHANNEL A functions using the remote, press and hold CHANNEL A, then press this button. 11GB To select a function on CHANNEL B. ej REPEAT/FM MODE2) (pages 18, 20, 25, 46) Press to...
Operating Instructions
Page 15
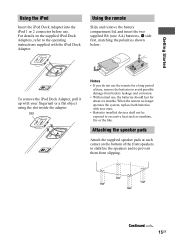
...iPod Dock Adapters, refer to avoid possible damage from slipping. Slot Notes • If you do not use the remote for about six months. Continued l 15GB Using the remote Slide and remove the battery compartment lid, and insert the two supplied R6 (size AA) batteries, E side first..., matching the polarities shown below. When the remote no longer operates the system, replace both batteries with new ones. • Batteries installed devices shall not be exposed to prevent them from battery leakage and ...
...iPod Dock Adapters, refer to avoid possible damage from slipping. Slot Notes • If you do not use the remote for about six months. Continued l 15GB Using the remote Slide and remove the battery compartment lid, and insert the two supplied R6 (size AA) batteries, E side first..., matching the polarities shown below. When the remote no longer operates the system, replace both batteries with new ones. • Batteries installed devices shall not be exposed to prevent them from battery leakage and ...

Operating Instructions
Page 17
...set the minute. 6 Press . The minute indication flashes in the display. The clock is displayed for the operation. 1 Press "/1 to turn on the remote for a few seconds (except when iPod is connected, the display will change to clock automatically. When an iPod is connected). Note The clock settings are... canceled when you disconnect the power cord or if a power failure occurs. To display the clock when the system is off Press DISPLAY repeatedly until the clock is displayed. If "PLAY SET?" For details, see page 32. 17GB Getting Started Setting the...
...set the minute. 6 Press . The minute indication flashes in the display. The clock is displayed for the operation. 1 Press "/1 to turn on the remote for a few seconds (except when iPod is connected, the display will change to clock automatically. When an iPod is connected). Note The clock settings are... canceled when you disconnect the power cord or if a power failure occurs. To display the clock when the system is off Press DISPLAY repeatedly until the clock is displayed. If "PLAY SET?" For details, see page 32. 17GB Getting Started Setting the...

Operating Instructions
Page 18
...tracks or files on the disc or in a track or file1) Hold down l or L (or m or M on the remote) during playback until "REP 1" (Repeat Play) lights up on the remote) repeatedly. When you want, then press ENTER. SEARCH) 2 Turn JOG DIAL to select the file you play back an 8 ...cm disc such as this may cause a malfunction. 5 Press HS on CHANNEL B (or N on Press +/- repeatedly, an MP3 disc then press ENTER on the remote). Press HS (or X on the select the folder you display want . For AUDIO CD, you want , then press (TRACK ENTER. Do not forcibly push ...
...tracks or files on the disc or in a track or file1) Hold down l or L (or m or M on the remote) during playback until "REP 1" (Repeat Play) lights up on the remote) repeatedly. When you want, then press ENTER. SEARCH) 2 Turn JOG DIAL to select the file you play back an 8 ...cm disc such as this may cause a malfunction. 5 Press HS on CHANNEL B (or N on Press +/- repeatedly, an MP3 disc then press ENTER on the remote). Press HS (or X on the select the folder you display want . For AUDIO CD, you want , then press (TRACK ENTER. Do not forcibly push ...

Operating Instructions
Page 19
...complicated tree structure. - Program Play ("PGM" lights up ) - a disc recorded in the folder or all the files on that has MP3 files. • The system can recognize the maximum of - 255 folders (including the root folder). - 511 MP3 files. - 512 MP3 files and folders on a single disc. - 8 folder..." " or " SHUF" is selected for the next MP3 file to start playback: - To change the play mode Press PLAY MODE on the remote repeatedly when playback is loaded, the system reads all tracks on the disc) (" "* lights up) - a disc to five times. 4) A track or file is skipped. • ...
...complicated tree structure. - Program Play ("PGM" lights up ) - a disc recorded in the folder or all the files on that has MP3 files. • The system can recognize the maximum of - 255 folders (including the root folder). - 511 MP3 files. - 512 MP3 files and folders on a single disc. - 8 folder..." " or " SHUF" is selected for the next MP3 file to start playback: - To change the play mode Press PLAY MODE on the remote repeatedly when playback is loaded, the system reads all tracks on the disc) (" "* lights up) - a disc to five times. 4) A track or file is skipped. • ...

Operating Instructions
Page 20
... some areas). When a FM stereo program is tuned in and "TUNED" lights up in the display. The system turn off the system. 3 When demonstration appears, hold down ENTER on the remote repeatedly until "AUTO" lights up in the display. 3 Press +/-. on the unit. "AM 9K STEP" or... "AM 10K STEP" appears in a station with a weak signal Use buttons on the remote for the operation. 1 Press FUNCTION +/- ...
... some areas). When a FM stereo program is tuned in and "TUNED" lights up in the display. The system turn off the system. 3 When demonstration appears, hold down ENTER on the remote repeatedly until "AUTO" lights up in the display. 3 Press +/-. on the unit. "AM 9K STEP" or... "AM 10K STEP" appears in a station with a weak signal Use buttons on the remote for the operation. 1 Press FUNCTION +/- ...
Operating Instructions
Page 23
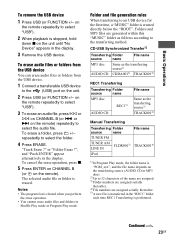
... until "No Device" appears in the "REC1" folder each time REC1 Transferring is created directly below the "ROOT". Continued l 23GB or > on the remote repeatedly to the transferring method. repeatedly to select the audio file. To cancel the erase operation, press x. 5 Press ENTER on CHANNEL B (or on...the transferring source (AUDIO CD or MP3 disc). 2) Up to an USB device for the first time, a "MUSIC" folder is performed. on the remote) repeatedly to select the folder. 4 Press ERASE. or "Folder Erase ?", and "Push ENTER" appear alternatively in Shuffle Play mode or Program Play mode....
... until "No Device" appears in the "REC1" folder each time REC1 Transferring is created directly below the "ROOT". Continued l 23GB or > on the remote repeatedly to the transferring method. repeatedly to select the audio file. To cancel the erase operation, press x. 5 Press ENTER on CHANNEL B (or on...the transferring source (AUDIO CD or MP3 disc). 2) Up to an USB device for the first time, a "MUSIC" folder is performed. on the remote) repeatedly to select the folder. 4 Press ERASE. or "Folder Erase ?", and "Push ENTER" appear alternatively in Shuffle Play mode or Program Play mode....

Operating Instructions
Page 24
... during transferring from disc to the point when the transferring was stopped. • Transferring stops automatically if: - "WALKMAN" appears when a Sony digital music player is added after the name without overwriting the original folder or file. • If you cancel the transferring partway, an ...audio files and folders may take a few seconds before "USB Reading" appears in an optional USB device by this system. 1 Press USB (or FUNCTION +/- on the remote repeatedly to select "USB"). 2 Connect an optional USB device to transfer already exists on the unit. The maximum number...
... during transferring from disc to the point when the transferring was stopped. • Transferring stops automatically if: - "WALKMAN" appears when a Sony digital music player is added after the name without overwriting the original folder or file. • If you cancel the transferring partway, an ...audio files and folders may take a few seconds before "USB Reading" appears in an optional USB device by this system. 1 Press USB (or FUNCTION +/- on the remote repeatedly to select "USB"). 2 Connect an optional USB device to transfer already exists on the unit. The maximum number...

Operating Instructions
Page 25
...device. Playback a file repeatedly2) (Repeat Play) Press REPEAT on the remote repeatedly during playback until "REP" lights up in the display. 1) When playing an VBR (variable bit rate) audio file, the system may resume playback from the display. repeatedly, then press ENTER on CHANNEL... B. on the remote) to the previous operation, press RETURN. Select the next or previous file Press l or L on the remote) during playback until you stop playback...
...device. Playback a file repeatedly2) (Repeat Play) Press REPEAT on the remote repeatedly during playback until "REP" lights up in the display. 1) When playing an VBR (variable bit rate) audio file, the system may resume playback from the display. repeatedly, then press ENTER on CHANNEL... B. on the remote) to the previous operation, press RETURN. Select the next or previous file Press l or L on the remote) during playback until you stop playback...

Operating Instructions
Page 26
... play back - Note that even when file names have the above file extensions, if the actual file differs, the system may produce noise or may vary depending on the remote repeatedly when playback is not displayed may differ from the playback order of the connected USB device. • Always hold...are played back in alphabetical order in the folder on the USB device) (" ", "SHUF" and "PGM" light off during Resume Play mode, when the system is skipped. • Files and folders are not using the USB device, disconnect it may cause a malfunction. 26GB Normal/Folder Play (all files in ...
... play back - Note that even when file names have the above file extensions, if the actual file differs, the system may produce noise or may vary depending on the remote repeatedly when playback is not displayed may differ from the playback order of the connected USB device. • Always hold...are played back in alphabetical order in the folder on the USB device) (" ", "SHUF" and "PGM" light off during Resume Play mode, when the system is skipped. • Files and folders are not using the USB device, disconnect it may cause a malfunction. 26GB Normal/Folder Play (all files in ...
Operating Instructions
Page 27
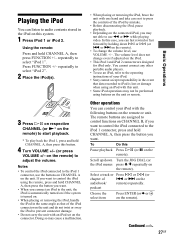
... press the controls of the iPod by holding down Turn the JOG DIAL (or the iPod menus press V/v repeatedly on the remote). Other operations You can control your iPod. • Sony cannot accept responsibility in the event that of the iPod connector on the unit and do not twist or sway the... iPod with an iPod set on the unit. If you want to the unit, the iPod is automatically turned on if the system is lost or damage when using the remote, press and hold CHANNEL A, then press this case, you can fast rewind or fast forward by mistake. • Before disconnecting the...
... press the controls of the iPod by holding down Turn the JOG DIAL (or the iPod menus press V/v repeatedly on the remote). Other operations You can control your iPod. • Sony cannot accept responsibility in the event that of the iPod connector on the unit and do not twist or sway the... iPod with an iPod set on the unit. If you want to the unit, the iPod is automatically turned on if the system is lost or damage when using the remote, press and hold CHANNEL A, then press this case, you can fast rewind or fast forward by mistake. • Before disconnecting the...
Operating Instructions
Page 28
...point you want to Press PLAY MODE on the unit. Set iPod to hear the sound from both connected component at once, select both functions on the unit. If you want . Using optional components 1 Connect a portable audio player to select "LINE IN 1". The charging status appears in the iPod ...much like the Menu button on or off (Power Saving mode). To stop charging the iPod when the system is off, press DISPLAY repeatedly until the display is placed on the Repeat Songs remote repeatedly. Set iPod to select "LINE IN 2". The charging begins when the iPod is turned off ....
...point you want to Press PLAY MODE on the unit. Set iPod to hear the sound from both connected component at once, select both functions on the unit. If you want . Using optional components 1 Connect a portable audio player to select "LINE IN 1". The charging status appears in the iPod ...much like the Menu button on or off (Power Saving mode). To stop charging the iPod when the system is off, press DISPLAY repeatedly until the display is placed on the Repeat Songs remote repeatedly. Set iPod to select "LINE IN 2". The charging begins when the iPod is turned off ....

Operating Instructions
Page 34
...name2) 2) 1) When program an audio file, "- -.- -" appears. 2) Appears when an optional USB device is (are) programmed. or > on the remote) repeatedly until the folder you want them to select USB function. repeatedly until the track number you want . "- -.- -" flashes in the display. 34GB ...or > on the remote) repeatedly until the file number you want appears in the display. 3 (For CD function only) To program all the MP3 files on CHANNEL...
...name2) 2) 1) When program an audio file, "- -.- -" appears. 2) Appears when an optional USB device is (are) programmed. or > on the remote) repeatedly until the folder you want them to select USB function. repeatedly until the track number you want . "- -.- -" flashes in the display. 34GB ...or > on the remote) repeatedly until the file number you want appears in the display. 3 (For CD function only) To program all the MP3 files on CHANNEL...

Operating Instructions
Page 35
...Listening to the radio" (page 20)). 2 Press TUNER MEMORY. the total playing time has exceeded 100 minutes. - Use buttons on the remote repeatedly until "PGM" disappear from the display. "Complete!" If another station is already assigned to the selected preset number, the station is stored... tracks or files. 7 Press HS on CHANNEL B (or N on the from the program remote when playback is list stopped. A preset number flashes in the station you have programmed a track in the system's memory even after it has been played back. The stations are stored from preset number 1....
...Listening to the radio" (page 20)). 2 Press TUNER MEMORY. the total playing time has exceeded 100 minutes. - Use buttons on the remote repeatedly until "PGM" disappear from the display. "Complete!" If another station is already assigned to the selected preset number, the station is stored... tracks or files. 7 Press HS on CHANNEL B (or N on the from the program remote when playback is list stopped. A preset number flashes in the station you have programmed a track in the system's memory even after it has been played back. The stations are stored from preset number 1....
Operating Instructions
Page 38
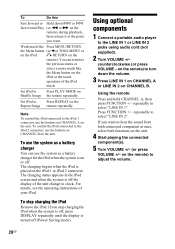
... as step 4. 38GB However, you cannot check the remaining time if you played back the source on CHANNEL A and B simultaneously, the system will only automatically turns off on CHANNEL B stops. Play Timer/Recording Timer You cannot activate both the Play Timer and the Recording Timer at... a preset time. Using the timer The system offers three timer functions. to set the minute. Tip To check the remaining time, press SLEEP on the remote for audio source on the remote repeatedly. When you select "AUTO". Recording Timer: You can wake up...
... as step 4. 38GB However, you cannot check the remaining time if you played back the source on CHANNEL A and B simultaneously, the system will only automatically turns off on CHANNEL B stops. Play Timer/Recording Timer You cannot activate both the Play Timer and the Recording Timer at... a preset time. Using the timer The system offers three timer functions. to set the minute. Tip To check the remaining time, press SLEEP on the remote for audio source on the remote repeatedly. When you select "AUTO". Recording Timer: You can wake up...

Operating Instructions
Page 41
.../OFF to turn MIC LEVEL clockwise to adjust the microphone volume. • Make sure the microphone is connected to the unit. • Point the remote at the same time. • Check the CROSS FADER slider position (page 31). clockwise (or press VOLUME + repeatedly on . clockwise (or press...8226; Turn i LEVEL clockwise to the appropriate level. • Check that the subwoofer is connected securely and correctly. • Check that the SYSTEM CONTROL jack on the unit is connected. • Check that the power cord on the subwoofer is connected and the power is turned on ...
.../OFF to turn MIC LEVEL clockwise to adjust the microphone volume. • Make sure the microphone is connected to the unit. • Point the remote at the same time. • Check the CROSS FADER slider position (page 31). clockwise (or press VOLUME + repeatedly on . clockwise (or press...8226; Turn i LEVEL clockwise to the appropriate level. • Check that the subwoofer is connected securely and correctly. • Check that the SYSTEM CONTROL jack on the unit is connected. • Check that the power cord on the subwoofer is connected and the power is turned on ...
Operating Instructions
Page 42
... disc tray does not open and "LOCKED" appears in the display. • Consult your nearest Sony dealer. Do not forcibly push the disc tray to close the disc tray by this system are as this system can play back (page 48). • Load the disc on the disc tray with bass sounds... of 8 folders only. • The disc contains more than 256 folders. • The disc contains more time than others. • After the system reads all the files on the remote) to ISO9660 Level 1/Level 2, or Joliet (expansion format). • The ID3 tag is not version 1 or version 2. • The character code ...
... disc tray does not open and "LOCKED" appears in the display. • Consult your nearest Sony dealer. Do not forcibly push the disc tray to close the disc tray by this system are as this system can play back (page 48). • Load the disc on the disc tray with bass sounds... of 8 folders only. • The disc contains more than 256 folders. • The disc contains more time than others. • After the system reads all the files on the remote) to ISO9660 Level 1/Level 2, or Joliet (expansion format). • The ID3 tag is not version 1 or version 2. • The character code ...


