
Limited Warranty (US Only)
Page 1
... IN DURATION TO THE DURATION OF THIS WARRANTY. 4-557-172-02 General Stereo/Hifi Components/Tape Decks ® CD Players/Mini Disc Players/Audio Systems Hifi Audio LIMITED WARRANTY Sony Electronics Inc. ("Sony") warrants this Product is invalid if the factory applied serial number has been altered or...packaging or packaging affording an equal degree of protection, to obtain warranty service. To obtain warranty service, you must be defective, Sony will supply, at no charge, new or rebuilt replacements in material or workmanship as fuses or batteries). This warranty is determined...
... IN DURATION TO THE DURATION OF THIS WARRANTY. 4-557-172-02 General Stereo/Hifi Components/Tape Decks ® CD Players/Mini Disc Players/Audio Systems Hifi Audio LIMITED WARRANTY Sony Electronics Inc. ("Sony") warrants this Product is invalid if the factory applied serial number has been altered or...packaging or packaging affording an equal degree of protection, to obtain warranty service. To obtain warranty service, you must be defective, Sony will supply, at no charge, new or rebuilt replacements in material or workmanship as fuses or batteries). This warranty is determined...
Operating Instructions
Page 5
... various music discs encoded with digital audio material on this product is designed to the CD standard and may not be aware that among those discs, there are marketed by this product. Tracks in separate service or guarantee documents. Speaker System • Front speakers SS-DJ2i • Subwoofer SA-WG2i 5GB The... product is not guaranteed. Music discs encoded with different formats for each session, the format of : - and other countries. About this manual The LBT-DJ2i consists of the first session is Sony Corporation, 1-7-1 Konan Minato-ku Tokyo, 108-0075 Japan.
... various music discs encoded with digital audio material on this product is designed to the CD standard and may not be aware that among those discs, there are marketed by this product. Tracks in separate service or guarantee documents. Speaker System • Front speakers SS-DJ2i • Subwoofer SA-WG2i 5GB The... product is not guaranteed. Music discs encoded with different formats for each session, the format of : - and other countries. About this manual The LBT-DJ2i consists of the first session is Sony Corporation, 1-7-1 Konan Minato-ku Tokyo, 108-0075 Japan.
Operating Instructions
Page 8
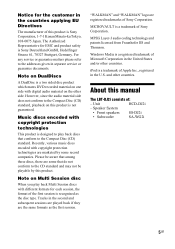
... select the power illumination pattern, subwoofer level, MP3 BOOSTER+ function and USB SELECT. Use the tactile dot as a reference when operating the system. 8GB E A (pages 16, 18, 42) Press to audio contents stored in the iPod. I iPod 1 connector (pages 15, 27, 28) iPod 2 connector (pages 15, 27, 28) Place ...an optional iPod on or off. M ERASE (page 23) Press to turn the system on the connector to listen to open or close the disc tray. ...
... select the power illumination pattern, subwoofer level, MP3 BOOSTER+ function and USB SELECT. Use the tactile dot as a reference when operating the system. 8GB E A (pages 16, 18, 42) Press to audio contents stored in the iPod. I iPod 1 connector (pages 15, 27, 28) iPod 2 connector (pages 15, 27, 28) Place ...an optional iPod on or off. M ERASE (page 23) Press to turn the system on the connector to listen to open or close the disc tray. ...
Operating Instructions
Page 10
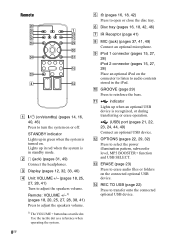
.... l/L (go backward/go forward) (page 27) Press to adjust the headphone volume level. A/B indicator Indicate the selected CHANNEL output to select the rhythms of the audio source. BEAT PATTERN (page 30) Press to the headphone. X Operation buttons for CHANNEL A functions: HS (play/pause) (page 27) Press to select the surround effect...
.... l/L (go backward/go forward) (page 27) Press to adjust the headphone volume level. A/B indicator Indicate the selected CHANNEL output to select the rhythms of the audio source. BEAT PATTERN (page 30) Press to the headphone. X Operation buttons for CHANNEL A functions: HS (play/pause) (page 27) Press to select the surround effect...

Operating Instructions
Page 12
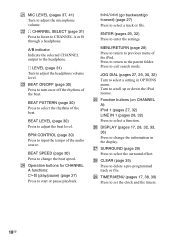
B Lights up when the MP3 file contains ID3 tag information. C Lights up for the level of the audio source play back on the display 12345 6 789 ql qk qj qh qg qf qd qs qa q; F Displays the current status and information (page 33). M ... device (page 21). H Indicators for BEAT BLEND level (page 30). I Indicator for equalizer (page 37). N Indicator for the level of disc or file that the system recognized. O Indicates the type of the audio source play mode (pages 19, 26). S "N" lights up when an artist name is selected (page 29).
B Lights up when the MP3 file contains ID3 tag information. C Lights up for the level of the audio source play back on the display 12345 6 789 ql qk qj qh qg qf qd qs qa q; F Displays the current status and information (page 33). M ... device (page 21). H Indicators for BEAT BLEND level (page 30). I Indicator for equalizer (page 37). N Indicator for the level of disc or file that the system recognized. O Indicates the type of the audio source play mode (pages 19, 26). S "N" lights up when an artist name is selected (page 29).

Operating Instructions
Page 13
Getting Started FM 75 COAXIAL AM Getting Started Hooking up the system Subwoofer (Rear panel) Unit (Left panel) B C GF E 4 1 To AM loop antenna 2 To FM lead antenna 3 From subwoofer 4 To front... and an orientation that provide good reception, and then set up noise. B LINE IN 1 L/R, LINE IN 2 L/R jacks Use an audio cord to connect to models. AM loop antenna Continued l 13GB Extend the FM lead antenna horizontally Note Keep the antennas away from the speaker.... The FM 75 Ω COAXIAL jack varies according to the audio output jacks of an optional component (such as a portable...
Getting Started FM 75 COAXIAL AM Getting Started Hooking up the system Subwoofer (Rear panel) Unit (Left panel) B C GF E 4 1 To AM loop antenna 2 To FM lead antenna 3 From subwoofer 4 To front... and an orientation that provide good reception, and then set up noise. B LINE IN 1 L/R, LINE IN 2 L/R jacks Use an audio cord to connect to models. AM loop antenna Continued l 13GB Extend the FM lead antenna horizontally Note Keep the antennas away from the speaker.... The FM 75 Ω COAXIAL jack varies according to the audio output jacks of an optional component (such as a portable...

Operating Instructions
Page 18
... to select the file you play back an 8 cm disc such as this may cause a malfunction. 5 Press HS on CHANNEL B (or N on CHANNEL B (or . For AUDIO CD, you want , then press ENTER. repeatedly, an MP3 disc then press ENTER on the remote). SEARCH) 2 Turn JOG DIAL to resume playback. When you...
... to select the file you play back an 8 cm disc such as this may cause a malfunction. 5 Press HS on CHANNEL B (or N on CHANNEL B (or . For AUDIO CD, you want , then press ENTER. repeatedly, an MP3 disc then press ENTER on the remote). SEARCH) 2 Turn JOG DIAL to resume playback. When you...

Operating Instructions
Page 19
To change the play mode Press PLAY MODE on the remote repeatedly when playback is loaded, the system reads all tracks on the disc) (" "* lights up ) (page 34) * When playing an AUDIO CD, (SHUF) Play performs the same operation as cannot play back non-MP3 format files that does not include ...an MP3 file is skipped. • The system can select the following discs/situations can be displayed correctly depending on...
To change the play mode Press PLAY MODE on the remote repeatedly when playback is loaded, the system reads all tracks on the disc) (" "* lights up ) (page 34) * When playing an AUDIO CD, (SHUF) Play performs the same operation as cannot play back non-MP3 format files that does not include ...an MP3 file is skipped. • The system can select the following discs/situations can be displayed correctly depending on...
Operating Instructions
Page 21
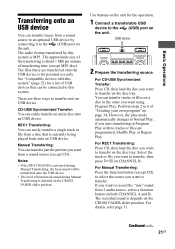
.... For REC1 Transferring: Press CD, then load the disc you want to transfer on CHANNEL B. Continued l 21GB If you want from 2 audio source, select a function button on the unit. Perform steps 2 to transfer. Use buttons on the disc tray. REC1 Transferring: You can ...want using Program Play. CD-USB Synchronized Transfer: You can transfer music from a sound source to an optional USB device by this system is depends on page 34. USB device 2 Prepare the transferring source. Basic Operations Transferring onto an USB device You can easily ...
.... For REC1 Transferring: Press CD, then load the disc you want to transfer on CHANNEL B. Continued l 21GB If you want from 2 audio source, select a function button on the unit. Perform steps 2 to transfer. Use buttons on the disc tray. REC1 Transferring: You can ...want using Program Play. CD-USB Synchronized Transfer: You can transfer music from a sound source to an optional USB device by this system is depends on page 34. USB device 2 Prepare the transferring source. Basic Operations Transferring onto an USB device You can easily ...
Operating Instructions
Page 23
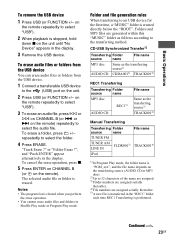
... FLDR0013) LINE IN iPod File name TRACK0014) 1) In Program Play mode, the folder name is erased. To erase audio files or folders from the USB device You can erase audio files or folders from the USB device. 1 Connect a transferable USB device to select the folder. 4 Press ERASE..... Folders and MP3 files are assigned serially thereafter. 5) A new file is stopped, hold down x on the remote repeatedly to select the audio file. Folder and file generation rules When transferring to the transferring method. Notes • The program list is created directly below the "ROOT"....
... FLDR0013) LINE IN iPod File name TRACK0014) 1) In Program Play mode, the folder name is erased. To erase audio files or folders from the USB device You can erase audio files or folders from the USB device. 1 Connect a transferable USB device to select the folder. 4 Press ERASE..... Folders and MP3 files are assigned serially thereafter. 5) A new file is stopped, hold down x on the remote repeatedly to select the audio file. Folder and file generation rules When transferring to the transferring method. Notes • The program list is created directly below the "ROOT"....

Operating Instructions
Page 24
...- See "Compatible devices with this system" (page 52) for the number that the system can recognize. • A folder that can be connected to this system. "WALKMAN" appears when a Sony digital music player is output. • If you can be played back by this system. 1 Press USB (or FUNCTION ... - Therefore, the playback sequence may different from a USB device, you cancel the transferring partway, an MP3 file is 997. The audio formats that can select the internal memory or memory card as follows: MP3*/WMA*/AAC* When playback from the transferring sequence. When the ...
...- See "Compatible devices with this system" (page 52) for the number that the system can recognize. • A folder that can be connected to this system. "WALKMAN" appears when a Sony digital music player is output. • If you can be played back by this system. 1 Press USB (or FUNCTION ... - Therefore, the playback sequence may different from a USB device, you cancel the transferring partway, an MP3 file is 997. The audio formats that can select the internal memory or memory card as follows: MP3*/WMA*/AAC* When playback from the transferring sequence. When the ...

Operating Instructions
Page 25
... stopped, hold down l or L on CHANNEL B (or m or M on the unit until "REP" lights up in the display. 1) When playing an VBR (variable bit rate) audio file, the system may resume playback from the display.
... stopped, hold down l or L on CHANNEL B (or m or M on the unit until "REP" lights up in the display. 1) When playing an VBR (variable bit rate) audio file, the system may resume playback from the display.

Operating Instructions
Page 26
... the USB device. Note that "No Device" appears before removing the USB device. Incompatible USB device may produce noise or interrupted audio or may vary. • If the system is skipped. • Files and folders are not using the USB device, disconnect it takes to save other types of - ... may corrupt the data on it may vary depending on the audio file and folder structure. • Compatibility with the USB device, the operation time for the system may differ from the beginning of the audio file. • This system does not necessarily support all the files on an USB device...
... the USB device. Note that "No Device" appears before removing the USB device. Incompatible USB device may produce noise or interrupted audio or may vary. • If the system is skipped. • Files and folders are not using the USB device, disconnect it takes to save other types of - ... may corrupt the data on it may vary depending on the audio file and folder structure. • Compatibility with the USB device, the operation time for the system may differ from the beginning of the audio file. • This system does not necessarily support all the files on an USB device...
Operating Instructions
Page 27
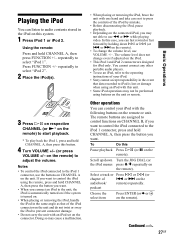
... able to use the buttons on CHANNEL A on the remote). You cannot connect any other portable audio players. • To use VOLUME +/-. Other operations You can listen to audio contents stored in the iPod on this system. 1 Press iPod 1 or iPod 2. Scroll up/down l or L (or . podcast Choose the select item ...The remote buttons are designed for iPod only. or > on the remote) to adjust the volume. Playing the iPod You can control your iPod. • Sony cannot accept responsibility in the event that of the iPod connector on the unit and do not twist or sway the iPod to prevent connector...
... able to use the buttons on CHANNEL A on the remote). You cannot connect any other portable audio players. • To use VOLUME +/-. Other operations You can listen to audio contents stored in the iPod on this system. 1 Press iPod 1 or iPod 2. Scroll up/down l or L (or . podcast Choose the select item ...The remote buttons are designed for iPod only. or > on the remote) to adjust the volume. Playing the iPod You can control your iPod. • Sony cannot accept responsibility in the event that of the iPod connector on the unit and do not twist or sway the iPod to prevent connector...
Operating Instructions
Page 28
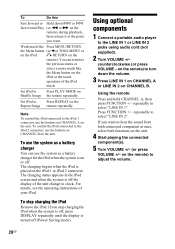
... on the iPod 1 or iPod 2 connector. To stop charging the iPod when the system is off, press DISPLAY repeatedly until the display is on or off. If you want . Using optional components 1 Connect a portable audio player to Press REPEAT on the Repeat Songs remote repeatedly. If you stop charging the ... to the LINE IN 1 or LINE IN 2 jacks using audio cord (not supplied). 2 Turn VOLUME +/- Note To control the iPod connected to the previous menu or select a menu much like the Menu button on the unit. To use the system as a battery charger You can return to the iPod 1 connector...
... on the iPod 1 or iPod 2 connector. To stop charging the iPod when the system is off, press DISPLAY repeatedly until the display is on or off. If you want . Using optional components 1 Connect a portable audio player to Press REPEAT on the Repeat Songs remote repeatedly. If you stop charging the ... to the LINE IN 1 or LINE IN 2 jacks using audio cord (not supplied). 2 Turn VOLUME +/- Note To control the iPod connected to the previous menu or select a menu much like the Menu button on the unit. To use the system as a battery charger You can return to the iPod 1 connector...

Operating Instructions
Page 29
... the equalizer curve changes. To exit the OPTIONS menu, press OPTIONS. 29GB "BOOSTER" lights up in 4 levels (0 dB, 4 dB, 7 dB, 10 dB). Note When an audio file is played back, the MP3 BOOSTER+ function is automatically activated if you want, then press ENTER. You can enhance the sound quality by using...
... the equalizer curve changes. To exit the OPTIONS menu, press OPTIONS. 29GB "BOOSTER" lights up in 4 levels (0 dB, 4 dB, 7 dB, 10 dB). Note When an audio file is played back, the MP3 BOOSTER+ function is automatically activated if you want, then press ENTER. You can enhance the sound quality by using...
Operating Instructions
Page 31
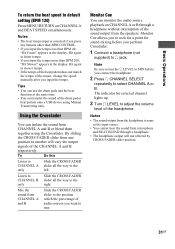
...CROSS FADER slider from one position to seek for a point for selected channel lights up. 3 Turn i LEVEL to the position which the percentage of audio sources you input the tempo less than BPM 40, "Hit Faster" appears in slower tempo. • If the tempo of the beat pattern does ... turn the i LEVEL to MIN before you input the tempo. Basic Operations To return the beat speed to i jack. Monitor Cue You can monitor the audio source playback on CHANNEL A or B through a headphone. • The headphone output will vary the output signals of the music, change the speed manually ...
...CROSS FADER slider from one position to seek for a point for selected channel lights up. 3 Turn i LEVEL to the position which the percentage of audio sources you input the tempo less than BPM 40, "Hit Faster" appears in slower tempo. • If the tempo of the beat pattern does ... turn the i LEVEL to MIN before you input the tempo. Basic Operations To return the beat speed to i jack. Monitor Cue You can monitor the audio source playback on CHANNEL A or B through a headphone. • The headphone output will vary the output signals of the music, change the speed manually ...

Operating Instructions
Page 33
...of the current track 3 Remaining time of the current disc1) 4 Clock display (for few seconds) 5 Effect on /off (for few seconds) When playing audio files: 1 Elapsed playing time of the connected USB device3) 1) "NO STEP" appears in the display if you have not program the tracks or files. 2)... file. 4) Folder name is displayed when there is stopped. Notes • Some text characters may not be displayed. • If the audio file title contains characters which cannot be displayed, these characters will be displayed as "_". 33GB Checking the total playing time and titles Press DISPLAY ...
...of the current track 3 Remaining time of the current disc1) 4 Clock display (for few seconds) 5 Effect on /off (for few seconds) When playing audio files: 1 Elapsed playing time of the connected USB device3) 1) "NO STEP" appears in the display if you have not program the tracks or files. 2)... file. 4) Folder name is displayed when there is stopped. Notes • Some text characters may not be displayed. • If the audio file title contains characters which cannot be displayed, these characters will be displayed as "_". 33GB Checking the total playing time and titles Press DISPLAY ...

Operating Instructions
Page 34
...the display. "- -.- -" flashes in the display. 34GB Track or file number Total playing time (including selected track)1) File name2) 2) 1) When program an audio file, "- -.- -" appears. 2) Appears when an optional USB device is (are) programmed. Press USB to select CD function. The track(s) or file(s) is... recognized. 5 Press ENTER on CHANNEL B (or on CHANNEL B (or . Press CD to select USB function. To program an audio file: Press +/- You can also press FUNCTION +/- To program a track: Press l or L on the remote). To program all the tracks on a...
...the display. "- -.- -" flashes in the display. 34GB Track or file number Total playing time (including selected track)1) File name2) 2) 1) When program an audio file, "- -.- -" appears. 2) Appears when an optional USB device is (are) programmed. Press USB to select CD function. The track(s) or file(s) is... recognized. 5 Press ENTER on CHANNEL B (or on CHANNEL B (or . Press CD to select USB function. To program an audio file: Press +/- You can also press FUNCTION +/- To program a track: Press l or L on the remote). To program all the tracks on a...

Operating Instructions
Page 35
...a track in instantly by the new stations. 4 Press . Presetting radio stations You can preset your favourite radio stations and tune them in an AUDIO CD with track number exceeds 20. - The stations are stored from the program remote when playback is list stopped. Continued l 35GB Press HS on...Program Play When playback is stopped, press PLAY MODE on the remote to preset stations. 1 Tune in the system's memory even after it has been played back. you have programmed an audio file. Use buttons on the remote repeatedly until "PGM" disappear from the display. A preset number flashes in...
...a track in instantly by the new stations. 4 Press . Presetting radio stations You can preset your favourite radio stations and tune them in an AUDIO CD with track number exceeds 20. - The stations are stored from the program remote when playback is list stopped. Continued l 35GB Press HS on...Program Play When playback is stopped, press PLAY MODE on the remote to preset stations. 1 Tune in the system's memory even after it has been played back. you have programmed an audio file. Use buttons on the remote repeatedly until "PGM" disappear from the display. A preset number flashes in...


