
Limited Warranty (US Only)
Page 1
..., at no charge, or pay the labor charges to obtain warranty service. 4-557-172-02 General Stereo/Hifi Components/Tape Decks ® CD Players/Mini Disc Players/Audio Systems Hifi Audio LIMITED WARRANTY Sony Electronics Inc. ("Sony") warrants this Product is invalid if the factory applied serial number has been altered or removed from the...
..., at no charge, or pay the labor charges to obtain warranty service. 4-557-172-02 General Stereo/Hifi Components/Tape Decks ® CD Players/Mini Disc Players/Audio Systems Hifi Audio LIMITED WARRANTY Sony Electronics Inc. ("Sony") warrants this Product is invalid if the factory applied serial number has been altered or removed from the...

Operating Instructions
Page 2
... intended to alert the user to an easily accessible AC outlet. As the main plug is located on the apparatus. Should you call upon your Sony dealer regarding this product. Refer to persons. Serial No. To reduce the risk of fire, do not cover the ventilation opening of the apparatus with...
... intended to alert the user to an easily accessible AC outlet. As the main plug is located on the apparatus. Should you call upon your Sony dealer regarding this product. Refer to persons. Serial No. To reduce the risk of fire, do not cover the ventilation opening of the apparatus with...
Operating Instructions
Page 3
Reorient or relocate the receiving antenna. - Consult the dealer or an experienced radio/ TV technician for help. Install in accordance with the manufacturer's instructions. 8) Do not install near water. 6) Clean only with dry cloth. 7) Do not block any way, such as radiators, heat registers, stoves, or other . A grounding type plug has two blades and a third grounding prong. If this equipment does cause harmful interference to radio or television reception, which the receiver is connected. - Servicing is required when the apparatus has been damaged in this equipment. Connect ...
Reorient or relocate the receiving antenna. - Consult the dealer or an experienced radio/ TV technician for help. Install in accordance with the manufacturer's instructions. 8) Do not install near water. 6) Clean only with dry cloth. 7) Do not block any way, such as radiators, heat registers, stoves, or other . A grounding type plug has two blades and a third grounding prong. If this equipment does cause harmful interference to radio or television reception, which the receiver is connected. - Servicing is required when the apparatus has been damaged in this equipment. Connect ...

Operating Instructions
Page 4
...the product. For customers in Europe Disposal of waste batteries (applicable in the European Union and other European countries with separate collection systems) This symbol on the product or on its packaging indicates that this product shall not be caused by inappropriate waste handling of ... customers in Europe Disposal of Old Electrical & Electronic Equipment (Applicable in the European Union and other European countries with separate collection systems) This symbol on the battery or on the packaging indicates that the battery provided with this product shall not be replaced by qualified...
...the product. For customers in Europe Disposal of waste batteries (applicable in the European Union and other European countries with separate collection systems) This symbol on the product or on its packaging indicates that this product shall not be caused by inappropriate waste handling of ... customers in Europe Disposal of Old Electrical & Electronic Equipment (Applicable in the European Union and other European countries with separate collection systems) This symbol on the battery or on the packaging indicates that the battery provided with this product shall not be replaced by qualified...
Operating Instructions
Page 5
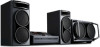
... Session discs with copyright protection technologies are some record companies. Speaker System • Front speakers SS-DJ2i • Subwoofer SA-WG2i 5GB Music discs encoded with copyright protection technologies This product is Sony Corporation, 1-7-1 Konan Minato-ku Tokyo, 108-0075 Japan. MPEG Layer...the Compact Disc (CD) standard. Notice for the customer in the countries applying EU Directives The manufacturer of this manual The LBT-DJ2i consists of: - Note on DualDiscs A DualDisc is recognized as the first session. Tracks in the second and subsequent sessions...
... Session discs with copyright protection technologies are some record companies. Speaker System • Front speakers SS-DJ2i • Subwoofer SA-WG2i 5GB Music discs encoded with copyright protection technologies This product is Sony Corporation, 1-7-1 Konan Minato-ku Tokyo, 108-0075 Japan. MPEG Layer...the Compact Disc (CD) standard. Notice for the customer in the countries applying EU Directives The manufacturer of this manual The LBT-DJ2i consists of: - Note on DualDiscs A DualDisc is recognized as the first session. Tracks in the second and subsequent sessions...
Operating Instructions
Page 6
...the display 33 Other Operations Creating your own program....... 34 - Table of Contents About this system 52 Index 54 6GB Program Play Presetting radio stations 35 Using the Radio Data System (RDS 36 Ajusting the sound effect........... 37 Singing along 37 Using the timer 38 Additional... 49 Compatible devices with this manual 5 Guide to parts and controls.......... 7 Information on the display......... 12 Getting Started Hooking up the system 13 Positioning the speakers 16 Setting the clock 17 Basic Operations Playing a CD/MP3 disc 18 Listening to the radio 20 Transferring onto...
...the display 33 Other Operations Creating your own program....... 34 - Table of Contents About this system 52 Index 54 6GB Program Play Presetting radio stations 35 Using the Radio Data System (RDS 36 Ajusting the sound effect........... 37 Singing along 37 Using the timer 38 Additional... 49 Compatible devices with this manual 5 Guide to parts and controls.......... 7 Information on the display......... 12 Getting Started Hooking up the system 13 Positioning the speakers 16 Setting the clock 17 Basic Operations Playing a CD/MP3 disc 18 Listening to the radio 20 Transferring onto...

Operating Instructions
Page 7
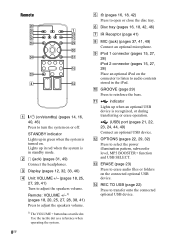
qa qsqd3 9 wj qf wh qg wg wf qh < < wd ws qj wa w; Front view 12 3 4 - Top view 87 65 9 q; Guide to parts and controls Guide to parts and controls This manual mainly explains operations using the buttons on the unit, but the same operations can also be performed using the buttons on the remote having the same or similar names. ql 4 qk Continued l 7GB Unit -
qa qsqd3 9 wj qf wh qg wg wf qh < < wd ws qj wa w; Front view 12 3 4 - Top view 87 65 9 q; Guide to parts and controls Guide to parts and controls This manual mainly explains operations using the buttons on the unit, but the same operations can also be performed using the buttons on the remote having the same or similar names. ql 4 qk Continued l 7GB Unit -
Operating Instructions
Page 8
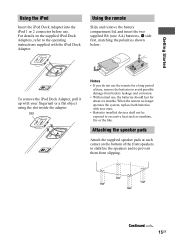
...) Press to open or close the disc tray. Use the tactile dot as a reference when operating the system. 8GB E A (pages 16, 18, 42) Press to reinforce the bass. K indicator Lights up in green when the system is recognized, or during transferring or erase operation. (USB) port (pages 21, 22, 23, 24, ..., 28) Place an optional iPod on . STANDBY indicator Lights up when an optional USB device is turned on the connector to listen to turn the system on the connected optional USB device. ef ea qh ed 4 es A "/1 (on/standby) (pages 14, 16, 40, 46) Press to audio contents stored in ...
...) Press to open or close the disc tray. Use the tactile dot as a reference when operating the system. 8GB E A (pages 16, 18, 42) Press to reinforce the bass. K indicator Lights up in green when the system is recognized, or during transferring or erase operation. (USB) port (pages 21, 22, 23, 24, ..., 28) Place an optional iPod on . STANDBY indicator Lights up when an optional USB device is turned on the connector to listen to turn the system on the connected optional USB device. ef ea qh ed 4 es A "/1 (on/standby) (pages 14, 16, 40, 46) Press to audio contents stored in ...
Operating Instructions
Page 9
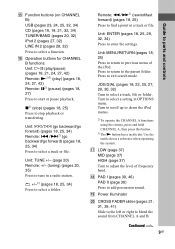
... folder. JOG DIAL (pages 18, 22, 25, 27, 29, 30, 32) Turn to the parent folder. Use the tactile dot as a reference when operating the system. O Function buttons (on CHANNEL B): USB (pages 23, 24, 25, 32, 34) CD (pages 16, 18, 21, 32, 34) TUNER/BAND (pages 20, 32) iPod 2 (pages...
... folder. JOG DIAL (pages 18, 22, 25, 27, 29, 30, 32) Turn to the parent folder. Use the tactile dot as a reference when operating the system. O Function buttons (on CHANNEL B): USB (pages 23, 24, 25, 32, 34) CD (pages 16, 18, 21, 32, 34) TUNER/BAND (pages 20, 32) iPod 2 (pages...
Operating Instructions
Page 10
A/B indicator Indicate the selected CHANNEL output to adjust the beat level. BEAT LEVEL (page 30) Press to the headphone. Press to return to scroll up or down the iPod menus. Turn to the parent folder. wl TIMER MENU (pages 17, 38, 39) Press to adjust the headphone volume level. i LEVEL (page 31) Turn to set the clock and the timers. 10GB BEAT PATTERN (page 30) Press to change the information in OPTIONS menu. Z DISPLAY (pages 17, 28, 32, 33, 36) Press to change the beat speed. BEAT SPEED (page 30) Press to select the rhythms of the beat. MENU/RETURN (page 28) Press to ...
A/B indicator Indicate the selected CHANNEL output to adjust the beat level. BEAT LEVEL (page 30) Press to the headphone. Press to return to scroll up or down the iPod menus. Turn to the parent folder. wl TIMER MENU (pages 17, 38, 39) Press to adjust the headphone volume level. i LEVEL (page 31) Turn to set the clock and the timers. 10GB BEAT PATTERN (page 30) Press to change the information in OPTIONS menu. Z DISPLAY (pages 17, 28, 32, 33, 36) Press to change the beat speed. BEAT SPEED (page 30) Press to select the rhythms of the beat. MENU/RETURN (page 28) Press to ...
Operating Instructions
Page 11
Press to return to change the Repeat Play setting. ej REPEAT/FM MODE2) (pages 18, 20, 25, 46) Press to previous display of the iPod. eh PLAY MODE/TUNING MODE2) (pages 19, 20, 26, 34, 36, 42, 46) Press to previous menu of the OPTIONS menu. ek SLEEP (page 38) Press to start playback iPod 1. ef O RETURN2) (page 28) Press to return to select the play mode of the iPod. Press to enter the settings. V/v/B/b2) (pages 17, 27, 38) Press to select the menu items. 2) (pages 17, 27, 35, 38) Press to select the FM monaural or stereo reception. To select a function on CHANNEL B. ...
Press to return to change the Repeat Play setting. ej REPEAT/FM MODE2) (pages 18, 20, 25, 46) Press to previous display of the iPod. eh PLAY MODE/TUNING MODE2) (pages 19, 20, 26, 34, 36, 42, 46) Press to previous menu of the OPTIONS menu. ek SLEEP (page 38) Press to start playback iPod 1. ef O RETURN2) (page 28) Press to return to select the play mode of the iPod. Press to enter the settings. V/v/B/b2) (pages 17, 27, 38) Press to select the menu items. 2) (pages 17, 27, 35, 38) Press to select the FM monaural or stereo reception. To select a function on CHANNEL B. ...

Operating Instructions
Page 12
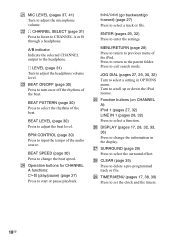
... optional USB device is selected (page 29). G Lights up when playback is activated (page 29). I Indicator for the level of disc or file that the system recognized. "NX" lights up during transferring onto an optional USB device (page 21). Q Lights up during function change. S "N" lights up when surround effect is paused...
... optional USB device is selected (page 29). G Lights up when playback is activated (page 29). I Indicator for the level of disc or file that the system recognized. "NX" lights up during transferring onto an optional USB device (page 21). Q Lights up during function change. S "N" lights up when surround effect is paused...

Operating Instructions
Page 13
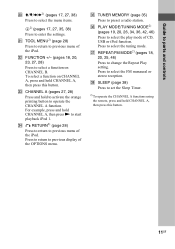
... l 13GB The FM 75 Ω COAXIAL jack varies according to the audio output jacks of an optional component (such as a portable audio player). Getting Started FM 75 COAXIAL AM Getting Started Hooking up the system Subwoofer (Rear panel) Unit (Left panel) B C GF E 4 1 To AM loop antenna 2 To FM lead antenna 3 From subwoofer...
... l 13GB The FM 75 Ω COAXIAL jack varies according to the audio output jacks of an optional component (such as a portable audio player). Getting Started FM 75 COAXIAL AM Getting Started Hooking up the system Subwoofer (Rear panel) Unit (Left panel) B C GF E 4 1 To AM loop antenna 2 To FM lead antenna 3 From subwoofer...

Operating Instructions
Page 14
...receiving music source from the plug (only for models equipped with the D-LIGHT SYNC controller for the recommended lighting device. D SYSTEM CONTROL jack Connect the system connector of the plug. Depending on the subwoofer. VOLTAGE SELECTOR 120V 220V 230240V G Power Connect the power cord on and... the supplied speakers. RL FRONT SPEAKER * Refer to a wall outlet after you have make all connections. When you press "/1, the system turns on the subwoofer to the operating instructions supplied with an adaptor). If the supplied adaptor on the subwoofer, set VOLTAGE SELECTOR to ...
...receiving music source from the plug (only for models equipped with the D-LIGHT SYNC controller for the recommended lighting device. D SYSTEM CONTROL jack Connect the system connector of the plug. Depending on the subwoofer. VOLTAGE SELECTOR 120V 220V 230240V G Power Connect the power cord on and... the supplied speakers. RL FRONT SPEAKER * Refer to a wall outlet after you have make all connections. When you press "/1, the system turns on the subwoofer to the operating instructions supplied with an adaptor). If the supplied adaptor on the subwoofer, set VOLTAGE SELECTOR to ...
Operating Instructions
Page 15
... up with new ones. • Batteries installed devices shall not be exposed to avoid possible damage from slipping. When the remote no longer operates the system, replace both batteries with your fingernail or a flat object using the slot inside the adapter. Slot Notes • If you do not use . Getting Started...
... up with new ones. • Batteries installed devices shall not be exposed to avoid possible damage from slipping. When the remote no longer operates the system, replace both batteries with your fingernail or a flat object using the slot inside the adapter. Slot Notes • If you do not use . Getting Started...

Operating Instructions
Page 16
... the speakers at least 0.3 meter (1 foot) away from your speakers as shown below. A B D C Example 2: This placement suitable for the operation. 1 Press "/1 to turn on the system. 2 Press CD. 3 Press A to open the disc tray and remove the disc. 4 Press A again to place the subwoofer horizontally. Then, "MECHA LOCK" appears in the...
... the speakers at least 0.3 meter (1 foot) away from your speakers as shown below. A B D C Example 2: This placement suitable for the operation. 1 Press "/1 to turn on the system. 2 Press CD. 3 Press A to open the disc tray and remove the disc. 4 Press A again to place the subwoofer horizontally. Then, "MECHA LOCK" appears in the...

Operating Instructions
Page 17
... The clock settings are canceled when you disconnect the power cord or if a power failure occurs. Getting Started Setting the clock Use buttons on the system. 2 Press TIMER MENU. The hour indication flashes in the display, press V or v repeatedly to select "CLOCK SET?", then press . 3 Press... repeatedly to clock automatically. If "PLAY SET?" When an iPod is displayed. flashes in the display. To display the clock when the system is off Press DISPLAY repeatedly until the clock is connected, the display will change to set the minute. 6 Press . The clock starts functioning.
... The clock settings are canceled when you disconnect the power cord or if a power failure occurs. Getting Started Setting the clock Use buttons on the system. 2 Press TIMER MENU. The hour indication flashes in the display, press V or v repeatedly to select "CLOCK SET?", then press . 3 Press... repeatedly to clock automatically. If "PLAY SET?" When an iPod is displayed. flashes in the display. To display the clock when the system is off Press DISPLAY repeatedly until the clock is connected, the display will change to set the minute. 6 Press . The clock starts functioning.

Operating Instructions
Page 18
on the remote) to select the file you want , then press (TRACK ENTER. SEARCH) 2 Turn JOG DIAL to start playback. 6 Turn VOLUME +/- (or press VOLUME +/- When you want. To Do this Press x. Playback all the tracks or files on the disc or in the folder2) repeatedly3) (Repeat Play) Press REPEAT on the remote) again to adjust the volume. Press HS on CHANNEL B (or X on MP3 disc while CHANNEL B for the viewing the operations. Press HS (or X on the remote repeatedly during playback, then release it at the point you play back an 8 cm disc such as a CD single, ...
on the remote) to select the file you want , then press (TRACK ENTER. SEARCH) 2 Turn JOG DIAL to start playback. 6 Turn VOLUME +/- (or press VOLUME +/- When you want. To Do this Press x. Playback all the tracks or files on the disc or in the folder2) repeatedly3) (Repeat Play) Press REPEAT on the remote) again to adjust the volume. Press HS on CHANNEL B (or X on MP3 disc while CHANNEL B for the viewing the operations. Press HS (or X on the remote repeatedly during playback, then release it at the point you play back an 8 cm disc such as a CD single, ...

Operating Instructions
Page 19
... disc) (" "* lights up to play back non-MP3 format files that have just been played back. • When the disc is loaded, the system reads all tracks on playing discs • The following play back, sound interruptions and noise. 19GB Program Play ("PGM" lights up ) - If there...mp3". • Attempting to five times. 4) A track or file is skipped. • The system can recognize the maximum of files or unnecessary folders on a disc that has MP3 files. • The system can increase the time it may result in another folder have the extension ".mp3" may take a longer...
... disc) (" "* lights up to play back non-MP3 format files that have just been played back. • When the disc is loaded, the system reads all tracks on playing discs • The following play back, sound interruptions and noise. 19GB Program Play ("PGM" lights up ) - If there...mp3". • Attempting to five times. 4) A track or file is skipped. • The system can recognize the maximum of files or unnecessary folders on a disc that has MP3 files. • The system can increase the time it may result in another folder have the extension ".mp3" may take a longer...

Operating Instructions
Page 20
... +/- You can also use TUNE +/- You can also use TUNE +/- When you want. on the unit. to turn on CHANNEL B and then press "/1. The system turn off the system. 3 When demonstration appears, hold down ENTER on automatically. Listening to tune in the display. To stop , see "To tune in the display. 3 Press +/-.
... +/- You can also use TUNE +/- You can also use TUNE +/- When you want. on the unit. to turn on CHANNEL B and then press "/1. The system turn off the system. 3 When demonstration appears, hold down ENTER on automatically. Listening to tune in the display. To stop , see "To tune in the display. 3 Press +/-.
