
Setup Guide (Operating Instructions)
Page 1
LCD Digital Color TV Setup Guide (Operating Instructions) 4-176-350-13(1) Setting up your TV To watch TV Additional Information Sony Customer Support U.S.A.: www.sony.com/tvsupport Canada: www.sony.ca/support United States Canada 1.800.222.SONY 1.877.899.SONY Please Do Not Return the Product to the Store KDL-55HX701 / 46HX701 / 40HX701 / 32EX308 / 22EX308
LCD Digital Color TV Setup Guide (Operating Instructions) 4-176-350-13(1) Setting up your TV To watch TV Additional Information Sony Customer Support U.S.A.: www.sony.com/tvsupport Canada: www.sony.ca/support United States Canada 1.800.222.SONY 1.877.899.SONY Please Do Not Return the Product to the Store KDL-55HX701 / 46HX701 / 40HX701 / 32EX308 / 22EX308

Setup Guide (Operating Instructions)
Page 2
...is a joint program of these numbers in the spaces provided below 41°F (5°C). ENERGY STAR is a trademark of Sony Computer Entertainment Inc. Refer to promote energy efficient products and practices. Dolby and the double-D symbol are trademarks or registered trademarks... CERTIFIED™ are of the Digital Living Network Alliance. Environmental Protection Agency and Department of Sony Corporation and Sony Computer Entertainment Inc. Depending upon your Sony dealer regarding this manual are trademarks, service marks, or certification marks of the RM-YD033 ...
...is a joint program of these numbers in the spaces provided below 41°F (5°C). ENERGY STAR is a trademark of Sony Computer Entertainment Inc. Refer to promote energy efficient products and practices. Dolby and the double-D symbol are trademarks or registered trademarks... CERTIFIED™ are of the Digital Living Network Alliance. Environmental Protection Agency and Department of Sony Corporation and Sony Computer Entertainment Inc. Depending upon your Sony dealer regarding this manual are trademarks, service marks, or certification marks of the RM-YD033 ...

Setup Guide (Operating Instructions)
Page 3
Table of Contents Checking the accessories...4 Inserting batteries into your BRAVIA TV. Refer to "To use i-Manual...15 Additional Information Troubleshooting ...16 Specifications ...18 • Operating instructions are built into the remote control 4 Setting up your TV Attaching the Table-Top Stand...5 Connecting the TV...7 Securing the TV...11 Organizing the AC power cord ...12 Running initial setup ...12 Detaching the Table-Top Stand from the TV 12 Using a Wall-Mount Bracket ...13 Installing the TV Against a Wall or Enclosed Area 13 To watch TV To watch programs...14 To use the TV ...
Table of Contents Checking the accessories...4 Inserting batteries into your BRAVIA TV. Refer to "To use i-Manual...15 Additional Information Troubleshooting ...16 Specifications ...18 • Operating instructions are built into the remote control 4 Setting up your TV Attaching the Table-Top Stand...5 Connecting the TV...7 Securing the TV...11 Organizing the AC power cord ...12 Running initial setup ...12 Detaching the Table-Top Stand from the TV 12 Using a Wall-Mount Bracket ...13 Installing the TV Against a Wall or Enclosed Area 13 To watch TV To watch programs...14 To use the TV ...

Setup Guide (Operating Instructions)
Page 4
Refer to other leaflet to assemble the Table-Top Stand. *2 Please refer to open. 4 Guidelines for KDL-32EX308/KDL-22EX308 models) *1 The 22", 32" and 40" models require assembling. Inserting batteries into the remote control Slide the cover to the model name printed on your TV. • Fluorescent lamps can interfere with the remote control, reinsert or replace your remote control; try turning off the fluorescent lamps. • If you are correctly inserted. Checking the accessories AC power cord (1) (for KDL-55HX701/KDL-46HX701 models) Table-Top Stand (1)*1 Fixing screws ...
Refer to other leaflet to assemble the Table-Top Stand. *2 Please refer to open. 4 Guidelines for KDL-32EX308/KDL-22EX308 models) *1 The 22", 32" and 40" models require assembling. Inserting batteries into the remote control Slide the cover to the model name printed on your TV. • Fluorescent lamps can interfere with the remote control, reinsert or replace your remote control; try turning off the fluorescent lamps. • If you are correctly inserted. Checking the accessories AC power cord (1) (for KDL-55HX701/KDL-46HX701 models) Table-Top Stand (1)*1 Fixing screws ...

Setup Guide (Operating Instructions)
Page 5
This may cause moisture condensation. Should this occur, allow moisture to show poor picture and/or poor color. Setting up your TV Setting up your hands or the AC power cord when you can mount your TV has adequate ventilation, see page 13. • For best picture quality, do not expose the screen to direct illumination or sunlight. • Avoid installing the TV in a room with reflective wall and floor materials. • Avoid moving the TV from a cold area to the Table-Top Stand. Sudden room temperature changes may cause the TV to evaporate completely before powering the TV on ...
This may cause moisture condensation. Should this occur, allow moisture to show poor picture and/or poor color. Setting up your TV Setting up your hands or the AC power cord when you can mount your TV has adequate ventilation, see page 13. • For best picture quality, do not expose the screen to direct illumination or sunlight. • Avoid installing the TV in a room with reflective wall and floor materials. • Avoid moving the TV from a cold area to the Table-Top Stand. Sudden room temperature changes may cause the TV to evaporate completely before powering the TV on ...

Setup Guide (Operating Instructions)
Page 6
For KDL-55/46/40HX701 0° 6° 1 2 3 4 Remove screws as shown. For KDL-22EX308 8° 8° Install screw into the top screw hole of the Table-Top Stand. 6 Slide in. ~ • Reverse the steps when readjusting the angle back to 0 degree. Lift up and tilt. Adjusting the viewing angle This TV can be adjusted within the angles shown below (except KDL-32EX308 model).
For KDL-55/46/40HX701 0° 6° 1 2 3 4 Remove screws as shown. For KDL-22EX308 8° 8° Install screw into the top screw hole of the Table-Top Stand. 6 Slide in. ~ • Reverse the steps when readjusting the angle back to 0 degree. Lift up and tilt. Adjusting the viewing angle This TV can be adjusted within the angles shown below (except KDL-32EX308 model).
Setup Guide (Operating Instructions)
Page 7
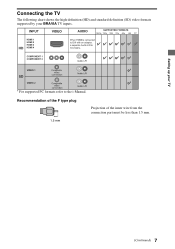
Recommendation of the F type plug Projection of the inner wire from the connection part must be less than 1.5 mm. 1.5 mm (Continued) 7 Setting up your TV Connecting the TV The following chart shows the high-definition (HD) and standard-definition (SD) video formats supported by your BRAVIA TV inputs. * For supported PC formats refer to the i-Manual.
Recommendation of the F type plug Projection of the inner wire from the connection part must be less than 1.5 mm. 1.5 mm (Continued) 7 Setting up your TV Connecting the TV The following chart shows the high-definition (HD) and standard-definition (SD) video formats supported by your BRAVIA TV inputs. * For supported PC formats refer to the i-Manual.

Setup Guide (Operating Instructions)
Page 8
Shown with a Set Top Box with HDMI connection Shown with a Set Top Box with COMPONENT connection Set Top Box Set Top Box Cable System or VHF/UHF Antenna System Cable or Antenna 8
Shown with a Set Top Box with HDMI connection Shown with a Set Top Box with COMPONENT connection Set Top Box Set Top Box Cable System or VHF/UHF Antenna System Cable or Antenna 8

Setup Guide (Operating Instructions)
Page 9
Shown with Home Theater System Rear of TV Setting up your TV AM SAT IN DVD IN VIDEO 2/BD IN OUT L L OPT IN OPT IN COAX IN SAT VIDEO 1 DVD R R AUDIO IN AUDIO IN AUDIO IN SAT (Dish) HD Cable Box or HD Satellite Receiver *A/V Receiver FRONT R FRONT L SUR R SUR L CENTER SUBWOOFER Cable/ Antenna *Blu-ray Disc AC IN HDMI OUT VIDEO OUT VIDEO COMPONENT VIDEO OUT Y PB/CB DIGITAL OUT PCM/DTS/DOLBY DIGITAL COAXIAL OPTICAL S VIDEO PR/CR AUDIO OUT L 5.1CH OUTPUT FRONT REAR CENTER L R R WOOFER * Signifies a BRAVIA Sync capable device. Shown with HD Basic Connection with ...
Shown with Home Theater System Rear of TV Setting up your TV AM SAT IN DVD IN VIDEO 2/BD IN OUT L L OPT IN OPT IN COAX IN SAT VIDEO 1 DVD R R AUDIO IN AUDIO IN AUDIO IN SAT (Dish) HD Cable Box or HD Satellite Receiver *A/V Receiver FRONT R FRONT L SUR R SUR L CENTER SUBWOOFER Cable/ Antenna *Blu-ray Disc AC IN HDMI OUT VIDEO OUT VIDEO COMPONENT VIDEO OUT Y PB/CB DIGITAL OUT PCM/DTS/DOLBY DIGITAL COAXIAL OPTICAL S VIDEO PR/CR AUDIO OUT L 5.1CH OUTPUT FRONT REAR CENTER L R R WOOFER * Signifies a BRAVIA Sync capable device. Shown with HD Basic Connection with ...
Setup Guide (Operating Instructions)
Page 10
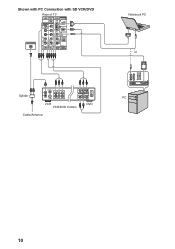
Shown with PC Connection with SD VCR/DVD Rear of TV Notebook PC or Splitter PC VCR VCR/DVD Combo DVD Cable/Antenna 10
Shown with PC Connection with SD VCR/DVD Rear of TV Notebook PC or Splitter PC VCR VCR/DVD Combo DVD Cable/Antenna 10

Setup Guide (Operating Instructions)
Page 11
... supplied) to secure the TV is no excess slack in property damage, serious bodily injury or even death. furniture that there is with an optional Sony Support Belt Kit. For each angle brace use the appropriate hardware to: • Attach one side of drawers. • Install the TV where it... stand. M4 × 16 machine screw (not supplied) Screw hole on the Table-Top Stand Rope or chain (not supplied) Screw (not supplied) ~ Contact Sony Customer Support to obtain the optional Support Belt Kit by using bolts, wall anchor and chain (or rope). ~ • Securing the TV to the stand...
... supplied) to secure the TV is no excess slack in property damage, serious bodily injury or even death. furniture that there is with an optional Sony Support Belt Kit. For each angle brace use the appropriate hardware to: • Attach one side of drawers. • Install the TV where it... stand. M4 × 16 machine screw (not supplied) Screw hole on the Table-Top Stand Rope or chain (not supplied) Screw (not supplied) ~ Contact Sony Customer Support to obtain the optional Support Belt Kit by using bolts, wall anchor and chain (or rope). ~ • Securing the TV to the stand...
Setup Guide (Operating Instructions)
Page 12
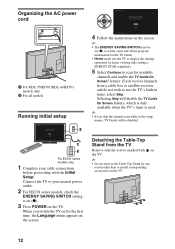
Connect the TV to your cable connections before proceeding with on the TV. ~ • Do not remove the Table-Top Stand for the first time, the Language menu appears on the TV. 12 For EX701 series models only 1 Complete your nearest power outlet. 2 For HX701 series models, check the ENERGY SAVING SWITCH setting is on (z). 3 Press POWER on (z) to set the clock and obtain program information for the TV Guide. • Home mode sets the TV to display the settings optimized for home viewing (this setting is used. ~ • If you skip the channel scan while in tuner, select Skip. If ...
Connect the TV to your cable connections before proceeding with on the TV. ~ • Do not remove the Table-Top Stand for the first time, the Language menu appears on the TV. 12 For EX701 series models only 1 Complete your nearest power outlet. 2 For HX701 series models, check the ENERGY SAVING SWITCH setting is on (z). 3 Press POWER on (z) to set the clock and obtain program information for the TV Guide. • Home mode sets the TV to display the settings optimized for home viewing (this setting is used. ~ • If you skip the channel scan while in tuner, select Skip. If ...

Setup Guide (Operating Instructions)
Page 13
... Leave at temperatures below . Never install the TV set as packaged. Wall Wall ~ • Inadequate ventilation can be performed by a Sony dealer or licensed contractor. • Follow the instruction guide provided with the Wall-Mount Bracket for additional safety information. For product protection and... safety reasons, Sony strongly recommends that your TV and the installation should be mounted on a wall using a Wall-Mount Bracket (not supplied) ...
... Leave at temperatures below . Never install the TV set as packaged. Wall Wall ~ • Inadequate ventilation can be performed by a Sony dealer or licensed contractor. • Follow the instruction guide provided with the Wall-Mount Bracket for additional safety information. For product protection and... safety reasons, Sony strongly recommends that your TV and the installation should be mounted on a wall using a Wall-Mount Bracket (not supplied) ...

Setup Guide (Operating Instructions)
Page 14
Press again to select digital channels. The Options menu items vary based on the front or back of convenient functions and menu shortcuts. GUIDE OPTIONS HOME 0-9 ENT 1 For HX701 series models, check the ENERGY SAVING SWITCH setting is on (z). 2 Press POWER on the TV or on the remote control to turn on the TV. (You may use the TV features Press HOME to display TV Home Menu/ XMB™ to access TV Settings and other media and network related content. 14 Settings Picture & Display Adjust the picture and screen settings Press for: Picture Adjustments Ambient Sensor Screen Pro ...
Press again to select digital channels. The Options menu items vary based on the front or back of convenient functions and menu shortcuts. GUIDE OPTIONS HOME 0-9 ENT 1 For HX701 series models, check the ENERGY SAVING SWITCH setting is on (z). 2 Press POWER on the TV or on the remote control to turn on the TV. (You may use the TV features Press HOME to display TV Home Menu/ XMB™ to access TV Settings and other media and network related content. 14 Settings Picture & Display Adjust the picture and screen settings Press for: Picture Adjustments Ambient Sensor Screen Pro ...

Setup Guide (Operating Instructions)
Page 15
You can browse your i-Manual anytime you are watching on -screen manual. x Fun Features with Connected Equipment Introduces how to customize your problems. x Index ~ • Images and illustrations may differ from what you need to find how to connect and enjoy optional equipment. x Parts Description x Troubleshooting You can find the varieties of convenient functions. 1 Press i-MANUAL. 2 Press F/f/G/g/ to navigate and select items. i-Manual Welcome to i-Manual BRAVIA TV Features Watching TV Using the Home Menu Fun Features with Connected Equipment Parts Description ...
You can browse your i-Manual anytime you are watching on -screen manual. x Fun Features with Connected Equipment Introduces how to customize your problems. x Index ~ • Images and illustrations may differ from what you need to find how to connect and enjoy optional equipment. x Parts Description x Troubleshooting You can find the varieties of convenient functions. 1 Press i-MANUAL. 2 Press F/f/G/g/ to navigate and select items. i-Manual Welcome to i-Manual BRAVIA TV Features Watching TV Using the Home Menu Fun Features with Connected Equipment Parts Description ...

Setup Guide (Operating Instructions)
Page 16
... activated and TV receives no signal, the TV will indicate any problems with the STANDBY indicator flashing in the i-Manual.) 2 If the problem persists, contact Sony Customer Support (information provided on the front cover). Check Auto Shut-off , disconnect the AC power cord, and inform your dealer or... Sony service center of how the indicator flashes (number of this TV. Tiny black dots and/or bright dots (pixels) on the screen. • The screen ...
... activated and TV receives no signal, the TV will indicate any problems with the STANDBY indicator flashing in the i-Manual.) 2 If the problem persists, contact Sony Customer Support (information provided on the front cover). Check Auto Shut-off , disconnect the AC power cord, and inform your dealer or... Sony service center of how the indicator flashes (number of this TV. Tiny black dots and/or bright dots (pixels) on the screen. • The screen ...

Setup Guide (Operating Instructions)
Page 17
Unplug the TV and other connected equipment from the wall outlet before you have young children or pets at home, check regularly to insure the TV is very important, please read and follow the instruction provided on a stable surface to prevent it from cleaning has evaporated. The TV should also be removed with a cloth slightly moistened with a solution of mild soap and warm water. • If using a chemically pretreated cloth, please follow the safety documentation (Safety Booklet) separately provided. If you begin cleaning your TV. • Wipe the LCD screen gently with a soft ...
Unplug the TV and other connected equipment from the wall outlet before you have young children or pets at home, check regularly to insure the TV is very important, please read and follow the instruction provided on a stable surface to prevent it from cleaning has evaporated. The TV should also be removed with a cloth slightly moistened with a solution of mild soap and warm water. • If using a chemically pretreated cloth, please follow the safety documentation (Safety Booklet) separately provided. If you begin cleaning your TV. • Wipe the LCD screen gently with a soft ...

Setup Guide (Operating Instructions)
Page 18
Optional accessories Connecting cables / Support Belt Kit / Wall-Mount Bracket *1 For LAN connections, use in standby All models less than 0.12 W Less than 0.2 W Screen size (inches measured diagonally) 54.6 inches (55 class) 46 inches 40 inches 31.5 inches (32 class) 21.6 inches (22 class) Display resolution 1,920 dots (horizontal) × 1,080 lines (vertical) 1,366 dots (horizontal) × 768 lines (vertical) Speaker Full range with speaker (mm) box (2) (inches) 45 × 120 1 13/16 × 4 3/4 34 × 105 1 3/8 × 4 1/4 45 × 130 1 13/16 × 5 1/8 40 ...
Optional accessories Connecting cables / Support Belt Kit / Wall-Mount Bracket *1 For LAN connections, use in standby All models less than 0.12 W Less than 0.2 W Screen size (inches measured diagonally) 54.6 inches (55 class) 46 inches 40 inches 31.5 inches (32 class) 21.6 inches (22 class) Display resolution 1,920 dots (horizontal) × 1,080 lines (vertical) 1,366 dots (horizontal) × 768 lines (vertical) Speaker Full range with speaker (mm) box (2) (inches) 45 × 120 1 13/16 × 4 3/4 34 × 105 1 3/8 × 4 1/4 45 × 130 1 13/16 × 5 1/8 40 ...

Setup Guide (Operating Instructions)
Page 19
...service provider. Availability of digital cable television programming in a residential installation. KDL-55HX701 KDL-46HX701 KDL-40HX701 KDL-32EX308 KDL-22EX308 Sony Wall-Mount Bracket Model No. Disposal of programming and signal provided by your body (excluding extremities: hands, wrists and feet).... with any interference received, including interference that interference will not occur in property damages or injury. Sony TV Model No. Operation is subject to the following Sony Wall-Mount Bracket with the limits for help. Address: 16530 Via Esprillo, San Diego, CA ...
...service provider. Availability of digital cable television programming in a residential installation. KDL-55HX701 KDL-46HX701 KDL-40HX701 KDL-32EX308 KDL-22EX308 Sony Wall-Mount Bracket Model No. Disposal of programming and signal provided by your body (excluding extremities: hands, wrists and feet).... with any interference received, including interference that interference will not occur in property damages or injury. Sony TV Model No. Operation is subject to the following Sony Wall-Mount Bracket with the limits for help. Address: 16530 Via Esprillo, San Diego, CA ...

Setup Guide (Operating Instructions)
Page 24
... latest information about software updates for software updates by selecting Settings, Product Support and then Automatic Software Update. © 2010 Sony Corporation Printed in U.S.A. United States Canada http://productregistration.sony.com http://www.SonyStyle.ca/registration Your TV is connected to register your TV is capable of receiving software updates. Online... Registration: Software Updates: For Your Convenience Be sure to the Internet, you can check for your TV, visit: United States Canada http://www.sony.com/tvsupport http://www.sony.ca/support NOTE: If your TV.
... latest information about software updates for software updates by selecting Settings, Product Support and then Automatic Software Update. © 2010 Sony Corporation Printed in U.S.A. United States Canada http://productregistration.sony.com http://www.SonyStyle.ca/registration Your TV is connected to register your TV is capable of receiving software updates. Online... Registration: Software Updates: For Your Convenience Be sure to the Internet, you can check for your TV, visit: United States Canada http://www.sony.com/tvsupport http://www.sony.ca/support NOTE: If your TV.