
Limited Warranty (US Only)
Page 1
...your exclusive remedies. This Limited Warranty is provided "AS IS" unless expressly provided for in material or workmanship during service and Sony will , at its original specifications. DURATION OF IMPLIED WARRANTIES: EXCEPT TO THE EXTENT PROHIBITED BY APPLICABLE LAW, ANY IMPLIED ... required. Some states do not allow the exclusion or limitation of or to state. SONY® DSLR Cameras and Lenses for DSLR Camera LIMITED INARRANT'f (us Only, Sony Electronics Inc. ("Sony") warrantsthis product against defects in the United States. It does not cover technical assistance for...
...your exclusive remedies. This Limited Warranty is provided "AS IS" unless expressly provided for in material or workmanship during service and Sony will , at its original specifications. DURATION OF IMPLIED WARRANTIES: EXCEPT TO THE EXTENT PROHIBITED BY APPLICABLE LAW, ANY IMPLIED ... required. Some states do not allow the exclusion or limitation of or to state. SONY® DSLR Cameras and Lenses for DSLR Camera LIMITED INARRANT'f (us Only, Sony Electronics Inc. ("Sony") warrantsthis product against defects in the United States. It does not cover technical assistance for...

Instruction Manual
Page 2
... country or region. 3 Search for in shooting mode. 2 Select the desired shooting tip, then press z on the many functions of the camera. 1 Access the Sony support page. Shooting Tip The camera displays shooting tips for MENU items and the setting values. 1 Press the MENU button or the Fn (Function) button. 2 Select the desired...
... country or region. 3 Search for in shooting mode. 2 Select the desired shooting tip, then press z on the many functions of the camera. 1 Access the Sony support page. Shooting Tip The camera displays shooting tips for MENU items and the setting values. 1 Press the MENU button or the Fn (Function) button. 2 Select the desired...
Instruction Manual
Page 4
...the instructions. [ AC Adaptor Use the nearby wall outlet (wall socket) when using the apparatus. You can help preserve our environment by Sony. • Dispose of used with other electrical equipment. Operation is designed specifically for an uncontrolled environment and meets the FCC radio frequency (...15 of the FCC Rules. This equipment has very low levels of RF energy that may not cause harmful interference, and (2) this camera only, and should not be used battery packs promptly as described in the U.S.A. and Canada [ RECYCLING LITHIUM-ION BATTERIES Lithium-Ion ...
...the instructions. [ AC Adaptor Use the nearby wall outlet (wall socket) when using the apparatus. You can help preserve our environment by Sony. • Dispose of used with other electrical equipment. Operation is designed specifically for an uncontrolled environment and meets the FCC radio frequency (...15 of the FCC Rules. This equipment has very low levels of RF energy that may not cause harmful interference, and (2) this camera only, and should not be used battery packs promptly as described in the U.S.A. and Canada [ RECYCLING LITHIUM-ION BATTERIES Lithium-Ion ...
Instruction Manual
Page 7
...an incorporated battery, this battery should be replaced by qualified service staff only. For Customers in Singapore For customers who purchased their camera from a store in Japan that for standards supported by inappropriate waste handling. On certain batteries this product or battery, please ...contact your local Civic Office, your Sony dealer or local authorized Sony service facility. By ensuring these products at end-of-life to the applicable collection point for the environment and...
...an incorporated battery, this battery should be replaced by qualified service staff only. For Customers in Singapore For customers who purchased their camera from a store in Japan that for standards supported by inappropriate waste handling. On certain batteries this product or battery, please ...contact your local Civic Office, your Sony dealer or local authorized Sony service facility. By ensuring these products at end-of-life to the applicable collection point for the environment and...
Instruction Manual
Page 8
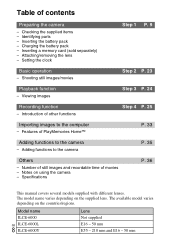
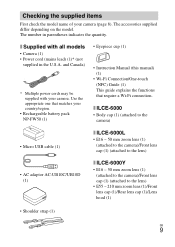
... Playback function - Model name ILCE-6000 GB ILCE-6000L 8 ILCE-6000Y Lens Not supplied E16 - 50 mm E55 - 210 mm and E16 - 50 mm Checking the supplied items - Adding functions to the camera - The model name varies depending on using the camera - Charging the battery pack ... P. 24 Recording function - Specifications P. 36 This manual covers several models supplied with different lenses. Introduction of contents Preparing the camera - Inserting the battery pack - The available model varies depending on the countries/regions. Features of movies - Number of still ...
... Playback function - Model name ILCE-6000 GB ILCE-6000L 8 ILCE-6000Y Lens Not supplied E16 - 50 mm E55 - 210 mm and E16 - 50 mm Checking the supplied items - Adding functions to the camera - The model name varies depending on using the camera - Charging the battery pack ... P. 24 Recording function - Specifications P. 36 This manual covers several models supplied with different lenses. Introduction of contents Preparing the camera - Inserting the battery pack - The available model varies depending on the countries/regions. Features of movies - Number of still ...
Instruction Manual
Page 9
... power cords may be supplied with all models • Camera (1) • Power cord (mains lead) (1)* (not supplied in parentheses indicates the quantity. x ILCE-6000 • Body cap (1) (attached to the camera) • Micro USB cable (1) x ILCE-6000L • E16 - 50 mm zoom lens (1) (attached to the camera)/Front lens cap (1) (attached to the lens) • AC...
... power cords may be supplied with all models • Camera (1) • Power cord (mains lead) (1)* (not supplied in parentheses indicates the quantity. x ILCE-6000 • Body cap (1) (attached to the camera) • Micro USB cable (1) x ILCE-6000L • E16 - 50 mm zoom lens (1) (attached to the camera)/Front lens cap (1) (attached to the lens) • AC...
Instruction Manual
Page 11
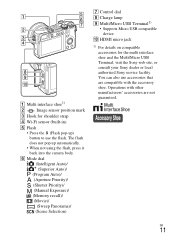
.... A Multi interface shoe1) B Image sensor position mark C Hook for the multi interface shoe and the Multi/Micro USB Terminal, visit the Sony web site, or consult your Sony dealer or local authorized Sony service facility. J HDMI micro jack 1) For details on compatible accessories for shoulder strap D Wi-Fi sensor (built-in) E Flash •...
.... A Multi interface shoe1) B Image sensor position mark C Hook for the multi interface shoe and the Multi/Micro USB Terminal, visit the Sony web site, or consult your Sony dealer or local authorized Sony service facility. J HDMI micro jack 1) For details on compatible accessories for shoulder strap D Wi-Fi sensor (built-in) E Flash •...
Instruction Manual
Page 12
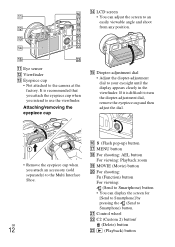
.... U Control wheel V C2 (Custom 2) button/ (Delete) button W (Playback) button Attaching/removing the eyepiece cup O Diopter-adjustment dial • Adjust the diopter-adjustment dial to the camera at the factory. N LCD screen • You can display the screen for [Send to Smartphone] by pressing the (Send to an easily viewable angle and...
.... U Control wheel V C2 (Custom 2) button/ (Delete) button W (Playback) button Attaching/removing the eyepiece cup O Diopter-adjustment dial • Adjust the diopter-adjustment dial to the camera at the factory. N LCD screen • You can display the screen for [Send to Smartphone] by pressing the (Send to an easily viewable angle and...
Instruction Manual
Page 13
B Connection plate cover • Use this when using an ACPW20 AC Adaptor (sold separately). GB 13 Otherwise, you connect the camera to the camera may occur. D Speaker E Access lamp F Battery/memory card cover G Memory card slot H Battery insertion slot I Battery eject lever A (N Mark)... • Touch the mark when you cannot firmly secure the camera, and damage to a smartphone equipped with a screw less than 5.5 mm (7/32 inches) long. Insert the connection plate into the battery compartment, and ...
B Connection plate cover • Use this when using an ACPW20 AC Adaptor (sold separately). GB 13 Otherwise, you connect the camera to the camera may occur. D Speaker E Access lamp F Battery/memory card cover G Memory card slot H Battery insertion slot I Battery eject lever A (N Mark)... • Touch the mark when you cannot firmly secure the camera, and damage to a smartphone equipped with a screw less than 5.5 mm (7/32 inches) long. Insert the connection plate into the battery compartment, and ...
Instruction Manual
Page 15
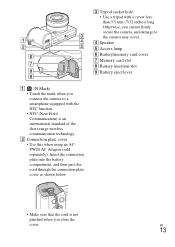
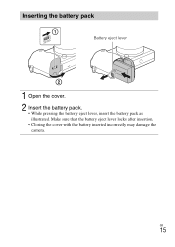
GB 15 Inserting the battery pack Battery eject lever 1 Open the cover. 2 Insert the battery pack. • While pressing the battery eject lever, insert the battery pack as illustrated. Make sure that the battery eject lever locks after insertion. • Closing the cover with the battery inserted incorrectly may damage the camera.
GB 15 Inserting the battery pack Battery eject lever 1 Open the cover. 2 Insert the battery pack. • While pressing the battery eject lever, insert the battery pack as illustrated. Make sure that the battery eject lever locks after insertion. • Closing the cover with the battery inserted incorrectly may damage the camera.
Instruction Manual
Page 16
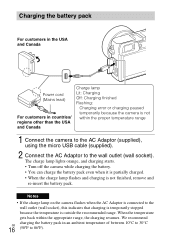
...that charging is temporarily stopped because the temperature is outside the recommended range. When the temperature gets back within the proper temperature range 1 Connect the camera to the AC Adaptor (supplied), using the micro USB cable (supplied). 2 Connect the AC Adaptor to the wall outlet (wall socket). Notes... • If the charge lamp on the camera flashes when the AC Adaptor is connected to 86ºF). We recommend charging the battery pack in countries/ regions other than the USA and ...
...that charging is temporarily stopped because the temperature is outside the recommended range. When the temperature gets back within the proper temperature range 1 Connect the camera to the AC Adaptor (supplied), using the micro USB cable (supplied). 2 Connect the AC Adaptor to the wall outlet (wall socket). Notes... • If the charge lamp on the camera flashes when the AC Adaptor is connected to 86ºF). We recommend charging the battery pack in countries/ regions other than the USA and ...
Instruction Manual
Page 17
...power source. • When charging is finished, disconnect the AC Adaptor from the wall outlet (wall socket). • Be sure to use only genuine Sony brand battery packs, micro USB cable (supplied) and AC Adaptor (supplied). • Power is connected to a wall outlet (wall socket) with the ...when charging via a computer: - Do not charge for charging using a custom-built computer or a GB modified computer. 17 x Charging by connecting the camera to a computer using a micro USB cable. In this case, wipe any dust off or restart the computer, or wake the computer to resume from ...
...power source. • When charging is finished, disconnect the AC Adaptor from the wall outlet (wall socket). • Be sure to use only genuine Sony brand battery packs, micro USB cable (supplied) and AC Adaptor (supplied). • Power is connected to a wall outlet (wall socket) with the ...when charging via a computer: - Do not charge for charging using a custom-built computer or a GB modified computer. 17 x Charging by connecting the camera to a computer using a micro USB cable. In this case, wipe any dust off or restart the computer, or wake the computer to resume from ...

Instruction Manual
Page 18
...) has been reached, and then continued by pressing the MOVIE button again. Approx. 60 min. Number of minutes for shooting under the following conditions: (CIPA: Camera & Imaging Products Association) - Using a Sony Memory Stick PRO Duo™ (Mark2) media (sold separately). -
...) has been reached, and then continued by pressing the MOVIE button again. Approx. 60 min. Number of minutes for shooting under the following conditions: (CIPA: Camera & Imaging Products Association) - Using a Sony Memory Stick PRO Duo™ (Mark2) media (sold separately). -
Instruction Manual
Page 20
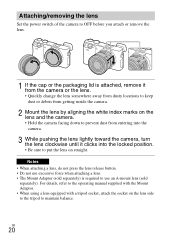
... the lens release button. • Do not use excessive force when attaching a lens. • The Mount Adaptor (sold separately) is attached, remove it from the camera or the lens. • Quickly change the lens somewhere away from dusty locations to keep dust or debris from getting inside the... sure to put the lens on the lens side to the tripod to maintain balance. Attaching/removing the lens Set the power switch of the camera to OFF before you attach or remove the lens. 1 If the cap or the packaging lid is required to use an A-mount lens (sold separately...
... the lens release button. • Do not use excessive force when attaching a lens. • The Mount Adaptor (sold separately) is attached, remove it from the camera or the lens. • Quickly change the lens somewhere away from dusty locations to keep dust or debris from getting inside the... sure to put the lens on the lens side to the tripod to maintain balance. Attaching/removing the lens Set the power switch of the camera to OFF before you attach or remove the lens. 1 If the cap or the packaging lid is required to use an A-mount lens (sold separately...
Instruction Manual
Page 21
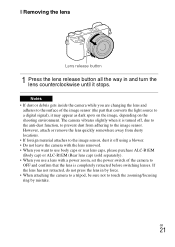
... the lens Lens release button 1 Press the lens release button all the way in by force. • When attaching the camera to a tripod, be sure not to the surface of the camera to OFF and confirm that converts the light source to the image sensor. GB 21 Notes • If dust or... debris gets inside the camera while you use body caps or rear lens caps, please purchase ALC-B1EM (Body cap) or ALC-R1EM (Rear lens cap) (sold separately). • When ...
... the lens Lens release button 1 Press the lens release button all the way in by force. • When attaching the camera to a tripod, be sure not to the surface of the camera to OFF and confirm that converts the light source to the image sensor. GB 21 Notes • If dust or... debris gets inside the camera while you use body caps or rear lens caps, please purchase ALC-B1EM (Body cap) or ALC-R1EM (Rear lens cap) (sold separately). • When ...
Instruction Manual
Page 22
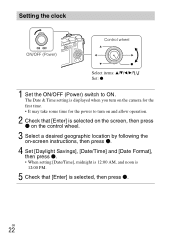
The Date & Time setting is displayed when you turn on the camera for the first time. • It may take some time for the power to ON. Setting the clock ON/OFF (Power) Control wheel Select items: v/V/b/B/ / ...
The Date & Time setting is displayed when you turn on the camera for the first time. • It may take some time for the power to ON. Setting the clock ON/OFF (Power) Control wheel Select items: v/V/b/B/ / ...
Instruction Manual
Page 23
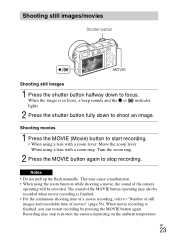
...finished. • For the continuous shooting time of a movie recording, refer to "Number of still images and recordable time of the camera operating will be recorded when movie recording is finished, you can restart recording by pressing the MOVIE button again. Recording may cause a malfunction...; When using a lens with a zoom ring: Turn the zoom ring. 2 Press the MOVIE button again to stop to protect the camera depending on the ambient temperature. Shooting still images/movies Shutter button MOVIE Shooting still images 1 Press the shutter button halfway down to shoot an...
...finished. • For the continuous shooting time of a movie recording, refer to "Number of still images and recordable time of the camera operating will be recorded when movie recording is finished, you can restart recording by pressing the MOVIE button again. Recording may cause a malfunction...; When using a lens with a zoom ring: Turn the zoom ring. 2 Press the MOVIE button again to stop to protect the camera depending on the ambient temperature. Shooting still images/movies Shutter button MOVIE Shooting still images 1 Press the shutter button halfway down to shoot an...
Instruction Manual
Page 25
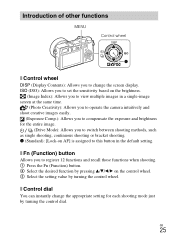
... function by pressing v/V/b/B on AF] is assigned to this button in a single-image screen at the same time. (Photo Creativity): Allows you to operate the camera intuitively and shoot creative images easily. (Exposure Comp.): Allows you to compensate the exposure and brightness for each shooting mode just by turning the control...
... function by pressing v/V/b/B on AF] is assigned to this button in a single-image screen at the same time. (Photo Creativity): Allows you to operate the camera intuitively and shoot creative images easily. (Exposure Comp.): Allows you to compensate the exposure and brightness for each shooting mode just by turning the control...
Instruction Manual
Page 26
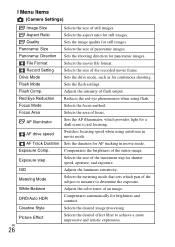
.... Compensates the brightness of still images. Metering Mode Selects the metering mode that sets which provides light for AF tracking in movie mode. x Menu Items (Camera Settings) Image Size Selects the size of the entire image. Aspect Ratio Selects the aspect ratio for shutter speed, aperture, and exposure. Panorama: Size Selects...
.... Compensates the brightness of still images. Metering Mode Selects the metering mode that sets which provides light for AF tracking in movie mode. x Menu Items (Camera Settings) Image Size Selects the size of the entire image. Aspect Ratio Selects the aspect ratio for shutter speed, aperture, and exposure. Panorama: Size Selects...
Instruction Manual
Page 27
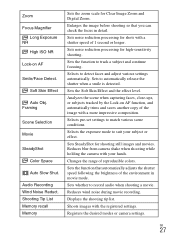
... audio when shooting a movie. Selects pre-set settings to detect faces and adjust various settings automatically. Registers the desired modes or camera settings. Framing Scene Selection Movie SteadyShot Color Space Auto Slow Shut. Changes the range of 1 second or longer. Displays the shooting... detail. Audio Recording Wind Noise Reduct. Sets SteadyShot for shots with a more impressive composition. Reduces blur from camera shake when shooting while holding the camera with the registered settings. Sets the Soft Skin Effect and the effect level. Soft Skin Effect Auto Obj....
... audio when shooting a movie. Selects pre-set settings to detect faces and adjust various settings automatically. Registers the desired modes or camera settings. Framing Scene Selection Movie SteadyShot Color Space Auto Slow Shut. Changes the range of 1 second or longer. Displays the shooting... detail. Audio Recording Wind Noise Reduct. Sets SteadyShot for shots with a more impressive composition. Reduces blur from camera shake when shooting while holding the camera with the registered settings. Sets the Soft Skin Effect and the effect level. Soft Skin Effect Auto Obj....


