Operating Instructions
Page 3
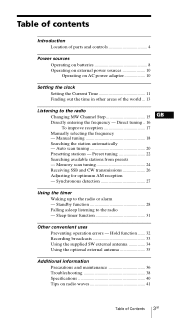
...Using the supplied SW external antenna 34 Using the optional external antenna 35 Additional information Precautions and maintenance 36 Troubleshooting 38 Specifications 40 Tips on AC power adaptor 10 Setting the clock Setting the Current Time 11 Finding out the time in other areas of Contents 3GB... of contents Introduction Location of parts and controls 4 Power sources Operating on batteries 8 Operating on external power sources 10 Operating on radio waves 41 Table of the world ... 13 Listening to the radio Changing MW Channel Step 15 GB Directly entering the frequency -
...Using the supplied SW external antenna 34 Using the optional external antenna 35 Additional information Precautions and maintenance 36 Troubleshooting 38 Specifications 40 Tips on AC power adaptor 10 Setting the clock Setting the Current Time 11 Finding out the time in other areas of Contents 3GB... of contents Introduction Location of parts and controls 4 Power sources Operating on batteries 8 Operating on external power sources 10 Operating on radio waves 41 Table of the world ... 13 Listening to the radio Changing MW Channel Step 15 GB Directly entering the frequency -
Operating Instructions
Page 10
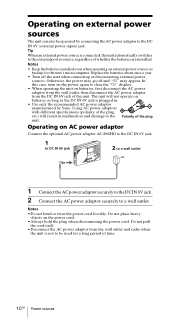
Tip When an external power source is connected, the unit automatically switches to the DC IN 6V (external power input) jack. Replace the batteries about once a ... the AC power adaptor from the wall outlet, then disconnect the AC power adaptor from the wall outlet and radio when the unit is plugged in malfunction and damage to be operated by Sony. Operating on AC power adaptor Connect the optional AC power adaptor AC-E60HG to the DC IN 6V...
Tip When an external power source is connected, the unit automatically switches to the DC IN 6V (external power input) jack. Replace the batteries about once a ... the AC power adaptor from the wall outlet, then disconnect the AC power adaptor from the wall outlet and radio when the unit is plugged in malfunction and damage to be operated by Sony. Operating on AC power adaptor Connect the optional AC power adaptor AC-E60HG to the DC IN 6V...
Operating Instructions
Page 12
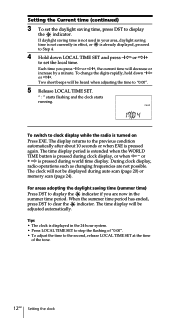
... adjust the time to display the indicator if you press -?K or k?+, the current time will be adjusted automatically. To switch to clock display while the radio is already displayed, proceed to Step 4. 4 Hold down -?K or k?+. The time display period is extended when the WORLD TIME button is displayed in ... the daylight saving time (summer time) Press DST to the second, release LOCAL TIME SET at the time of the tone. 12GB Setting the clock Tips • The clock is pressed during clock display, or when K - " : " starts flashing and the clock starts running. Two short beeps will not be...
... adjust the time to display the indicator if you press -?K or k?+, the current time will be adjusted automatically. To switch to clock display while the radio is already displayed, proceed to Step 4. 4 Hold down -?K or k?+. The time display period is extended when the WORLD TIME button is displayed in ... the daylight saving time (summer time) Press DST to the second, release LOCAL TIME SET at the time of the tone. 12GB Setting the clock Tips • The clock is pressed during clock display, or when K - " : " starts flashing and the clock starts running. Two short beeps will not be...
Operating Instructions
Page 17
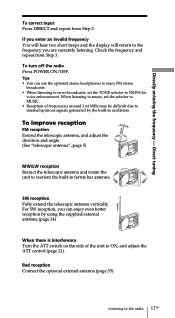
...reception Retract the telescopic antenna and rotate the unit to internal spurious signals generated by the built-in ferrite bar antenna. To turn off the radio Press POWER ON/OFF. Listening to NEWS for voice enhancement. For SW reception, you can use the optional stereo headphones to enjoy FM ... enter an invalid frequency You will hear two short beeps and the display will return to ON, and adjust the ATT control (page 21). Tips • You can enjoy even better reception by using the supplied external antenna (page 34) When there is interference Turn the ATT switch on...
...reception Retract the telescopic antenna and rotate the unit to internal spurious signals generated by the built-in ferrite bar antenna. To turn off the radio Press POWER ON/OFF. Listening to NEWS for voice enhancement. For SW reception, you can use the optional stereo headphones to enjoy FM ... enter an invalid frequency You will hear two short beeps and the display will return to ON, and adjust the ATT control (page 21). Tips • You can enjoy even better reception by using the supplied external antenna (page 34) When there is interference Turn the ATT switch on...
Operating Instructions
Page 19
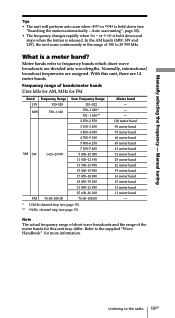
...scan tuning", page 20). • The frequency changes rapidly when K - or + k is held down and stops when the button is released. Refer to the radio 19GB What is held down (see page 15). Frequency range of 150 to frequency bands which short wave broadcasts are divided into wavelengths. Normally, international... range of the meter bands for more information. Listening to the supplied "Wave Handbook" for this unit, there are assigned. Manual tuning Tips • The unit will perform auto scan when -?K or k?+ is a meter band? Meter bands refer to 29 999 kHz.
...scan tuning", page 20). • The frequency changes rapidly when K - or + k is held down and stops when the button is released. Refer to the radio 19GB What is held down (see page 15). Frequency range of 150 to frequency bands which short wave broadcasts are divided into wavelengths. Normally, international... range of the meter bands for more information. Listening to the supplied "Wave Handbook" for this unit, there are assigned. Manual tuning Tips • The unit will perform auto scan when -?K or k?+ is a meter band? Meter bands refer to 29 999 kHz.

Operating Instructions
Page 21
To adjust the reception sensitivity for 3 seconds. ATT control ATT switch 1 Set the ATT switch to the radio 21GB Listening to ON. Using the ATT switch and ATT control When scanning for MW broadcasts at night when reception is convenient when you do... control is enabled. 2 Turn the ATT control and adjust the reception sensitivity. If the unit stops scanning frequently, adjust the reception sensitivity. Auto scan tuning Tips • The unit scans the frequencies in descending order when holding down -?K, and in ascending order when holding down k?+. • To change the scanning ...
To adjust the reception sensitivity for 3 seconds. ATT control ATT switch 1 Set the ATT switch to the radio 21GB Listening to ON. Using the ATT switch and ATT control When scanning for MW broadcasts at night when reception is convenient when you do... control is enabled. 2 Turn the ATT control and adjust the reception sensitivity. If the unit stops scanning frequently, adjust the reception sensitivity. Auto scan tuning Tips • The unit scans the frequencies in descending order when holding down -?K, and in ascending order when holding down k?+. • To change the scanning ...
Operating Instructions
Page 25
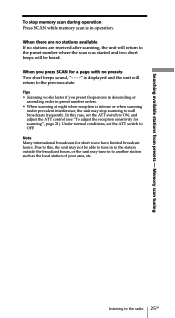
..., set the ATT switch to the preset number where the scan was started and two short beeps will be able to tune in to the radio 25GB When there are no stations available If no presets Two short beeps sound, "- - - -" is intense or when scanning under prevalent interference, the unit may... operation Press SCAN while memory scan is in to another station such as the local station of your area, etc. Searching available stations from presets - Tips • Scanning works faster if you press SCAN for scanning", page 21).
..., set the ATT switch to the preset number where the scan was started and two short beeps will be able to tune in to the radio 25GB When there are no stations available If no presets Two short beeps sound, "- - - -" is intense or when scanning under prevalent interference, the unit may... operation Press SCAN while memory scan is in to another station such as the local station of your area, etc. Searching available stations from presets - Tips • Scanning works faster if you press SCAN for scanning", page 21).

Operating Instructions
Page 26
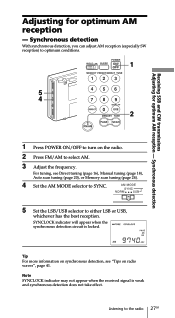
During this unit. 1 6 4 3 2 1 Press POWER ON/OFF to turn on radio waves", page 41. 26GB Listening to the radio For tuning, see Direct tuning (page 16), Manual tuning (page 18), or Auto scan tuning (page 20). 6 Use SSB FINE TUNE control to fine tune ... the frequency. Receiving SSB and CW transmissions You can fine tune the received frequency in to either LSB or USB. Tip For more information on SSB and CW, refer to "Tips on the radio. 2 Press FM/AM to select AM. 3 Set the AM MODE selector to SSB. 4 Set the LSB/USB selector to...
During this unit. 1 6 4 3 2 1 Press POWER ON/OFF to turn on radio waves", page 41. 26GB Listening to the radio For tuning, see Direct tuning (page 16), Manual tuning (page 18), or Auto scan tuning (page 20). 6 Use SSB FINE TUNE control to fine tune ... the frequency. Receiving SSB and CW transmissions You can fine tune the received frequency in to either LSB or USB. Tip For more information on SSB and CW, refer to "Tips on the radio. 2 Press FM/AM to select AM. 3 Set the AM MODE selector to SSB. 4 Set the LSB/USB selector to...
Operating Instructions
Page 27
... SYNCLOCK indicator may not appear when the received signal is locked. Receiving SSB and CW transmissions Adjusting for optimum AM reception - For tuning, see "Tips on radio waves", page 41. SYNCLOCK indicator will appear when the synchronous detection circuit is weak and synchronous detection does not take effect. Synchronous detection With synchronous... selector to SYNC. 5 Set the LSB/USB selector to either LSB or USB, whichever has the best reception. Synchronous detection Adjusting for optimum AM reception - Tip For more information on the radio. 2 Press FM/AM to the...
... SYNCLOCK indicator may not appear when the received signal is locked. Receiving SSB and CW transmissions Adjusting for optimum AM reception - For tuning, see "Tips on radio waves", page 41. SYNCLOCK indicator will appear when the synchronous detection circuit is weak and synchronous detection does not take effect. Synchronous detection With synchronous... selector to SYNC. 5 Set the LSB/USB selector to either LSB or USB, whichever has the best reception. Synchronous detection Adjusting for optimum AM reception - Tip For more information on the radio. 2 Press FM/AM to the...

Operating Instructions
Page 29
...time. • You can set both STANDBY and are set the standby time. To change the digits. Tips • To temporarily cancel the standby function, turn off . The timer goes back to the radio or alarm - The clock indication returns to take effect (LOCAL time or WORLD time). The...display (see "Preventing operation errors - Hold down STANDBY MEMORY or selected in the direction of the area you are set the new time. The radio turns on , SLEEP indicator appears and the preset station is pressed. Standby function 5 Hold down the button to Step 5 for setting the ...
...time. • You can set both STANDBY and are set the standby time. To change the digits. Tips • To temporarily cancel the standby function, turn off . The timer goes back to the radio or alarm - The clock indication returns to take effect (LOCAL time or WORLD time). The...display (see "Preventing operation errors - Hold down STANDBY MEMORY or selected in the direction of the area you are set the new time. The radio turns on , SLEEP indicator appears and the preset station is pressed. Standby function 5 Hold down the button to Step 5 for setting the ...

Operating Instructions
Page 32
... is activated, all buttons become inoperative, preventing accidental operation when the radio is turned off . 32GB Other convenient uses Hold function When the hold function Slide HOLD switch in the direction of the arrow. Tips When the hold function can only be used . The hold function... is activated while the radio is being carried or used to the radio or alarm - B Other convenient uses Preventing operation errors - "-" indicator ...
... is activated, all buttons become inoperative, preventing accidental operation when the radio is turned off . 32GB Other convenient uses Hold function When the hold function Slide HOLD switch in the direction of the arrow. Tips When the hold function can only be used . The hold function... is activated while the radio is being carried or used to the radio or alarm - B Other convenient uses Preventing operation errors - "-" indicator ...

Operating Instructions
Page 33
...to a cassette recorder with a connecting cable. Other convenient uses 33GB Hold function Recording broadcasts Recording broadcasts You can record radio broadcasts by connecting the radio to NEWS or MUSIC as necessary. 3 Record on the cassette recorder. Use the appropriate cable for the type of cassette... recorder. Tip Adjusting the VOLUME control on the radio has no effect on a stereo cassette recorder Both channels will be sure to insert headphones into the i jack. When...
...to a cassette recorder with a connecting cable. Other convenient uses 33GB Hold function Recording broadcasts Recording broadcasts You can record radio broadcasts by connecting the radio to NEWS or MUSIC as necessary. 3 Record on the cassette recorder. Use the appropriate cable for the type of cassette... recorder. Tip Adjusting the VOLUME control on the radio has no effect on a stereo cassette recorder Both channels will be sure to insert headphones into the i jack. When...

Operating Instructions
Page 41
...beat sound only. The synchronous detection circuit of this unit extracts one of its half bandwidth structure. Specifications Tips on radio waves Tips on radio waves What is not modulated for CW transmissions. This unit can receive CW transmissions successfully with no level ...variation which is very popular among ham and business radio transmissions. CW transmissions convey information by interferences from interferences. Only this...
...beat sound only. The synchronous detection circuit of this unit extracts one of its half bandwidth structure. Specifications Tips on radio waves Tips on radio waves What is not modulated for CW transmissions. This unit can receive CW transmissions successfully with no level ...variation which is very popular among ham and business radio transmissions. CW transmissions convey information by interferences from interferences. Only this...
Service Manual
Page 5
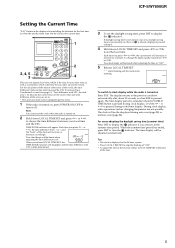
... "0:00". • To adjust the time to ±0. Tips • The clock is turned on , press POWER ON/OFF to "0:00". 5 Release LOCAL TIME SET. Note You cannot set the local time. or + k to pinpoint specific areas. 1 If the radio is pressed during auto scan (page 20) or memory scan...as well as changing frequencies are now in the summer time period. If daylight saving time is used in your local time and the UTC. ICF-SW7600GR Setting the Current Time "0:00" flashes in the display when installing the batteries for each area"). Set the clock to the previous condition automatically ...
... "0:00". • To adjust the time to ±0. Tips • The clock is turned on , press POWER ON/OFF to "0:00". 5 Release LOCAL TIME SET. Note You cannot set the local time. or + k to pinpoint specific areas. 1 If the radio is pressed during auto scan (page 20) or memory scan...as well as changing frequencies are now in the summer time period. If daylight saving time is used in your local time and the UTC. ICF-SW7600GR Setting the Current Time "0:00" flashes in the display when installing the batteries for each area"). Set the clock to the previous condition automatically ...

