Operating Instructions (HT-DDW670)
Page 6
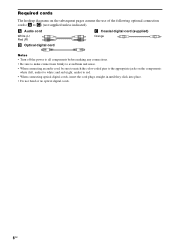
A Audio cord White (L) Red (R) C Coaxial digital cord (supplied) Orange B Optical digital cord Notes • Turn off the power to all components before making any connections. • Be sure to make connections firmly to avoid hum and noise. • When connecting an audio cord, be sure to ... of the following optional connection cords (A to C) (not supplied unless indicated). and red (right, audio) to white; Required cords The hookup diagrams on the components: white (left, audio) to red. • When connecting optical digital cords, insert the cord plugs straight in until they click...
A Audio cord White (L) Red (R) C Coaxial digital cord (supplied) Orange B Optical digital cord Notes • Turn off the power to all components before making any connections. • Be sure to make connections firmly to avoid hum and noise. • When connecting an audio cord, be sure to ... of the following optional connection cords (A to C) (not supplied unless indicated). and red (right, audio) to white; Required cords The hookup diagrams on the components: white (left, audio) to red. • When connecting optical digital cords, insert the cord plugs straight in until they click...
Operating Instructions (HT-DDW670)
Page 7
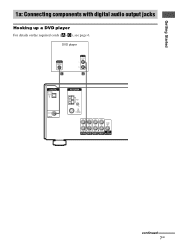
DVD player OUTPUT DIGITAL COAXIAL C OUTPUT AUDIO OUT L R A DIGITAL OPTICAL SA-CD/ CD IN DVD IN COAXIAL ANTENNA AM L L AUDIO OUT AUDIO IN R AUDIO IN AUDIO IN R AUDIO IN SUB SA-CD/CD DVD VIDEO 2 VIDEO 1 WOOFER continued 7GB Getting Started . 1a: Connecting components with digital audio output jacks Hooking up a DVD player For details on the required cords (A-C), see page 6.
DVD player OUTPUT DIGITAL COAXIAL C OUTPUT AUDIO OUT L R A DIGITAL OPTICAL SA-CD/ CD IN DVD IN COAXIAL ANTENNA AM L L AUDIO OUT AUDIO IN R AUDIO IN AUDIO IN R AUDIO IN SUB SA-CD/CD DVD VIDEO 2 VIDEO 1 WOOFER continued 7GB Getting Started . 1a: Connecting components with digital audio output jacks Hooking up a DVD player For details on the required cords (A-C), see page 6.
Operating Instructions (HT-DDW670)
Page 8
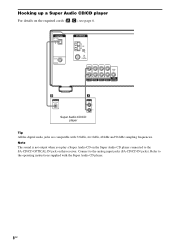
... CD player connected to the analog input jacks (SA-CD/CD IN jacks). Connect to the SA-CD/CD OPTICAL IN jack on the required cords (A-C), see page 6. Hooking up a Super Audio CD/CD player For details on this receiver. Refer to the operating instructions supplied with 32 kHz, 44.1 kHz..., 48 kHz and 96 kHz sampling frequencies. DIGITAL OPTICAL SA-CD/ CD IN DVD IN COAXIAL ANTENNA AM L L AUDIO OUT AUDIO IN R AUDIO IN AUDIO IN R AUDIO IN SUB SA-CD/CD DVD VIDEO 2 VIDEO 1 WOOFER...
... CD player connected to the analog input jacks (SA-CD/CD IN jacks). Connect to the SA-CD/CD OPTICAL IN jack on the required cords (A-C), see page 6. Hooking up a Super Audio CD/CD player For details on this receiver. Refer to the operating instructions supplied with 32 kHz, 44.1 kHz..., 48 kHz and 96 kHz sampling frequencies. DIGITAL OPTICAL SA-CD/ CD IN DVD IN COAXIAL ANTENNA AM L L AUDIO OUT AUDIO IN R AUDIO IN AUDIO IN R AUDIO IN SUB SA-CD/CD DVD VIDEO 2 VIDEO 1 WOOFER...
Operating Instructions (HT-DDW670)
Page 9
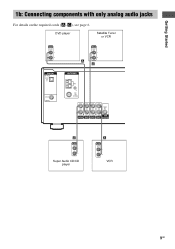
DVD player Satellite Tuner or VCR OUTPUT AUDIO OUT L R A OUTPUT AUDIO OUT L R A DIGITAL OPTICAL SA-CD/ CD IN ANTENNA AM DVD IN COAXIAL L L AUDIO OUT AUDIO IN R AUDIO IN AUDIO IN R AUDIO IN SUB SA-CD/CD DVD VIDEO 2 VIDEO 1 WOOFER A OUTPUT LINE L R Super Audio CD/CD player A OUTPUT AUDIO OUT L R VCR 9GB Getting Started 1b: Connecting components with only analog audio jacks For details on the required cords (A-C), see page 6.
DVD player Satellite Tuner or VCR OUTPUT AUDIO OUT L R A OUTPUT AUDIO OUT L R A DIGITAL OPTICAL SA-CD/ CD IN ANTENNA AM DVD IN COAXIAL L L AUDIO OUT AUDIO IN R AUDIO IN AUDIO IN R AUDIO IN SUB SA-CD/CD DVD VIDEO 2 VIDEO 1 WOOFER A OUTPUT LINE L R Super Audio CD/CD player A OUTPUT AUDIO OUT L R VCR 9GB Getting Started 1b: Connecting components with only analog audio jacks For details on the required cords (A-C), see page 6.

Operating Instructions (HT-DDW670)
Page 38
.... • Make sure the sound field function is on both the receiver and the component. • Check that the connecting cords are away from COAXIAL or OPTICAL input jack). • Check that the INPUT MODE is severe hum or noise. • Check that the speakers ...and components are connected securely and correctly. • Check that both the receiver and the component. There is not set to cancel the muting function. There is no sound from digital...
.... • Make sure the sound field function is on both the receiver and the component. • Check that the connecting cords are away from COAXIAL or OPTICAL input jack). • Check that the INPUT MODE is severe hum or noise. • Check that the speakers ...and components are connected securely and correctly. • Check that both the receiver and the component. There is not set to cancel the muting function. There is no sound from digital...
Operating Instructions (HT-DDW670)
Page 42
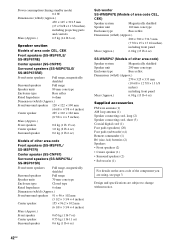
...; 12 7/8 × 13 1/8 inches) including front panel Mass (Approx.) 6.0 kg (13 lb 4 oz) Supplied accessories FM wire antenna (1) AM loop antenna (1) Speaker connecting cord, long (2) Speaker connecting cord, short (3) Coaxial digital cord (1) Foot pads (speakers) (20) Foot pads (subwoofer) (4) Remote commander (1) R6 (size-AA) batteries (2) Speakers • Front speakers (2) • Center speaker (1) • Surround speakers...
...; 12 7/8 × 13 1/8 inches) including front panel Mass (Approx.) 6.0 kg (13 lb 4 oz) Supplied accessories FM wire antenna (1) AM loop antenna (1) Speaker connecting cord, long (2) Speaker connecting cord, short (3) Coaxial digital cord (1) Foot pads (speakers) (20) Foot pads (subwoofer) (4) Remote commander (1) R6 (size-AA) batteries (2) Speakers • Front speakers (2) • Center speaker (1) • Surround speakers...


