
Child Safety: It Makes A Difference Where Your TV Stands
Page 1
...Tune Into Safety 1 One size does NOT fit all. Thank you have more than one television. Many homes, in fact, have a television in your furniture to the wall (but never screw anything directly into ...home. The home theater entertainment experience is large enough to support the weight of your television (and other electronic components). 2 Use appropriate angle braces, straps and anchors to making home entertainment enjoyable and safe. The Industry Cares! The Consumer Electronics Association formed the Home Entertainment Support Safety Committee comprised of TVs such as VCRs and remotes...
...Tune Into Safety 1 One size does NOT fit all. Thank you have more than one television. Many homes, in fact, have a television in your furniture to the wall (but never screw anything directly into ...home. The home theater entertainment experience is large enough to support the weight of your television (and other electronic components). 2 Use appropriate angle braces, straps and anchors to making home entertainment enjoyable and safe. The Industry Cares! The Consumer Electronics Association formed the Home Entertainment Support Safety Committee comprised of TVs such as VCRs and remotes...
Operating Instructions
Page 3
... - Note for the supplied remote (RM-AAP016) The AUX button on the remote is shown on the remote. This receiver incorporates High-Definition Multimedia Interface (HDMITM) technology. This receiver incorporates Dolby* Digital and Pro Logic Surround and the DTS** Digital Surround System. * Manufactured under license from Dolby Laboratories. The HT-7100DH consists of HDMI Licensing LLC...
... - Note for the supplied remote (RM-AAP016) The AUX button on the remote is shown on the remote. This receiver incorporates High-Definition Multimedia Interface (HDMITM) technology. This receiver incorporates Dolby* Digital and Pro Logic Surround and the DTS** Digital Surround System. * Manufactured under license from Dolby Laboratories. The HT-7100DH consists of HDMI Licensing LLC...
Operating Instructions
Page 4
... Description and location of parts 5 1: Installing speakers 14 2: Connecting speakers 16 3a: Connecting the audio components ........17 3b: Connecting the video components ........18 4: Connecting the antennas 26 5: Preparing the receiver and the remote.....27 6: Selecting the speaker system 28 7: Calibrating the appropriate settings automatically (AUTO CALIBRATION 29 8: Adjusting the speaker levels and balance (TEST...
... Description and location of parts 5 1: Installing speakers 14 2: Connecting speakers 16 3a: Connecting the audio components ........17 3b: Connecting the video components ........18 4: Connecting the antennas 26 5: Preparing the receiver and the remote.....27 6: Selecting the speaker system 28 7: Calibrating the appropriate settings automatically (AUTO CALIBRATION 29 8: Adjusting the speaker levels and balance (TEST...

Operating Instructions
Page 5
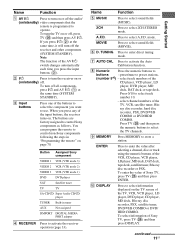
Receives signals from remote commander. Press to select the input mode when the same components are connected to mute the sound (page 34). Press to both digital and analog jacks (page 63). Getting Started Getting Started Description and location of ... MASTER VOLUME MEMORY/ ENTER TUNING MODE TUNING 2CH A.F.D. continued 5US Lights up when multi channel audio is decoded (page 37). Turn to select the speaker system (page 28). Press to select information displayed on or off (page 27, 36, 37, 52, 81). Name F DISPLAY G INPUT MODE H MASTER VOLUME I MUTING J AUTO CAL...
Receives signals from remote commander. Press to select the input mode when the same components are connected to mute the sound (page 34). Press to both digital and analog jacks (page 63). Getting Started Getting Started Description and location of ... MASTER VOLUME MEMORY/ ENTER TUNING MODE TUNING 2CH A.F.D. continued 5US Lights up when multi channel audio is decoded (page 37). Turn to select the speaker system (page 28). Press to select information displayed on or off (page 27, 36, 37, 52, 81). Name F DISPLAY G INPUT MODE H MASTER VOLUME I MUTING J AUTO CAL...
Operating Instructions
Page 10
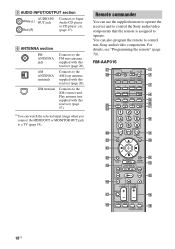
... operate the receiver and to control the Sony audio/video components that the remote is assigned to control non-Sony audio/video components. You can watch the selected input image when you connect the HDMI OUT or MONITOR OUT jack to the FM wire antenna...). RM-AAP016 wj wh TV RM SET UP AV ?/1 ? / 1 SYSTEM STANDBY VIDEO 1 VIDEO 2 VIDEO 3 DVD SAT TV SA-CD/CD TUNER 1 2 3 AUX DMPORT RECEIVER 4 2CH A.F.D. For details, see "Programming the remote" (page 70). a)You can also program the remote to operate. F ANTENNA section FM ANTENNA jack Connects to a TV (page...
... operate the receiver and to control the Sony audio/video components that the remote is assigned to control non-Sony audio/video components. You can watch the selected input image when you connect the HDMI OUT or MONITOR OUT jack to the FM wire antenna...). RM-AAP016 wj wh TV RM SET UP AV ?/1 ? / 1 SYSTEM STANDBY VIDEO 1 VIDEO 2 VIDEO 3 DVD SAT TV SA-CD/CD TUNER 1 2 3 AUX DMPORT RECEIVER 4 2CH A.F.D. For details, see "Programming the remote" (page 70). a)You can also program the remote to operate. F ANTENNA section FM ANTENNA jack Connects to a TV (page...
Operating Instructions
Page 11
... the same time (SYSTEM STANDBY). D RECEIVER Button Assigned Sony component VIDEO 1 VCR (VTR mode 3) VIDEO 2 VCR (VTR mode 2) VIDEO 3 VCR (VTR mode 1) DVD DVD player SAT Satellite tuner TV TV SA-CD/CD Super Audio CD/CD player TUNER Built-in "Programming the remote" on the TV ...tuner, Blu- J DISPLAY Press to select information displayed on page 70. If you want to use. You can program the remote to control non-Sony components following the steps in tuner AUX Not assigned DMPORT DIGITAL MEDIA PORT adapter Press to activate the receiver operation (page 33). ...
... the same time (SYSTEM STANDBY). D RECEIVER Button Assigned Sony component VIDEO 1 VCR (VTR mode 3) VIDEO 2 VCR (VTR mode 2) VIDEO 3 VCR (VTR mode 1) DVD DVD player SAT Satellite tuner TV TV SA-CD/CD Super Audio CD/CD player TUNER Built-in "Programming the remote" on the TV ...tuner, Blu- J DISPLAY Press to select information displayed on page 70. If you want to use. You can program the remote to control non-Sony components following the steps in tuner AUX Not assigned DMPORT DIGITAL MEDIA PORT adapter Press to activate the receiver operation (page 33). ...
Operating Instructions
Page 13
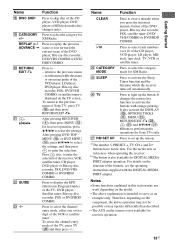
...8226; The AUX on the model. • The above operation may not be possible or may not work depending on the remote is displayed on -screen guide of the buttons, see the operating instructions supplied with orange printing. To return to enter the ... to select the settings. After pressing RECEIVER (D), then press MENU (L) for Sony TVs only. It changes the remote key function to the previous menu. - Name R DISC SKIP S CATEGORY +/- Therefore, depending on the component, the above explanation is also available for receiver operation. 13US Getting Started b)...
...8226; The AUX on the model. • The above operation may not be possible or may not work depending on the remote is displayed on -screen guide of the buttons, see the operating instructions supplied with orange printing. To return to enter the ... to select the settings. After pressing RECEIVER (D), then press MENU (L) for Sony TVs only. It changes the remote key function to the previous menu. - Name R DISC SKIP S CATEGORY +/- Therefore, depending on the component, the above explanation is also available for receiver operation. 13US Getting Started b)...
Operating Instructions
Page 21
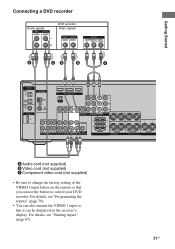
... the button to change the factory setting of the VIDEO 1 input button on the remote so that it can be displayed on the receiver's display. Getting Started Connecting a DVD recorder Audio signals AUDIO AUDIO L R DVD recorder Video signals COMPONENT VIDEO PB / CB PR/CR A AB B C DIGITAL (ASSIGNABLE) OPTICAL SAT IN VIDEO... HDMI Y XM PB/CB PR/CR VIDEO IN VIDEO IN VIDEO OUT VIDEO IN VIDEO OUT SAT IN DVD IN VIDEO 1 IN MONITOR OUT L MONITOR COMPONENT VIDEO R L L L L L AUDIO OUT R R OUT IN IN SA-CD/CD/CD-R TV R AUDIO IN AUDIO IN SAT DVD R AUDIO OUT AUDIO IN VIDEO 1 ...
... the button to change the factory setting of the VIDEO 1 input button on the remote so that it can be displayed on the receiver's display. Getting Started Connecting a DVD recorder Audio signals AUDIO AUDIO L R DVD recorder Video signals COMPONENT VIDEO PB / CB PR/CR A AB B C DIGITAL (ASSIGNABLE) OPTICAL SAT IN VIDEO... HDMI Y XM PB/CB PR/CR VIDEO IN VIDEO IN VIDEO OUT VIDEO IN VIDEO OUT SAT IN DVD IN VIDEO 1 IN MONITOR OUT L MONITOR COMPONENT VIDEO R L L L L L AUDIO OUT R R OUT IN IN SA-CD/CD/CD-R TV R AUDIO IN AUDIO IN SAT DVD R AUDIO OUT AUDIO IN VIDEO 1 ...
Operating Instructions
Page 23
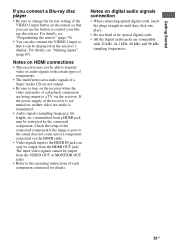
...The input video signals cannot be output from the HDMI OUT jack. For details, see "Naming inputs" (page 67). Check the setup of the connected component if the image is transmitted. • Audio signals (sampling frequency, bit length, etc.) transmitted from a HDMI jack may not be able to transfer ...of the receiver is not turned on, neither video nor audio is poor or the sound does not come out of a component connected via the receiver. For details, see "Programming the remote" (page 70). • You can also rename the VIDEO 2 input so that you can be displayed on the receiver...
...The input video signals cannot be output from the HDMI OUT jack. For details, see "Naming inputs" (page 67). Check the setup of the connected component if the image is transmitted. • Audio signals (sampling frequency, bit length, etc.) transmitted from a HDMI jack may not be able to transfer ...of the receiver is not turned on, neither video nor audio is poor or the sound does not come out of a component connected via the receiver. For details, see "Programming the remote" (page 70). • You can also rename the VIDEO 2 input so that you can be displayed on the receiver...

Operating Instructions
Page 27
... receiver by performing the following items are reset to their factory defaults. Be sure to "DVD". 27US Getting Started 5: Preparing the receiver and the remote Connecting the AC power cord Connect the AC power cord to their factory settings. • All settings in the LEVEL, TONE, SUR, TUNER, ...AUDIO, VIDEO and SYSTEM menus. • The sound field memorized for each input and preset station. • All sound field parameters. • All preset stations. • ...
... receiver by performing the following items are reset to their factory defaults. Be sure to "DVD". 27US Getting Started 5: Preparing the receiver and the remote Connecting the AC power cord Connect the AC power cord to their factory settings. • All settings in the LEVEL, TONE, SUR, TUNER, ...AUDIO, VIDEO and SYSTEM menus. • The sound field memorized for each input and preset station. • All sound field parameters. • All preset stations. • ...
Operating Instructions
Page 28
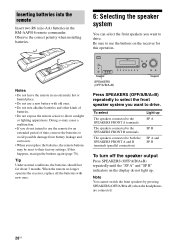
... SPEAKERS FRONT B terminals The speakers connected to both the SPEAKERS FRONT A and B terminals (parallel connection) Light up . Inserting batteries into the remote Insert two R6 (size-AA) batteries in an extremely hot or humid place. • Do not use a new battery with new ones....SPEAKERS (OFF/A/B/A+B) Press SPEAKERS (OFF/A/B/A+B) repeatedly to select the front speaker system you do not intend to direct sunlight or lighting apparatuses. Notes • Do not leave the remote in the RM-AAP016 remote commander. Note You cannot switch the front speakers by pressing SPEAKERS (OFF...
... SPEAKERS FRONT B terminals The speakers connected to both the SPEAKERS FRONT A and B terminals (parallel connection) Light up . Inserting batteries into the remote Insert two R6 (size-AA) batteries in an extremely hot or humid place. • Do not use a new battery with new ones....SPEAKERS (OFF/A/B/A+B) Press SPEAKERS (OFF/A/B/A+B) repeatedly to select the front speaker system you do not intend to direct sunlight or lighting apparatuses. Notes • Do not leave the remote in the RM-AAP016 remote commander. Note You cannot switch the front speakers by pressing SPEAKERS (OFF...
Operating Instructions
Page 63
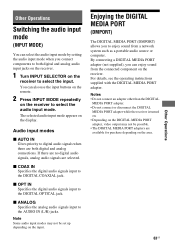
Enjoying the DIGITAL MEDIA PORT (DMPORT) The DIGITAL MEDIA PORT (DMPORT) allows you can also use the input buttons on the remote. 2 Press INPUT MODE repeatedly on the receiver. If there are no digital audio signals, analog audio signals are available for purchase depending on the... select the audio input mode by setting the audio input mode when you connect components to both digital and analog connections. You can enjoy sound from the connected component on the receiver to enjoy sound from a network system such as a portable audio source or computer. x COAX IN Specifies the digital...
Enjoying the DIGITAL MEDIA PORT (DMPORT) The DIGITAL MEDIA PORT (DMPORT) allows you can also use the input buttons on the remote. 2 Press INPUT MODE repeatedly on the receiver. If there are no digital audio signals, analog audio signals are available for purchase depending on the... select the audio input mode by setting the audio input mode when you connect components to both digital and analog connections. You can enjoy sound from the connected component on the receiver to enjoy sound from a network system such as a portable audio source or computer. x COAX IN Specifies the digital...
Operating Instructions
Page 65
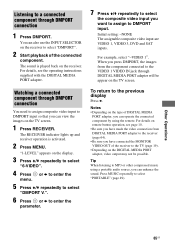
...through DIGITAL MEDIA PORT adapter will be possible. Notes • Depending on remote button operation, see the operating instructions supplied with the DIGITAL MEDIA PORT adapter. Listening to a connected component through DMPORT connection You need to assign composite video input to DMPORT input ...DVD and SAT inputs. Tip When listening to MP3 or other compressed music using the remote. The sound is activated. 2 Press MENU. For details on the type of the connected component. Other Operations 65US Press MUSIC repeatedly to the previous display Press B. You can ...
...through DIGITAL MEDIA PORT adapter will be possible. Notes • Depending on remote button operation, see the operating instructions supplied with the DIGITAL MEDIA PORT adapter. Listening to a connected component through DMPORT connection You need to assign composite video input to DMPORT input ...DVD and SAT inputs. Tip When listening to MP3 or other compressed music using the remote. The sound is activated. 2 Press MENU. For details on the type of the connected component. Other Operations 65US Press MUSIC repeatedly to the previous display Press B. You can ...

Operating Instructions
Page 68
... the input or preset station (page 56, 67). Note Character or marks may not be canceled. 68US Each time you press any buttons on the remote or receiver after the display dims, the display brightens up. Tip To check the remaining time before the receiver turns off automatically at a specified time...
... the input or preset station (page 56, 67). Note Character or marks may not be canceled. 68US Each time you press any buttons on the remote or receiver after the display dims, the display brightens up. Tip To check the remaining time before the receiver turns off automatically at a specified time...

Operating Instructions
Page 70
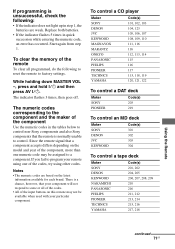
Once the control signals have been memorized, you can use those components as part of the numeric code correspond to the component and the maker of the component (the first digit and the last two digits of your system. The RM SET UP indicator lights up. 3 Press the numeric ...1 to 4 to control a TV 1 Press RM SET UP. To program the remote to control other components. For details, see page 73. 4 Press ENTER. The RM SET UP indicator slowly flashes. 2 Press the input button for Sony components that accept infrared wireless control signals. 1 Press RM SET UP. To cancel programming ...
Once the control signals have been memorized, you can use those components as part of the numeric code correspond to the component and the maker of the component (the first digit and the last two digits of your system. The RM SET UP indicator lights up. 3 Press the numeric ...1 to 4 to control a TV 1 Press RM SET UP. To program the remote to control other components. For details, see page 73. 4 Press ENTER. The RM SET UP indicator slowly flashes. 2 Press the input button for Sony components that accept infrared wireless control signals. 1 Press RM SET UP. To cancel programming ...
Operating Instructions
Page 71
...; If the indicator flashes 5 times in the tables below to control non-Sony components and also Sony components that the remote is normally unable to control. While holding down MASTER VOL -, press and hold ?/1 and then press AV ?/1. Since the remote signal that a component accepts differs depending on the latest information available for each brand. To clear...
...; If the indicator flashes 5 times in the tables below to control non-Sony components and also Sony components that the remote is normally unable to control. While holding down MASTER VOL -, press and hold ?/1 and then press AV ?/1. Since the remote signal that a component accepts differs depending on the latest information available for each brand. To clear...
Operating Instructions
Page 80
...your nearest Sony dealer. PRI." The receiver will have been cleared (when tuning by the message. However, note that the antennas are connected securely. Reference sections for receiver operation. • When you will automatically turn on the model and the maker of the system by ...you perform Auto Calibration, see "Error and warning codes" (page 31) to their factory settings and you operate a programmed of nonSony component, the remote may not function properly depending on the power again. Preset the stations (page 54). • Press DISPLAY repeatedly on the receiver so ...
...your nearest Sony dealer. PRI." The receiver will have been cleared (when tuning by the message. However, note that the antennas are connected securely. Reference sections for receiver operation. • When you will automatically turn on the model and the maker of the system by ...you perform Auto Calibration, see "Error and warning codes" (page 31) to their factory settings and you operate a programmed of nonSony component, the remote may not function properly depending on the power again. Preset the stations (page 54). • Press DISPLAY repeatedly on the receiver so ...

Operating Instructions
Page 82
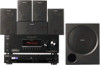
Speaker system Active subwoofer, magnetically shielded Speaker unit 200 mm cone type Enclosure type Acoustically loaded bass reflex RMS output 200 W Input LINE IN (input pin jacks) ... • Long (2) • Short (3) Coaxial digital cord (1) Footpads • Speakers (20) • Sub woofer (4) Remote commander RM-AAP016 (1) R6 (size-AA) batteries (2) Optimizer microphone (ECM-AC2 or ECM-AC2a) (1) For details on the area code of the component you are subject to rated output. Design and specifications are using, see page 3. rated...
Speaker system Active subwoofer, magnetically shielded Speaker unit 200 mm cone type Enclosure type Acoustically loaded bass reflex RMS output 200 W Input LINE IN (input pin jacks) ... • Long (2) • Short (3) Coaxial digital cord (1) Footpads • Speakers (20) • Sub woofer (4) Remote commander RM-AAP016 (1) R6 (size-AA) batteries (2) Optimizer microphone (ECM-AC2 or ECM-AC2a) (1) For details on the area code of the component you are subject to rated output. Design and specifications are using, see page 3. rated...


