
Operating Guide
Page 4
...outlet (wall socket) when using a genuine Sony battery charger or a device that may cause undesired operation. For more information regarding recycling of the FCC Rules. Battery pack This device complies with the same or equivalent type recommended by returning your VCR. Otherwise, fire or injury may result. Even...in the sun. • Do not incinerate or dispose of small children. • Keep the battery pack dry. • Replace only with Part 15 of rechargeable batteries, call toll free 1800-822- 8837, or visit http://www.rbrc.org/ Caution: Do not handle damaged or leaking ...
...outlet (wall socket) when using a genuine Sony battery charger or a device that may cause undesired operation. For more information regarding recycling of the FCC Rules. Battery pack This device complies with the same or equivalent type recommended by returning your VCR. Otherwise, fire or injury may result. Even...in the sun. • Do not incinerate or dispose of small children. • Keep the battery pack dry. • Replace only with Part 15 of rechargeable batteries, call toll free 1800-822- 8837, or visit http://www.rbrc.org/ Caution: Do not handle damaged or leaking ...
Operating Guide
Page 5
... San Diego, CA 92127 U.S.A Telephone number: 858-942-2230 This device complies with Part 15 of Conformity Trade Name: SONY Model No.: GV-HD700E/1 Responsible Party: Sony Electronics Inc. Increase the separation between the equipment and receiver. - Operation is an... call: Sony Customer Information Center 1-800222-SONY (7669). For customers in a residential installation. Address: 16530 Via Esprillo, San Diego, CA 92127 U.S.A Telephone number: 858-942-2230 This device complies with Part 15 of Conformity Trade Name: SONY Model No.: GV-HD700/1 Responsible Party: Sony Electronics Inc...
... San Diego, CA 92127 U.S.A Telephone number: 858-942-2230 This device complies with Part 15 of Conformity Trade Name: SONY Model No.: GV-HD700E/1 Responsible Party: Sony Electronics Inc. Increase the separation between the equipment and receiver. - Operation is an... call: Sony Customer Information Center 1-800222-SONY (7669). For customers in a residential installation. Address: 16530 Via Esprillo, San Diego, CA 92127 U.S.A Telephone number: 858-942-2230 This device complies with Part 15 of Conformity Trade Name: SONY Model No.: GV-HD700/1 Responsible Party: Sony Electronics Inc...
Operating Guide
Page 7
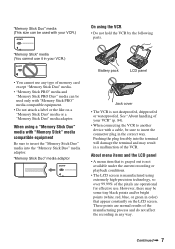
..."Memory Stick PRO" media compatible equipment. • Do not attach a label or the like on the LCD screen. However, there may result in your VCR.) On using extremely high-precision technology, so over 99.99% of memory card except "Memory Stick Duo" media. • "Memory Stick PRO" media and...a "Memory Stick Duo" media or a "Memory Stick Duo" media adaptor. "Memory Stick Duo" media adaptor Battery pack LCD panel Jack cover • The VCR is manufactured using the VCR • Do not hold the VCR by the following parts. "Memory Stick" media (You cannot use it in a malfunction of the...
..."Memory Stick PRO" media compatible equipment. • Do not attach a label or the like on the LCD screen. However, there may result in your VCR.) On using extremely high-precision technology, so over 99.99% of memory card except "Memory Stick Duo" media. • "Memory Stick PRO" media and...a "Memory Stick Duo" media or a "Memory Stick Duo" media adaptor. "Memory Stick Duo" media adaptor Battery pack LCD panel Jack cover • The VCR is manufactured using the VCR • Do not hold the VCR by the following parts. "Memory Stick" media (You cannot use it in a malfunction of the...

Operating Guide
Page 10
... settings (BEEP/USB SELECT, etc.) Troubleshooting Troubleshooting 66 Warning indicators and messages 73 Additional Information Using your VCR abroad 76 Maintenance and precautions ...... 79 HDV format and recording/playback 79 About the "Memory Stick" media 80 About the "InfoLITHIUM" battery pack 81... About i.LINK 82 About x.v.Color 84 About handling of your VCR ........ 84 Specifications 86 Quick Reference Identifying parts and controls ....... 90...
... settings (BEEP/USB SELECT, etc.) Troubleshooting Troubleshooting 66 Warning indicators and messages 73 Additional Information Using your VCR abroad 76 Maintenance and precautions ...... 79 HDV format and recording/playback 79 About the "Memory Stick" media 80 About the "InfoLITHIUM" battery pack 81... About i.LINK 82 About x.v.Color 84 About handling of your VCR ........ 84 Specifications 86 Quick Reference Identifying parts and controls ....... 90...

Operating Guide
Page 13
... the DC plug. • Do not pull the power code (mains lead) connected to use the VCR. For the types of battery packs compatible with the VCR, see page 16. 1 Attach the battery pack by holding the center part (1) and sliding it in this case. Charging the battery pack You can use the... VCR with the AC Adaptor When recording/editing or using the VCR for a long time, connect the AC Adaptor...
... the DC plug. • Do not pull the power code (mains lead) connected to use the VCR. For the types of battery packs compatible with the VCR, see page 16. 1 Attach the battery pack by holding the center part (1) and sliding it in this case. Charging the battery pack You can use the... VCR with the AC Adaptor When recording/editing or using the VCR for a long time, connect the AC Adaptor...

Operating Guide
Page 15
... M series (optional) To attach: Attach the battery pack by holding the center part (1) and sliding it in the direction of the M series (optional) (p. 15). Make sure to OFF (CHG). The POWER/CHARGE lamp turns on the VCR. POWER/ CHARGE lamp To remove the battery pack Set the POWER switch to attach... when the battery pack is turned off. After charging the battery pack, disconnect the AC Adaptor from the DC IN jack by holding both the VCR and the DC plug. Getting Started 5 Connect the power cord (mains lead) to attach the L series is different from that of the arrow (2) ...
... M series (optional) To attach: Attach the battery pack by holding the center part (1) and sliding it in the direction of the M series (optional) (p. 15). Make sure to OFF (CHG). The POWER/CHARGE lamp turns on the VCR. POWER/ CHARGE lamp To remove the battery pack Set the POWER switch to attach... when the battery pack is turned off. After charging the battery pack, disconnect the AC Adaptor from the DC IN jack by holding both the VCR and the DC plug. Getting Started 5 Connect the power cord (mains lead) to attach the L series is different from that of the arrow (2) ...

Operating Guide
Page 20
... as described in step 1 and remove the cassette tape. 20 "Memory Stick Duo" media access lamp b Notes • If you touch any part of the cassette compartment when it is reading/writing data. Otherwise, image data may not be closed properly. • Do not close the cassette ...compartment automatically slides back in the right direction until it clicks. b Notes • Do not insert your fingers or touch the inside of the VCR other than the (PUSH) mark when closing the cassette compartment, the cassette compartment may be damaged. • When inserting or ejecting the "Memory...
... as described in step 1 and remove the cassette tape. 20 "Memory Stick Duo" media access lamp b Notes • If you touch any part of the cassette compartment when it is reading/writing data. Otherwise, image data may not be closed properly. • Do not close the cassette ...compartment automatically slides back in the right direction until it clicks. b Notes • Do not insert your fingers or touch the inside of the VCR other than the (PUSH) mark when closing the cassette compartment, the cassette compartment may be damaged. • When inserting or ejecting the "Memory...
Operating Guide
Page 32
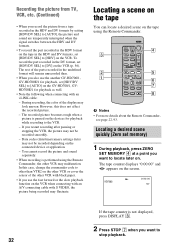
...tape You can locate a desired scene on the tape using the Remote Commander, the other VCR with black paper. • If you use the another GV-HD700/1, GV-HD700E/1 for playback, set [HDV/DV SEL] to [HDV] on the VCR. b Notes • For more details about the Remote Commander, see page 22, 93...signal switches between the HDV and DV formats. • To record the part recorded in the HDV format on the tape in the HDV and DV formats, set [HDV/DV SEL] to [AUTO] on the GV-HD700/1, GVHD700E/1 for playback as well. • Note the following when connecting with S VIDEO, the picture being recorded...
...tape You can locate a desired scene on the tape using the Remote Commander, the other VCR with black paper. • If you use the another GV-HD700/1, GV-HD700E/1 for playback, set [HDV/DV SEL] to [HDV] on the VCR. b Notes • For more details about the Remote Commander, see page 22, 93...signal switches between the HDV and DV formats. • To record the part recorded in the HDV format on the tape in the HDV and DV formats, set [HDV/DV SEL] to [AUTO] on the GV-HD700/1, GVHD700E/1 for playback as well. • Note the following when connecting with S VIDEO, the picture being recorded...

Operating Guide
Page 88
... specifications are subject to + 140 °F) Dimensions (approx.) 201 × 64 × 162 mm (8 × 2 5/8 × 6 1/2 in.) (w/h/d) including the projecting parts Mass (approx.) 1.2 kg (2 lb 9 oz) Mass in .) (w/h/d) excluding the projecting parts Mass (approx.) 170 g (6.0 oz) excluding the power cord (mains lead) * See the label on the AC Adaptor for other specifications...
... specifications are subject to + 140 °F) Dimensions (approx.) 201 × 64 × 162 mm (8 × 2 5/8 × 6 1/2 in.) (w/h/d) including the projecting parts Mass (approx.) 1.2 kg (2 lb 9 oz) Mass in .) (w/h/d) excluding the projecting parts Mass (approx.) 170 g (6.0 oz) excluding the power cord (mains lead) * See the label on the AC Adaptor for other specifications...

Operating Guide
Page 90
D EJECT lever (19) E Cassette compartment (19) F Cassette compartment lid (19) G LCD screen (18) H Stereo speakers (21) I Remote sensor (93) J POWER/CHARGE lamp (15, 18) 90 A "Memory Stick Duo" media slot (20) B "Memory Stick" media access lamp (20) C {RESET} button (bottom) Press the {RESET} button using a sharppointed object. If you press the {RESET} button, all settings including the clock setting (except the LCD profile settings) return to the default. Quick Reference Identifying parts and controls The numbers in ( ) are reference pages.
D EJECT lever (19) E Cassette compartment (19) F Cassette compartment lid (19) G LCD screen (18) H Stereo speakers (21) I Remote sensor (93) J POWER/CHARGE lamp (15, 18) 90 A "Memory Stick Duo" media slot (20) B "Memory Stick" media access lamp (20) C {RESET} button (bottom) Press the {RESET} button using a sharppointed object. If you press the {RESET} button, all settings including the clock setting (except the LCD profile settings) return to the default. Quick Reference Identifying parts and controls The numbers in ( ) are reference pages.

Operating Guide
Page 92
Identifying parts and controls (Continued) A LCD ON/OFF button (35) B ALLSCAN button (36) C DISPLAY/BATT INFO button (16, 35) D ASSIGN buttons (1/2*/3) (36) E Memory control buttons (PHOTO, PLAY, ..., 50) F VOLUME/MEMORY buttons* (21, 46) G LCD BRIGHT buttons (21) H POWER switch (18) I EXEC button (54) J V/v/B/b buttons (54) K STATUS CHECK button (35) L MENU button (54) M Video control buttons (PLAY N*, REW m, FF M, PAUSE X, STOP x, SLOW y, REC) (21, 31) * Each of the buttons. 92 Use it to identify the location of the PLAY...
Identifying parts and controls (Continued) A LCD ON/OFF button (35) B ALLSCAN button (36) C DISPLAY/BATT INFO button (16, 35) D ASSIGN buttons (1/2*/3) (36) E Memory control buttons (PHOTO, PLAY, ..., 50) F VOLUME/MEMORY buttons* (21, 46) G LCD BRIGHT buttons (21) H POWER switch (18) I EXEC button (54) J V/v/B/b buttons (54) K STATUS CHECK button (35) L MENU button (54) M Video control buttons (PLAY N*, REW m, FF M, PAUSE X, STOP x, SLOW y, REC) (21, 31) * Each of the buttons. 92 Use it to identify the location of the PLAY...