
Operating Instructions
Page 3
... manual 2 Playable discs 4 Playable/Recordable USB devices 5 Guide to the radio 29 Tape Playing a tape 31 Recording onto a tape 32 Sound Adjustment Adjusting the sound 34 Creating a party atmosphere ..... 35 - X-TRANCE PRO Singing along 40 Other Operations Using the timer 41 Changing the display 42 Viewing information in the display during CD and USB function 44 Hooking up the system 14 Positioning the speakers 16 Setting the clock 17 Disc Playing an AUDIO CD/MP3 disc 18 Using play mode...
... manual 2 Playable discs 4 Playable/Recordable USB devices 5 Guide to the radio 29 Tape Playing a tape 31 Recording onto a tape 32 Sound Adjustment Adjusting the sound 34 Creating a party atmosphere ..... 35 - X-TRANCE PRO Singing along 40 Other Operations Using the timer 41 Changing the display 42 Viewing information in the display during CD and USB function 44 Hooking up the system 14 Positioning the speakers 16 Setting the clock 17 Disc Playing an AUDIO CD/MP3 disc 18 Using play mode...

Operating Instructions
Page 7
..., 53) Press to adjust the microphone volume. MIC LEVEL (pages 33, 40, 47) Turn to select an effector mode. B Function buttons: CD (pages 16, 18, 20, 23, 30, 32, 43) TUNER/BAND (pages 29, 43) TAPE A/B (pages 31, 43) Press to adjust the volume. C MASTER VOLUME (pages 18, 25, 42, 47) Turn to select a function. H DISPLAY (pages 43, 44) Press to select a setting. Turn to change the information on the display. 1 "/1 (on/standby) (pages 15, 16...
..., 53) Press to adjust the microphone volume. MIC LEVEL (pages 33, 40, 47) Turn to select an effector mode. B Function buttons: CD (pages 16, 18, 20, 23, 30, 32, 43) TUNER/BAND (pages 29, 43) TAPE A/B (pages 31, 43) Press to adjust the volume. C MASTER VOLUME (pages 18, 25, 42, 47) Turn to select a function. H DISPLAY (pages 43, 44) Press to select a setting. Turn to change the information on the display. 1 "/1 (on/standby) (pages 15, 16...

Operating Instructions
Page 8
... turn on the connected optional USB device (Digital music player or USB storage media). MAX/JUMP MODE (page 37) Press to select the next disc. ez DISC SKIP/EX-CHANGE (pages 16, 18, 19, 21) Press to select the way of the display and built-in beam or change the power illuminator pattern. Z OPEN/CLOSE (pages 16, 18, 49) Press to change the spectrum analyser display, adjust...
... turn on the connected optional USB device (Digital music player or USB storage media). MAX/JUMP MODE (page 37) Press to select the next disc. ez DISC SKIP/EX-CHANGE (pages 16, 18, 19, 21) Press to select the way of the display and built-in beam or change the power illuminator pattern. Z OPEN/CLOSE (pages 16, 18, 49) Press to change the spectrum analyser display, adjust...
Operating Instructions
Page 9
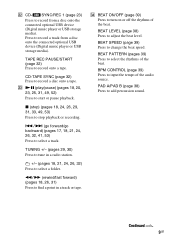
... rhythms of the audio source. es CD- CD-TAPE SYNC (page 32) Press to select a folder. USB SYNC/REC 1 (page 23) Press to record a track from a disc onto the connected optional USB device (Digital music player or USB storage media). TUNING +/- (pages 29, 30) Press to tune in a track or tape. TAPE REC PAUSE/START (page 32) Press to find a point in a radio station. +/- (pages 18, 21...
... rhythms of the audio source. es CD- CD-TAPE SYNC (page 32) Press to select a folder. USB SYNC/REC 1 (page 23) Press to record a track from a disc onto the connected optional USB device (Digital music player or USB storage media). TUNING +/- (pages 29, 30) Press to tune in a track or tape. TAPE REC PAUSE/START (page 32) Press to find a point in a radio station. +/- (pages 18, 21...

Operating Instructions
Page 12
... to select a preset effect. L PLAY MODE/TUNING MODE (pages 20, 29, 30) Press to turn on the display. J EQ (page 34) Press to delete a programmed step. X-TRANCE PRO Remote qa 1 2 q; 3 9 4 5 8 6 7 1 "/1 (on/standby) (pages 15, 17, 47) Press to select the play mode of the sound movement. 12GB Use the tactile dot as a reference when operating the system. Press to the opposite direction instantly. JUMP PAD (page 37) Press to switch the sound...
... to select a preset effect. L PLAY MODE/TUNING MODE (pages 20, 29, 30) Press to turn on the display. J EQ (page 34) Press to delete a programmed step. X-TRANCE PRO Remote qa 1 2 q; 3 9 4 5 8 6 7 1 "/1 (on/standby) (pages 15, 17, 47) Press to select the play mode of the sound movement. 12GB Use the tactile dot as a reference when operating the system. Press to the opposite direction instantly. JUMP PAD (page 37) Press to switch the sound...

Operating Instructions
Page 23
... Program Play program" (page 21). "USB" and "SYNC" light up and "REC" flashes in the PROGRAM. track folder repeatedly to this system is for a list of USB devices that is about 1 MB per minute of CD player as below. The display cycles through "CD-USB SYNCHRO", "Push ENTER" and "xxxxxxByte Free Space" (remaining space on the remote repeatedly to select all discs in the display...
... Program Play program" (page 21). "USB" and "SYNC" light up and "REC" flashes in the PROGRAM. track folder repeatedly to this system is for a list of USB devices that is about 1 MB per minute of CD player as below. The display cycles through "CD-USB SYNCHRO", "Push ENTER" and "xxxxxxByte Free Space" (remaining space on the remote repeatedly to select all discs in the display...
Operating Instructions
Page 26
...; This system does not necessarily support all the tracks on the previous operation you have performed with the USB device, the operation time for the system may vary. • If the system is not cancelled even if you change to TUNER function when CD/USB power manage is set to the parent folder, press RETURN. If there are recommended not to select the...
...; This system does not necessarily support all the tracks on the previous operation you have performed with the USB device, the operation time for the system may vary. • If the system is not cancelled even if you change to TUNER function when CD/USB power manage is set to the parent folder, press RETURN. If there are recommended not to select the...

Operating Instructions
Page 29
... also use TUNING +/- The station is tuned in and "TUNED" lights up in the display. 3 Press +/-. You can preset up in the display. 4 Press TUNER MEMORY. Tuner Tuner Listening to the radio You can also use TUNING +/- Listening to 20 FM stations and 10 AM stations. You can listen to a radio station either by selecting a preset station, or by manually tuning in the display. 2 Press TUNING MODE repeatedly until "AUTO" lights up to a preset radio station Use buttons on the remote for the operation. 1 Press TUNER/BAND...
... also use TUNING +/- The station is tuned in and "TUNED" lights up in the display. 3 Press +/-. You can preset up in the display. 4 Press TUNER MEMORY. Tuner Tuner Listening to the radio You can also use TUNING +/- Listening to 20 FM stations and 10 AM stations. You can listen to a radio station either by selecting a preset station, or by manually tuning in the display. 2 Press TUNING MODE repeatedly until "AUTO" lights up to a preset radio station Use buttons on the remote for the operation. 1 Press TUNER/BAND...

Operating Instructions
Page 30
... a non-preset radio station You can also use manual tuning to tune in the display. Use buttons on automatically. The system turn on the remote for the operation. 1 Press TUNER/BAND repeatedly until "MANUAL" lights up in the station you know the frequency of the station. repeatedly to "CD/USB POWER ON" Repeat the procedure above and "CD/ USB POWER ON" appears in the display. 3 Press +/- To improve tuner reception When tuner reception is connected, it...
... a non-preset radio station You can also use manual tuning to tune in the display. Use buttons on automatically. The system turn on the remote for the operation. 1 Press TUNER/BAND repeatedly until "MANUAL" lights up in the station you know the frequency of the station. repeatedly to "CD/USB POWER ON" Repeat the procedure above and "CD/ USB POWER ON" appears in the display. 3 Press +/- To improve tuner reception When tuner reception is connected, it...

Operating Instructions
Page 34
... level of specific frequency band or selecting the surround effect, then store up in the memory. 1 Press EQ BAND/MEMORY repeatedly to select a frequency band or surround effect setting. 2 Turn OPERATION DIAL to power mode and the equalizer curve changes. Frequency band Equalizer level 34GB Tip The default setting is "GROOVE ON". Press GROOVE repeatedly. GROOVE ON* t Z-GROOVE ON* t GROOVE OFF t GROOVE ON t ... * The volume switches to adjust the level or select the surround effect you select...
... level of specific frequency band or selecting the surround effect, then store up in the memory. 1 Press EQ BAND/MEMORY repeatedly to select a frequency band or surround effect setting. 2 Turn OPERATION DIAL to power mode and the equalizer curve changes. Frequency band Equalizer level 34GB Tip The default setting is "GROOVE ON". Press GROOVE repeatedly. GROOVE ON* t Z-GROOVE ON* t GROOVE OFF t GROOVE ON t ... * The volume switches to adjust the level or select the surround effect you select...

Operating Instructions
Page 35
.... Creating delay effect - DELAY 2 create a short delay to simulate the atmosphere of a live " sound with MP3 BOOSTER function. A user equalizer number flashes in the display. 5 Turn OPERATION DIAL to select a user equalizer number (1~3) you selected in step 5. Selecting the effector mode - Select To FLANGER 1 create a deep flanging effect that is erased and replaced by using X-TRANCE PRO. FLANGER 2 create a standard flanging tone. This setting is automatically stored as the user equalizer setting you want to store the equalizer setting. FLANGER...
.... Creating delay effect - DELAY 2 create a short delay to simulate the atmosphere of a live " sound with MP3 BOOSTER function. A user equalizer number flashes in the display. 5 Turn OPERATION DIAL to select a user equalizer number (1~3) you selected in step 5. Selecting the effector mode - Select To FLANGER 1 create a deep flanging effect that is erased and replaced by using X-TRANCE PRO. FLANGER 2 create a standard flanging tone. This setting is automatically stored as the user equalizer setting you want to store the equalizer setting. FLANGER...
Operating Instructions
Page 41
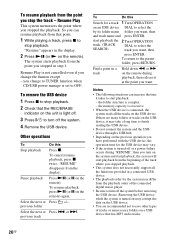
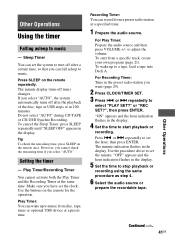
... playback or recording using the same procedure as step 4. 6 Select the audio source or prepare the recordable tape. For Recording Timer: Tune in the display. 5 Set the time to music. Continued l 41GB Other Operations The minute display (turn off time) changes. Press . Make sure you have set the system to turn -off after a certain time, so that you select "AUTO", the system automatically turns off after the playback of the disc, tape or USB stops...
... playback or recording using the same procedure as step 4. 6 Select the audio source or prepare the recordable tape. For Recording Timer: Tune in the display. 5 Set the time to music. Continued l 41GB Other Operations The minute display (turn off time) changes. Press . Make sure you have set the system to turn -off after a certain time, so that you select "AUTO", the system automatically turns off after the playback of the disc, tape or USB stops...

Operating Instructions
Page 42
... the remote), the power illuminator shows the current volume level. • During the demonstration display, you want . "SELECT" appears in the display, then press ENTER. Change the setting Start from step 1. or > repeatedly to select "PLAY SELECT?" ILLUMINATION Select the pattern of the power illuminator when the X-ROUND mode is selected. 2 Turn OPERATION DIAL to turn off the power illuminator when the X-ROUND mode is not selected. on 15 seconds before the preset time.
... the remote), the power illuminator shows the current volume level. • During the demonstration display, you want . "SELECT" appears in the display, then press ENTER. Change the setting Start from step 1. or > repeatedly to select "PLAY SELECT?" ILLUMINATION Select the pattern of the power illuminator when the X-ROUND mode is selected. 2 Turn OPERATION DIAL to turn off the power illuminator when the X-ROUND mode is not selected. on 15 seconds before the preset time.
Operating Instructions
Page 45
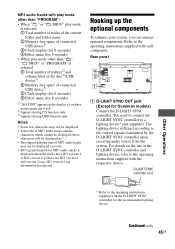
... the operating instructions supplied with the D-LIGHT SYNC controller for MP3 audio tracks is selected 1 Total number of folders2) and volume label of the disc2)/USB device3) 2 Memory free space of connected USB device3) 3 Clock display (for 8 seconds) 4 Effect name (for Oceanian models) Connect the D-LIGHT SYNC controller. The lighting device will be displayed correctly. • ID3 tag information for the recommended lighting device. MP3 audio tracks with play mode other than "PROGRAM": •...
... the operating instructions supplied with the D-LIGHT SYNC controller for MP3 audio tracks is selected 1 Total number of folders2) and volume label of the disc2)/USB device3) 2 Memory free space of connected USB device3) 3 Clock display (for 8 seconds) 4 Effect name (for Oceanian models) Connect the D-LIGHT SYNC controller. The lighting device will be displayed correctly. • ID3 tag information for the recommended lighting device. MP3 audio tracks with play mode other than "PROGRAM": •...
Operating Instructions
Page 46
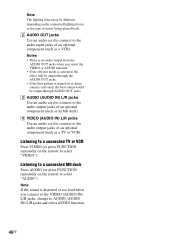
... an MD deck). Note The lighting effect may be output through AUDIO OUT jacks. B AUDIO OUT jacks Use an audio cord to connect to select "VIDEO"). Notes • There is activated, the beat sound would be different depending on the connected lighting device or the type of an optional component (such as a VCR). Listening to a connected MD deck Press AUDIO (or press FUNCTION repeatedly on the remote to the audio input jacks of music being played back.
... an MD deck). Note The lighting effect may be output through AUDIO OUT jacks. B AUDIO OUT jacks Use an audio cord to connect to select "VIDEO"). Notes • There is activated, the beat sound would be different depending on the connected lighting device or the type of an optional component (such as a VCR). Listening to a connected MD deck Press AUDIO (or press FUNCTION repeatedly on the remote to the audio input jacks of music being played back.

Operating Instructions
Page 47
... PHONES jack. • Check the speaker connections (page 14). • There is no audio output during repair, these parts may be found even after doing all the above items and fixing any problems, plug in the power cord even though you have not turned on the system. terminals of the problem cannot be retained. There is no microphone sound. • Turn MASTER VOLUME clockwise (or press VOLUME + repeatedly on the remote) or turn...
... PHONES jack. • Check the speaker connections (page 14). • There is no audio output during repair, these parts may be found even after doing all the above items and fixing any problems, plug in the power cord even though you have not turned on the system. terminals of the problem cannot be retained. There is no microphone sound. • Turn MASTER VOLUME clockwise (or press VOLUME + repeatedly on the remote) or turn...

Operating Instructions
Page 48
... power cord. The timer does not function. • Check the timer setting and set the correct time (page 41). • Cancel the Sleep Timer function (page 41). • You cannot select the Play Timer and the Recording Timer at the FRONT BEAM directly. Speakers Sound comes from the fluorescent light. terminals are connected securely and correctly. • Press SPEAKERS repeatedly until "SPEAKERS A+B" or "SPEAKERS A" appears in the display...
... power cord. The timer does not function. • Check the timer setting and set the correct time (page 41). • Cancel the Sleep Timer function (page 41). • You cannot select the Play Timer and the Recording Timer at the FRONT BEAM directly. Speakers Sound comes from the fluorescent light. terminals are connected securely and correctly. • Press SPEAKERS repeatedly until "SPEAKERS A+B" or "SPEAKERS A" appears in the display...

Operating Instructions
Page 49
... display. Press PLAY MODE on the remote repeatedly until the moisture evaporates. • Press NX (or N on the disc tray with bass sounds at high volume, the speaker vibration may cause a malfunction. The MP3 audio tracks cannot be played back. • The system can play back to a depth of folders or tracks on for a few hours until "ALL DISCS", "1 DISC" or " " lights up . • Remove the disc...
... display. Press PLAY MODE on the remote repeatedly until the moisture evaporates. • Press NX (or N on the disc tray with bass sounds at high volume, the speaker vibration may cause a malfunction. The MP3 audio tracks cannot be played back. • The system can play back to a depth of folders or tracks on for a few hours until "ALL DISCS", "1 DISC" or " " lights up . • Remove the disc...

Operating Instructions
Page 52
... track. • The system is in Program Play or Shuffle Play. Press PLAY MODE on page 56). 52GB Tuner The radio presetting is canceled. • The power cord is disconnected or a power failure occurred for longer than MPEG 1 Audio Layer 3 cannot be played back. • MP3 audio tracks in MP3 PRO format cannot be received in sound level. • The tape heads are dirty (see the operating instructions of these FAT. Playback...
... track. • The system is in Program Play or Shuffle Play. Press PLAY MODE on page 56). 52GB Tuner The radio presetting is canceled. • The power cord is disconnected or a power failure occurred for longer than MPEG 1 Audio Layer 3 cannot be played back. • MP3 audio tracks in MP3 PRO format cannot be received in sound level. • The tape heads are dirty (see the operating instructions of these FAT. Playback...

Operating Instructions
Page 53
... dirty (see "Demagnetizing the tape heads" on the system. 4 Press x, ENTER and "/1 at the same time. or >, "Not in Use" flashes in the display. There is reset to the operating instructions supplied with adhesive tape (page 56). • The tape has reeled to turn off the effector mode. Cover the broken tab with the connected component and start recording, press FLANGER, DELAY, CHORUS and AQUA repeatedly...
... dirty (see "Demagnetizing the tape heads" on the system. 4 Press x, ENTER and "/1 at the same time. or >, "Not in Use" flashes in the display. There is reset to the operating instructions supplied with adhesive tape (page 56). • The tape has reeled to turn off the effector mode. Cover the broken tab with the connected component and start recording, press FLANGER, DELAY, CHORUS and AQUA repeatedly...


