
User Guide
Page 2
......5 Connecting the Hardware ...5 Plasma Hookup ...5 Plasma Hookup with Surround Sound ...6 TV Hookup ...7 Detecting and Setting Up the Initial IP Address 8 Configuring the EBS-N200...9 Using the Software...10 Overview...10 Launching the Software ...10 Screen Layout ...11 General Information...12 Control Web Pages ...13 Body...13 Control Web Pages ...... an Existing Playlist...43 Entry Types...44 Maintenance (Plasma only)...49 Energy Saving...49 Picture Inversion ...50 Picture Orbit...50 Screen Saver (X1 only) ...51 EBS-N200 Network Display Adapter 2
......5 Connecting the Hardware ...5 Plasma Hookup ...5 Plasma Hookup with Surround Sound ...6 TV Hookup ...7 Detecting and Setting Up the Initial IP Address 8 Configuring the EBS-N200...9 Using the Software...10 Overview...10 Launching the Software ...10 Screen Layout ...11 General Information...12 Control Web Pages ...13 Body...13 Control Web Pages ...... an Existing Playlist...43 Entry Types...44 Maintenance (Plasma only)...49 Energy Saving...49 Picture Inversion ...50 Picture Orbit...50 Screen Saver (X1 only) ...51 EBS-N200 Network Display Adapter 2

User Guide
Page 5
Connecting the Hardware You can connect the EBS-N200 to a plasma, a plasma with surround sound, and a TV. This section provides images on connecting the unit to various types of displays. Plasma Hookup The following image displays how to connect the EBS-N200 to install. To install it, you are ready to configure the software to a display and detect or setup the initial IP address. After that, you simply connect the unit to meet your individual specifications. Installing the EBS-N200 Overview The EBS-N200 comes ready to a plasma: EBS-N200 Network Display Adapter 5
Connecting the Hardware You can connect the EBS-N200 to a plasma, a plasma with surround sound, and a TV. This section provides images on connecting the unit to various types of displays. Plasma Hookup The following image displays how to connect the EBS-N200 to install. To install it, you are ready to configure the software to a display and detect or setup the initial IP address. After that, you simply connect the unit to meet your individual specifications. Installing the EBS-N200 Overview The EBS-N200 comes ready to a plasma: EBS-N200 Network Display Adapter 5

User Guide
Page 8
... the EBS-N200's web interface. Diskless and hard drive equipped EBS-N200s are pre-configured differently as follow: • Connect the EBS-N200 to a computer with a Static IP Address of this only one EBS-N200 should be changed during configuration since additional un-configured EBS-N200s on the boot server to supply an IP address. Diskless...work with the DHCP enabled and rely on the network will have the same name. Hard Drive Equipped EBS-N200 IP Address Configuration: All EBS-N200's equipped with a hard drive are also set up to reboot the unit for Server, DHCP, and DNS set up .
... the EBS-N200's web interface. Diskless and hard drive equipped EBS-N200s are pre-configured differently as follow: • Connect the EBS-N200 to a computer with a Static IP Address of this only one EBS-N200 should be changed during configuration since additional un-configured EBS-N200s on the boot server to supply an IP address. Diskless...work with the DHCP enabled and rely on the network will have the same name. Hard Drive Equipped EBS-N200 IP Address Configuration: All EBS-N200's equipped with a hard drive are also set up to reboot the unit for Server, DHCP, and DNS set up .

User Guide
Page 10
...that allows you do not have to complete steps 2 through 4. Launching the Software To launch the EBS-N200 software, perform the following image displays an example of your Internet browser, enter the IP address to which you want to control the audio and video inputs. In the Password field, enter ...the EBS-N200 password. 4. The following steps: 1. In the Log in as field, select User, Remote View Host,...
...that allows you do not have to complete steps 2 through 4. Launching the Software To launch the EBS-N200 software, perform the following image displays an example of your Internet browser, enter the IP address to which you want to control the audio and video inputs. In the Password field, enter ...the EBS-N200 password. 4. The following steps: 1. In the Log in as field, select User, Remote View Host,...
User Guide
Page 12
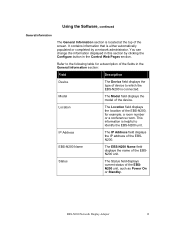
... On or Standby. Model The Model field displays the model of the EBSN200. EBS-N200 Network Display Adapter 12 IP Address The IP Address field displays the IP address of the device. It contains information that is located at the top of device to identify the EBS-N200 unit. Using the Software, continued General Information The General Information section is...
... On or Standby. Model The Model field displays the model of the EBSN200. EBS-N200 Network Display Adapter 12 IP Address The IP Address field displays the IP address of the device. It contains information that is located at the top of device to identify the EBS-N200 unit. Using the Software, continued General Information The General Information section is...
User Guide
Page 14
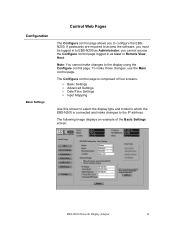
To make changes to the IP address. Configuration Basic Settings Control Web Pages The Configure control page allows you to EBS-N200 as User or Remote View Host. The following image displays an example of four screens: Basic Settings Advanced Settings Date/Time Settings ...Input Mapping Use this screen to select the display type and model to which the EBS-N200 is comprised of the Basic Settings screen: EBS-N200 Network Display Adapter 14 The Configure control page is connected and make changes to the display using the Configure control ...
To make changes to the IP address. Configuration Basic Settings Control Web Pages The Configure control page allows you to EBS-N200 as User or Remote View Host. The following image displays an example of four screens: Basic Settings Advanced Settings Date/Time Settings ...Input Mapping Use this screen to select the display type and model to which the EBS-N200 is comprised of the Basic Settings screen: EBS-N200 Network Display Adapter 14 The Configure control page is connected and make changes to the display using the Configure control ...
User Guide
Page 15
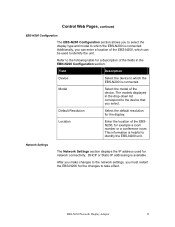
... of the EBS-N200, which the EBS-N200 is connected. The models displayed in the EBN-N200 Configuration section: Field Description Device Select the device to take effect. Location Enter the location of the device. DHCP or Static IP addressing is helpful to... Settings The Network Settings section displays the IP address used to identify the EBS-N200 unit. Model Select the model of the EBSN200, for the display. This information is available. Control Web Pages, continued EBS-N200 Configuration The EBS-N200 Configuration section allows you select.
... of the EBS-N200, which the EBS-N200 is connected. The models displayed in the EBN-N200 Configuration section: Field Description Device Select the device to take effect. Location Enter the location of the device. DHCP or Static IP addressing is helpful to... Settings The Network Settings section displays the IP address used to identify the EBS-N200 unit. Model Select the model of the EBSN200, for the display. This information is available. Control Web Pages, continued EBS-N200 Configuration The EBS-N200 Configuration section allows you select.

User Guide
Page 16
... table for a description of the fields in the Network Settings section: Field Description Obtain IP Address Automatically (DHCP) Select this radio button to the following fields: - Primary DNS Server - Default Gateway - Secondary DNS Server EBS-N200 Network Display Adapter 16 IP Address - Control Web Pages, continued Network Settings, continued Refer to have the software automatically detect...
... table for a description of the fields in the Network Settings section: Field Description Obtain IP Address Automatically (DHCP) Select this radio button to the following fields: - Primary DNS Server - Default Gateway - Secondary DNS Server EBS-N200 Network Display Adapter 16 IP Address - Control Web Pages, continued Network Settings, continued Refer to have the software automatically detect...
User Guide
Page 17
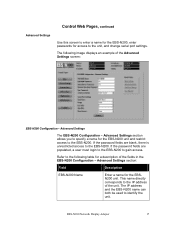
... - If the password fields are blank, there is unrestricted access to the IP address of the fields in the EBS-N200 Configuration - The IP address and the EBS-N200 name can both be used to the EBS-N200. Advanced Settings section allows you to specify a name for the EBS-N200 unit and restrict access to identify the unit. Refer to the following...
... - If the password fields are blank, there is unrestricted access to the IP address of the fields in the EBS-N200 Configuration - The IP address and the EBS-N200 name can both be used to the EBS-N200. Advanced Settings section allows you to specify a name for the EBS-N200 unit and restrict access to identify the unit. Refer to the following...

User Guide
Page 33
...Check the Lock Session checkbox if you do not check the checkbox, someone else without any restrictions. Click the Disconnect All button. EBS-N200 Network Display Adapter 33 Click the Connect button. In the Resolution field, select the resolution equal to the resolution on the display ... yourself from the session. 4. To disconnect an open access remote view session, perform the following steps: 1. In the IP Address field, verify the IP address is configured to open access, you have the ability to share your screen with someone else can disconnect you from the remote...
...Check the Lock Session checkbox if you do not check the checkbox, someone else without any restrictions. Click the Disconnect All button. EBS-N200 Network Display Adapter 33 Click the Connect button. In the Resolution field, select the resolution equal to the resolution on the display ... yourself from the session. 4. To disconnect an open access remote view session, perform the following steps: 1. In the IP Address field, verify the IP address is configured to open access, you have the ability to share your screen with someone else can disconnect you from the remote...

User Guide
Page 38
... Or, enter new participant manually and click Add, enter the participant's name and IP Address, and then click the Add button Refresh - Use the buttons at the bottom of all participants and clear the screen, click the Clear button EBS-N200 Network Display Adapter 38 This screen displays the participants logged into the session...
... Or, enter new participant manually and click Add, enter the participant's name and IP Address, and then click the Add button Refresh - Use the buttons at the bottom of all participants and clear the screen, click the Clear button EBS-N200 Network Display Adapter 38 This screen displays the participants logged into the session...