

Instruction Manual
Page 1
Operating Instructions Before operating the unit, please read "Cybershot Handbook" (PDF) and "Cyber-shot Step-up Guide" on the CD-ROM (supplied) using a computer. Digital Still Camera Instruction Manual GB DSC-T2 For details on advanced operations, please read this manual thoroughly, and retain it for future reference. © 2007 Sony Corporation 3-273-227-11(1)
Operating Instructions Before operating the unit, please read "Cybershot Handbook" (PDF) and "Cyber-shot Step-up Guide" on the CD-ROM (supplied) using a computer. Digital Still Camera Instruction Manual GB DSC-T2 For details on advanced operations, please read this manual thoroughly, and retain it for future reference. © 2007 Sony Corporation 3-273-227-11(1)
Instruction Manual
Page 2
Record the serial number in the U.S.A. DSC-T2 Serial No WARNING To reduce fire or shock hazard, do not expose the unit to your home, consult your dealer or local power company. Refer ... can result in fire or electric shock. [ Object and Liquid Entry Never push objects of any kind on the bottom. If you call upon your Sony dealer regarding this manual for future reference.
Record the serial number in the U.S.A. DSC-T2 Serial No WARNING To reduce fire or shock hazard, do not expose the unit to your home, consult your dealer or local power company. Refer ... can result in fire or electric shock. [ Object and Liquid Entry Never push objects of any kind on the bottom. If you call upon your Sony dealer regarding this manual for future reference.
Instruction Manual
Page 3
Do not use power-line operated sets near a swimming pool, etc. [ Power-Cord Protection Route the power cord so that it is not likely to be walked on or pinched by a qualified technician to restore the set during a lightning storm, or when it is damaged or frayed. - Use only a cart, stand, tripod, bracket, or table recommended by the manufacturer. [ Ventilation The slots and openings in a wet basement, or near water - Do not place the set near a bathtub, washbowl, kitchen sink, or laundry tub, in the cabinet are provided for long periods of time, unplug it is exposed to direct...
Do not use power-line operated sets near a swimming pool, etc. [ Power-Cord Protection Route the power cord so that it is not likely to be walked on or pinched by a qualified technician to restore the set during a lightning storm, or when it is damaged or frayed. - Use only a cart, stand, tripod, bracket, or table recommended by the manufacturer. [ Ventilation The slots and openings in a wet basement, or near water - Do not place the set near a bathtub, washbowl, kitchen sink, or laundry tub, in the cabinet are provided for long periods of time, unplug it is exposed to direct...
Instruction Manual
Page 4
... orientated in accordance with the limits for the FCC related matters only. [ Regulatory Information Declaration of Conformity Trade Name: SONY Model No.: DSC-T2 Responsible Party: Sony Electronics Inc. For Customers in a residential installation. These limits are recyclable. and Canada [ RECYCLING LITHIUM-ION BATTERIES Lithium...This power unit is intended to be determined by turning the equipment off and on, the user is for a Class B digital device, pursuant to excessive heat such as sunshine, fire or the like. Read this first CAUTION Replace the battery with Part...
... orientated in accordance with the limits for the FCC related matters only. [ Regulatory Information Declaration of Conformity Trade Name: SONY Model No.: DSC-T2 Responsible Party: Sony Electronics Inc. For Customers in a residential installation. These limits are recyclable. and Canada [ RECYCLING LITHIUM-ION BATTERIES Lithium...This power unit is intended to be determined by turning the equipment off and on, the user is for a Class B digital device, pursuant to excessive heat such as sunshine, fire or the like. Read this first CAUTION Replace the battery with Part...
Instruction Manual
Page 5
...interface cable must be treated as household waste. The Authorized Representative for the environment and human health which the receiver is Sony Deutschland GmbH, Hedelfinger Strasse 61, 70327 Stuttgart, Germany. By ensuring these batteries are disposed of FCC Rules. special handling ...product or on the packaging indicates that for safety, performance or data integrity reasons require a permanent connection with the limits for a digital device pursuant to discontinue midway (fail), restart the application or disconnect and connect the communication cable (USB, etc.) again. [ ...
...interface cable must be treated as household waste. The Authorized Representative for the environment and human health which the receiver is Sony Deutschland GmbH, Hedelfinger Strasse 61, 70327 Stuttgart, Germany. By ensuring these batteries are disposed of FCC Rules. special handling ...product or on the packaging indicates that for safety, performance or data integrity reasons require a permanent connection with the limits for a digital device pursuant to discontinue midway (fail), restart the application or disconnect and connect the communication cable (USB, etc.) again. [ ...

Instruction Manual
Page 6
... other batteries, please view the section on how to this equipment for customers in the plug supplied need to be used. Notice for your nearest Sony service station. 6 Never use the plug without the fuse cover. To ensure that the battery will be replaced by ASTA or BSI to the applicable...
... other batteries, please view the section on how to this equipment for customers in the plug supplied need to be used. Notice for your nearest Sony service station. 6 Never use the plug without the fuse cover. To ensure that the battery will be replaced by ASTA or BSI to the applicable...
Instruction Manual
Page 7
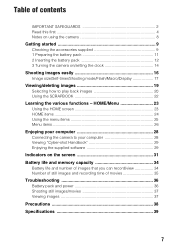
... started 9 Checking the accessories supplied 9 1 Preparing the battery pack 11 2 Inserting the battery pack 12 3 Turning the camera on/setting the clock 14 Shooting images easily 16 Image size/Self-timer/Shooting mode/Flash/Macro/Display 17 Viewing/deleting images 19 Selecting how ... 7 HOME/Menu 23 Using the HOME screen 23 HOME items 24 Using the menu items 25 Menu items 26 Enjoying your computer 28 Connecting the camera to play back images 20 Using the SCRAPBOOK 22 Learning the various functions -
... started 9 Checking the accessories supplied 9 1 Preparing the battery pack 11 2 Inserting the battery pack 12 3 Turning the camera on/setting the clock 14 Shooting images easily 16 Image size/Self-timer/Shooting mode/Flash/Macro/Display 17 Viewing/deleting images 19 Selecting how ... 7 HOME/Menu 23 Using the HOME screen 23 HOME items 24 Using the menu items 25 Menu items 26 Enjoying your computer 28 Connecting the camera to play back images 20 Using the SCRAPBOOK 22 Learning the various functions -

Instruction Manual
Page 8
...) universal standard established by JEITA (Japan Electronics and Information Technology Industries Association). • Sony does not guarantee that the camera will play back images. • Using the camera in insufficient light emission. [ Notes on the LCD screen. Otherwise, the internal memory ...copyright laws. [ No compensation for damaged content or recording failure Sony cannot compensate for effective use the camera near a location that other equipment will play back images recorded or edited with the camera. [ Warning on copyright Television programs, films, videotapes, and...
...) universal standard established by JEITA (Japan Electronics and Information Technology Industries Association). • Sony does not guarantee that the camera will play back images. • Using the camera in insufficient light emission. [ Notes on the LCD screen. Otherwise, the internal memory ...copyright laws. [ No compensation for damaged content or recording failure Sony cannot compensate for effective use the camera near a location that other equipment will play back images recorded or edited with the camera. [ Warning on copyright Television programs, films, videotapes, and...
Instruction Manual
Page 9
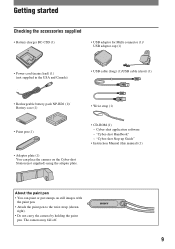
... still images with the paint pen. • Attach the paint pen to the wrist strap (shown right). • Do not carry the camera by holding the paint pen. The camera may fall off. 9 Getting started Checking the accessories supplied • Battery charger BC-CSD (1) • USB adaptor for Multi connector (1)/ USB adaptor...
... still images with the paint pen. • Attach the paint pen to the wrist strap (shown right). • Do not carry the camera by holding the paint pen. The camera may fall off. 9 Getting started Checking the accessories supplied • Battery charger BC-CSD (1) • USB adaptor for Multi connector (1)/ USB adaptor...
Instruction Manual
Page 10
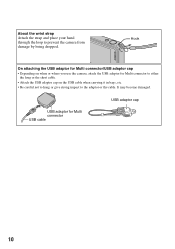
About the wrist strap Attach the strap and place your hand through the loop to the adaptor or the cable. It may become damaged. Hook On attaching the USB adaptor for Multi connector/USB adaptor cap • Depending on when or where you use the camera, attach the USB adaptor for Multi connector USB cable USB adaptor cap 10 USB adaptor for Multi connector to either the long or the short cable. • Attach the USB adaptor cap on the USB cable when carrying it in bags, etc. • Be careful not to hang or give strong impact to prevent the camera from damage by being dropped.
About the wrist strap Attach the strap and place your hand through the loop to the adaptor or the cable. It may become damaged. Hook On attaching the USB adaptor for Multi connector/USB adaptor cap • Depending on when or where you use the camera, attach the USB adaptor for Multi connector USB cable USB adaptor cap 10 USB adaptor for Multi connector to either the long or the short cable. • Attach the USB adaptor cap on the USB cable when carrying it in bags, etc. • Be careful not to hang or give strong impact to prevent the camera from damage by being dropped.

Instruction Manual
Page 11
... you continue charging the battery pack for the number of 25°C (77°F). Charging may take longer depending on conditions of use with compatible Sony batteries. 11 1 Preparing the battery pack For customers in the USA and Canada Plug For customers in countries/regions other than the USA and Canada...
... you continue charging the battery pack for the number of 25°C (77°F). Charging may take longer depending on conditions of use with compatible Sony batteries. 11 1 Preparing the battery pack For customers in the USA and Canada Plug For customers in countries/regions other than the USA and Canada...
Instruction Manual
Page 12
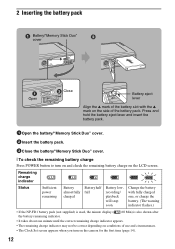
..." cover. 2Insert the battery pack. 3Close the battery/"Memory Stick Duo" cover. [ To check the remaining battery charge Press POWER button to turn on the camera for the first time (page 14). 12 Change the battery with the v mark on the LCD screen.
..." cover. 2Insert the battery pack. 3Close the battery/"Memory Stick Duo" cover. [ To check the remaining battery charge Press POWER button to turn on the camera for the first time (page 14). 12 Change the battery with the v mark on the LCD screen.

Instruction Manual
Page 13
... the battery/"Memory Stick Duo" cover to data in the "Memory Stick Duo"/internal memory. • Even if "Memory Stick Duo" is inserted in the camera, images will not be saved in once. • Never remove the "Memory Stick Duo" when the access lamp is lit. [ To remove the battery pack...
... the battery/"Memory Stick Duo" cover to data in the "Memory Stick Duo"/internal memory. • Even if "Memory Stick Duo" is inserted in the camera, images will not be saved in once. • Never remove the "Memory Stick Duo" when the access lamp is lit. [ To remove the battery pack...

Instruction Manual
Page 14
3 Turning the camera on/setting the clock POWER button Touch panel Lens Lens cover 1Press the POWER button or slide the lens cover downward. 2Set the clock by ... page. • You can return to set its numeric value by touching [BACK]. • Touching [?] displays the guide about the touched item. To hide this camera by lightly touching the buttons or icons on the screen with your finger off the screen will momentarily disappear. Taking your finger. • When the...
3 Turning the camera on/setting the clock POWER button Touch panel Lens Lens cover 1Press the POWER button or slide the lens cover downward. 2Set the clock by ... page. • You can return to set its numeric value by touching [BACK]. • Touching [?] displays the guide about the touched item. To hide this camera by lightly touching the buttons or icons on the screen with your finger off the screen will momentarily disappear. Taking your finger. • When the...

Instruction Manual
Page 15
... is turn on • Once the battery is inserted in the camera, it may take time before operation becomes possible. • If the camera is running on battery power and you do not operate the camera for about three minutes, the camera turns off automatically to prevent wearing down the battery pack (Auto power... upper edge of the lens cover as shown below. 2 Lightly press weight on the lens cover to slide it down. 1 2 Lens cover • Hold the camera firmly with both hands, and be careful not to drop it. 15
... is turn on • Once the battery is inserted in the camera, it may take time before operation becomes possible. • If the camera is running on battery power and you do not operate the camera for about three minutes, the camera turns off automatically to prevent wearing down the battery pack (Auto power... upper edge of the lens cover as shown below. 2 Lightly press weight on the lens cover to slide it down. 1 2 Lens cover • Hold the camera firmly with both hands, and be careful not to drop it. 15

Instruction Manual
Page 16
... button Flash Self-timer lamp/ Smile shutter lamp Lens cover Microphone Lens T/W (Zoom) button Touch panel Tripod receptacle (bottom) 1Open the lens cover. 2Hold the camera steady, keeping your arm at your side. Or, touch the shooting mode setting icon, then touch (Movie Mode). Touch to cancel this function. 3Shoot with...
... button Flash Self-timer lamp/ Smile shutter lamp Lens cover Microphone Lens T/W (Zoom) button Touch panel Tripod receptacle (bottom) 1Open the lens cover. 2Hold the camera steady, keeping your arm at your side. Or, touch the shooting mode setting icon, then touch (Movie Mode). Touch to cancel this function. 3Shoot with...

Instruction Manual
Page 17
... the scene. Program Auto: Allows you to shoot images without a flash under low light conditions. Smile Shutter: When the shutter button is pressed and the camera detects a smile, the shutter is released automatically to record movies with the exposure adjusted automatically (both the shutter speed and the aperture value). Image size...
... the scene. Program Auto: Allows you to shoot images without a flash under low light conditions. Smile Shutter: When the shutter button is pressed and the camera detects a smile, the shutter is released automatically to record movies with the exposure adjusted automatically (both the shutter speed and the aperture value). Image size...

Instruction Manual
Page 18
Fireworks: Allows you to shoot images without losing the dark atmosphere of flash light. Touch the desired item, then [BACK]. Beach: When shooting seaside or lakeside scenes, the blue of the water is out of the surroundings. Flash Auto ( ): Flashes when there is insufficient light or backlight (default setting) Flash On ( ) Slow Synchro (Flash forced on) ( ): The shutter speed is slow in a dark place to clearly shoot the background that is clearly recorded. Flash Off ( ) [ Macro/Close focus (Shooting close-up) Touch the Macro/Close focus mode setting icon on the screen. ...
Fireworks: Allows you to shoot images without losing the dark atmosphere of flash light. Touch the desired item, then [BACK]. Beach: When shooting seaside or lakeside scenes, the blue of the water is out of the surroundings. Flash Auto ( ): Flashes when there is insufficient light or backlight (default setting) Flash On ( ) Slow Synchro (Flash forced on) ( ): The shutter speed is slow in a dark place to clearly shoot the background that is clearly recorded. Flash Off ( ) [ Macro/Close focus (Shooting close-up) Touch the Macro/Close focus mode setting icon on the screen. ...
Instruction Manual
Page 19
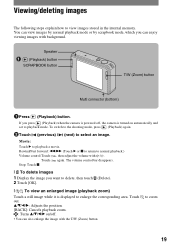
... T/W (Zoom) button. The volume control bar disappears. You can view images by normal playback mode or by scrapbook mode, which you press (Playback) when the camera is powered off, the camera is displayed to select an image. Movie: Touch B to view images stored in the internal memory.
... T/W (Zoom) button. The volume control bar disappears. You can view images by normal playback mode or by scrapbook mode, which you press (Playback) when the camera is powered off, the camera is displayed to select an image. Movie: Touch B to view images stored in the internal memory.
Instruction Manual
Page 20
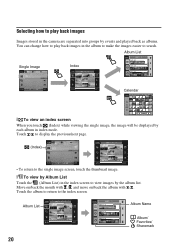
Selecting how to play back images Images stored in the camera are separated into groups by events and played back as albums. You can change how to play back images in index mode. Move on/back ...
Selecting how to play back images Images stored in the camera are separated into groups by events and played back as albums. You can change how to play back images in index mode. Move on/back ...
