Operating Instructions
Page 4
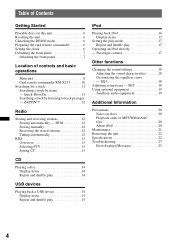
... 12 Storing manually 12 Receiving the stored stations 12 Tuning automatically 12 RDS 13 Overview 13 Selecting PTY 13 Setting CT 13 CD Playing a disc 14 ... 6 Setting the clock 6 Detaching the front panel 7 Attaching the front panel 7 Location of MP3/WMA/AAC files 20 About iPod 20 Maintenance 21 Removing the unit 22 Specifications 22 Troubleshooting 23 Error displays/...control 17 Other functions Changing the sound settings 18 Adjusting the sound characteristics 18 Customizing the equalizer curve - ZAPPIN 12 Radio Storing and receiving stations 12 Storing automatically -
... 12 Storing manually 12 Receiving the stored stations 12 Tuning automatically 12 RDS 13 Overview 13 Selecting PTY 13 Setting CT 13 CD Playing a disc 14 ... 6 Setting the clock 6 Detaching the front panel 7 Attaching the front panel 7 Location of MP3/WMA/AAC files 20 About iPod 20 Maintenance 21 Removing the unit 22 Specifications 22 Troubleshooting 23 Error displays/...control 17 Other functions Changing the sound settings 18 Adjusting the sound characteristics 18 Customizing the equalizer curve - ZAPPIN 12 Radio Storing and receiving stations 12 Storing automatically -

Operating Instructions
Page 7
... panel and display window. • Do not subject the front panel to the OFF position without detaching the front panel, the caution alarm will only sound if the built-in a parked car or on the unit (or insert a disc) to the right, then gently pull out the left side in. The... alarm will sound for a few seconds. Avoid leaving it in amplifier is turned off. 2 Press (OPEN). Press (SOURCE) on a dashboard/rear tray. • Do not detach the front...
... panel and display window. • Do not subject the front panel to the OFF position without detaching the front panel, the caution alarm will only sound if the built-in a parked car or on the unit (or insert a disc) to the right, then gently pull out the left side in. The... alarm will sound for a few seconds. Avoid leaving it in amplifier is turned off. 2 Press (OPEN). Press (SOURCE) on a dashboard/rear tray. • Do not detach the front...
Operating Instructions
Page 9
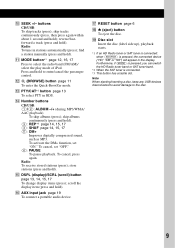
Press and hold to the disc. 9 Radio: To receive stored stations (press); store stations (press and hold ); Furthermore, if (MODE) is pressed, you can switch the HD Radio tuner band or SAT tuner band. *2 ...)/ select the play mode of iPod. N Number buttons CD/USB: (1)/(2): ALBUM -/+ (during MP3/WMA/ AAC playback) To skip albums (press); To cancel, set "ON." find a station manually (press and hold ). (3): REP*3 page 14, 15, 17 (4): SHUF page 14, 15, 17 (5): DM+ Improves digitally compressed sound, such as MP3. skip albums continuously (press and hold ). scroll the...
Press and hold to the disc. 9 Radio: To receive stored stations (press); store stations (press and hold ); Furthermore, if (MODE) is pressed, you can switch the HD Radio tuner band or SAT tuner band. *2 ...)/ select the play mode of iPod. N Number buttons CD/USB: (1)/(2): ALBUM -/+ (during MP3/WMA/ AAC playback) To skip albums (press); To cancel, set "ON." find a station manually (press and hold ). (3): REP*3 page 14, 15, 17 (4): SHUF page 14, 15, 17 (5): DM+ Improves digitally compressed sound, such as MP3. skip albums continuously (press and hold ). scroll the...

Operating Instructions
Page 10
... the insulation film before use (page 6). A OFF button To turn on the unit. F ATT (attenuate) button To attenuate the sound. To cancel, press again. I M (+)/m (-) buttons To control CD/USB, the same as (1)/(2) (ALBUM -/+) on ; store stations (press and hold to enter/cancel the passenger control. B SOURCE ..., you can be operated with the card remote commander unless (SOURCE) on the unit. button To adjust volume. K Number buttons To receive stored stations (press); H MODE button*1 Press to activate the unit first. Card remote commander RM-X151 1 2 3 4 OFF ATT SOURCE SEL MODE +...
... the insulation film before use (page 6). A OFF button To turn on the unit. F ATT (attenuate) button To attenuate the sound. To cancel, press again. I M (+)/m (-) buttons To control CD/USB, the same as (1)/(2) (ALBUM -/+) on ; store stations (press and hold to enter/cancel the passenger control. B SOURCE ..., you can be operated with the card remote commander unless (SOURCE) on the unit. button To adjust volume. K Number buttons To receive stored stations (press); H MODE button*1 Press to activate the unit first. Card remote commander RM-X151 1 2 3 4 OFF ATT SOURCE SEL MODE +...
Operating Instructions
Page 12
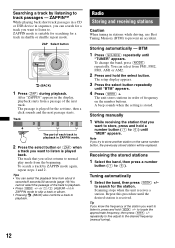
... the band, then press (SEEK) +/- Scanning stops when the unit receives a station. to prevent an accident. Radio Storing and receiving stations Caution When tuning in sequence, you can search for the set time, then a click sounds and the next passage starts. To change the band, press (MODE)... repeatedly. to (6)) until "BTM" appears. 4 Press (SEEK) +. ZAPPIN™ While playing back short track passages in a CD ...
... the band, then press (SEEK) +/- Scanning stops when the unit receives a station. to prevent an accident. Radio Storing and receiving stations Caution When tuning in sequence, you can search for the set time, then a click sounds and the next passage starts. To change the band, press (MODE)... repeatedly. to (6)) until "BTM" appears. 4 Press (SEEK) +. ZAPPIN™ While playing back short track passages in a CD ...
Operating Instructions
Page 16
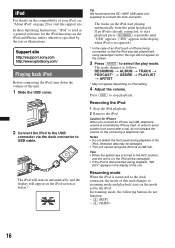
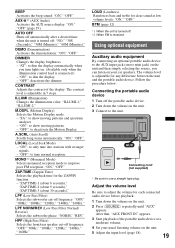
The tracks on , the iPod will turn down the volume of the unit. 1 Slide the USB cover. 2 Connect the iPod to avoid sudden loud sound after a call . Press (OFF) to resuming mode and playback starts in the mode set by the iPod. Tips • When the ignition key is on ... the play mode. iPod For details on the compatibility of your iPod, see "About iPod" on iPod setting. 4 Adjust the volume. Support site http://esupport.sony.com http://www.xplodsony.com/ Playing back iPod Before connecting the iPod, turn on automatically, and the display will not appear on the iPod screen...
The tracks on , the iPod will turn down the volume of the unit. 1 Slide the USB cover. 2 Connect the iPod to avoid sudden loud sound after a call . Press (OFF) to resuming mode and playback starts in the mode set by the iPod. Tips • When the ignition key is on ... the play mode. iPod For details on the compatibility of your iPod, see "About iPod" on iPod setting. 4 Adjust the volume. Support site http://esupport.sony.com http://www.xplodsony.com/ Playing back iPod Before connecting the iPod, turn on automatically, and the display will not appear on the iPod screen...

Operating Instructions
Page 18
...dial to select the setting (example "ON" or "OFF"). 4 Press and hold the select button. The larger the number, the more ambient sound field. Adjusting setup items - The setup is complete and the display returns to normal reception/play mode. DSO (Dynamic Soundstage Organizer) Creates a... and setting. "-8 dB." The volume level is complete and the display returns to normal reception/play mode. Other functions Changing the sound settings Adjusting the sound characteristics 1 Press the select button repeatedly until "LOW," "MID" or "HI" appears. 4 Rotate the control dial to adjust ...
...dial to select the setting (example "ON" or "OFF"). 4 Press and hold the select button. The larger the number, the more ambient sound field. Adjusting setup items - The setup is complete and the display returns to normal reception/play mode. DSO (Dynamic Soundstage Organizer) Creates a... and setting. "-8 dB." The volume level is complete and the display returns to normal reception/play mode. Other functions Changing the sound settings Adjusting the sound characteristics 1 Press the select button repeatedly until "LOW," "MID" or "HI" appears. 4 Rotate the control dial to adjust ...
Operating Instructions
Page 19
...only when the illumination control lead is connected.) - The volume level is turned off automatically after a desired time when the unit is adjustable for clear sound at a moderate volume. 4 Set your car speakers. AUTO OFF Shuts off : "NO," "30S (Seconds)," "30M (Minutes)," "60M (Minutes)."... off . *2 When FM is adjustable in 7 steps. LOCAL (Local Seek Mode) - "OFF": to dim the display. - The contrast level is received. ZAP.TIME (Zappin Time) Selects the playback time for each connected audio device before playback. 1 Turn down the volume on the unit. 2 Press (SOURCE...
...only when the illumination control lead is connected.) - The volume level is turned off automatically after a desired time when the unit is adjustable for clear sound at a moderate volume. 4 Set your car speakers. AUTO OFF Shuts off : "NO," "30S (Seconds)," "30M (Minutes)," "60M (Minutes)."... off . *2 When FM is adjustable in 7 steps. LOCAL (Local Seek Mode) - "OFF": to dim the display. - The contrast level is received. ZAP.TIME (Zappin Time) Selects the playback time for each connected audio device before playback. 1 Turn down the volume on the unit. 2 Press (SOURCE...
Operating Instructions
Page 20
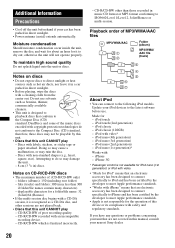
...MP3/WMA/AAC files MP3/WMA/AAC Folder (album) MP3/WMA/ AAC file (track) Notes on CD-R/CD-RW discs • The maximum number of poor recording quality. - Discs with - displayable characters for - CD-R/CD-RW which is designed to playback discs that conform to the Compact Disc (CD) standard. About iPod • You can connect to the Compact Disc (CD...manual, consult your nearest Sony dealer. 20 CD-R/CD-RW recorded with labels...sound quality Do not splash liquid onto the unit or discs. - files (tracks) and folders: 300 (may ruin the disc. - iPod classic - CD-R/CD-RW of : (CD-R/CD...
...MP3/WMA/AAC files MP3/WMA/AAC Folder (album) MP3/WMA/ AAC file (track) Notes on CD-R/CD-RW discs • The maximum number of poor recording quality. - Discs with - displayable characters for - CD-R/CD-RW which is designed to playback discs that conform to the Compact Disc (CD) standard. About iPod • You can connect to the Compact Disc (CD...manual, consult your nearest Sony dealer. 20 CD-R/CD-RW recorded with labels...sound quality Do not splash liquid onto the unit or discs. - files (tracks) and folders: 300 (may ruin the disc. - iPod classic - CD-R/CD-RW of : (CD-R/CD...
Operating Instructions
Page 23
...set ) Optional accessories/equipment: BUS cable (supplied with the car's accessory power connector. Troubleshooting The following support site. Support site http://esupport.sony.com http://www.xplodsony.com/ General No power is being supplied to the ATT lead) is activated. • The position of the ...• Packaging cushions are erased. The fuse has blown. Design and specifications are subject to next page t 23 No beep sound. • The beep sound is canceled (page 19). • An optional power amplifier is not solved, visit the following checklist will help you remedy problems...
...set ) Optional accessories/equipment: BUS cable (supplied with the car's accessory power connector. Troubleshooting The following support site. Support site http://esupport.sony.com http://www.xplodsony.com/ General No power is being supplied to the ATT lead) is activated. • The position of the ...• Packaging cushions are erased. The fuse has blown. Design and specifications are subject to next page t 23 No beep sound. • The beep sound is canceled (page 19). • An optional power amplifier is not solved, visit the following checklist will help you remedy problems...
Operating Instructions
Page 24
...disc. 24 • The CD-Rs/CD-RWs are not for data protection. t Set "A.SCRL-ON" (page 19). The operation buttons do not scroll. • For discs with the MP3/WMA/AAC format and version. This unit cannot recognize USB devices via a USB hub. The sound is hampered by noises. ... displays The current station is sometimes hampered by noises. • The connection is set to play back items via a USB hub. MP3/WMA/AAC files cannot be received. The following discs take longer to "OFF." a disc recorded with a complicated tree structure. t Install the unit at a high-...
...disc. 24 • The CD-Rs/CD-RWs are not for data protection. t Set "A.SCRL-ON" (page 19). The operation buttons do not scroll. • For discs with the MP3/WMA/AAC format and version. This unit cannot recognize USB devices via a USB hub. The sound is hampered by noises. ... displays The current station is sometimes hampered by noises. • The connection is set to play back items via a USB hub. MP3/WMA/AAC files cannot be received. The following discs take longer to "OFF." a disc recorded with a complicated tree structure. t Install the unit at a high-...

