Operating Instructions
Page 1
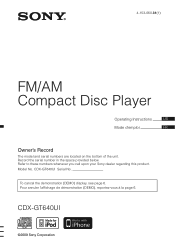
CDX-GT640UI ©2009 Sony Corporation Refer to these numbers whenever you call upon your Sony dealer regarding this product. To cancel the demonstration (DEMO) display, see page 6. Record the serial number in the space provided below. CDX-GT640UI Serial No. Pour annuler l'affichage de démonstration (DEMO), reportez-vous à la page 6. Model No. 4-153-060-31(1) FM/AM Compact Disc Player Operating Instructions US Mode d'emploi FR Owner's Record The model and serial numbers are located on the bottom of the unit.
CDX-GT640UI ©2009 Sony Corporation Refer to these numbers whenever you call upon your Sony dealer regarding this product. To cancel the demonstration (DEMO) display, see page 6. Record the serial number in the space provided below. CDX-GT640UI Serial No. Pour annuler l'affichage de démonstration (DEMO), reportez-vous à la page 6. Model No. 4-153-060-31(1) FM/AM Compact Disc Player Operating Instructions US Mode d'emploi FR Owner's Record The model and serial numbers are located on the bottom of the unit.
Operating Instructions
Page 3
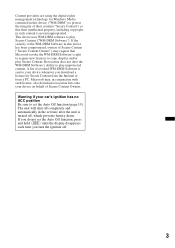
...Microsoft may request that their content ("Secure Content") so that Microsoft revoke the WM-DRM Software's right to acquire new licenses to copy, display and/or play Secure Content ("WM-DRM Software"). If you download a license for Windows Media contained in this device has been compromised, owners... protect the integrity of their intellectual property, including copyright, in the set the Auto Off function, press and hold (OFF) until the display disappears each time you turn the ignition off , which prevents battery drain. Warning if your car's ignition has no ACC position Be sure...
...Microsoft may request that their content ("Secure Content") so that Microsoft revoke the WM-DRM Software's right to acquire new licenses to copy, display and/or play Secure Content ("WM-DRM Software"). If you download a license for Windows Media contained in this device has been compromised, owners... protect the integrity of their intellectual property, including copyright, in the set the Auto Off function, press and hold (OFF) until the display disappears each time you turn the ignition off , which prevents battery drain. Warning if your car's ignition has no ACC position Be sure...
Operating Instructions
Page 4
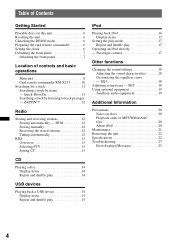
...11 Searching a track by name - BTM 12 Storing manually 12 Receiving the stored stations 12 Tuning automatically 12 RDS 13 Overview 13 Selecting PTY 13 Setting CT 13 CD Playing a disc 14 Display items 14 Repeat and shuffle play 14 USB devices Playing back ... commander 6 Setting the clock 6 Detaching the front panel 7 Attaching the front panel 7 Location of MP3/WMA/AAC files 20 About iPod 20 Maintenance 21 Removing the unit 22 Specifications 22 Troubleshooting 23 Error displays/Messages 25 4 ZAPPIN 12 Radio Storing and receiving stations 12 Storing automatically -
...11 Searching a track by name - BTM 12 Storing manually 12 Receiving the stored stations 12 Tuning automatically 12 RDS 13 Overview 13 Selecting PTY 13 Setting CT 13 CD Playing a disc 14 Display items 14 Repeat and shuffle play 14 USB devices Playing back ... commander 6 Setting the clock 6 Detaching the front panel 7 Attaching the front panel 7 Location of MP3/WMA/AAC files 20 About iPod 20 Maintenance 21 Removing the unit 22 Specifications 22 Troubleshooting 23 Error displays/Messages 25 4 ZAPPIN 12 Radio Storing and receiving stations 12 Storing automatically -
Operating Instructions
Page 6
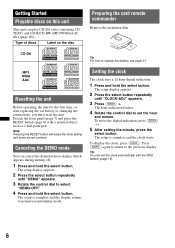
..., press (SEEK) -/+. 5 After setting the minute, press the select button. Type of discs Label on this unit This unit can play mode. CD-DA Tip For how to the previous display. Canceling the DEMO mode You can set the hour and minute. Tip You can cancel the demonstration...DSPL) again to return to replace the battery, see page 21. To display the clock, press (DSPL). The setup is complete and the display returns to set the clock automatically with a pointed object, such as a ball-point pen. MP3 WMA AAC Resetting the unit Before operating the unit for the first time, or ...
..., press (SEEK) -/+. 5 After setting the minute, press the select button. Type of discs Label on this unit This unit can play mode. CD-DA Tip For how to the previous display. Canceling the DEMO mode You can set the hour and minute. Tip You can cancel the demonstration...DSPL) again to return to replace the battery, see page 21. To display the clock, press (DSPL). The setup is complete and the display returns to set the clock automatically with a pointed object, such as a ball-point pen. MP3 WMA AAC Resetting the unit Before operating the unit for the first time, or ...

Operating Instructions
Page 7
... B on the unit, then lightly push the left end of the front panel. Avoid leaving it in a parked car or on the front panel and display window. • Do not subject the front panel to prevent theft. Notes • Do not drop or put anything on the unit (or insert a disc...
... B on the unit, then lightly push the left end of the front panel. Avoid leaving it in a parked car or on the front panel and display window. • Do not subject the front panel to prevent theft. Notes • Do not drop or put anything on the unit (or insert a disc...
Operating Instructions
Page 8
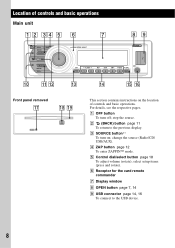
...and basic operations. D ZAP button page 12 To enter ZAPPIN™ mode. select setup items (press and rotate). stop the source. change the source (Radio/CD/ USB/AUX). C SOURCE button*1 To turn off; B (BACK) button page 11 To return to the USB device. 8 For details, see the respective.... E Control dial/select button page 18 To adjust volume (rotate); F Receptor for the card remote commander G Display window H OPEN button page 7, 14 I USB connector page 14, 16 To connect to the previous display. qa qs CAT PTY ALBUM 1 2 AUX REP SHUF DM PAUSE SCRL 3 4 5 6 DSPL qd qf...
...and basic operations. D ZAP button page 12 To enter ZAPPIN™ mode. select setup items (press and rotate). stop the source. change the source (Radio/CD/ USB/AUX). C SOURCE button*1 To turn off; B (BACK) button page 11 To return to the USB device. 8 For details, see the respective.... E Control dial/select button page 18 To adjust volume (rotate); F Receptor for the card remote commander G Display window H OPEN button page 7, 14 I USB connector page 14, 16 To connect to the previous display. qa qs CAT PTY ALBUM 1 2 AUX REP SHUF DM PAUSE SCRL 3 4 5 6 DSPL qd qf...
Operating Instructions
Page 9
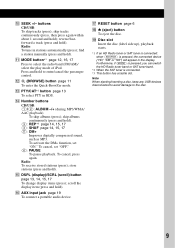
...function, set "OFF." (6): PAUSE To pause playback. O DSPL (display)/SCRL (scroll) button page 13, 14, 15, 17 To change display items (press); Radio: To tune in RDS. N Number buttons CD/USB: (1)/(2): ALBUM -/+ (during MP3/WMA/ AAC playback) To skip albums (press); To cancel, press again. scroll...eject the disc. buttons CD/USB: To skip tracks (press); S Disc slot Insert the disc (label side up), playback starts. *1 If an HD Radio tuner or SAT tuner is connected: when (SOURCE) is connected. *3 This button has a tactile dot. Radio: To receive stored stations (press); ...
...function, set "OFF." (6): PAUSE To pause playback. O DSPL (display)/SCRL (scroll) button page 13, 14, 15, 17 To change display items (press); Radio: To tune in RDS. N Number buttons CD/USB: (1)/(2): ALBUM -/+ (during MP3/WMA/ AAC playback) To skip albums (press); To cancel, press again. scroll...eject the disc. buttons CD/USB: To skip tracks (press); S Disc slot Insert the disc (label side up), playback starts. *1 If an HD Radio tuner or SAT tuner is connected: when (SOURCE) is connected. *3 This button has a tactile dot. Radio: To receive stored stations (press); ...

Operating Instructions
Page 10
...change the source (Radio/CD/ USB/AUX). Setup, sound setting, etc., can be operated by M m. B SOURCE button*1 To turn off and the display disappears, it cannot be operated with the card remote commander unless (SOURCE) on the unit. K Number buttons To receive stored stations (press); Furthermore..., if (MODE) is pressed, the connected device ("HD," "XM" or "SR") will appear in the display. To cancel, press again. Note If the unit is inserted to activate...
...change the source (Radio/CD/ USB/AUX). Setup, sound setting, etc., can be operated by M m. B SOURCE button*1 To turn off and the display disappears, it cannot be operated with the card remote commander unless (SOURCE) on the unit. K Number buttons To receive stored stations (press); Furthermore..., if (MODE) is pressed, the connected device ("HD," "XM" or "SR") will appear in the display. To cancel, press again. Note If the unit is inserted to activate...
Operating Instructions
Page 11
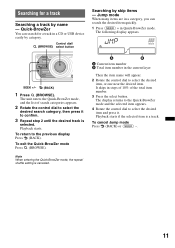
.../ shuffle setting is selected. Searching for a track in the current layer Then the item name will appear. 2 Rotate the control dial to the previous display Press (BACK). Control dial/ (BROWSE) select button Searching by category. SEEK +/- (BACK) 1 Press (BROWSE). It skips in Quick-BrowZer mode. ...A Current item number B Total item number in a CD or USB device easily by skip items - The unit enters the Quick-BrowZer mode, and the list of the total item number. 3 Press the ...
.../ shuffle setting is selected. Searching for a track in the current layer Then the item name will appear. 2 Rotate the control dial to the previous display Press (BACK). Control dial/ (BROWSE) select button Searching by category. SEEK +/- (BACK) 1 Press (BROWSE). It skips in Quick-BrowZer mode. ...A Current item number B Total item number in a CD or USB device easily by skip items - The unit enters the Quick-BrowZer mode, and the list of the total item number. 3 Press the ...
Operating Instructions
Page 12
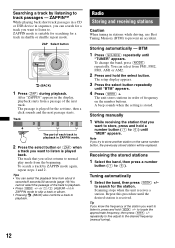
...BTM) to prevent an accident. The unit stores stations in the display, playback starts from the beginning. repeatedly to fine adjust to (6)). Track 1 2 3 4 ZAP The part of each track to playback. Radio Storing and receiving stations Caution When tuning in ZAPPIN mode to skip a track or... +/- Repeat this procedure until "TUNER" appears. The passage is played back. ZAPPIN™ While playing back short track passages in a CD or USB device in sequence, you can select from about 6 seconds/9 seconds/30 seconds (page 19).You cannot select the passage of ...
...BTM) to prevent an accident. The unit stores stations in the display, playback starts from the beginning. repeatedly to fine adjust to (6)). Track 1 2 3 4 ZAP The part of each track to playback. Radio Storing and receiving stations Caution When tuning in ZAPPIN mode to skip a track or... +/- Repeat this procedure until "TUNER" appears. The passage is played back. ZAPPIN™ While playing back short track passages in a CD or USB device in sequence, you can select from about 6 seconds/9 seconds/30 seconds (page 19).You cannot select the passage of ...
Operating Instructions
Page 13
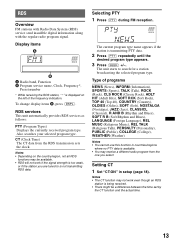
...the CT function and the actual time. 13 Display items A Radio band, Function B Program service name, Clock, Frequency*, Preset number * While receiving the RDS station, " *" is displayed on the country/region, not all RDS functions may receive a different radio program from the RDS transmission sets... too weak, or if the station you select. RDS services This unit automatically provides RDS services as follows: PTY (Program Types) Displays the currently received program type. Notes • Depending on the left of programs NEWS (News), INFORM (Information), SPORTS (Sports), TALK (Talk), ...
...the CT function and the actual time. 13 Display items A Radio band, Function B Program service name, Clock, Frequency*, Preset number * While receiving the RDS station, " *" is displayed on the country/region, not all RDS functions may receive a different radio program from the RDS transmission sets... too weak, or if the station you select. RDS services This unit automatically provides RDS services as follows: PTY (Program Types) Displays the currently received program type. Notes • Depending on the left of programs NEWS (News), INFORM (Information), SPORTS (Sports), TALK (Talk), ...
Operating Instructions
Page 14
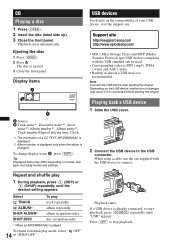
...use the one supplied with the USB standard can be used. • Corresponding codec is MP3 (.mp3), WMA (.wma) and AAC (.m4a). • Backup of a CD TEXT, MP3/WMA/AAC is displayed. *2 Album number is displayed only when the album is connected before starting the engine. Playback starts. Playing back a ... * When an MP3/WMA/AAC is recommended. A Source B Track name*1, Disc/artist name*1, Artist name*1, Album number*2, Album name*1, Track number/Elapsed playing time, Clock *1 The information of data in a USB device is played. Support site http://esupport.sony.com http://www....
...use the one supplied with the USB standard can be used. • Corresponding codec is MP3 (.mp3), WMA (.wma) and AAC (.m4a). • Backup of a CD TEXT, MP3/WMA/AAC is displayed. *2 Album number is displayed only when the album is connected before starting the engine. Playback starts. Playing back a ... * When an MP3/WMA/AAC is recommended. A Source B Track name*1, Disc/artist name*1, Artist name*1, Album number*2, Album name*1, Track number/Elapsed playing time, Clock *1 The information of data in a USB device is played. Support site http://esupport.sony.com http://www....
Operating Instructions
Page 15
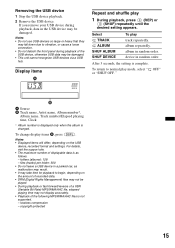
..., the setting is changed. Notes • Displayed items will differ, depending on the amount of recorded data. • DRM (Digital Rights Management) files may not be played. • During playback or fast-forward/reverse of the following MP3/WMA/AAC files is as malfunction may result. •... (albums): 128 - files (tracks) per folder: 500 • Do not leave a USB device in the USB device may not display accurately. • Playback of a VBR (Variable Bit Rate) MP3/WMA/AAC file, elapsed playing time may be damaged. • This unit cannot recognize USB devices via a USB hub...
..., the setting is changed. Notes • Displayed items will differ, depending on the amount of recorded data. • DRM (Digital Rights Management) files may not be played. • During playback or fast-forward/reverse of the following MP3/WMA/AAC files is as malfunction may result. •... (albums): 128 - files (tracks) per folder: 500 • Do not leave a USB device in the USB device may not display accurately. • Playback of a VBR (Variable Bit Rate) MP3/WMA/AAC file, elapsed playing time may be damaged. • This unit cannot recognize USB devices via a USB hub...
Operating Instructions
Page 16
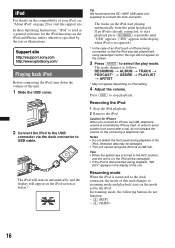
...to the ACC position, and the unit is controlled by iPhone itself. Support site http://esupport.sony.com http://www.xplodsony.com/ Playing back iPod Before connecting the iPod, turn on automatically, and the display will not appear on the screen. 3 Press (MODE) to stop playback. Press (OFF)... not function. - (3) (REP) - (4) (SHUF) 16 The tracks on the iPod start playback press (SOURCE) repeatedly until "USB" appears. ("IPD" appears in the display when iPod is used as a general reference for iPhone When you connect an iPhone via the dock connector to USB cable. Caution for the iPod...
...to the ACC position, and the unit is controlled by iPhone itself. Support site http://esupport.sony.com http://www.xplodsony.com/ Playing back iPod Before connecting the iPod, turn on automatically, and the display will not appear on the screen. 3 Press (MODE) to stop playback. Press (OFF)... not function. - (3) (REP) - (4) (SHUF) 16 The tracks on the iPod start playback press (SOURCE) repeatedly until "USB" appears. ("IPD" appears in the display when iPod is used as a general reference for iPhone When you connect an iPhone via the dock connector to USB cable. Caution for the iPod...
Operating Instructions
Page 17
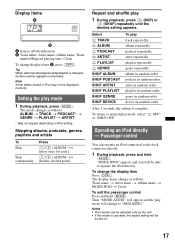
...After 3 seconds, the setting is changed, its item number appears momentarily. To return to normal play mode will be turned off. 17 The display items change to desired point] Repeat and shuffle play 1 During playback, press (3) (REP) or (4) (SHUF) repeatedly until the desired setting...MODE IPOD" appears and you will appear and the play mode, select " OFF" or "SHUF OFF." Then "MODE AUDIO" will be displayed correctly. Notes • The volume can operate an iPod connected to operate the iPod directly. artist in random order. artist repeatedly. podcast repeatedly...
...After 3 seconds, the setting is changed, its item number appears momentarily. To return to normal play mode will be turned off. 17 The display items change to desired point] Repeat and shuffle play 1 During playback, press (3) (REP) or (4) (SHUF) repeatedly until the desired setting...MODE IPOD" appears and you will appear and the play mode, select " OFF" or "SHUF OFF." Then "MODE AUDIO" will be displayed correctly. Notes • The volume can operate an iPod connected to operate the iPod directly. artist in random order. artist repeatedly. podcast repeatedly...

Operating Instructions
Page 18
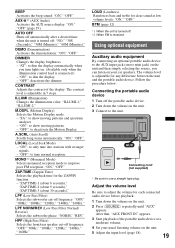
...reference for each connected auxiliary equipment: "+18 dB" - Tip Other equalizer types are also adjustable. The volume level is complete and the display returns to normal reception/play mode. The setting is adjustable in 1 dB steps, from 7 music types (XPLOD, VOCAL, EDGE, CRUISE..., SPACE, GRAVITY, CUSTOM or OFF). The setup is complete. 5 Press (BACK). "-8 dB." Note Displayed items will differ, depending on the source and setting. FAD (Fader) Adjusts the relative level between the left and right speakers. Other functions Changing...
...reference for each connected auxiliary equipment: "+18 dB" - Tip Other equalizer types are also adjustable. The volume level is complete and the display returns to normal reception/play mode. The setting is adjustable in 1 dB steps, from 7 music types (XPLOD, VOCAL, EDGE, CRUISE..., SPACE, GRAVITY, CUSTOM or OFF). The setup is complete. 5 Press (BACK). "-8 dB." Note Displayed items will differ, depending on the source and setting. FAD (Fader) Adjusts the relative level between the left and right speakers. Other functions Changing...
Operating Instructions
Page 19
... frequency: "OFF," "80Hz," "100Hz," "120Hz," "140Hz," "160Hz." "ON": to improve poor FM reception: "ON," "OFF." M.DSPL (Motion Display) Selects the Motion Display mode. - "ZAP.TIME-1 (about 6 seconds)," "ZAP.TIME-2 (about 9 seconds)," "ZAP.TIME-3 (about 30 seconds)." Follow the procedure below: ...a moderate volume. 4 Set your car speakers. The volume level is received. DIMMER Changes the display brightness. - "SA": to show moving patterns. - Adjust the volume level Be sure to dim the display automatically when you can listen on your usual listening volume on the unit...
... frequency: "OFF," "80Hz," "100Hz," "120Hz," "140Hz," "160Hz." "ON": to improve poor FM reception: "ON," "OFF." M.DSPL (Motion Display) Selects the Motion Display mode. - "ZAP.TIME-1 (about 6 seconds)," "ZAP.TIME-2 (about 9 seconds)," "ZAP.TIME-3 (about 30 seconds)." Follow the procedure below: ...a moderate volume. 4 Set your car speakers. The volume level is received. DIMMER Changes the display brightness. - "SA": to show moving patterns. - Adjust the volume level Be sure to dim the display automatically when you can listen on your usual listening volume on the unit...
Operating Instructions
Page 20
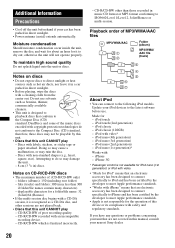
... Works with an incompatible recording device. - Playback order of MP3/WMA/AAC files MP3/WMA/AAC Folder (album) MP3/WMA/ AAC file (track) Notes on CD-R/CD-RW discs • The maximum number of poor recording quality.... parked in music CD format or MP3 format conforming to ISO9660 Level 1/Level 2, Joliet/Romeo or multi-session. otherwise the unit will not operate properly. displayable characters for a ... the discs with video* - CD-R/CD-RW other sessions are not covered in ) discs. If you have any questions or problems concerning your nearest Sony dealer. 20 Discs with non-...
... Works with an incompatible recording device. - Playback order of MP3/WMA/AAC files MP3/WMA/AAC Folder (album) MP3/WMA/ AAC file (track) Notes on CD-R/CD-RW discs • The maximum number of poor recording quality.... parked in music CD format or MP3 format conforming to ISO9660 Level 1/Level 2, Joliet/Romeo or multi-session. otherwise the unit will not operate properly. displayable characters for a ... the discs with video* - CD-R/CD-RW other sessions are not covered in ) discs. If you have any questions or problems concerning your nearest Sony dealer. 20 Discs with non-...
Operating Instructions
Page 23
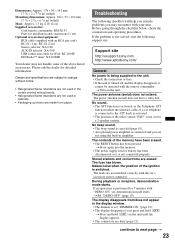
...8226; Check the connection or fuse. • If the unit is turned off and the display disappears, it is activated. • The position of the above listed accessories. Support site http://esupport.sony.com http://www.xplodsony.com/ General No power is being supplied to next page t 23... (page 19). • An optional power amplifier is switched. Stored stations and correct time are made from /does not appear in the display window. • The dimmer is performed for detailed information. Troubleshooting The following support site. Before going through the checklist below, check the ...
...8226; Check the connection or fuse. • If the unit is turned off and the display disappears, it is activated. • The position of the above listed accessories. Support site http://esupport.sony.com http://www.xplodsony.com/ General No power is being supplied to next page t 23... (page 19). • An optional power amplifier is switched. Stored stations and correct time are made from /does not appear in the display window. • The dimmer is performed for detailed information. Troubleshooting The following support site. Before going through the checklist below, check the ...
Operating Instructions
Page 24
...(page 19). a disc recorded in a sturdy part of the car. • Defective or dirty disc. The display items do not function. t Press and hold (DSPL) (SCRL). Press the RESET button (page 6). Cannot play ...in stereo is too weak. t If the auto antenna (aerial) will not eject. MP3/WMA/AAC files cannot be received. The disc is in the wrong way. a disc to start playback. - The ... playback. • Defective or dirty disc. 24 • The CD-Rs/CD-RWs are not for data protection. For details on . MP3/WMA/AAC files take a longer time to which data can be loaded. •...
...(page 19). a disc recorded in a sturdy part of the car. • Defective or dirty disc. The display items do not function. t Press and hold (DSPL) (SCRL). Press the RESET button (page 6). Cannot play ...in stereo is too weak. t If the auto antenna (aerial) will not eject. MP3/WMA/AAC files cannot be received. The disc is in the wrong way. a disc to start playback. - The ... playback. • Defective or dirty disc. 24 • The CD-Rs/CD-RWs are not for data protection. For details on . MP3/WMA/AAC files take a longer time to which data can be loaded. •...


