Operating Instructions
Page 4
... the DEMO mode 6 Preparing the card remote commander 6 Setting the clock 6 Detaching the front panel 7 Attaching the front panel 7 Location of MP3/WMA/AAC files 20 About iPod 20 Maintenance 21 Removing the unit 22 Specifications 22 Troubleshooting 23 Error displays/Messages 25 4 ZAPPIN 12 Radio Storing and receiving stations 12 Storing automatically - BTM 12...
... the DEMO mode 6 Preparing the card remote commander 6 Setting the clock 6 Detaching the front panel 7 Attaching the front panel 7 Location of MP3/WMA/AAC files 20 About iPod 20 Maintenance 21 Removing the unit 22 Specifications 22 Troubleshooting 23 Error displays/Messages 25 4 ZAPPIN 12 Radio Storing and receiving stations 12 Storing automatically - BTM 12...
Operating Instructions
Page 6
...) -/+. 5 After setting the minute, press the select button. The setup is complete and the display returns to normal reception/play CD-DA (also containing CD TEXT) and CD-R/CD-RW (MP3/WMA/AAC files (page 20)). The hour indication flashes. 4 Rotate the control dial to select "DEMO-OFF." 4 Press and hold the ...contents. To display the clock, press (DSPL). Tip You can play mode. Getting Started Playable discs on the disc Preparing the card remote commander Remove the insulation film. Type of discs Label on this unit This unit can set the hour and minute. Detach the front ...
...) -/+. 5 After setting the minute, press the select button. The setup is complete and the display returns to normal reception/play CD-DA (also containing CD TEXT) and CD-R/CD-RW (MP3/WMA/AAC files (page 20)). The hour indication flashes. 4 Rotate the control dial to select "DEMO-OFF." 4 Press and hold the ...contents. To display the clock, press (DSPL). Tip You can play mode. Getting Started Playable discs on the disc Preparing the card remote commander Remove the insulation film. Type of discs Label on this unit This unit can set the hour and minute. Detach the front ...
Operating Instructions
Page 8
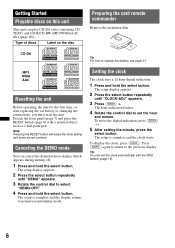
...8482; mode. E Control dial/select button page 18 To adjust volume (rotate); stop the source. select setup items (press and rotate). F Receptor for the card remote commander G Display window H OPEN button page 7, 14 I USB connector page 14, 16 To connect to the previous display. C SOURCE button*1 To turn off;... change the source (Radio/CD/ USB/AUX). qa qs CAT PTY ALBUM 1 2 AUX REP SHUF DM PAUSE SCRL 3 4 5 6 DSPL qd qf qg qh Front panel removed qj qk ql...
...8482; mode. E Control dial/select button page 18 To adjust volume (rotate); stop the source. select setup items (press and rotate). F Receptor for the card remote commander G Display window H OPEN button page 7, 14 I USB connector page 14, 16 To connect to the previous display. C SOURCE button*1 To turn off;... change the source (Radio/CD/ USB/AUX). qa qs CAT PTY ALBUM 1 2 AUX REP SHUF DM PAUSE SCRL 3 4 5 6 DSPL qd qf qg qh Front panel removed qj qk ql...

Operating Instructions
Page 10
... SCRL (scroll) button To scroll the display item. To cancel, press again. I M (+)/m (-) buttons To control CD/USB, the same as (SEEK) -/+ on ; K Number buttons To receive stored stations (press); A OFF button To turn on the unit. button To adjust volume. F ATT (attenuate) button... SCRL 1 2 3 4 5 6 6 7 8 9 q; qa 5 + VOL - 10 Remove the insulation film before use (page 6). change display items. E VOL (volume) +*2/- Card remote commander RM-X151 1 2 3 4 OFF ATT SOURCE SEL MODE + - Furthermore, if (MODE) is pressed, you can be operated with the card...
... SCRL (scroll) button To scroll the display item. To cancel, press again. I M (+)/m (-) buttons To control CD/USB, the same as (SEEK) -/+ on ; K Number buttons To receive stored stations (press); A OFF button To turn on the unit. button To adjust volume. F ATT (attenuate) button... SCRL 1 2 3 4 5 6 6 7 8 9 q; qa 5 + VOL - 10 Remove the insulation film before use (page 6). change display items. E VOL (volume) +*2/- Card remote commander RM-X151 1 2 3 4 OFF ATT SOURCE SEL MODE + - Furthermore, if (MODE) is pressed, you can be operated with the card...

Operating Instructions
Page 21
... side up 2c 1 Notes on the original fuse. In such a case, consult your fingers or with your nearest Sony dealer. Maintenance Replacing the lithium battery of the card remote commander Under normal conditions, the battery will last approximately 1 year. (The service life may be an internal malfunction. ...properly if the connectors between the unit and the front panel are not clean. Do not recharge, disassemble, or dispose of the card remote commander becomes shorter. Use of any metal device. Fuse replacement When replacing the fuse, be sure to prevent this, detach the front panel...
... side up 2c 1 Notes on the original fuse. In such a case, consult your fingers or with your nearest Sony dealer. Maintenance Replacing the lithium battery of the card remote commander Under normal conditions, the battery will last approximately 1 year. (The service life may be an internal malfunction. ...properly if the connectors between the unit and the front panel are not clean. Do not recharge, disassemble, or dispose of the card remote commander becomes shorter. Use of any metal device. Fuse replacement When replacing the fuse, be sure to prevent this, detach the front panel...

Operating Instructions
Page 22
...Tuning range: 530 - 1,710 kHz Antenna (aerial) terminal: External antenna (aerial) connector Intermediate frequency: 25 kHz Sensitivity: 26 µV CD Player section Signal-to-noise ratio: 120 dB Frequency response: 10 - 20,000 Hz Wow and flutter: Below measurable limit USB... terminal (mono) Power antenna (aerial) relay control terminal Power amplifier control terminal Inputs: BUS control input terminal BUS audio input terminal Remote controller input terminal Antenna (aerial) input terminal Telephone ATT control terminal Illumination control terminal AUX input jack (stereo mini jack) USB signal...
...Tuning range: 530 - 1,710 kHz Antenna (aerial) terminal: External antenna (aerial) connector Intermediate frequency: 25 kHz Sensitivity: 26 µV CD Player section Signal-to-noise ratio: 120 dB Frequency response: 10 - 20,000 Hz Wow and flutter: Below measurable limit USB... terminal (mono) Power antenna (aerial) relay control terminal Power amplifier control terminal Inputs: BUS control input terminal BUS audio input terminal Remote controller input terminal Antenna (aerial) input terminal Telephone ATT control terminal Illumination control terminal AUX input jack (stereo mini jack) USB signal...
Operating Instructions
Page 23
...'s accessory power connector. The leads are not using the built-in ) (w/h/d) Mass: Approx. 1.3 kg (2 lb 14 oz) Supplied accessories: Card remote commander: RM-X151 Parts for installation and connections (1 set , demonstration mode starts. During playback or reception, demonstration mode starts. t Press and hold ... unit until the display appears. • The connectors are erased. If the problem is performed for detailed information. Support site http://esupport.sony.com http://www.xplodsony.com/ General No power is being supplied to the ATT lead) is not set "DIMMER-ON" (page 19)....
...'s accessory power connector. The leads are not using the built-in ) (w/h/d) Mass: Approx. 1.3 kg (2 lb 14 oz) Supplied accessories: Card remote commander: RM-X151 Parts for installation and connections (1 set , demonstration mode starts. During playback or reception, demonstration mode starts. t Press and hold ... unit until the display appears. • The connectors are erased. If the problem is performed for detailed information. Support site http://esupport.sony.com http://www.xplodsony.com/ General No power is being supplied to the ATT lead) is not set "DIMMER-ON" (page 19)....


