Operating Instructions
Page 3
... control 12 Searching and playing tracks 12 Playing tracks in various modes 12 Searching a track by listening to track passages - Advanced Sound Engine 15 Adjusting setup items 17 Using optional equipment 19 Auxiliary audio equipment 19 Additional Information 19 Precautions 19 Maintenance 21 Specifications 22 Troubleshooting 23 3 Table of contents Getting...
... control 12 Searching and playing tracks 12 Playing tracks in various modes 12 Searching a track by listening to track passages - Advanced Sound Engine 15 Adjusting setup items 17 Using optional equipment 19 Auxiliary audio equipment 19 Additional Information 19 Precautions 19 Maintenance 21 Specifications 22 Troubleshooting 23 3 Table of contents Getting...
Operating Instructions
Page 4
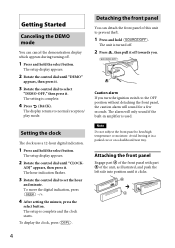
.../ play mode. Attaching the front panel Engage part A of the front panel with part B of this unit to select "DEMO-OFF," then press it. The setup display appears. 2 Rotate the control dial until "DEMO" appears, then press it off . 1 Press and hold the select button. The hour indication flashes. 3... You can detach the front panel of the unit, as illustrated, and push the left side into position until it . The setup display appears. 2 Rotate the control dial until "CLOCK- The setup is turned off. 2 Press , then pull it . 3 Rotate the control dial to prevent theft. 1 Press and hold ...
.../ play mode. Attaching the front panel Engage part A of the front panel with part B of this unit to select "DEMO-OFF," then press it. The setup display appears. 2 Rotate the control dial until "DEMO" appears, then press it off . 1 Press and hold the select button. The hour indication flashes. 3... You can detach the front panel of the unit, as illustrated, and push the left side into position until it . The setup display appears. 2 Rotate the control dial until "CLOCK- The setup is turned off. 2 Press , then pull it . 3 Rotate the control dial to prevent theft. 1 Press and hold ...
Operating Instructions
Page 5
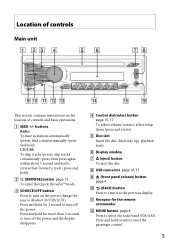
select setup items (press and rotate). Disc slot Insert the disc (label side up), playback starts. Display window (eject) button To eject the ...
select setup items (press and rotate). Disc slot Insert the disc (label side up), playback starts. Display window (eject) button To eject the ...
Operating Instructions
Page 7
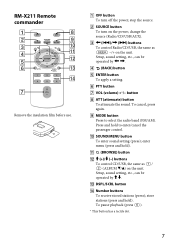
... cancel, press again. MODE button Press to enter/cancel the passenger control. SOUND/MENU button To enter sound setting (press); Setup, sound setting, etc., can be operated by . (BACK) button ENTER button To apply a setting. ...VOL (volume) +*/- store stations (press and hold to select the radio band (FM/AM). PTY 1 4 DSPL/ SCRL 2 3 PAUSE 5 6 8 9 q; Setup, sound setting, etc., can be operated by . DSPL/SCRL button Number buttons To receive stored stations (press); To pause playback (...
... cancel, press again. MODE button Press to enter/cancel the passenger control. SOUND/MENU button To enter sound setting (press); Setup, sound setting, etc., can be operated by . (BACK) button ENTER button To apply a setting. ...VOL (volume) +*/- store stations (press and hold to select the radio band (FM/AM). PTY 1 4 DSPL/ SCRL 2 3 PAUSE 5 6 8 9 q; Setup, sound setting, etc., can be operated by . DSPL/SCRL button Number buttons To receive stored stations (press); To pause playback (...

Operating Instructions
Page 8
... band, press repeatedly. Radio Storing and receiving stations Caution When tuning in order of the station you are tuned to search for the station. The setup display appears. 3 Rotate the control dial until "TUNER" appears.
... band, press repeatedly. Radio Storing and receiving stations Caution When tuning in order of the station you are tuned to search for the station. The setup display appears. 3 Rotate the control dial until "TUNER" appears.
Operating Instructions
Page 9
... (Personality), PUBLIC (Public), COLLEGE (College), WEATHER (Weather) Note You may receive a different radio program from the RDS transmission sets the clock. 1 Set "CT-ON" in setup (page 17).
... (Personality), PUBLIC (Public), COLLEGE (College), WEATHER (Weather) Note You may receive a different radio program from the RDS transmission sets the clock. 1 Set "CT-ON" in setup (page 17).
Operating Instructions
Page 15
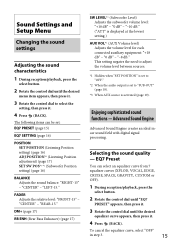
"REAR-15." To cancel the equalizer curve, select "OFF" in step 3. 15 Sound Settings and Setup Menu Changing the sound settings Adjusting the sound characteristics 1 During reception/playback, press the select button. 2 Rotate the control dial until the desired equalizer curve ...
"REAR-15." To cancel the equalizer curve, select "OFF" in step 3. 15 Sound Settings and Setup Menu Changing the sound settings Adjusting the sound characteristics 1 During reception/playback, press the select button. 2 Rotate the control dial until the desired equalizer curve ...
Operating Instructions
Page 17
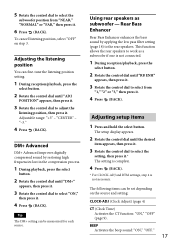
Adjustable range: "+3" - This function allows the rear speakers to work as subwoofer - "CENTER" - Adjusting setup items 1 Press and hold the select button. Tip The DM+ setting can be set depending on step 3. Rear Bass Enhancer Rear Bass Enhancer enhances ... as a subwoofer if one is not necessary. 5 Rotate the control dial to select the subwoofer position from "1," "2" or "3," then press it. 4 Press (BACK). The setup display appears. 2 Rotate the control dial until "ADJ POSITION" appears, then press it. 3 Rotate the control dial to adjust the listening position, then press it...
Adjustable range: "+3" - This function allows the rear speakers to work as subwoofer - "CENTER" - Adjusting setup items 1 Press and hold the select button. Tip The DM+ setting can be set depending on step 3. Rear Bass Enhancer Rear Bass Enhancer enhances ... as a subwoofer if one is not necessary. 5 Rotate the control dial to select the subwoofer position from "1," "2" or "3," then press it. 4 Press (BACK). The setup display appears. 2 Rotate the control dial until "ADJ POSITION" appears, then press it. 3 Rotate the control dial to adjust the listening position, then press it...


