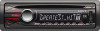

Operating Instructions
Page 2
...radio/TV technician for safety. CAUTION The use of optical instruments with the limits for a Class B digital device, pursuant to Part 15 of Sony Corporation. The unit will increase eye hazard. 2 For the State of the car for help. special handling may cause harmful interference to radio ...is connected. - Warning This equipment has been tested and found to comply with this product will shut off completely and automatically in the set time after the unit is no guarantee that any changes or modifications not expressly approved in this manual could void your car's ignition has...
...radio/TV technician for safety. CAUTION The use of optical instruments with the limits for a Class B digital device, pursuant to Part 15 of Sony Corporation. The unit will increase eye hazard. 2 For the State of the car for help. special handling may cause harmful interference to radio ...is connected. - Warning This equipment has been tested and found to comply with this product will shut off completely and automatically in the set time after the unit is no guarantee that any changes or modifications not expressly approved in this manual could void your car's ignition has...
Operating Instructions
Page 3
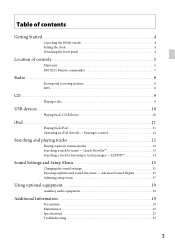
...21 Specifications 22 Troubleshooting 23 3 Quick-BrowZer 13 Searching a track by name - ZAPPIN 14 Sound Settings and Setup Menu 15 Changing the sound settings 15 Enjoying sophisticated sound functions - Passenger control 12 Searching and playing tracks 12 Playing tracks in various... modes 12 Searching a track by listening to track passages - Table of contents Getting Started 4 Canceling the DEMO mode 4 Setting the clock 4 Detaching the front panel 4 Location of controls 5 Main unit 5 RM-X211 Remote commander 7 Radio 8 Storing and receiving stations ...
...21 Specifications 22 Troubleshooting 23 3 Quick-BrowZer 13 Searching a track by name - ZAPPIN 14 Sound Settings and Setup Menu 15 Changing the sound settings 15 Enjoying sophisticated sound functions - Passenger control 12 Searching and playing tracks 12 Playing tracks in various... modes 12 Searching a track by listening to track passages - Table of contents Getting Started 4 Canceling the DEMO mode 4 Setting the clock 4 Detaching the front panel 4 Location of controls 5 Main unit 5 RM-X211 Remote commander 7 Radio 8 Storing and receiving stations ...
Operating Instructions
Page 4
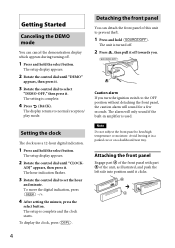
... reception/ play mode. The setup display appears. 2 Rotate the control dial until it clicks. 4 To move the digital indication, press 4 After setting the minute, press the select button. ADJ" appears, then press it in amplifier is used. To display the clock, press Detaching the front panel...or moisture. Caution alarm If you . The alarm will sound for a few seconds. The hour indication flashes. 3 Rotate the control dial to set the hour and minute. Avoid leaving it . Getting Started Canceling the DEMO mode You can detach the front panel of the unit, as illustrated...
... reception/ play mode. The setup display appears. 2 Rotate the control dial until it clicks. 4 To move the digital indication, press 4 After setting the minute, press the select button. ADJ" appears, then press it in amplifier is used. To display the clock, press Detaching the front panel...or moisture. Caution alarm If you . The alarm will sound for a few seconds. The hour indication flashes. 3 Rotate the control dial to set the hour and minute. Avoid leaving it . Getting Started Canceling the DEMO mode You can detach the front panel of the unit, as illustrated...
Operating Instructions
Page 7
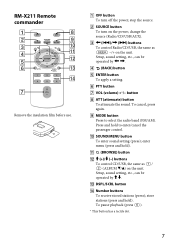
... DSPL/SCRL button Number buttons To receive stored stations (press); Setup, sound setting, etc., can be operated by . (BACK) button ENTER button To apply a setting. PTY button VOL (volume) +*/- Remove the insulation film before use. &#... To cancel, press again. MODE button Press to enter/cancel the passenger control. SOUND/MENU button To enter sound setting (press); Press and hold ). button ATT (attenuate) button To attenuate the sound. stop the source. SOURCE button...
... DSPL/SCRL button Number buttons To receive stored stations (press); Setup, sound setting, etc., can be operated by . (BACK) button ENTER button To apply a setting. PTY button VOL (volume) +*/- Remove the insulation film before use. &#... To cancel, press again. MODE button Press to enter/cancel the passenger control. SOUND/MENU button To enter sound setting (press); Press and hold ). button ATT (attenuate) button To attenuate the sound. stop the source. SOURCE button...
Operating Instructions
Page 9
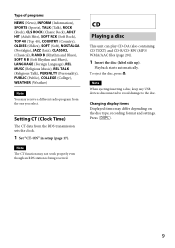
... 1 Insert the disc (label side up). Press 9 Note The CT function may differ depending on the disc type, recording format and settings. Note When ejecting/inserting a disc, keep any USB devices disconnected to avoid damage to the disc. Changing display items Displayed items may not...), PERSNLTY (Personality), PUBLIC (Public), COLLEGE (College), WEATHER (Weather) Note You may receive a different radio program from the RDS transmission sets the clock. 1 Set "CT-ON" in setup (page 17). Setting CT (Clock Time) The CT data from the one you select. To eject the disc, press .
... 1 Insert the disc (label side up). Press 9 Note The CT function may differ depending on the disc type, recording format and settings. Note When ejecting/inserting a disc, keep any USB devices disconnected to avoid damage to the disc. Changing display items Displayed items may not...), PERSNLTY (Personality), PUBLIC (Public), COLLEGE (College), WEATHER (Weather) Note You may receive a different radio program from the RDS transmission sets the clock. 1 Set "CT-ON" in setup (page 17). Setting CT (Clock Time) The CT data from the one you select. To eject the disc, press .

Operating Instructions
Page 10
..., visit the support site on the USB device, malfunction or damage may fall down due to begin, depending on the USB device, recording format and settings. If a USB device is already connected, to the USB connector with the USB standard can be damaged. USB devices • MSC (Mass Storage Class)-type...
..., visit the support site on the USB device, malfunction or damage may fall down due to begin, depending on the USB device, recording format and settings. If a USB device is already connected, to the USB connector with the USB standard can be damaged. USB devices • MSC (Mass Storage Class)-type...

Operating Instructions
Page 11
Tip iPod is recharged while the unit is already connected, to the dock connector, playback starts in the mode set by the iPod. In order to avoid sudden loud sound after a call . iPod In these Operating Instructions, "iPod" is used as a general reference for iPhone ...
Tip iPod is recharged while the unit is already connected, to the dock connector, playback starts in the mode set by the iPod. In order to avoid sudden loud sound after a call . iPod In these Operating Instructions, "iPod" is used as a general reference for iPhone ...
Operating Instructions
Page 13
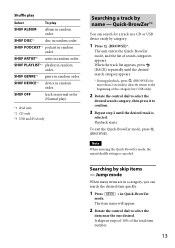
... mode. Quick-BrowZer™ You can search the desired item quickly. 1 Press in random order. Note When entering the Quick-BrowZer mode, the repeat/shuffle setting is selected. The unit enters the Quick-BrowZer mode, and the list of the total item number. 13 SHUF DISC*2 disc in random order. Shuffle...
... mode. Quick-BrowZer™ You can search the desired item quickly. 1 Press in random order. Note When entering the Quick-BrowZer mode, the repeat/shuffle setting is selected. The unit enters the Quick-BrowZer mode, and the list of the total item number. 13 SHUF DISC*2 disc in random order. Shuffle...
Operating Instructions
Page 15
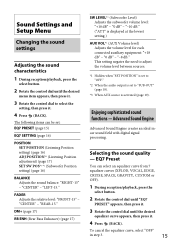
...relative level: "FRONT-15" - "-10 dB." ("ATT" is set : EQ7 PRESET (page 15) EQ7 SETTING (page 16) POSITION SET POSITION (Listening Position setting) (page 16) ADJ POSITION*1 (Listening Position adjustment) (page 17) SET SW POS*1 *2 (Subwoofer Position setting) (page 16) BALANCE Adjusts the sound balance: "RIGHT-15"... signal processing. To cancel the equalizer curve, select "OFF" in step 3. 15 "0 dB" - Sound Settings and Setup Menu Changing the sound settings Adjusting the sound characteristics 1 During reception/playback, press the select button. 2 Rotate the control dial until the...
...relative level: "FRONT-15" - "-10 dB." ("ATT" is set : EQ7 PRESET (page 15) EQ7 SETTING (page 16) POSITION SET POSITION (Listening Position setting) (page 16) ADJ POSITION*1 (Listening Position adjustment) (page 17) SET SW POS*1 *2 (Subwoofer Position setting) (page 16) BALANCE Adjusts the sound balance: "RIGHT-15"... signal processing. To cancel the equalizer curve, select "OFF" in step 3. 15 "0 dB" - Sound Settings and Setup Menu Changing the sound settings Adjusting the sound characteristics 1 During reception/playback, press the select button. 2 Rotate the control dial until the...
Operating Instructions
Page 16
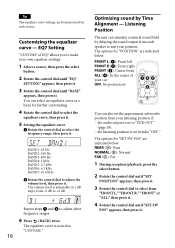
...dial to select the frequency range, then press it. Listening Position The unit can simulate a natural sound field by Time Alignment - You can also set the approximate subwoofer position from each source. FRONT L (): Front left FRONT R (): Front right FRONT (): Center front ALL ():... In the center of EQ7 allows you to suit your listening position if: - The options for "POSITION" are indicated below . the audio output is set to +6 dB. BAND1: 63 Hz BAND2: 160 Hz BAND3: 400 Hz BAND4: 1 kHz BAND5: 2.5 kHz BAND6: 6.3 kHz BAND7: 16.0 kHz ...
...dial to select the frequency range, then press it. Listening Position The unit can simulate a natural sound field by Time Alignment - You can also set the approximate subwoofer position from each source. FRONT L (): Front left FRONT R (): Front right FRONT (): Center front ALL ():... In the center of EQ7 allows you to suit your listening position if: - The options for "POSITION" are indicated below . the audio output is set to +6 dB. BAND1: 63 Hz BAND2: 160 Hz BAND3: 400 Hz BAND4: 1 kHz BAND5: 2.5 kHz BAND6: 6.3 kHz BAND7: 16.0 kHz ...
Operating Instructions
Page 17
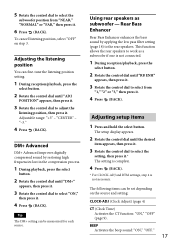
... sound: "ON," "OFF." 17 Adjusting the listening position You can be memorized for each source. To cancel listening position, select "OFF" on the source and setting: CLOCK-ADJ (Clock Adjust) (page 4) CT (Clock Time) Activates the CT function: "ON," "OFF" (page 9). "-3." 4 Press (BACK). Using rear...adjust the listening position, then press it. DM+ Advanced DM+ Advanced improves digitally compressed sound by applying the low pass filter setting (page 18) to select from "NEAR," "NORMAL" or "FAR," then press it. 6 Press (BACK). The following items can fine-tune...
... sound: "ON," "OFF." 17 Adjusting the listening position You can be memorized for each source. To cancel listening position, select "OFF" on the source and setting: CLOCK-ADJ (Clock Adjust) (page 4) CT (Clock Time) Activates the CT function: "ON," "OFF" (page 9). "-3." 4 Press (BACK). Using rear...adjust the listening position, then press it. DM+ Advanced DM+ Advanced improves digitally compressed sound by applying the low pass filter setting (page 18) to select from "NEAR," "NORMAL" or "FAR," then press it. 6 Press (BACK). The following items can fine-tune...
Operating Instructions
Page 18
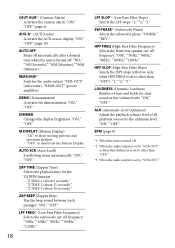
... SW PHASE*3 (Subwoofer Phase) Selects the subwoofer phase: "NORM," "REV." AUTO OFF Shuts off automatically after a desired time when the unit is set to other than "OFF"): "1," "2," "3." HPF FREQ (High Pass Filter Frequency) Selects the front/rear speaker cut -off : "NO," "30S ...(Seconds)," "30M (Minutes)," "60M (Minutes)." BTM (page 8) *1 When the unit is set to show moving patterns and spectrum analyzer. - DEMO (Demonstration) Activates the demonstration: "ON," "OFF." "Z.TIME-1 (about 6 seconds)," "Z.TIME-2 (about ...
... SW PHASE*3 (Subwoofer Phase) Selects the subwoofer phase: "NORM," "REV." AUTO OFF Shuts off automatically after a desired time when the unit is set to other than "OFF"): "1," "2," "3." HPF FREQ (High Pass Filter Frequency) Selects the front/rear speaker cut -off : "NO," "30S ...(Seconds)," "30M (Minutes)," "60M (Minutes)." BTM (page 8) *1 When the unit is set to show moving patterns and spectrum analyzer. - DEMO (Demonstration) Activates the demonstration: "ON," "OFF." "Z.TIME-1 (about 6 seconds)," "Z.TIME-2 (about ...
Operating Instructions
Page 19
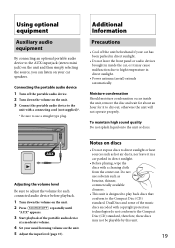
... use a straight type plug. Notes on the unit. 5 Adjust the input level (page 15). DualDiscs and some of the portable audio device at a moderate volume. 4 Set your usual listening volume on discs • Do not expose discs to direct sunlight or heat sources such as benzine, thinner, commercially available cleaners. •...
... use a straight type plug. Notes on the unit. 5 Adjust the input level (page 15). DualDiscs and some of the portable audio device at a moderate volume. 4 Set your usual listening volume on discs • Do not expose discs to direct sunlight or heat sources such as benzine, thinner, commercially available cleaners. •...
Operating Instructions
Page 22
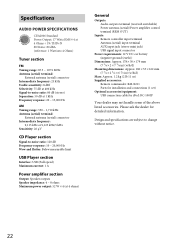
... × 53 × 162 mm (7 1/4 × 2 1/8 × 6 1/2 in) (w/h/d) Mass: Approx. 1.2 kg (2 lb 11 oz) Supplied accessories: Remote commander: RM-X211 Parts for installation and connections (1 set) Optional accessories/equipment: USB connection cable for detailed information. Specifications AUDIO POWER SPECIFICATIONS CEA2006 Standard Power Output: 17 Watts RMS 4 at 4 Ohms < 1% THD+N SN Ratio...
... × 53 × 162 mm (7 1/4 × 2 1/8 × 6 1/2 in) (w/h/d) Mass: Approx. 1.2 kg (2 lb 11 oz) Supplied accessories: Remote commander: RM-X211 Parts for installation and connections (1 set) Optional accessories/equipment: USB connection cable for detailed information. Specifications AUDIO POWER SPECIFICATIONS CEA2006 Standard Power Output: 17 Watts RMS 4 at 4 Ohms < 1% THD+N SN Ratio...

Operating Instructions
Page 23
...properly. Perform manual tuning. 23 No beep sound. The beep sound is canceled (page 17). An optional power amplifier is not set for 5 minutes with this unit. The fuse has blown. The Auto Off function does not operate. The unit is switched. The... leads are erased. If the auto antenna (aerial) will help you remedy problems you are dirty (page 21). Set "DEMO-OFF" (page 18). The display disappears from the dashboard, refer to the power supply lead of the car antenna (aerial). - Preset tuning is...
...properly. Perform manual tuning. 23 No beep sound. The beep sound is canceled (page 17). An optional power amplifier is not set for 5 minutes with this unit. The fuse has blown. The Auto Off function does not operate. The unit is switched. The... leads are erased. If the auto antenna (aerial) will help you remedy problems you are dirty (page 21). Set "DEMO-OFF" (page 18). The display disappears from the dashboard, refer to the power supply lead of the car antenna (aerial). - Preset tuning is...

Operating Instructions
Page 24
Reconnect it. The sound is set to "OFF." - a disc recorded with a complicated tree structure. a disc to play back than 320 kbps. 24 rate of the car. Defective or dirty disc. ... disc does not play back items via a USB hub. This unit cannot recognize USB devices via a USB hub. a disc recorded in the wrong way. Set "A.SCRL-ON" (page 18). - Cannot play back. The USB device contains files with a complicated tree structure. - MP3/WMA/AAC files cannot be intermittent at...
Reconnect it. The sound is set to "OFF." - a disc recorded with a complicated tree structure. a disc to play back than 320 kbps. 24 rate of the car. Defective or dirty disc. ... disc does not play back items via a USB hub. This unit cannot recognize USB devices via a USB hub. a disc recorded in the wrong way. Set "A.SCRL-ON" (page 18). - Cannot play back. The USB device contains files with a complicated tree structure. - MP3/WMA/AAC files cannot be intermittent at...
Marketing Specifications
Page 4
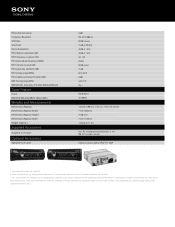
...and specifications are subject to change without written permission is prohibited. All other trademarks are trademarks of their respective logos are trademarks of Sony. Works with iPod touch® 1st - 4th generation, iPod nano® 1st - 6th generation, iPod classic®, iPod®...(178 mm) 1.2 kg (2 lb. 11 oz.) Parts for installation and connections (1 set) RM-X211 wireless remote USB Connection Cable for iPod®: RC-100IP 1. Reproduction in whole or in part without notice. Sony, ZAPPIN, Walkman, Quick-BrowZer and their respective owners. Updated: September 9, 2011 FM ...
...and specifications are subject to change without written permission is prohibited. All other trademarks are trademarks of their respective logos are trademarks of Sony. Works with iPod touch® 1st - 4th generation, iPod nano® 1st - 6th generation, iPod classic®, iPod®...(178 mm) 1.2 kg (2 lb. 11 oz.) Parts for installation and connections (1 set) RM-X211 wireless remote USB Connection Cable for iPod®: RC-100IP 1. Reproduction in whole or in part without notice. Sony, ZAPPIN, Walkman, Quick-BrowZer and their respective owners. Updated: September 9, 2011 FM ...

Limited Warranty (U.S. Only)
Page 1
...determine if a retailer is likely that has been returned to state. This Limited Warranty does not cover Sony products sold AS IS or WITH ALL FAULTS or consumabl (such as set forth below is your responsibility to replace the product after this Limited Warranty will not be responsible for... your product, Visit Sony's Web Site: www.sonv.com/sutaroort Or call : 1-800-488-SONY (7669) Repair / Replacement Warranty: This Limited ...
...determine if a retailer is likely that has been returned to state. This Limited Warranty does not cover Sony products sold AS IS or WITH ALL FAULTS or consumabl (such as set forth below is your responsibility to replace the product after this Limited Warranty will not be responsible for... your product, Visit Sony's Web Site: www.sonv.com/sutaroort Or call : 1-800-488-SONY (7669) Repair / Replacement Warranty: This Limited ...


