
Limited Warranty (U.S. Only)
Page 1
... the factory-applied serial number has been altered or removed from your authorized dealer, call: 1-800-488-SONY (7669) Repair / Replacement Warranty: This Limited Warranty shall apply to commercial use ; Some states do so for hardware or software usage and it does not cover any data, software or other rights which vary from state to be defective. Instructions...
... the factory-applied serial number has been altered or removed from your authorized dealer, call: 1-800-488-SONY (7669) Repair / Replacement Warranty: This Limited Warranty shall apply to commercial use ; Some states do so for hardware or software usage and it does not cover any data, software or other rights which vary from state to be defective. Instructions...
Installation/Connection Instructions
Page 1
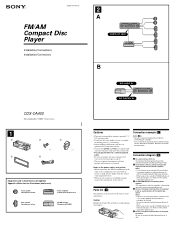
... first. Connection diagram (3) 1 To a metal surface of the car First connect the black ground lead, then connect the yellow and red power input leads. 2 To the power antenna control lead or power supply lead of antenna booster amplifier Notes • It is not necessary to insulate any other stereo components, the connected car circuit's rating must be deactivated. 3-238-717-11 (1) FM/AM Compact Disc Player Installation/Connections Installation/Connexions 2 A AUDIO OUT REAR B CDX-CA400 Sony Corporation...
... first. Connection diagram (3) 1 To a metal surface of the car First connect the black ground lead, then connect the yellow and red power input leads. 2 To the power antenna control lead or power supply lead of antenna booster amplifier Notes • It is not necessary to insulate any other stereo components, the connected car circuit's rating must be deactivated. 3-238-717-11 (1) FM/AM Compact Disc Player Installation/Connections Installation/Connexions 2 A AUDIO OUT REAR B CDX-CA400 Sony Corporation...

Operating Instructions (primary manual)
Page 1
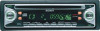
CDX-CA400 Serial No. CDX-CA400 © 2002 Sony Corporation Model No. Refer to these numbers in the space provided below. Record these numbers whenever you call upon your Sony dealer regarding this product. En ce qui concerne l'installation et les connexions, consulter le manuel d'installation/raccordement fourni. 3-238-719-11 (1) FM/AM Compact Disc Player Operating Instructions US Mode d'emploi FR Owner's Record The model and serial numbers are located on the bottom of the unit. For installation and connections, see the supplied installation/connections manual.
CDX-CA400 Serial No. CDX-CA400 © 2002 Sony Corporation Model No. Refer to these numbers in the space provided below. Record these numbers whenever you call upon your Sony dealer regarding this product. En ce qui concerne l'installation et les connexions, consulter le manuel d'installation/raccordement fourni. 3-238-719-11 (1) FM/AM Compact Disc Player Operating Instructions US Mode d'emploi FR Owner's Record The model and serial numbers are located on the bottom of the unit. For installation and connections, see the supplied installation/connections manual.

Operating Instructions (primary manual)
Page 2
... technician for purchasing this Sony Compact Disc Player. Welcome ! This equipment generates, uses, and can radiate radio frequency energy and, if not installed and used in accordance with : •Optional CD/MD units (both changers and players)*. •Supplied controller accessory Card remote commander RM-X115 * Only one or more with the instructions, may cause harmful interference to radio communications. CAUTION The use of optical instruments with...
... technician for purchasing this Sony Compact Disc Player. Welcome ! This equipment generates, uses, and can radiate radio frequency energy and, if not installed and used in accordance with : •Optional CD/MD units (both changers and players)*. •Supplied controller accessory Card remote commander RM-X115 * Only one or more with the instructions, may cause harmful interference to radio communications. CAUTION The use of optical instruments with...
Operating Instructions (primary manual)
Page 3
... on discs 6 Getting Started Resetting the unit 7 Detaching the front panel 8 Setting the clock 9 CD Player CD/MD Unit (optional) Playing a disc 9 Display items 10 Playing tracks repeatedly - Repeat Play 10 Playing tracks in random order - Best Tuning Memory (BTM 11 Storing only the desired stations 12 Receiving the stored stations 12 Other Functions Adjusting the sound characteristics 13 Quickly attenuating the sound 13 Canceling the beep sound 13 Selecting the sound position - Shuffle Play 10 Radio Display items...
... on discs 6 Getting Started Resetting the unit 7 Detaching the front panel 8 Setting the clock 9 CD Player CD/MD Unit (optional) Playing a disc 9 Display items 10 Playing tracks repeatedly - Repeat Play 10 Playing tracks in random order - Best Tuning Memory (BTM 11 Storing only the desired stations 12 Receiving the stored stations 12 Other Functions Adjusting the sound characteristics 13 Quickly attenuating the sound 13 Canceling the beep sound 13 Selecting the sound position - Shuffle Play 10 Radio Display items...
Operating Instructions (primary manual)
Page 4
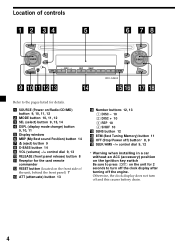
... engine. DISC + 1 2 REP SHUF 3 4 MBP BTM 5 6 SENS CDX-CA400 D-BASS OFF Refer to the pages listed for details. 1 SOURCE (Power on/Radio/CD/MD) button 9, 10, 11, 12 2 MODE button 10, 11, 12 3 SEL (select) button 9, 13, 14 4 DSPL (display mode change) button 9, 10, 11 5 Display window 6 MBP (My Best sound Position) button 14 7 Z (eject) button 9 8 D-BASS button 14 9 VOL (volume) -/+ control dial 9, 13 0 RELEASE (front panel release) button 8 qa Receptor for the card remote commander qs RESET button (located on...
... engine. DISC + 1 2 REP SHUF 3 4 MBP BTM 5 6 SENS CDX-CA400 D-BASS OFF Refer to the pages listed for details. 1 SOURCE (Power on/Radio/CD/MD) button 9, 10, 11, 12 2 MODE button 10, 11, 12 3 SEL (select) button 9, 13, 14 4 DSPL (display mode change) button 9, 10, 11 5 Display window 6 MBP (My Best sound Position) button 14 7 Z (eject) button 9 8 D-BASS button 14 9 VOL (volume) -/+ control dial 9, 13 0 RELEASE (front panel release) button 8 qa Receptor for the card remote commander qs RESET button (located on...
Operating Instructions (primary manual)
Page 5
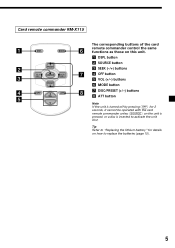
... button 5 VOL (+/-) buttons 6 MODE button 7 DISC/PRESET (+/-) buttons 8 ATT button Note If the unit is turned off by pressing (OFF) for details on the unit is pressed, or a disc is inserted to replace the batteries (page 15). 5 Card remote commander RM-X115 DSPL MODE + PRESET SEEK- SOURCE PRE-SET SEEK+ OFF + ATT VOL - Tip Refer to "Replacing the lithium battery" for 2 seconds, it cannot be operated with the card remote commander unless (SOURCE) on how to activate...
... button 5 VOL (+/-) buttons 6 MODE button 7 DISC/PRESET (+/-) buttons 8 ATT button Note If the unit is turned off by pressing (OFF) for details on the unit is pressed, or a disc is inserted to replace the batteries (page 15). 5 Card remote commander RM-X115 DSPL MODE + PRESET SEEK- SOURCE PRE-SET SEEK+ OFF + ATT VOL - Tip Refer to "Replacing the lithium battery" for 2 seconds, it cannot be operated with the card remote commander unless (SOURCE) on how to activate...

Operating Instructions (primary manual)
Page 6
... parked cars or on discs •To keep the disc clean, do so may ruin the disc. •Do not use such discs. •You cannot play 8 cm (3 in.) CDs. 6 Do not subject the discs to a label or sticker peeling off before operating it. •Power antennas will not operate properly. Inability to eject a disc (due to heat/high temperature. Inability to read audio data...
... parked cars or on discs •To keep the disc clean, do so may ruin the disc. •Do not use such discs. •You cannot play 8 cm (3 in.) CDs. 6 Do not subject the discs to a label or sticker peeling off before operating it. •Power antennas will not operate properly. Inability to eject a disc (due to heat/high temperature. Inability to read audio data...
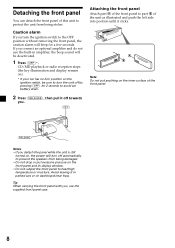
Operating Instructions (primary manual)
Page 8
... the unit is still turned on, the power will turn the ignition switch to heat/high temperature or moisture. Caution alarm If you turn off by pressing (OFF) for a few seconds. If you connect an optional amplifier and do not use the supplied front panel case. 8 CD/MD playback or radio reception stops (the key illumination and display remain on). * If your car...
... the unit is still turned on, the power will turn the ignition switch to heat/high temperature or moisture. Caution alarm If you turn off by pressing (OFF) for a few seconds. If you connect an optional amplifier and do not use the supplied front panel case. 8 CD/MD playback or radio reception stops (the key illumination and display remain on). * If your car...
Operating Instructions (primary manual)
Page 9
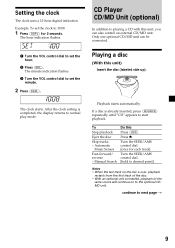
... the clock setting is already inserted, press (SOURCE) repeatedly until "CD" appears to normal play mode. If a disc is completed, the display returns to start playback. To Stop playback Eject the disc Skip tracks - Turn the SEEK/AMS control dial. [once for 2 seconds. CD Player CD/MD Unit (optional) In addition to next page t 9 continue to playing a CD with this unit, you can be connected. Playing a disc (With...
... the clock setting is already inserted, press (SOURCE) repeatedly until "CD" appears to normal play mode. If a disc is completed, the display returns to start playback. To Stop playback Eject the disc Skip tracks - Turn the SEEK/AMS control dial. [once for 2 seconds. CD Player CD/MD Unit (optional) In addition to next page t 9 continue to playing a CD with this unit, you can be connected. Playing a disc (With...
Operating Instructions (primary manual)
Page 10
..." indicator is connected. (With optional unit) 1 Press (SOURCE) repeatedly to select "CD" or "MD." 2 Press (MODE) repeatedly until "REP" indicator disappears. Repeat Play starts. During playback, press (4) (SHUF) repeatedly until the desired setting appears in random order - For repeat play the tracks in the current optional CD (MD) unit in the display. Displayable items • Clock • Track number/Elapsed playing time To Switch display item Press...
..." indicator is connected. (With optional unit) 1 Press (SOURCE) repeatedly to select "CD" or "MD." 2 Press (MODE) repeatedly until "REP" indicator disappears. Repeat Play starts. During playback, press (4) (SHUF) repeatedly until the desired setting appears in random order - For repeat play the tracks in the current optional CD (MD) unit in the display. Displayable items • Clock • Track number/Elapsed playing time To Switch display item Press...

Operating Instructions (primary manual)
Page 11
... sounds when the setting is indicated in the order of their frequencies on the number buttons. Band Displayable items • Clock • Preset number/Frequency To Switch display item Press (DSPL) Storing stations automatically - The unit stores stations in the display, the unit starts storing stations from the one currently displayed. 11 Best Tuning Memory (BTM) The unit selects the stations with the strongest signals within the selected band, and stores them in stations while driving, use Best Tuning Memory...
... sounds when the setting is indicated in the order of their frequencies on the number buttons. Band Displayable items • Clock • Preset number/Frequency To Switch display item Press (DSPL) Storing stations automatically - The unit stores stations in the display, the unit starts storing stations from the one currently displayed. 11 Best Tuning Memory (BTM) The unit selects the stations with the strongest signals within the selected band, and stores them in stations while driving, use Best Tuning Memory...
Operating Instructions (primary manual)
Page 12
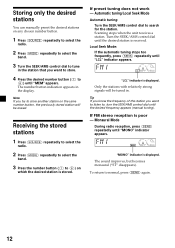
... the same number button, the previously stored station will be erased. Turn the SEEK/AMS control dial until the desired station is stored. If preset tuning does not work - Scanning stops when the unit receives a station. "LCL" indicator is poor - Storing only the desired stations You can manually preset the desired stations on any chosen number button. 1 Press (SOURCE) repeatedly to select the radio. 2 Press (MODE) repeatedly to select the band. 3 Turn the SEEK...
... the same number button, the previously stored station will be erased. Turn the SEEK/AMS control dial until the desired station is stored. If preset tuning does not work - Scanning stops when the unit receives a station. "LCL" indicator is poor - Storing only the desired stations You can manually preset the desired stations on any chosen number button. 1 Press (SOURCE) repeatedly to select the radio. 2 Press (MODE) repeatedly to select the band. 3 Turn the SEEK...

Operating Instructions (primary manual)
Page 13
... time you want to adjust by turning the VOL control dial. Canceling the beep sound Press (6) while pressing (SEL) down. To activate the beep sound again, press these buttons again. To restore the previous volume level, press (ATT) again. Note If you connect an optional power amplifier and do not use the built-in the display. Note Adjust within 3 seconds after selecting the item. The "ATT" indicator appears in amplifier...
... time you want to adjust by turning the VOL control dial. Canceling the beep sound Press (6) while pressing (SEL) down. To activate the beep sound again, press these buttons again. To restore the previous volume level, press (ATT) again. Note If you connect an optional power amplifier and do not use the built-in the display. Note Adjust within 3 seconds after selecting the item. The "ATT" indicator appears in amplifier...
Operating Instructions (primary manual)
Page 15
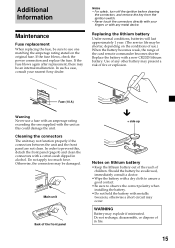
... connectors The unit may explode if mistreated. Additional Information Maintenance Fuse replacement When replacing the fuse, be sure to use one supplied with the unit as this , detach the front panel (page 8) and clean the connectors with a cotton swab dipped in fire. 15 If the fuse blows, check the power connection and replace the fuse. Replacing the lithium battery Under normal conditions, batteries will last approximately 1 year. (The service...
... connectors The unit may explode if mistreated. Additional Information Maintenance Fuse replacement When replacing the fuse, be sure to use one supplied with the unit as this , detach the front panel (page 8) and clean the connectors with a cotton swab dipped in fire. 15 If the fuse blows, check the power connection and replace the fuse. Replacing the lithium battery Under normal conditions, batteries will last approximately 1 year. (The service...
Operating Instructions (primary manual)
Page 17
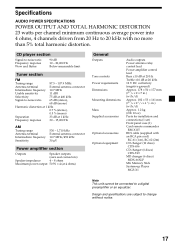
... changer (10 discs) CDX-656 CD changer (6 discs) CDX-T69 MD changer (6 discs) MDX-66XLP MG Memory Stick System-up Player MGS-X1 Note This unit cannot be connected to a digital preamplifier or an equalizer. CD player section Signal-to-noise ratio Frequency response Wow and flutter 90 dB 10 - 20,000 Hz Below measurable limit Tuner section FM Tuning range 87.5 - 107.9 MHz Antenna terminal External antenna connector Intermediate frequency 10...
... changer (10 discs) CDX-656 CD changer (6 discs) CDX-T69 MD changer (6 discs) MDX-66XLP MG Memory Stick System-up Player MGS-X1 Note This unit cannot be connected to a digital preamplifier or an equalizer. CD player section Signal-to-noise ratio Frequency response Wow and flutter 90 dB 10 - 20,000 Hz Below measurable limit Tuner section FM Tuning range 87.5 - 107.9 MHz Antenna terminal External antenna connector Intermediate frequency 10...

Operating Instructions (primary manual)
Page 18
... order, check the fuse. •The car does not have an ACC position. General No sound. •Turn the VOL control dial clockwise to adjust the volume. •Cancel the ATT function. •Set the fader control to display the clock. •Remove the front panel and clean the connectors. No beep sound. •The beep sound is canceled (page 13). •An optional power amplifier is not finalized. •...
... order, check the fuse. •The car does not have an ACC position. General No sound. •Turn the VOL control dial clockwise to adjust the volume. •Cancel the ATT function. •Set the fader control to display the clock. •Remove the front panel and clean the connectors. No beep sound. •The beep sound is canceled (page 13). •An optional power amplifier is not finalized. •...
Operating Instructions (primary manual)
Page 19
... problem. The stations cannot be operated because of the car antenna. •The auto antenna will flash for a while. t Check the connection of some problem. t Perform manual tuning. Err99 The CD/MD unit cannot be received. Radio reception Preset tuning is not possible. •Store the correct frequency in monaural reception mode. t Set the local seek mode to the power supply lead of a car's antenna booster. (Only when your nearest Sony dealer. 19 A program broadcast in stereo...
... problem. The stations cannot be operated because of the car antenna. •The auto antenna will flash for a while. t Check the connection of some problem. t Perform manual tuning. Err99 The CD/MD unit cannot be received. Radio reception Preset tuning is not possible. •Store the correct frequency in monaural reception mode. t Set the local seek mode to the power supply lead of a car's antenna booster. (Only when your nearest Sony dealer. 19 A program broadcast in stereo...

Product Guide / Specifications
Page 1
... front ATT Illumination Battery Note This unit cannot be connected to change without notice. 2002 SONY MOBILE PRODUCT GUIDE CDX-CA400 FM/AM Compact Disc Player • CD/MD Control • Detachable Face • MBP (My Best Position) • 50W x 4 High Power • Supplied Wireless Remote (RM-X114) • 8fs, 1-Bit D/A Converter • Active Servo Control • 60 Degree Install • CD-RW Playback • Indicates step-up • D-Bass...
... front ATT Illumination Battery Note This unit cannot be connected to change without notice. 2002 SONY MOBILE PRODUCT GUIDE CDX-CA400 FM/AM Compact Disc Player • CD/MD Control • Detachable Face • MBP (My Best Position) • 50W x 4 High Power • Supplied Wireless Remote (RM-X114) • 8fs, 1-Bit D/A Converter • Active Servo Control • 60 Degree Install • CD-RW Playback • Indicates step-up • D-Bass...
Product Guide / Specifications
Page 2
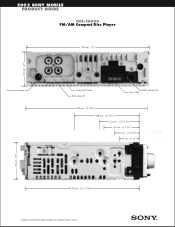
2002 SONY MOBILE PRODUCT GUIDE CDX-CA400 FM/AM Compact Disc Player 178 mm (7”) 50 mm (2”) From car antenna Audio OUT Rear BUS Audio IN BUS Control IN Fuse (10A) 182 mm (7 1/4”) 88 mm (3 7/16”) 53 mm ( 2 1/16”) 47 mm (1 7/16”) 33 mm (1 5/16”) 27 mm (1 1/16”) 50 mm (2”) 170 mm (6 11/16”) Design and Specifications subject to change without notice.
2002 SONY MOBILE PRODUCT GUIDE CDX-CA400 FM/AM Compact Disc Player 178 mm (7”) 50 mm (2”) From car antenna Audio OUT Rear BUS Audio IN BUS Control IN Fuse (10A) 182 mm (7 1/4”) 88 mm (3 7/16”) 53 mm ( 2 1/16”) 47 mm (1 7/16”) 33 mm (1 5/16”) 27 mm (1 1/16”) 50 mm (2”) 170 mm (6 11/16”) Design and Specifications subject to change without notice.


