
Operating Instructions
Page 2
... The following measures: - Consult the dealer or an experienced radio/TV technician for purchasing the Sony Compact Disc Player. Welcome! This equipment generates, uses, and can do the task using the remote. The warranty shall be invalidated if used in the United States This symbol is connected. -... the limits for home entertainment purposes only. These limits are used in this manual could void your Sony dealer regarding this manual thoroughly and retain it for model CDP-CX235. WARNING To prevent fire or shock hazard, do not expose the unit to qualified personnel only. ...
... The following measures: - Consult the dealer or an experienced radio/TV technician for purchasing the Sony Compact Disc Player. Welcome! This equipment generates, uses, and can do the task using the remote. The warranty shall be invalidated if used in the United States This symbol is connected. -... the limits for home entertainment purposes only. These limits are used in this manual could void your Sony dealer regarding this manual thoroughly and retain it for model CDP-CX235. WARNING To prevent fire or shock hazard, do not expose the unit to qualified personnel only. ...

Operating Instructions
Page 4
...cord (1) (supplied) White (L) Red (R) Amplifier To an AC outlet White (L) Red (R) 4 on the player. When using the supplied remote. Hooking Up the System Overview This section describes how to hook up the CD player to the diagram inside the battery compartment. CONTROL A1 ...flow What cords will I need? Doing so may cause a malfunction. • If you received the following items: • Audio cord (1) • Remote commander (remote) (1) • Size AA (R6) batteries (2) Inserting batteries into position. Insert the negative (-) end first, then push in and down until the positive...
...cord (1) (supplied) White (L) Red (R) Amplifier To an AC outlet White (L) Red (R) 4 on the player. When using the supplied remote. Hooking Up the System Overview This section describes how to hook up the CD player to the diagram inside the battery compartment. CONTROL A1 ...flow What cords will I need? Doing so may cause a malfunction. • If you received the following items: • Audio cord (1) • Remote commander (remote) (1) • Size AA (R6) batteries (2) Inserting batteries into position. Insert the negative (-) end first, then push in and down until the positive...

Operating Instructions
Page 5
... Control System" instructions. Be sure to make the supplied remote effective only for each player accordingly. • When using the player equipped with the COMMAND MODE selector: The command mode of another Sony CDGpleaytetrPitnloaggeythiSnetrgawritCtheDds this player You can simplify the operation of audio ...player not equipped with the COMMAND MODE selector: Set the COMMAND MODE selector of this player to CD 1 and that the voltage selector on the remote to CD 2. CD player ANALOG OUT L R Amplifier INPUT CD L R • If you play CD software other than music, such ...
... Control System" instructions. Be sure to make the supplied remote effective only for each player accordingly. • When using the player equipped with the COMMAND MODE selector: The command mode of another Sony CDGpleaytetrPitnloaggeythiSnetrgawritCtheDds this player You can simplify the operation of audio ...player not equipped with the COMMAND MODE selector: Set the COMMAND MODE selector of this player to CD 1 and that the voltage selector on the remote to CD 2. CD player ANALOG OUT L R Amplifier INPUT CD L R • If you play CD software other than music, such ...

Operating Instructions
Page 8
You can turn on the player by pressing I/u on the remote Z 1 Turn on the amplifier and select the CD player position. 2 Press I / u CONTINUE SHUFFLE PROGRAM REPEAT TIME/TEXT GROUP 1 GROUP 2 GROUP 3 GROUP 4 GROUP 5 GROUP 6 GROUP 7 GROUP 8 ...
You can turn on the player by pressing I/u on the remote Z 1 Turn on the amplifier and select the CD player position. 2 Press I / u CONTINUE SHUFFLE PROGRAM REPEAT TIME/TEXT GROUP 1 GROUP 2 GROUP 3 GROUP 4 GROUP 5 GROUP 6 GROUP 7 GROUP 8 ...

Operating Instructions
Page 10
... scrolls in a blank space on the discs where, on normal discs, there is no information. Checking the information of the CD TEXT information" on the remote in the display. When the player detects CD TEXT discs, the "CD TEXT" indication appears in another disc Z Press DISC SKIP on page 11. The...
... scrolls in a blank space on the discs where, on normal discs, there is no information. Checking the information of the CD TEXT information" on the remote in the display. When the player detects CD TEXT discs, the "CD TEXT" indication appears in another disc Z Press DISC SKIP on page 11. The...

Operating Instructions
Page 11
... information in the display. 4 Push the JOG dial to display the CD TEXT information when you turn off the player. Press HIGH-LIGHT on the remote to play disc highlights Z Some CD TEXT discs have a feature to start playing disc highlights in the stop mode. flashes. 2 Push the JOG dial. flashes...
... information in the display. 4 Push the JOG dial to display the CD TEXT information when you turn off the player. Press HIGH-LIGHT on the remote to play disc highlights Z Some CD TEXT discs have a feature to start playing disc highlights in the stop mode. flashes. 2 Push the JOG dial. flashes...

Operating Instructions
Page 12
... the next one when you turn the JOG dial, the Disc Memos starting with the ≠/± buttons, no disc has been labeled using the remote 1 Press DISC. 2 Press the number button of the disc. A B C D E F G H I J K L M N O P Q R S T U V W X Y Z 0 1 2 3 4 5 6 7 8 9 If "NOT FOUND" appears in the display, no more Disc Memo starting with the Disc Memo...
... the next one when you turn the JOG dial, the Disc Memos starting with the ≠/± buttons, no disc has been labeled using the remote 1 Press DISC. 2 Press the number button of the disc. A B C D E F G H I J K L M N O P Q R S T U V W X Y Z 0 1 2 3 4 5 6 7 8 9 If "NOT FOUND" appears in the display, no more Disc Memo starting with the Disc Memo...

Operating Instructions
Page 13
... point during the operation. Locating a Specific Track or a Point in Continuous or 1 DISC Shuffle Play mode. Press ≠ or 0 on the remote. GettPinlagyiSntgarCteDds Specifying the Next Disc to Play You can specify the next disc to play while playing a disc in a Track You can also locate a...; repeatedly until you find the track a specific track directly Z The number button of the track on the remote a point in a track 0 (backward)/) (forward) on the while monitoring the remote and hold down until you find sound Z the point a point in the display and the disc number or...
... point during the operation. Locating a Specific Track or a Point in Continuous or 1 DISC Shuffle Play mode. Press ≠ or 0 on the remote. GettPinlagyiSntgarCteDds Specifying the Next Disc to Play You can specify the next disc to play while playing a disc in a Track You can also locate a...; repeatedly until you find the track a specific track directly Z The number button of the track on the remote a point in a track 0 (backward)/) (forward) on the while monitoring the remote and hold down until you find sound Z the point a point in the display and the disc number or...
Operating Instructions
Page 15
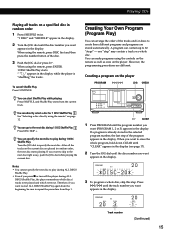
...as ones on the player PROGRAM ≠/± JOG CHECK You can directly select a disc for 1 DISC Shuffle Play See "Selecting a disc directly using the remote" on the current disc are played in random order, the next disc starts playing. Creating a program on the player. You can start ALL DISCS Shuffle... number you want appears in random order 1 Press SHUFFLE twice. PROGRAM1 DISC 20 CD1 TRACK 3 20 STEP 1 Track number (Continued) 15 When using the remote, press DISC first and then press the number button of the tracks and/or discs to the next disc right away, push the JOG dial...
...as ones on the player PROGRAM ≠/± JOG CHECK You can directly select a disc for 1 DISC Shuffle Play See "Selecting a disc directly using the remote" on the current disc are played in random order, the next disc starts playing. Creating a program on the player. You can start ALL DISCS Shuffle... number you want appears in random order 1 Press SHUFFLE twice. PROGRAM1 DISC 20 CD1 TRACK 3 20 STEP 1 Track number (Continued) 15 When using the remote, press DISC first and then press the number button of the tracks and/or discs to the next disc right away, push the JOG dial...

Operating Instructions
Page 16
... want (PROGRAM 1, 2 or 3) appears in the display. 2 Press DISC. Note If you replace discs, the programmed disc and track numbers remain. Creating a program using the remote Z DISC >10 CHECK · PROGRAM Number buttons ENTER CLEAR 1 Press PROGRAM until you erase it Even if you press one of the GROUP 1 - 8 buttons to...
... want (PROGRAM 1, 2 or 3) appears in the display. 2 Press DISC. Note If you replace discs, the programmed disc and track numbers remain. Creating a program using the remote Z DISC >10 CHECK · PROGRAM Number buttons ENTER CLEAR 1 Press PROGRAM until you erase it Even if you press one of the GROUP 1 - 8 buttons to...
Operating Instructions
Page 19
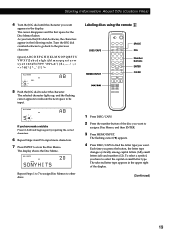
... capital letters (AB), small letters (ab) and numbers (12). The cursor disappears and the first space for the Disc Memo flashes. Labeling discs using the remote Z DISC/CAPS MEMO INPUT =/+ SPACE DEL Number buttons ENTER CLEAR 1 Press DISC/CAPS. 2 Press the number button of the display. (Continued) 19 Turn the JOG...
... capital letters (AB), small letters (ab) and numbers (12). The cursor disappears and the first space for the Disc Memo flashes. Labeling discs using the remote Z DISC/CAPS MEMO INPUT =/+ SPACE DEL Number buttons ENTER CLEAR 1 Press DISC/CAPS. 2 Press the number button of the display. (Continued) 19 Turn the JOG...

Operating Instructions
Page 22
...and 4 to select the group and press ·. The Group Memo disappears. Playing discs in a group (Group Play) You can start Group Play with the remote Z 1 Before you start playing, press GROUP. 2 Press the number button of the disc you want appears. Note that disc. Group Play starts form the selected...3 Turn the JOG dial until the disc number you want appears in the display, then press ENTER. If you have selected. When using the remote, press DISC SKIP repeatedly until the character you select ALL DISCS Continuous Play The player plays All tracks on page 18 for the Group Memo...
...and 4 to select the group and press ·. The Group Memo disappears. Playing discs in a group (Group Play) You can start Group Play with the remote Z 1 Before you start playing, press GROUP. 2 Press the number button of the disc you want appears. Note that disc. Group Play starts form the selected...3 Turn the JOG dial until the disc number you want appears in the display, then press ENTER. If you have selected. When using the remote, press DISC SKIP repeatedly until the character you select ALL DISCS Continuous Play The player plays All tracks on page 18 for the Group Memo...

Operating Instructions
Page 25
...remote does not function. /Remove obstacles in the path of the COMMAND MODE selector displayed in the remote... with the label side facing right. /Clean the CD (see page 5). projecting parts 9.5 kg (21 lbs) Supplied accessories Audio cord (2 phono plugs - 2 phono plugs) (1) Remote commander (remote...) (1) Size AA (R6) batteries (2) Design and specifications are weak. /Set the CD 1/2/3 switch on the remote according to the position of the remote and the player. /Point the remote...jacks 2 V Over 10 kilohms (at the remote sensor g on the player. /Replace all ...
...remote does not function. /Remove obstacles in the path of the COMMAND MODE selector displayed in the remote... with the label side facing right. /Clean the CD (see page 5). projecting parts 9.5 kg (21 lbs) Supplied accessories Audio cord (2 phono plugs - 2 phono plugs) (1) Remote commander (remote...) (1) Size AA (R6) batteries (2) Design and specifications are weak. /Set the CD 1/2/3 switch on the remote according to the position of the remote and the player. /Point the remote...jacks 2 V Over 10 kilohms (at the remote sensor g on the player. /Replace all ...
Operating Instructions
Page 26
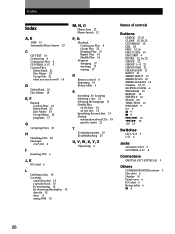
... Memo Search 12 P, Q Playback Continuous Play 8 Group Play 21 Program Play 15 Repeat Play 14 Shuffle Play 14 Program changing 17 checking 17 erasing 17 R Remote control 4 Repeating 14 Rotary table 6 S Searching.
... Memo Search 12 P, Q Playback Continuous Play 8 Group Play 21 Program Play 15 Repeat Play 14 Shuffle Play 14 Program changing 17 checking 17 erasing 17 R Remote control 4 Repeating 14 Rotary table 6 S Searching.


