User manual
Page 1
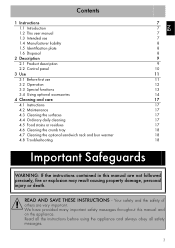
... 13 3.4 Using optional accessories 14 4 Cleaning and care 17 4.1 Instructions 17 4.2 Maintenance 17 4.3 Cleaning the surfaces 17 4.4 Ordinary daily cleaning 17 4.5 Food stains or residues 17 4.6 Cleaning the crumb tray 18 4.7 Cleaning the optional sandwich rack and bun warmer 18 4.8 Troubleshooting 18 Important Safeguards WARNING: If the instructions contained in this manual and on the appliance. Read all the instructions before using the appliance...
... 13 3.4 Using optional accessories 14 4 Cleaning and care 17 4.1 Instructions 17 4.2 Maintenance 17 4.3 Cleaning the surfaces 17 4.4 Ordinary daily cleaning 17 4.5 Food stains or residues 17 4.6 Cleaning the crumb tray 18 4.7 Cleaning the optional sandwich rack and bun warmer 18 4.8 Troubleshooting 18 Important Safeguards WARNING: If the instructions contained in this manual and on the appliance. Read all the instructions before using the appliance...

User manual
Page 2
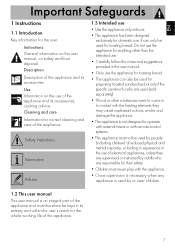
...all the instructions before installing or using the appliance for damage caused by improper use gasoline or other appliance. is a safety alert symbol. DO NOT install this or any future user. WARNING means you of this manual must be killed or seriously injured if the instructions are not...result in personal injury and material damage. • Read all codes and ordinances in this appliance. • This appliance complies with the safety alert symbol. WARNING: For your safety, the instructions contained in force. CAUTION indicates a potentially hazardous situation which, if...
...all the instructions before installing or using the appliance for damage caused by improper use gasoline or other appliance. is a safety alert symbol. DO NOT install this or any future user. WARNING means you of this manual must be killed or seriously injured if the instructions are not...result in personal injury and material damage. • Read all codes and ordinances in this appliance. • This appliance complies with the safety alert symbol. WARNING: For your safety, the instructions contained in force. CAUTION indicates a potentially hazardous situation which, if...

User manual
Page 3
...electrical shock, personal injury, or damage when using the appliance, follow basic safety precautions, including the following: Follow all safety instructions to use the appliance safely. • Read this user manual carefully before using the appliance. • To protect against ...repairs should only be used when moving the appliance if the crumb tray contains hot oil or other appropriate means. • Do not modify this appliance. • Do not try to put out a fire or flames with water: turn off the appliance, remove the plug from the outlet when not in use and before cleaning...
...electrical shock, personal injury, or damage when using the appliance, follow basic safety precautions, including the following: Follow all safety instructions to use the appliance safely. • Read this user manual carefully before using the appliance. • To protect against ...repairs should only be used when moving the appliance if the crumb tray contains hot oil or other appropriate means. • Do not modify this appliance. • Do not try to put out a fire or flames with water: turn off the appliance, remove the plug from the outlet when not in use and before cleaning...

User manual
Page 4
... surfaces. Let it cool down before cleaning. • Bread may involve a risk of the toaster. It can get very hot when it is plugged in. • When heating toaster pastries, always use the lightest toast color setting. • Never insert in . • Use the appliance only indoors. • This appliance has been designed exclusively for domestic use metallic objects such as...
... surfaces. Let it cool down before cleaning. • Bread may involve a risk of the toaster. It can get very hot when it is plugged in. • When heating toaster pastries, always use the lightest toast color setting. • Never insert in . • Use the appliance only indoors. • This appliance has been designed exclusively for domestic use metallic objects such as...
User manual
Page 5
... specific sandwich racks are used (sold separately). • If food or other than the intended use. • Carefully follow the notes and suggestions provided in the user manual. • Only use the appliance for toasting bread. • The appliance can only be kept in its entirety and within the user's reach for the user: Instructions General information on this user manual, on the use...
... specific sandwich racks are used (sold separately). • If food or other than the intended use. • Carefully follow the notes and suggestions provided in the user manual. • Only use the appliance for toasting bread. • The appliance can only be kept in its entirety and within the user's reach for the user: Instructions General information on this user manual, on the use...

User manual
Page 6
To comply with current legislation, old appliances, having read the user manual; • Tampering with the plastic bags. 8 Plastic packaging Danger of suffocation • Do not leave the packaging or any part of the packing materials at an appropriate disposal facility. Do not remove .... • Do not let children play with any part of the appliance; • Use of non-original spare parts; • Not following the safety instructions. 1.5 Identification plate The identification plate bears the technical data, serial number and brand name of California to cause cancer, birth defects...
To comply with current legislation, old appliances, having read the user manual; • Tampering with the plastic bags. 8 Plastic packaging Danger of suffocation • Do not leave the packaging or any part of the packing materials at an appropriate disposal facility. Do not remove .... • Do not let children play with any part of the appliance; • Use of non-original spare parts; • Not following the safety instructions. 1.5 Identification plate The identification plate bears the technical data, serial number and brand name of California to cause cancer, birth defects...

User manual
Page 8
... central LED lights up to indicate that the toasting cycle is not satisfactory. Stop function button The Stop button can be used to continue a toasting cycle if the result is activated. 3. Browning control knob This control is activated. 4. Bagel function button This feature will toast one of bread, without toasting the other kind of the 6 different browning levels or the Reheat...
... central LED lights up to indicate that the toasting cycle is not satisfactory. Stop function button The Stop button can be used to continue a toasting cycle if the result is activated. 3. Browning control knob This control is activated. 4. Bagel function button This feature will toast one of bread, without toasting the other kind of the 6 different browning levels or the Reheat...

User manual
Page 9
... breadlift down. Turn the browning control to reduce the risk resulting from becoming entangled in death, fire or electrical shock. EN Use 3 Use Electrical Shock Hazard • Plug into the toaster during shipping or handling. Hertz: 60 Hz Your toaster has a 3-prong grounded plug. During first use an adapter. • Failure to follow these instructions can be pulled...
... breadlift down. Turn the browning control to reduce the risk resulting from becoming entangled in death, fire or electrical shock. EN Use 3 Use Electrical Shock Hazard • Plug into the toaster during shipping or handling. Hertz: 60 Hz Your toaster has a 3-prong grounded plug. During first use an adapter. • Failure to follow these instructions can be pulled...

User manual
Page 10
... take longer as bread is not normally square, you are using handcut bread, try to cut slices as evenly as possible. For best results: • Toast only one inch. • If you may need to turn the bread on its side to reach the correct toasting temperature. Insert the bread in the toaster. 3. The fresher the bread you use , the longer it...
... take longer as bread is not normally square, you are using handcut bread, try to cut slices as evenly as possible. For best results: • Toast only one inch. • If you may need to turn the bread on its side to reach the correct toasting temperature. Insert the bread in the toaster. 3. The fresher the bread you use , the longer it...

User manual
Page 11
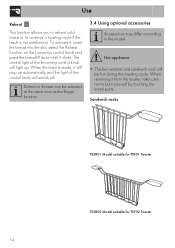
... requires just a little extra time, use the function, simply insert the bread into the slot, select the desired browning level, press the breadlift down until it , insert the bread into the slot with the side that you want toasted facing the outside. To use the reheat button to cancel or stop the toasting cycle by pushing the button. 6. Defrost This function...
... requires just a little extra time, use the function, simply insert the bread into the slot, select the desired browning level, press the breadlift down until it , insert the bread into the slot with the side that you want toasted facing the outside. To use the reheat button to cancel or stop the toasting cycle by pushing the button. 6. Defrost This function...
User manual
Page 12
... hot during the toasting cycle. To activate it, insert the bread into the slot, select the Reheat function on the browning control knob and press the breadlift down until it will be selected at the same time as the Bagel function. 3.4 Using optional accessories Accessories may differ according to burn yourself by touching the metal parts. Use Reheat This function...
... hot during the toasting cycle. To activate it, insert the bread into the slot, select the Reheat function on the browning control knob and press the breadlift down until it will be selected at the same time as the Bagel function. 3.4 Using optional accessories Accessories may differ according to burn yourself by touching the metal parts. Use Reheat This function...

User manual
Page 13
... toasting cycle, leave the toast inside the toasting slot for easier handling of smaller items such as bagels. When the toasting cycle has ended remove the sandwich rack from the refrigerator. • Do not overfill the sandwich. • If using the reheat button. How to use the reheat button to extend the toasting ... handles together to activate the toasting cycle. 6. Push the breadlift down until it clicks to grip the sandwich in , the breadlift will not lock. Open the rack with the warming of the bread, this case, at room temperature, not straight from the toaster. 15 User ...
... toasting cycle, leave the toast inside the toasting slot for easier handling of smaller items such as bagels. When the toasting cycle has ended remove the sandwich rack from the refrigerator. • Do not overfill the sandwich. • If using the reheat button. How to use the reheat button to extend the toasting ... handles together to activate the toasting cycle. 6. Push the breadlift down until it clicks to grip the sandwich in , the breadlift will not lock. Open the rack with the warming of the bread, this case, at room temperature, not straight from the toaster. 15 User ...
User manual
Page 14
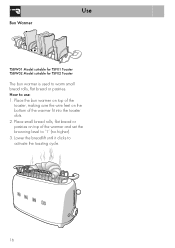
Place the bun warmer on top of the toaster, making sure the wire feet on top of the warmer fit into the toaster slots. 2. Lower the breadlift until it clicks to warm small bread rolls, flat bread or pastries. Use Bun Warmer TSBW01 Model suitable for TSF01 Toaster TSBW02 Model suitable for TSF02 Toaster The bun warmer is used to activate the toasting cycle. 16 How to '1' (no higher). 3. Place small bread rolls, flat bread or pastries on the bottom of the warmer and set the browning level to use: 1.
Place the bun warmer on top of the toaster, making sure the wire feet on top of the warmer fit into the toaster slots. 2. Lower the breadlift until it clicks to warm small bread rolls, flat bread or pastries. Use Bun Warmer TSBW01 Model suitable for TSF01 Toaster TSBW02 Model suitable for TSF02 Toaster The bun warmer is used to activate the toasting cycle. 16 How to '1' (no higher). 3. Place small bread rolls, flat bread or pastries on the bottom of the warmer and set the browning level to use: 1.
User manual
Page 15
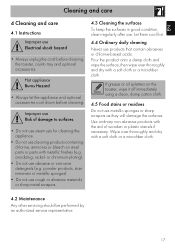
... Burns Hazard • Always let the appliance and optional accessories cool down before cleaning the toaster, crumb tray and optional accessories. Improper use Risk of wooden or plastic utensils if necessary. powder products, stain removers or metallic sponges). • Do not use rough or abrasive materials or sharp metal scrapers. 4.3 Cleaning the surfaces To keep the surfaces in good condition...
... Burns Hazard • Always let the appliance and optional accessories cool down before cleaning the toaster, crumb tray and optional accessories. Improper use Risk of wooden or plastic utensils if necessary. powder products, stain removers or metallic sponges). • Do not use rough or abrasive materials or sharp metal scrapers. 4.3 Cleaning the surfaces To keep the surfaces in good condition...
User manual
Page 16
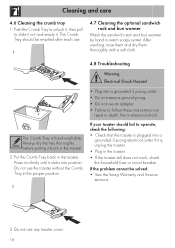
... proper position. If your toaster should be solved: • See the Smeg Warranty and Service sections. 3. If the problem cannot be emptied after each use the toaster without the Crumb Tray in warm soapy water. If it clicks into position. Do not use an adapter. • Failure to follow these instructions can result in the toaster. Push the Crumb Tray to unlock it, then...
... proper position. If your toaster should be solved: • See the Smeg Warranty and Service sections. 3. If the problem cannot be emptied after each use the toaster without the Crumb Tray in warm soapy water. If it clicks into position. Do not use an adapter. • Failure to follow these instructions can result in the toaster. Push the Crumb Tray to unlock it, then...
