Instruction manual
Page 7
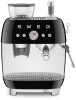
... fire or electric shock, do not immediately follow the instructions. We have provided many important safety messages throughout this manual are not followed precisely, fire or explosion may result ...messages. This symbol alerts you could be done by authorized service personnel only. DANGER, WARNING or CAUTION - WARNING means you could be killed or seriously injured if you do not remove the cover (or back). • No user-serviceable parts inside! • Repair should be killed or seriously injured if the instructions are very important. RECOGNIZE SAFETY INFORMATION This is used...
... fire or electric shock, do not immediately follow the instructions. We have provided many important safety messages throughout this manual are not followed precisely, fire or explosion may result ...messages. This symbol alerts you could be done by authorized service personnel only. DANGER, WARNING or CAUTION - WARNING means you could be killed or seriously injured if you do not remove the cover (or back). • No user-serviceable parts inside! • Repair should be killed or seriously injured if the instructions are very important. RECOGNIZE SAFETY INFORMATION This is used...
Instruction manual
Page 9
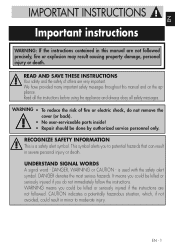
... using the appliance, read this user manual carefully. • Do not use the appliance outdoors. • This appliance is for household use only. • Do not use the appliance for examination, repair or adjustment. • Make sure the power cord does not come in contact with sharp edges. • Do not pull on the cord to extinguish a flame/fire with water: turn...
... using the appliance, read this user manual carefully. • Do not use the appliance outdoors. • This appliance is for household use only. • Do not use the appliance for examination, repair or adjustment. • Make sure the power cord does not come in contact with sharp edges. • Do not pull on the cord to extinguish a flame/fire with water: turn...

Instruction manual
Page 10
... injury, do not open the brew chamber during operation. SAVE THESE INSTRUCTIONS EN - 4 For this will void the warranty. • In case of 2000 meters. • Use only coffee beans to obtain the powder, do not attempt to repair it be placed in a cabinet when in the tank or without the help of spare parts not recommended by the manufacturer...
... injury, do not open the brew chamber during operation. SAVE THESE INSTRUCTIONS EN - 4 For this will void the warranty. • In case of 2000 meters. • Use only coffee beans to obtain the powder, do not attempt to repair it be placed in a cabinet when in the tank or without the help of spare parts not recommended by the manufacturer...
Instruction manual
Page 12
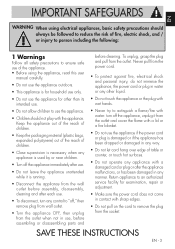
...INSTRUCTIONS EN - 6 IMPORTANT INSTRUCTIONS This user's manual This user's manual is so that valuable materials from old appliances can be recycled and the environment can be protected. Manufacturer's liability The manufacturer declines all liability for electrical and electronic waste. The identification plate must be kept intact and available to : • use of the appliance different...! For more information, please contact your local authorities or recycling center employees. Identification plate The identification plate lists the technical data, serial number and brand name.
...INSTRUCTIONS EN - 6 IMPORTANT INSTRUCTIONS This user's manual This user's manual is so that valuable materials from old appliances can be recycled and the environment can be protected. Manufacturer's liability The manufacturer declines all liability for electrical and electronic waste. The identification plate must be kept intact and available to : • use of the appliance different...! For more information, please contact your local authorities or recycling center employees. Identification plate The identification plate lists the technical data, serial number and brand name.
Instruction manual
Page 13
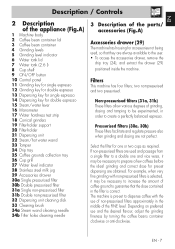
... (Fig.A) 1 Machine body 2 Coffee bean container lid 3 Coffee bean container 4 Grinding levels 5 Grinding level indicator 6 Water tank lid 7 Water tank (2.6 l) 8 Cup shelf 9 ON/OFF button 10 Control panel 11 Grinding key for single espresso 12 Grinding key for double espresso 13 Dispensing key for single espresso 14 Dispensing key for double espresso 15 Steam/water lever 16 Manometer 17 Water hardness test strip 18 Conical grinders 19 Filter-holder support 20 Filter-holder 21 Dispensing unit 22 Steam/hot water wand 23...
... (Fig.A) 1 Machine body 2 Coffee bean container lid 3 Coffee bean container 4 Grinding levels 5 Grinding level indicator 6 Water tank lid 7 Water tank (2.6 l) 8 Cup shelf 9 ON/OFF button 10 Control panel 11 Grinding key for single espresso 12 Grinding key for double espresso 13 Dispensing key for single espresso 14 Dispensing key for double espresso 15 Steam/water lever 16 Manometer 17 Water hardness test strip 18 Conical grinders 19 Filter-holder support 20 Filter-holder 21 Dispensing unit 22 Steam/hot water wand 23...

Instruction manual
Page 14
.... Make sure that the container is clogged. Use Dispensing unit cleaning disk (32) Silicone disk to be used to have a fixed light and then select the desired beverage. Keys (11) and (12) flash quickly: The coffee grinder has been used for cooling or disassemble the coffee grinder and clean the tube from the machine by pressing this button. Wait for a double espresso. Check the correct introduction or add water if...
.... Make sure that the container is clogged. Use Dispensing unit cleaning disk (32) Silicone disk to be used to have a fixed light and then select the desired beverage. Keys (11) and (12) flash quickly: The coffee grinder has been used for cooling or disassemble the coffee grinder and clean the tube from the machine by pressing this button. Wait for a double espresso. Check the correct introduction or add water if...

Instruction manual
Page 15
... the machine. A and B) • Unpack the appliance carefully and remove all packaging materials. • Use a damp cloth to clean all removable components, such as the coffee bean container (3), water tank (7), lids (6, 2), coffee grounds collection tray (25), drip tray (24), cup holder grill (26), filter-holder (20), filters (30a, 30b, 31a, 31b), tamper (23) and other accessories. • Make sure that all dispensing. • Lift the tank cover (6) and pour fresh water in...
... the machine. A and B) • Unpack the appliance carefully and remove all packaging materials. • Use a damp cloth to clean all removable components, such as the coffee bean container (3), water tank (7), lids (6, 2), coffee grounds collection tray (25), drip tray (24), cup holder grill (26), filter-holder (20), filters (30a, 30b, 31a, 31b), tamper (23) and other accessories. • Make sure that all dispensing. • Lift the tank cover (6) and pour fresh water in...

Instruction manual
Page 16
... the machine is correct. turning the coffee bean container (3) with the indicator (5). EN - 10 Proceed as all the keys have a fixed light. 4.2 Commissioning (Fig.A) On commissioning it . Turning the container (3) clockwise, grinding will be finer, anti-clockwise makes grinding coarser. • Position the filter-holder (20) with the beans inside could damage the grinding unit. • To adjust the level of grinding, turn the coffee beans...
... the machine is correct. turning the coffee bean container (3) with the indicator (5). EN - 10 Proceed as all the keys have a fixed light. 4.2 Commissioning (Fig.A) On commissioning it . Turning the container (3) clockwise, grinding will be finer, anti-clockwise makes grinding coarser. • Position the filter-holder (20) with the beans inside could damage the grinding unit. • To adjust the level of grinding, turn the coffee beans...

Instruction manual
Page 17
... has stopped. After approx. 5 minutes of no use, the machine goes into the filter-holder (20) . Coffee extracted correctly Fig.D1. To avoid spraying, do not remove the filter holder during dispensing: wait for two coffees. • After grinding, position the filter-holder (20) on , it is reached, dispensing will end automatically. The stand-by time can be aligned with hot water or dispensing hot water into the filter and...
... has stopped. After approx. 5 minutes of no use, the machine goes into the filter-holder (20) . Coffee extracted correctly Fig.D1. To avoid spraying, do not remove the filter holder during dispensing: wait for two coffees. • After grinding, position the filter-holder (20) on , it is reached, dispensing will end automatically. The stand-by time can be aligned with hot water or dispensing hot water into the filter and...
Instruction manual
Page 18
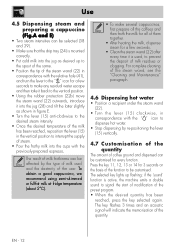
... correspondence with the relative hole (41), and turn the lever to the " " icon for a few seconds, • Clean the steam wand (22) after every time it into the cups with the " " icon to dispense hot water. • Stop dispensing by the type of milk used , to signal the start of modification of the pre-set program. • When the desired quantity has been...
... correspondence with the relative hole (41), and turn the lever to the " " icon for a few seconds, • Clean the steam wand (22) after every time it into the cups with the " " icon to dispense hot water. • Stop dispensing by the type of milk used , to signal the start of modification of the pre-set program. • When the desired quantity has been...

Instruction manual
Page 19
... to change this setting: • Access the programming menu as indicated in the following table: Key Auto power-off times, press the key (11). • To set the level of the keys flash at the same time and the machine emits a single sound indicating that factory settings have been reset. 5 Machine settings The programming menu can be used , thus making the requirement for descaling less frequent. Water hardness The machine is...
... to change this setting: • Access the programming menu as indicated in the following table: Key Auto power-off times, press the key (11). • To set the level of the keys flash at the same time and the machine emits a single sound indicating that factory settings have been reset. 5 Machine settings The programming menu can be used , thus making the requirement for descaling less frequent. Water hardness The machine is...

Instruction manual
Page 21
... change this setting: • Access the programming menu as indicated previously. • Press the key (14), it will flash 3 times to set with a standard pre-brewing mode. Acoustic signals The machine is set 11...buttons (11) and (12) at the same time for 10 seconds. Pre-brewing profiles The machine is pre-set 11 Short pre-brewing 12 Standard pre-brewing 13 Pulse pre-brewing 14 Constant pre-brewing • The key selected will flash 3 times and a sound will be emitted (if the acoustic signals are active) to indicate the setting has been saved. When using pressurised filters...
... change this setting: • Access the programming menu as indicated previously. • Press the key (14), it will flash 3 times to set with a standard pre-brewing mode. Acoustic signals The machine is set 11...buttons (11) and (12) at the same time for 10 seconds. Pre-brewing profiles The machine is pre-set 11 Short pre-brewing 12 Standard pre-brewing 13 Pulse pre-brewing 14 Constant pre-brewing • The key selected will flash 3 times and a sound will be emitted (if the acoustic signals are active) to indicate the setting has been saved. When using pressurised filters...

Instruction manual
Page 22
... cleaning the coffee machine. • Never immerse the coffee machine in water or other liquids. • Allow the coffee machine to a dedicated web section on Installation and Cleaning (fig. Only the cup grill (26) and the jug (28) are cleaned regularly. Cleaning and maintenance 6 Cleaning and maintenance 6.1 Warnings Electrocution hazard. • Remove the plug from the power outlet before cleaning. To make cleaning easier, it is possible to scan the QR code...
... cleaning the coffee machine. • Never immerse the coffee machine in water or other liquids. • Allow the coffee machine to a dedicated web section on Installation and Cleaning (fig. Only the cup grill (26) and the jug (28) are cleaned regularly. Cleaning and maintenance 6 Cleaning and maintenance 6.1 Warnings Electrocution hazard. • Remove the plug from the power outlet before cleaning. To make cleaning easier, it is possible to scan the QR code...

Instruction manual
Page 23
...; Dry the steam wand (22) using a damp cloth. EN - 17 Use detergent capsules for double coffee (31b) into the dispensing unit (21) and position a container with capacity of any milk remaining inside and just clean the grinders (18). Cleaning the water tank (7) • Remove the tank lid (6) and remove the tank from the outlet. • Remove the coffee bean container (3) by turning it anti-clockwise until the " " " " references...
...; Dry the steam wand (22) using a damp cloth. EN - 17 Use detergent capsules for double coffee (31b) into the dispensing unit (21) and position a container with capacity of any milk remaining inside and just clean the grinders (18). Cleaning the water tank (7) • Remove the tank lid (6) and remove the tank from the outlet. • Remove the coffee bean container (3) by turning it anti-clockwise until the " " " " references...
Instruction manual
Page 24
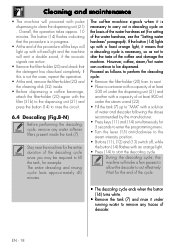
... the button (14) flashes with pulse dispensing to clean the dispensing unit (21) . The entire descaling and rinsing cycle lasts approximately 40 minutes. If this is not the case, repeat the operation. • At the end, remove the filter-holder (20) and the cleaning disk (32) inside the tank (7). Overall, the operation takes approx. 10 minutes. Stay near the machine for example. However, coffee, steam/hot water...
... the button (14) flashes with pulse dispensing to clean the dispensing unit (21) . The entire descaling and rinsing cycle lasts approximately 40 minutes. If this is not the case, repeat the operation. • At the end, remove the filter-holder (20) and the cleaning disk (32) inside the tank (7). Overall, the operation takes approx. 10 minutes. Stay near the machine for example. However, coffee, steam/hot water...

Instruction manual
Page 25
... "MAX" with clean water to perform the rinse cycle, then press the key (14) to the coffee machine. EN Cleaning and maintenance • Re-mount the tank and fill it up with a fixed white light. • Re-position the lever (15) in the event of contact with skin or eyes. • Use descaler products recommended by Smeg to prevent damage to start this cycle.
... "MAX" with clean water to perform the rinse cycle, then press the key (14) to the coffee machine. EN Cleaning and maintenance • Re-mount the tank and fill it up with a fixed white light. • Re-position the lever (15) in the event of contact with skin or eyes. • Use descaler products recommended by Smeg to prevent damage to start this cycle.
Instruction manual
Page 26
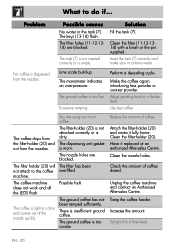
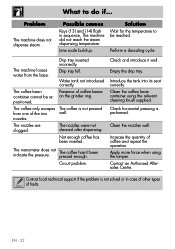
... coffee is insufficient ground coffee. Possible fault. Reduce the amount of coffee dosed. Have it fully home. Clean the nozzle holes. The keys (13-14) flash. Perform a descaling cycle. The coffee machine does not work and all the LEDS flash. There is too fine. Attach the filter-holder (20) and rotate it replaced at an authorised After-sales Centre. Set grind to do if... The tank...
... coffee is insufficient ground coffee. Possible fault. Reduce the amount of coffee dosed. Have it fully home. Clean the nozzle holes. The keys (13-14) flash. Perform a descaling cycle. The coffee machine does not work and all the LEDS flash. There is too fine. Attach the filter-holder (20) and rotate it replaced at an authorised After-sales Centre. Set grind to do if... The tank...

Instruction manual
Page 27
... unit (20) and the filter (30a-30b31a-31b). Mount the container correctly (3). Note: the quality of the froth depends on the type of the coffee from the programming menu following the instructions in colour and comes out of time. Machine not used /manual dexterity. Perform a descaling cycle. There is too fine. No water in the "Setting the coffee temperature" paragraph. Increase the temperature of milk used...
... unit (20) and the filter (30a-30b31a-31b). Mount the container correctly (3). Note: the quality of the froth depends on the type of the coffee from the programming menu following the instructions in colour and comes out of time. Machine not used /manual dexterity. Perform a descaling cycle. There is too fine. No water in the "Setting the coffee temperature" paragraph. Increase the temperature of milk used...
Instruction manual
Page 28
... not pressed well. Perform a descaling cycle. The machine looses water from one of faults. Circuit problem. Clean the coffee bean container using the tamper. Contact an Authorised Aftersales Centre. Presence of coffee and repeat the operation. Check and introduce it well. Increase the quantity of coffee beans on the grinder ring. Possible causes Keys (13) and (14) flash in case of other...
... not pressed well. Perform a descaling cycle. The machine looses water from one of faults. Circuit problem. Clean the coffee bean container using the tamper. Contact an Authorised Aftersales Centre. Presence of coffee and repeat the operation. Check and introduce it well. Increase the quantity of coffee beans on the grinder ring. Possible causes Keys (13) and (14) flash in case of other...
Product sheet
Page 1
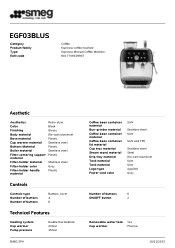
EGF03BLUS Category Product family Type EAN code Coffee Espresso coffee machine Espresso Manual Coffee Machine 8017709329907 Aesthetic Aesthetics Retro-style Color Black Finishing Glossy Body material Die-cast aluminum Base material Plastic Cup warmer material Stainless steel Buttons Material Plastic Boiler material Stainless steel Filter-centering support Plastic material Filter-holder material Stainless steel Filter-holder color Gray Filter-holder handle Plastic material Controls Controls type Number of buttons Number of buttons Buttons, Lever 4 6 Technical Features...
EGF03BLUS Category Product family Type EAN code Coffee Espresso coffee machine Espresso Manual Coffee Machine 8017709329907 Aesthetic Aesthetics Retro-style Color Black Finishing Glossy Body material Die-cast aluminum Base material Plastic Cup warmer material Stainless steel Buttons Material Plastic Boiler material Stainless steel Filter-centering support Plastic material Filter-holder material Stainless steel Filter-holder color Gray Filter-holder handle Plastic material Controls Controls type Number of buttons Number of buttons Buttons, Lever 4 6 Technical Features...