Instruction Manual
Page 1
... date of the original purchase, SMEG USA, Inc. ("SMEG") will repair or replace, at its option, any part of the refrigerator which fails in normal home use. All the other than the intended purpose or if used commercially/industrially. 5) Incorrect electric current, voltage or supply. 6) Improper setting of any control. 7) Loss of food due to spoilage. 8) Replacement of house fuses or resetting of circuit breakers. 9) Damage caused...
... date of the original purchase, SMEG USA, Inc. ("SMEG") will repair or replace, at its option, any part of the refrigerator which fails in normal home use. All the other than the intended purpose or if used commercially/industrially. 5) Incorrect electric current, voltage or supply. 6) Improper setting of any control. 7) Loss of food due to spoilage. 8) Replacement of house fuses or resetting of circuit breakers. 9) Damage caused...
Instruction Manual
Page 2
... in remote locations. CALL THE DEALER FROM WHOM YOUR APPLIANCE WAS PURCHASED OR; - In Alaska, the warranty excludes the cost of incidental or consequential damages. This warranty gives you specific legal rights, and you may also have other warranties, whether express, implied or statutory. To know what your legal rights are void if the original serial number has...
... in remote locations. CALL THE DEALER FROM WHOM YOUR APPLIANCE WAS PURCHASED OR; - In Alaska, the warranty excludes the cost of incidental or consequential damages. This warranty gives you specific legal rights, and you may also have other warranties, whether express, implied or statutory. To know what your legal rights are void if the original serial number has...
Instruction Manual 1
Page 1
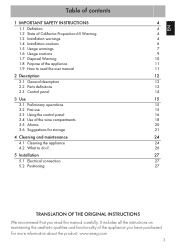
... 2.3 Control panel 14 3 Use 15 3.1 Preliminary operations 15 3.2 First use 15 3.3 Using the control panel 16 3.4 Use of the appliance you read this manual carefully. It includes all the instructions on maintaining the aesthetic qualities and functionality of the wine compartments 18 3.5 Alarms 20 3.6 Suggestions for storage 21 4 Cleaning and maintenance 24 4.1 Cleaning the appliance 24 4.2 What to do if... 26 5 Installation 27 5.1 Electrical connection...
... 2.3 Control panel 14 3 Use 15 3.1 Preliminary operations 15 3.2 First use 15 3.3 Using the control panel 16 3.4 Use of the appliance you read this manual carefully. It includes all the instructions on maintaining the aesthetic qualities and functionality of the wine compartments 18 3.5 Alarms 20 3.6 Suggestions for storage 21 4 Cleaning and maintenance 24 4.1 Cleaning the appliance 24 4.2 What to do if... 26 5 Installation 27 5.1 Electrical connection...

Instruction Manual 1
Page 3
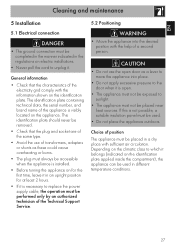
...install in direct sunlight or near heat sources. • The appliance must be placed in a dry place with sufficient air circulation. • Insert the plug into a grounded 3-pin socket. • Do not remove the ground pin. • Do not use an adapter. • Do not use an extension cord. • Observe all current codes... from the power supply in case of malfunction, maintenance, or during cleaning. • Before any intervention on the appliance (installation, maintenance, positioning, or movement), always wear personal protective equipment. • Before carrying out any work on the ...
...install in direct sunlight or near heat sources. • The appliance must be placed in a dry place with sufficient air circulation. • Insert the plug into a grounded 3-pin socket. • Do not remove the ground pin. • Do not use an adapter. • Do not use an extension cord. • Observe all current codes... from the power supply in case of malfunction, maintenance, or during cleaning. • Before any intervention on the appliance (installation, maintenance, positioning, or movement), always wear personal protective equipment. • Before carrying out any work on the ...

Instruction Manual 1
Page 4
... the power cord. • Do not damage or perforate refrigerant pipes. • DO NOT MODIFY THE APPLIANCE. • Do not attempt to repair the appliance yourself or without the intervention of a qualified technician. • Qualified personnel should carry out the installation and servicing in compliance with existing regulations. 6 Clean only with hot water. 1.4 Installation cautions CAUTION • Install the...
... the power cord. • Do not damage or perforate refrigerant pipes. • DO NOT MODIFY THE APPLIANCE. • Do not attempt to repair the appliance yourself or without the intervention of a qualified technician. • Qualified personnel should carry out the installation and servicing in compliance with existing regulations. 6 Clean only with hot water. 1.4 Installation cautions CAUTION • Install the...

Instruction Manual 1
Page 5
... instructed regarding the use of the appliance by children without supervision. • Do not climb, hang on shelves or stand on the terminal board must be left alone or unattended in the regulations on electric installations. • Use cables that are resistant to temperatures of at least 195°F. • The tightening torque of the screws of the power supply wires...
... instructed regarding the use of the appliance by children without supervision. • Do not climb, hang on shelves or stand on the terminal board must be left alone or unattended in the regulations on electric installations. • Use cables that are resistant to temperatures of at least 195°F. • The tightening torque of the screws of the power supply wires...
Instruction Manual 1
Page 6
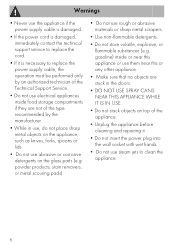
... Do not use abrasive or corrosive detergents on top of the appliance. • Unplug the appliance before cleaning and repairing it is necessary to clean the appliance. 8 powder products, stain removers, or metal scouring pads). • Do not use rough or ...use the appliance if the power supply cable is damaged. • If the power cord is damaged, immediately contact the technical support service to replace the cord. • If it . • Do not insert the power plug into the wall socket with wet hands. • Do not use steam jets to replace the power supply cable, the operation...
... Do not use abrasive or corrosive detergents on top of the appliance. • Unplug the appliance before cleaning and repairing it is necessary to clean the appliance. 8 powder products, stain removers, or metal scouring pads). • Do not use rough or ...use the appliance if the power supply cable is damaged. • If the power cord is damaged, immediately contact the technical support service to replace the cord. • If it . • Do not insert the power plug into the wall socket with wet hands. • Do not use steam jets to replace the power supply cable, the operation...

Instruction Manual 1
Page 7
...• Do not strike or apply too much force on any glass surface. • Do not use the handle to lift or move this unit. • Do not apply excessive pressure to the door when it is open. • Do not insert sharp metal objects (knives and utensils) into the ...slots. • Organic, acidic, and essential oils can corrode plastic surfaces and gaskets if they are left in contact for a long time. • DO NOT USE THE APPLIANCE TO COOL A ROOM UNDER ANY CIRCUMSTANCES. • Bottles with water...
...• Do not strike or apply too much force on any glass surface. • Do not use the handle to lift or move this unit. • Do not apply excessive pressure to the door when it is open. • Do not insert sharp metal objects (knives and utensils) into the ...slots. • Organic, acidic, and essential oils can corrode plastic surfaces and gaskets if they are left in contact for a long time. • DO NOT USE THE APPLIANCE TO COOL A ROOM UNDER ANY CIRCUMSTANCES. • Bottles with water...
Instruction Manual 1
Page 9
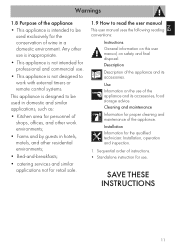
... appliance is not designed to work with external timers or remote control systems. This appliance is intended to read the user manual This user manual uses the following reading conventions: Instructions General information on this user manual, on the use . Cleaning and maintenance Information for the qualified technician: Installation, operation and inspection. 1. Use Information on safety and final disposal. Installation Information for proper cleaning and...
... appliance is not designed to work with external timers or remote control systems. This appliance is intended to read the user manual This user manual uses the following reading conventions: Instructions General information on this user manual, on the use . Cleaning and maintenance Information for the qualified technician: Installation, operation and inspection. 1. Use Information on safety and final disposal. Installation Information for proper cleaning and...

Instruction Manual 1
Page 11
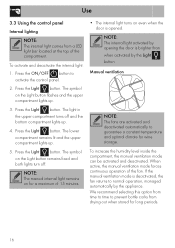
... than traditional wine bottles. Activated carbon filters Allow the conservation of the compartment from the surrounding environment. EN Description 2.2 Parts definitions Internal lighting The internal light of the appliance turns on when the door is opened (maximum brightness) or when the Light button on support surfaces. Fans (not visible) Useful for the lower compartment is pressed. NOTE: During fan operation electricity consumption increases. Door Equipped with a gasket and magnet...
... than traditional wine bottles. Activated carbon filters Allow the conservation of the compartment from the surrounding environment. EN Description 2.2 Parts definitions Internal lighting The internal light of the appliance turns on when the door is opened (maximum brightness) or when the Light button on support surfaces. Fans (not visible) Useful for the lower compartment is pressed. NOTE: During fan operation electricity consumption increases. Door Equipped with a gasket and magnet...
Instruction Manual 1
Page 12
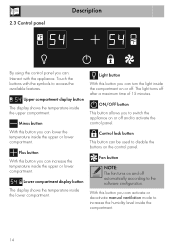
.... Control lock button This button can be used to increase the humidity level inside the compartment. 14 Fan button NOTE: The fan turns on or off after a maximum time of 15 minutes. Upper compartment display button The display shows the temperature inside the lower compartment. Light button With this button you can: Interact with the symbols to activate the control panel. With this button you can activate or deactivate manual ventilation...
.... Control lock button This button can be used to increase the humidity level inside the compartment. 14 Fan button NOTE: The fan turns on or off after a maximum time of 15 minutes. Upper compartment display button The display shows the temperature inside the lower compartment. Light button With this button you can: Interact with the symbols to activate the control panel. With this button you can activate or deactivate manual ventilation...
Instruction Manual 1
Page 13
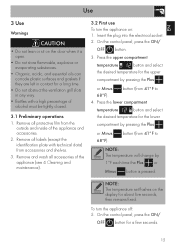
... gaskets if they are left in contact for the upper compartment by pressing the Plus or Minus button (from the outside and inside of the appliance and accessories. 2. EN Use 3 Use Warnings CAUTION • Do not lean or sit on the door when it is pressed. To turn the appliance on the display for a few seconds. 15 On the control panel...
... gaskets if they are left in contact for the upper compartment by pressing the Plus or Minus button (from the outside and inside of the appliance and accessories. 2. EN Use 3 Use Warnings CAUTION • Do not lean or sit on the door when it is pressed. To turn the appliance on the display for a few seconds. 15 On the control panel...
Instruction Manual 1
Page 14
... manual internal light remains on the Light button flashes and the upper compartment lights up . 5. We recommend selecting this option from time to time to activate the control panel. 2. To activate and deactivate the internal light: 1. Press the ON/OFF button to prevent bottle corks from a LED light bar located at the top of the fan. The symbol on for wine storage. The light in the upper compartment turns off...
... manual internal light remains on the Light button flashes and the upper compartment lights up . 5. We recommend selecting this option from time to time to activate the control panel. 2. To activate and deactivate the internal light: 1. Press the ON/OFF button to prevent bottle corks from a LED light bar located at the top of the fan. The symbol on for wine storage. The light in the upper compartment turns off...
Instruction Manual 1
Page 15
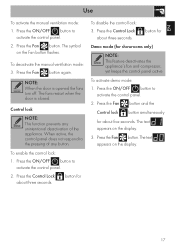
The symbol on the display. 3. To deactivate the manual ventilation mode: 3. The fans restart when the door is opened the fans turn off. To enable the control lock: 1. Press the Fan button. button for Demo mode (for To disable the control lock: 3. The text appears on the Fan button flashes. Press the Fan button. Press the ON/OFF button to activate the control panel. 2. Press the Control Lock about three seconds...
The symbol on the display. 3. To deactivate the manual ventilation mode: 3. The fans restart when the door is opened the fans turn off. To enable the control lock: 1. Press the Fan button. button for Demo mode (for To disable the control lock: 3. The text appears on the Fan button flashes. Press the Fan button. Press the ON/OFF button to activate the control panel. 2. Press the Control Lock about three seconds...
Instruction Manual 1
Page 17
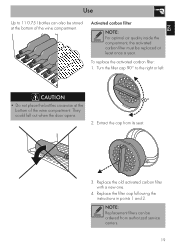
... from authorized service centers. 19 Replace the filter cap following the instructions in points 1 and 2. EN Use Up to the right or left. NOTE: Replacement filters can also be stored at least once a year. They could fall out when the door opens. 2. Turn the filter cap 90° to 11 0.75 l bottles can be replaced at the bottom of the wine compartment. To replace the activated...
... from authorized service centers. 19 Replace the filter cap following the instructions in points 1 and 2. EN Use Up to the right or left. NOTE: Replacement filters can also be stored at least once a year. They could fall out when the door opens. 2. Turn the filter cap 90° to 11 0.75 l bottles can be replaced at the bottom of the wine compartment. To replace the activated...
Instruction Manual 1
Page 18
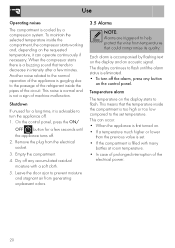
... the wine from the electrical socket. 3. Remove the plug from temperatures that the temperature inside the compartment, the compressor starts working and, depending on the requested temperature, it is cooled by flashing text on the display starts to the normal operation of the circuit. Use Operating noises The compartment is advisable to turn off the alarm, press any accumulated residual moisture with many bottles at room temperature. •...
... the wine from the electrical socket. 3. Remove the plug from temperatures that the temperature inside the compartment, the compressor starts working and, depending on the requested temperature, it is cooled by flashing text on the display starts to the normal operation of the circuit. Use Operating noises The compartment is advisable to turn off the alarm, press any accumulated residual moisture with many bottles at room temperature. •...

Instruction Manual 1
Page 19
... 60 seconds after having turned off the alarm using any button on the control panel and wait until the temperature returns to the detriment of its characteristics, an acidic drink should generally be preserved at a slightly lower temperature than 60 seconds. • Close the door. Serving a white wine at a higher temperature so as white wines. Door open for storage White wines Compared to make them...
... 60 seconds after having turned off the alarm using any button on the control panel and wait until the temperature returns to the detriment of its characteristics, an acidic drink should generally be preserved at a slightly lower temperature than 60 seconds. • Close the door. Serving a white wine at a higher temperature so as white wines. Door open for storage White wines Compared to make them...

Instruction Manual 1
Page 24
... is turned on the display is too high. • The door is opened too often or for too long. • Warm bottles were placed inside the wine compartment: • The drain opening or channel is dirty or damaged. The wine compartment does not get cold enough: • The temperature on . Cleaning and maintenance 4.2 What to do if... The compressor runs too...
... is turned on the display is too high. • The door is opened too often or for too long. • Warm bottles were placed inside the wine compartment: • The drain opening or channel is dirty or damaged. The wine compartment does not get cold enough: • The temperature on . Cleaning and maintenance 4.2 What to do if... The compressor runs too...
Instruction Manual 1
Page 25
... when the appliance is installed. • Before turning the appliance on for the first time, leave it in an upright position for at least 2 hours. • If it is necessary to replace the power supply cable, the operation must be completed in the manner indicated in the regulations on electric installations. • Never pull the cord to unplug it...
... when the appliance is installed. • Before turning the appliance on for the first time, leave it in an upright position for at least 2 hours. • If it is necessary to replace the power supply cable, the operation must be completed in the manner indicated in the regulations on electric installations. • Never pull the cord to unplug it...

Instruction Manual 1
Page 26
...dimensions of the condenser, follow the installation instructions. (front view) (side view) 28 N = Normal ST = Subtropical - If this is not possible, a suitable insulation panel must not be used. • Be sure to place the appliance where there is sufficient space for opening the door and for removing the inner shelves and drawers. • To ensure correct cooling...;F SN = Subnormal - T = Tropical • Position the appliance at a distance of 1 ¼" (3 cm) from electric or gas cookers and at least 12" (30 cm) from +50°F to +100°F SN-T from combustion heating ...
...dimensions of the condenser, follow the installation instructions. (front view) (side view) 28 N = Normal ST = Subtropical - If this is not possible, a suitable insulation panel must not be used. • Be sure to place the appliance where there is sufficient space for opening the door and for removing the inner shelves and drawers. • To ensure correct cooling...;F SN = Subnormal - T = Tropical • Position the appliance at a distance of 1 ¼" (3 cm) from electric or gas cookers and at least 12" (30 cm) from +50°F to +100°F SN-T from combustion heating ...
