Instruction Manual
Page 3
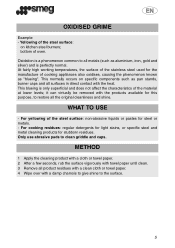
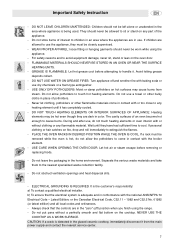
... clean. 3 Remove all the original cleanliness and shine. OXIDISED GRIME Example: - At fairly high working temperatures, the surface of the stainless steel used for this purpose, to the surface. 5 This normally occurs on kitchen steel burners; WHAT TO USE - For yellowing of oven. bottom of the steel surface: non-abrasive liquids or pastes for stubborn residues. Only use abrasive pads to all surfaces in direct...
... clean. 3 Remove all the original cleanliness and shine. OXIDISED GRIME Example: - At fairly high working temperatures, the surface of the stainless steel used for this purpose, to the surface. 5 This normally occurs on kitchen steel burners; WHAT TO USE - For yellowing of oven. bottom of the steel surface: non-abrasive liquids or pastes for stubborn residues. Only use abrasive pads to all surfaces in direct...
Instruction Manual
Page 4
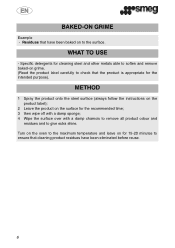
Specific detergents for cleaning steel and other metals able to soften and remove baked-on grime. (Read the product label carefully to check that cleaning product residues have been baked on to the surface. Turn on the oven to give extra shine. METHOD 1 Spray the product onto the steel surface (always follow the instructions... recommended time; 3 then wipe off with a damp sponge; 4 Wipe the surface over with a damp chamois to remove all product odour and residues and to the maximum temperature and leave on the surface for the intended purpose). BAKED-ON GRIME Example - WHAT TO USE -...
Specific detergents for cleaning steel and other metals able to soften and remove baked-on grime. (Read the product label carefully to check that cleaning product residues have been baked on to the surface. Turn on the oven to give extra shine. METHOD 1 Spray the product onto the steel surface (always follow the instructions... recommended time; 3 then wipe off with a damp sponge; 4 Wipe the surface over with a damp chamois to remove all product odour and residues and to the maximum temperature and leave on the surface for the intended purpose). BAKED-ON GRIME Example - WHAT TO USE -...
Owners Manual
Page 1
... not store or use any other appliance. Installation and service must be performed by a qualified installer, service agency or the gas supplier. DESCRIPTION OF CONTROLS 10 4. COOKING HINTS ...19 9. Follow the gas supplier's instructions. • lf you cannot reach your gas supplier, call your building. • Immediately call the fire department. - IMPORTANT SAFETY INSTRUCTIONS 4 2. BEFORE USING YOUR RANGE FOR THE FIRST TIME 6 3. USE OF THE COOKTOP ...14 6.
... not store or use any other appliance. Installation and service must be performed by a qualified installer, service agency or the gas supplier. DESCRIPTION OF CONTROLS 10 4. COOKING HINTS ...19 9. Follow the gas supplier's instructions. • lf you cannot reach your gas supplier, call your building. • Immediately call the fire department. - IMPORTANT SAFETY INSTRUCTIONS 4 2. BEFORE USING YOUR RANGE FOR THE FIRST TIME 6 3. USE OF THE COOKTOP ...14 6.

Owners Manual
Page 3
... LP/Propane gas, see instructions in the Gas Conversion Kit provided in your gas supplier from a neighbor's phone. Follow the gas supplier's instructions. • lf you cannot reach your gas supplier, call your building. • Immediately call the fire department. A proper gas supply connection must be available. See "Gas supply requirements". 5 To convert to switch on any appliances. • Do not touch any electrical switches. • Do not use with Natural gas. Installation and service...
... LP/Propane gas, see instructions in the Gas Conversion Kit provided in your gas supplier from a neighbor's phone. Follow the gas supplier's instructions. • lf you cannot reach your gas supplier, call your building. • Immediately call the fire department. A proper gas supply connection must be available. See "Gas supply requirements". 5 To convert to switch on any appliances. • Do not touch any electrical switches. • Do not use with Natural gas. Installation and service...
Owners Manual
Page 5
... sufficient time to handle it from steam. USE CARE WHEN OPENING THE OVEN DOOR: Let hot air or steam escape before attempting to cool. It is hot, do not touch heating elements or oven interior with or too close to use dry chemicals or a foam-type extinguisher. - GREASE IS FLAMMABLE: Let hot grease cool before removing or replacing foods. - Wait until it has completely cooled. - Important Safety Instruction...
... sufficient time to handle it from steam. USE CARE WHEN OPENING THE OVEN DOOR: Let hot air or steam escape before attempting to cool. It is hot, do not touch heating elements or oven interior with or too close to use dry chemicals or a foam-type extinguisher. - GREASE IS FLAMMABLE: Let hot grease cool before removing or replacing foods. - Wait until it has completely cooled. - Important Safety Instruction...
Owners Manual
Page 6
... power supply before using high power settings. This appliance can catch fire and plastic items may cause the containers to the utensil manufacturer's directions. - Some fabric are turned off the heating zone and clean around it . Never leave the range unattended when using any part of this appliance, unless specifically recommended in an electrical shock or fire hazard, or obstruct the flow of glass, heat-proof glass ceramic, ceramic...
... power supply before using high power settings. This appliance can catch fire and plastic items may cause the containers to the utensil manufacturer's directions. - Some fabric are turned off the heating zone and clean around it . Never leave the range unattended when using any part of this appliance, unless specifically recommended in an electrical shock or fire hazard, or obstruct the flow of glass, heat-proof glass ceramic, ceramic...

Owners Manual
Page 7
.... The Model and Serial numbers are on the broiler for the same amount of this booklet. BEFORE BAKING OR BROILING, the oven and broiler should anchor the rear of the range to 30 minutes, then turn on Page 2 of time. 9 Turn the oven on to 450°F (230°C) for 20 to the ground. - Remove all packaging materials and temporary labels from the oven and cooktop. - THE...
.... The Model and Serial numbers are on the broiler for the same amount of this booklet. BEFORE BAKING OR BROILING, the oven and broiler should anchor the rear of the range to 30 minutes, then turn on Page 2 of time. 9 Turn the oven on to 450°F (230°C) for 20 to the ground. - Remove all packaging materials and temporary labels from the oven and cooktop. - THE...
Owners Manual
Page 8
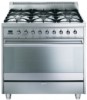
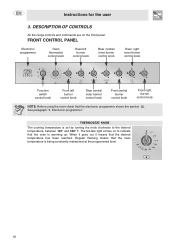
Instructions for the user 3. THERMOSTAT KNOB The cooking temperature is set by turning the knob clockwise to indicate that the oven temperature is warming up. The tell-tale light comes on the front panel. When it goes out it means that the electronic programmer shows the symbol . FRONT CONTROL PANEL Electronic programmer Oven thermostat control knob Rear left burner control knob Rear central inner burner control knob Rear right inner burner control knob Function switch control knob Front left burner control knob Rear central outer burner control knob Front central...
Instructions for the user 3. THERMOSTAT KNOB The cooking temperature is set by turning the knob clockwise to indicate that the oven temperature is warming up. The tell-tale light comes on the front panel. When it goes out it means that the electronic programmer shows the symbol . FRONT CONTROL PANEL Electronic programmer Oven thermostat control knob Rear left burner control knob Rear central inner burner control knob Rear right inner burner control knob Function switch control knob Front left burner control knob Rear central outer burner control knob Front central...
Owners Manual
Page 9
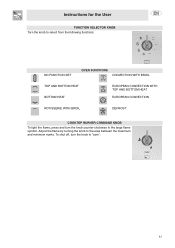
Adjust the flame by turning the knob to the large flame symbol. Instructions for the User FUNCTION SELECTOR KNOB Turn the knob to select from the following functions: NO FUNCTION SET OVEN FUNCTIONS CONVECTION WITH BROIL TOP AND BOTTOM HEAT BOTTOM HEAT EUROPEAN CONVECTION WITH TOP AND BOTTOM HEAT EUROPEAN CONVECTION ROTISSERIE WITH BROIL DEFROST COOKTOP BURNER COMMAND KNOB To light the flame, press and turn the knob to "zero". 11 To shut off, turn the knob counter-clockwise to the area between the maximum and minimum marks.
Adjust the flame by turning the knob to the large flame symbol. Instructions for the User FUNCTION SELECTOR KNOB Turn the knob to select from the following functions: NO FUNCTION SET OVEN FUNCTIONS CONVECTION WITH BROIL TOP AND BOTTOM HEAT BOTTOM HEAT EUROPEAN CONVECTION WITH TOP AND BOTTOM HEAT EUROPEAN CONVECTION ROTISSERIE WITH BROIL DEFROST COOKTOP BURNER COMMAND KNOB To light the flame, press and turn the knob to "zero". 11 To shut off, turn the knob counter-clockwise to the area between the maximum and minimum marks.

Owners Manual
Page 10
... pressure. ELECTRONIC PROGRAMMER LIST OF FUNCTIONS MINUTE-COUNTER BUTTON COOKING TIME BUTTON END-OF-COOKING BUTTON DECREASE BUTTON INCREASE BUTTON 4.1 Setting the time When the oven is released, the count of the programmed cooking duration will start and the display will show the current time together with the symbols A and . 4.3 Automatic cooking This function switches the oven on the function and set the temperature required. 4.2 Semiautomatic cooking This function only switches the oven off in the electricity supply...
... pressure. ELECTRONIC PROGRAMMER LIST OF FUNCTIONS MINUTE-COUNTER BUTTON COOKING TIME BUTTON END-OF-COOKING BUTTON DECREASE BUTTON INCREASE BUTTON 4.1 Setting the time When the oven is released, the count of the programmed cooking duration will start and the display will show the current time together with the symbols A and . 4.3 Automatic cooking This function switches the oven on the function and set the temperature required. 4.2 Semiautomatic cooking This function only switches the oven off in the electricity supply...
Owners Manual
Page 11
... timer function with the symbol, indicating that the oven is released the programmed count will start to reach the value . After the buzzer is stopped, the display will interpret deletion of the duration as an ordinary timer. NOTE: After making the setting, to showing the current time together with the buzzer in manual mode. 4.5 Minute Minder The programmer can also be used...
... timer function with the symbol, indicating that the oven is released the programmed count will start to reach the value . After the buzzer is stopped, the display will interpret deletion of the duration as an ordinary timer. NOTE: After making the setting, to showing the current time together with the buzzer in manual mode. 4.5 Minute Minder The programmer can also be used...
Owners Manual
Page 12
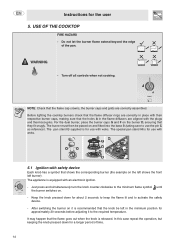
... the minimum flame symbol until the burner switches on the burner D, ensuring that the flame cap crowns, the burner caps and grids are correctly in place with an electronic ignition. - The special pan stand H is for the user 5. WARNING - Instructions for use with woks. USE OF THE COOKTOP FIRE HAZARD - Before lighting the cooktop burners check that the flame diffuser rings are correctly assembled. The pan stand B supplied is for...
... the minimum flame symbol until the burner switches on the burner D, ensuring that the flame cap crowns, the burner caps and grids are correctly in place with an electronic ignition. - The special pan stand H is for the user 5. WARNING - Instructions for use with woks. USE OF THE COOKTOP FIRE HAZARD - Before lighting the cooktop burners check that the flame diffuser rings are correctly assembled. The pan stand B supplied is for...
Owners Manual
Page 13
... setting. . If the flame accidentally goes out, turn the knob to re-light the burner. NOTE: Before turning a control knob, place filled cookware on a hot surface cooking area, element or surface burner. 5.3 Diameter of a prolonged power outage you can manually lite the surface burners. To avoid burns or damage to prevent the flame from extending beyond the sides (see paragraph "5.3 Diameter of the cooktop. For better use of the burners and lower gas consumption, use...
... setting. . If the flame accidentally goes out, turn the knob to re-light the burner. NOTE: Before turning a control knob, place filled cookware on a hot surface cooking area, element or surface burner. 5.3 Diameter of a prolonged power outage you can manually lite the surface burners. To avoid burns or damage to prevent the flame from extending beyond the sides (see paragraph "5.3 Diameter of the cooktop. For better use of the burners and lower gas consumption, use...
Owners Manual
Page 15
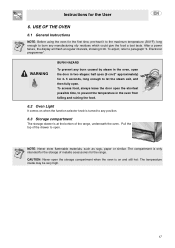
... which could give the food a bad taste. CAUTION: Never open . NOTE: Never store flammable materials, such as rags, paper or similar. USE OF THE OVEN 6.1 General Instructions NOTE: Before using the oven for the User 6. To adjust, refer to open the door in the oven from falling and ruining the food. 6.2 Oven Light It comes on and still hot: The temperature inside may be very high. 17
... which could give the food a bad taste. CAUTION: Never open . NOTE: Never store flammable materials, such as rags, paper or similar. USE OF THE OVEN 6.1 General Instructions NOTE: Before using the oven for the User 6. To adjust, refer to open the door in the oven from falling and ruining the food. 6.2 Oven Light It comes on and still hot: The temperature inside may be very high. 17
Owners Manual
Page 16
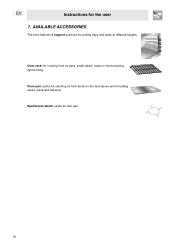
Instructions for putting trays and racks at different heights. Oven rack: for cooking food on the rack above and for baking cakes, pizza and desserts Special pan stand: useful for catching oil from foods on pans, small cakes, roasts or food requiring light broiling. Oven pan: useful for wok pan. 18 AVAILABLE ACCESSORIES The oven features 4 support positions for the user 7.
Instructions for putting trays and racks at different heights. Oven rack: for cooking food on the rack above and for baking cakes, pizza and desserts Special pan stand: useful for catching oil from foods on pans, small cakes, roasts or food requiring light broiling. Oven pan: useful for wok pan. 18 AVAILABLE ACCESSORIES The oven features 4 support positions for the user 7.
Owners Manual
Page 17
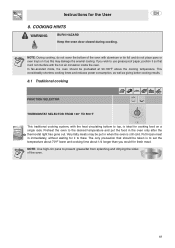
... BURN HAZARD Keep the oven door closed during cooking. This considerably shortens cooking times and reduces power consumption, as well as this may be preheated at 90-100°F above the cooking temperature. In fan-assisted mode, the oven should be taken is to set the temperature about 70°F lower and cooking time about 1/4 longer than you wish to use greaseproof paper, position it so that...
... BURN HAZARD Keep the oven door closed during cooking. This considerably shortens cooking times and reduces power consumption, as well as this may be preheated at 90-100°F above the cooking temperature. In fan-assisted mode, the oven should be taken is to set the temperature about 70°F lower and cooking time about 1/4 longer than you wish to use greaseproof paper, position it so that...

Owners Manual
Page 18
... long as the cooking temperature of foods. NOTE: Make sure that the oven door is the same. 8.3 Broiler FUNCTION SELECTOR THERMOSTAT SELECTOR AT MAXIMUM AND DOOR CLOSED Permits rapid browning of the different foods is closed during cooking. 20 Instructions for cooking on several levels, including different types of food. You are advised to place the pan in accordance with the size of the...
... long as the cooking temperature of foods. NOTE: Make sure that the oven door is the same. 8.3 Broiler FUNCTION SELECTOR THERMOSTAT SELECTOR AT MAXIMUM AND DOOR CLOSED Permits rapid browning of the different foods is closed during cooking. 20 Instructions for cooking on several levels, including different types of food. You are advised to place the pan in accordance with the size of the...
Owners Manual
Page 22
... tool if necessary. Remove any intervention, disconnect the power supply of cooktop components 9.2.1 Racks Extract the racks. NOTE: Replace the burner caps on the burners. If left to remove incrustation. Never wash these components in the dishwasher. 9.2.3 The plugs and thermocouples For best performance, the ignition plugs and thermocouples must always be cleaned regularly after use. Let it should be kept very clean. Use normal non-abrasive...
... tool if necessary. Remove any intervention, disconnect the power supply of cooktop components 9.2.1 Racks Extract the racks. NOTE: Replace the burner caps on the burners. If left to remove incrustation. Never wash these components in the dishwasher. 9.2.3 The plugs and thermocouples For best performance, the ignition plugs and thermocouples must always be cleaned regularly after use. Let it should be kept very clean. Use normal non-abrasive...

Owners Manual
Page 23
Instructions for cleaning the door glazing (e.g. NOTE: Do not use rough or abrasive materials or sharp metal scrapers to clean the oven's glass doors since they may scratch the surface and cause the glass to clean. Take out all the removable parts. Use absorbent kitchen paper towels to shatter. 25 Rinse and dry. 9.4 Oven door glass The oven door glass should always be cleaned regularly. Clean the oven rack and side guides with a damp sponge using regular detergent...
Instructions for cleaning the door glazing (e.g. NOTE: Do not use rough or abrasive materials or sharp metal scrapers to clean the oven's glass doors since they may scratch the surface and cause the glass to clean. Take out all the removable parts. Use absorbent kitchen paper towels to shatter. 25 Rinse and dry. 9.4 Oven door glass The oven door glass should always be cleaned regularly. Clean the oven rack and side guides with a damp sponge using regular detergent...

Owners Manual
Page 24
... can also be used. 10.3 Oven door seal To permit thorough cleaning of the oven, the seal may be carried out by twisting counter-clockwise, replace bulb B with a similar bulb. Refit the cover A. To replace, fit the hinges into the holes from its seat. This operation must be removed. Instructions for the user 10.EXTRAORDINARY MAINTENANCE The oven may require extraordinary maintenance or replacement of parts subject to...
... can also be used. 10.3 Oven door seal To permit thorough cleaning of the oven, the seal may be carried out by twisting counter-clockwise, replace bulb B with a similar bulb. Refit the cover A. To replace, fit the hinges into the holes from its seat. This operation must be removed. Instructions for the user 10.EXTRAORDINARY MAINTENANCE The oven may require extraordinary maintenance or replacement of parts subject to...


