Instruction Manual
Page 3
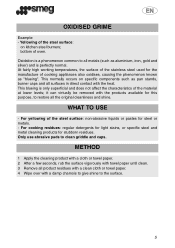
... paper. 2 After a few seconds, rub the surface vigorously with towel paper until clean. 3 Remove all surfaces in direct contact with the heat. For yellowing of oven. This normally occurs on kitchen steel burners; For cooking residues: regular detergents for light stains, or specific steel and metal cleaning products for steel or...
... paper. 2 After a few seconds, rub the surface vigorously with towel paper until clean. 3 Remove all surfaces in direct contact with the heat. For yellowing of oven. This normally occurs on kitchen steel burners; For cooking residues: regular detergents for light stains, or specific steel and metal cleaning products for steel or...
Instruction Manual
Page 4
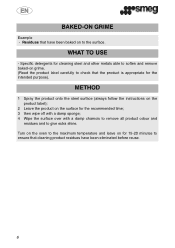
... grime. (Read the product label carefully to check that the product is appropriate for 15-20 minutes to the maximum temperature and leave on the oven to ensure that have been eliminated before reuse. 6 BAKED-ON GRIME Example - Turn on for the intended purpose). METHOD 1 Spray the product onto the steel...
... grime. (Read the product label carefully to check that the product is appropriate for 15-20 minutes to the maximum temperature and leave on the oven to ensure that have been eliminated before reuse. 6 BAKED-ON GRIME Example - Turn on for the intended purpose). METHOD 1 Spray the product onto the steel...
Owners Manual
Page 1
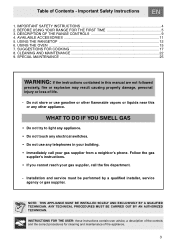
... causing property damage, personal injury or loss of life. - Installation and service must be performed by a qualified installer, service agency or gas supplier. USING THE OVEN ...15 7. INSTRUCTIONS FOR THE USER: these instructions contain user advice, a description of the controls and the correct procedures for cleaning and maintenance of Contents - IMPORTANT...
... causing property damage, personal injury or loss of life. - Installation and service must be performed by a qualified installer, service agency or gas supplier. USING THE OVEN ...15 7. INSTRUCTIONS FOR THE USER: these instructions contain user advice, a description of the controls and the correct procedures for cleaning and maintenance of Contents - IMPORTANT...
Owners Manual
Page 3
... brackets, they should never be closely supervised by a qualified installer. - Do not store items of the range to sit or stand on the oven door. 5 WEAR PROPER APPAREL: loose-fitting or hanging garments should anchor the rear of interest to your appliance, never sit, stand or lean ...on any part of the oven. - WARNING - NOTE: This range is moved. For safety reasons and to avoid damage to children in place and engaged. - If children are...
... brackets, they should never be closely supervised by a qualified installer. - Do not store items of the range to sit or stand on the oven door. 5 WEAR PROPER APPAREL: loose-fitting or hanging garments should anchor the rear of interest to your appliance, never sit, stand or lean ...on any part of the oven. - WARNING - NOTE: This range is moved. For safety reasons and to avoid damage to children in place and engaged. - If children are...
Owners Manual
Page 4
... broiler burner. - Or the CANADIAN ELECTRICAL CODE, C22.11 - 1982 and C22.2 No. 01982 - FLAMMABLE MATERIALS SHOULD NEVER BE STORED IN THE OVEN OR NEAR THE SURFACE BURNERS. - Do not allow deposits of waste and take them to extinguish the flames. - Sort the various items of grease ...burners. DO NOT USE WATER ON GREASE FIRES: Turn the appliance off ) position when the range is adequate and in the oven. - The oven cavity can be removed while the oven is the customer's responsibility: a) To contact a qualified electrician. It is hot, do not touch areas near burners or ...
... broiler burner. - Or the CANADIAN ELECTRICAL CODE, C22.11 - 1982 and C22.2 No. 01982 - FLAMMABLE MATERIALS SHOULD NEVER BE STORED IN THE OVEN OR NEAR THE SURFACE BURNERS. - Do not allow deposits of waste and take them to extinguish the flames. - Sort the various items of grease ...burners. DO NOT USE WATER ON GREASE FIRES: Turn the appliance off ) position when the range is adequate and in the oven. - The oven cavity can be removed while the oven is the customer's responsibility: a) To contact a qualified electrician. It is hot, do not touch areas near burners or ...
Owners Manual
Page 5
...benzene, formaldehyde, carbon monoxide, toluene, and soot. 7 Foil is engaged. Never leave the range unattended when using any part of the oven. - Not all range surface burners controls are extremely flammable and could , in this appliance unless specifically recommended in the presence of pressure ...low-level exposure to cause cancer, birth defects or other reproductive harm. DO NOT USE ALUMINUM FOIL TO LINE ANY PART OF THE OVEN OR RANGETOP. Be sure all types of cleaning product. Important Safety Instructions - IMPORTANT: After a spill or boilover, turn off and...
...benzene, formaldehyde, carbon monoxide, toluene, and soot. 7 Foil is engaged. Never leave the range unattended when using any part of the oven. - Not all range surface burners controls are extremely flammable and could , in this appliance unless specifically recommended in the presence of pressure ...low-level exposure to cause cancer, birth defects or other reproductive harm. DO NOT USE ALUMINUM FOIL TO LINE ANY PART OF THE OVEN OR RANGETOP. Be sure all types of cleaning product. Important Safety Instructions - IMPORTANT: After a spill or boilover, turn off and...
Owners Manual
Page 6
...should anchor the rear of the range to burn off any dirt, oil or grease remaining from the oven and rangetop. - The wall-mounted brackets should anchor the sides of the range (primary system) or...NOT BE REMOVED. - Failure to children or adults. REFER TO THE INSTRUCTIONS INSIDE THE INSTALLATION MANUAL. - Turn the oven on and set to 450°F (230°C) for 20 to the ground. - A child or adult can...mounted brackets, they should anchor the rear of the range to 30 minutes, then turn on the oven door or drawer. - Make sure that the anti-tip device is re-engaged when the range is...
...should anchor the rear of the range to burn off any dirt, oil or grease remaining from the oven and rangetop. - The wall-mounted brackets should anchor the sides of the range (primary system) or...NOT BE REMOVED. - Failure to children or adults. REFER TO THE INSTRUCTIONS INSIDE THE INSTALLATION MANUAL. - Turn the oven on and set to 450°F (230°C) for 20 to the ground. - A child or adult can...mounted brackets, they should anchor the rear of the range to 30 minutes, then turn on the oven door or drawer. - Make sure that the anti-tip device is re-engaged when the range is...
Owners Manual
Page 7
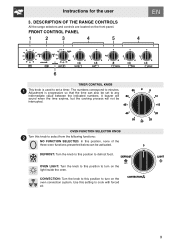
... is used to set to minutes. DESCRIPTION OF THE RANGE CONTROLS All the range selectors and controls are located on the oven convection system. OVEN FUNCTION SELECTOR KNOB Turn this setting to defrost food. Use this knob to turn on the front panel. DEFROST: Turn the knob to this... position, none of the three oven functions presented below can also be interrupted. OVEN LIGHT: Turn the knob to this position to select from the following functions: NO FUNCTION SELECTED: In this position to cook...
... is used to set to minutes. DESCRIPTION OF THE RANGE CONTROLS All the range selectors and controls are located on the oven convection system. OVEN FUNCTION SELECTOR KNOB Turn this setting to defrost food. Use this knob to turn on the front panel. DEFROST: Turn the knob to this... position, none of the three oven functions presented below can also be interrupted. OVEN LIGHT: Turn the knob to this position to select from the following functions: NO FUNCTION SELECTED: In this position to cook...
Owners Manual
Page 8
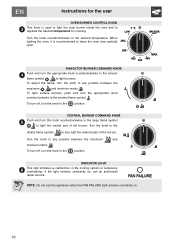
...the knob to the position. Instructions for cooking. Turn the knob to the double flame symbol to regulate the desired temperature for the user OVEN BURNER CONTROL KNOB This knob is recommended to light burners. INDICATOR LIGHT This light indicates a malfunction in the cooling system or temporary overheating... knob counterclockwise to the large flame symbol to light the central part of the burner. When lighting the oven, it is used to light the oven burner inside the oven and to also light the external part of the burner. CENTRAL BURNER COMMAND KNOB Push and turn the...
...the knob to the position. Instructions for cooking. Turn the knob to the double flame symbol to regulate the desired temperature for the user OVEN BURNER CONTROL KNOB This knob is recommended to light burners. INDICATOR LIGHT This light indicates a malfunction in the cooling system or temporary overheating... knob counterclockwise to the large flame symbol to light the central part of the burner. When lighting the oven, it is used to light the oven burner inside the oven and to also light the external part of the burner. CENTRAL BURNER COMMAND KNOB Push and turn the...
Owners Manual
Page 9
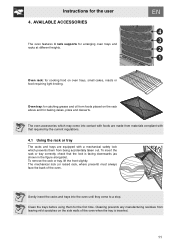
...or raised rack, where present) must always face the back of the oven when the tray is facing downwards (as shown in the figure alongside). Instructions for arranging oven trays and racks at different heights. The oven accessories which prevents them for baking cakes, pizza and desserts. Gently insert...regulations. 4.1 Using the rack or tray The racks and trays are made from being accidentally taken out. AVAILABLE ACCESSORIES The oven features 4 rack supports for the user 4. Cleaning prevents any manufacturing residues from foods placed on the rack above and for the first ...
...or raised rack, where present) must always face the back of the oven when the tray is facing downwards (as shown in the figure alongside). Instructions for arranging oven trays and racks at different heights. The oven accessories which prevents them for baking cakes, pizza and desserts. Gently insert...regulations. 4.1 Using the rack or tray The racks and trays are made from being accidentally taken out. AVAILABLE ACCESSORIES The oven features 4 rack supports for the user 4. Cleaning prevents any manufacturing residues from foods placed on the rack above and for the first ...
Owners Manual
Page 13
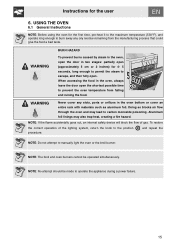
...internal safety device will block the flow of the lighting system, return the knob to burn away any slots, ports or orifices in the oven bottom or cover an entire rack with materials such as aluminum foil. NOTE: No attempt should be operated simultaneously. WARNING Never cover any oily...power failure. 15 BURN HAZARD WARNING To prevent burns caused by steam in the oven, open the door in the oven, always leave the door open . NOTE: The broil and oven burners cannot be made to prevent the oven temperature from the manufacturing process that could give the food a bad taste. USING...
...internal safety device will block the flow of the lighting system, return the knob to burn away any slots, ports or orifices in the oven bottom or cover an entire rack with materials such as aluminum foil. NOTE: No attempt should be operated simultaneously. WARNING Never cover any oily...power failure. 15 BURN HAZARD WARNING To prevent burns caused by steam in the oven, open the door in the oven, always leave the door open . NOTE: The broil and oven burners cannot be made to prevent the oven temperature from the manufacturing process that could give the food a bad taste. USING...
Owners Manual
Page 14
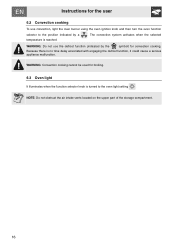
... convection cooking. The convection system activates when the selected WARNING: Do not use convection, light the oven burner using the oven ignition knob and then turn the oven function selector to the oven light setting . Instructions for the user 6.2 Convection cooking To use the defrost function (indicated by ...the symbol) for broiling. 6.3 Oven light It illuminates when the function selector knob is turned to the position indicated by a temperature is no time delay ...
... convection cooking. The convection system activates when the selected WARNING: Do not use convection, light the oven burner using the oven ignition knob and then turn the oven function selector to the oven light setting . Instructions for the user 6.2 Convection cooking To use the defrost function (indicated by ...the symbol) for broiling. 6.3 Oven light It illuminates when the function selector knob is turned to the position indicated by a temperature is no time delay ...
Owners Manual
Page 15
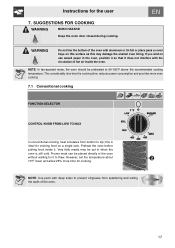
... CONTROL KNOB FROM LOW TO MAX In conventional cooking, heat circulates from splattering and soiling the walls of the oven. 17 SUGGESTIONS FOR COOKING WARNING BURN HAZARD Keep the oven door closed during cooking. WARNING Do not line the bottom of hot air inside it. NOTE: In fan... waiting for cooking food on this surface as this is still cold. Preheat the oven before putting food inside the oven. NOTE: Use pans with aluminum or tin foil or place pans or oven trays on a single rack. Instructions for cooking. This considerably shortens the cooking time, reduces ...
... CONTROL KNOB FROM LOW TO MAX In conventional cooking, heat circulates from splattering and soiling the walls of the oven. 17 SUGGESTIONS FOR COOKING WARNING BURN HAZARD Keep the oven door closed during cooking. WARNING Do not line the bottom of hot air inside it. NOTE: In fan... waiting for cooking food on this surface as this is still cold. Preheat the oven before putting food inside the oven. NOTE: Use pans with aluminum or tin foil or place pans or oven trays on a single rack. Instructions for cooking. This considerably shortens the cooking time, reduces ...
Owners Manual
Page 16
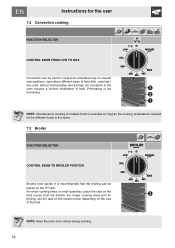
.... For longer cooking times and for broiling, put the rack on the lowest runner depending on the 3rd rack. Air circulation in the oven ensures a uniform distribution of multiple foods is possible as long as the cooking temperature required for the different foods is the same. 7.3... Broiler FUNCTION SELECTOR CONTROL KNOB TO BROILER POSITION Browns food rapidly. It is not necessary. NOTE: Keep the oven door closed during cooking. 18 NOTE: Simultaneous cooking of heat. Instructions for the user 7.2 Convection cooking FUNCTION SELECTOR CONTROL KNOB FROM LOW TO...
.... For longer cooking times and for broiling, put the rack on the lowest runner depending on the 3rd rack. Air circulation in the oven ensures a uniform distribution of multiple foods is possible as long as the cooking temperature required for the different foods is the same. 7.3... Broiler FUNCTION SELECTOR CONTROL KNOB TO BROILER POSITION Browns food rapidly. It is not necessary. NOTE: Keep the oven door closed during cooking. 18 NOTE: Simultaneous cooking of heat. Instructions for the user 7.2 Convection cooking FUNCTION SELECTOR CONTROL KNOB FROM LOW TO...
Owners Manual
Page 17
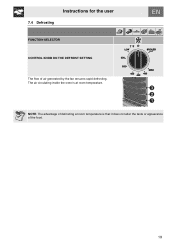
NOTE: The advantage of defrosting at room temperature is at room temperature. The air circulating inside the oven is that it does not alter the taste or appearance of air generated by the fan ensures rapid defrosting. Instructions for the user 7.4 Defrosting FUNCTION SELECTOR CONTROL KNOB ON THE DEFROST SETTING The flow of the food. 19
NOTE: The advantage of defrosting at room temperature is at room temperature. The air circulating inside the oven is that it does not alter the taste or appearance of air generated by the fan ensures rapid defrosting. Instructions for the user 7.4 Defrosting FUNCTION SELECTOR CONTROL KNOB ON THE DEFROST SETTING The flow of the food. 19

Owners Manual
Page 18
CONVENTIONAL COOKING RACK POSITION TEMPERATURE (°F) TIME IN MINUTES (*) FIRST COURSES LASAGNA OVEN-BAKED PASTA 2 - 3 2 - 3 390 - 410 410 - 450 50 - 60 40 MEAT VEAL ROAST BEEF ROAST PORK ROAST CHICKEN DUCK 2 2 1 - 2 1 - 2 2 350 - 390 410 - 470 350 - 400 350 - ... - 20 60 - 70 30 - 40 FRUIT CAKE ANGEL CAKE APPLE CAKE RICE CAKE 1 - 2 1 - 2 1 1 340 - 400 320 400 360 20 - 30 60 60 60 - 70 (*) = PREHEATED OVEN PORK CHOPS FILLET OF PORK FILLET OF BEEF LIVER VEAL CHOPS HALF CHICKEN SAUSAGES MEATBALLS FILLET OF FISH TOAST BROIL RACK POSITION 3 3 3 3 3 3 3 3 3 3 TIME IN MINUTES...
CONVENTIONAL COOKING RACK POSITION TEMPERATURE (°F) TIME IN MINUTES (*) FIRST COURSES LASAGNA OVEN-BAKED PASTA 2 - 3 2 - 3 390 - 410 410 - 450 50 - 60 40 MEAT VEAL ROAST BEEF ROAST PORK ROAST CHICKEN DUCK 2 2 1 - 2 1 - 2 2 350 - 390 410 - 470 350 - 400 350 - ... - 20 60 - 70 30 - 40 FRUIT CAKE ANGEL CAKE APPLE CAKE RICE CAKE 1 - 2 1 - 2 1 1 340 - 400 320 400 360 20 - 30 60 60 60 - 70 (*) = PREHEATED OVEN PORK CHOPS FILLET OF PORK FILLET OF BEEF LIVER VEAL CHOPS HALF CHICKEN SAUSAGES MEATBALLS FILLET OF FISH TOAST BROIL RACK POSITION 3 3 3 3 3 3 3 3 3 3 TIME IN MINUTES...

Owners Manual
Page 19
Instructions for the user FIRST COURSES LASAGNA OVEN-BAKED PASTA MEAT VEAL ROAST PORK ROAST BEEF ROAST FILLET OF BEEF ROASTED LAMB BEEF ROAST ROASTED CHICKEN ROASTED DUCK ROASTED TURKEY BREAST ROASTED RABBIT ... PASTRIES RICE CAKE APPLE CAKE ANGEL CAKE 2 - 3 2 - 3 1 - 2 2 - 3 2 - 3 2 - 3 2 - 3 2 - 3 2 - 3 2 - 3 410 - 450 370 - 400 430 - 470 300 - 340 340 - 380 320 - 340 340 - 360 340 360 320 (*) = PREHEATED OVEN TIME IN MINUTES (*) 40 - 50 25 - 30 65 - 90 70 - 100 65 - 90 35 - 45 100 - 130 40 - 45 70 - 80 100 - 120 90 80...
Instructions for the user FIRST COURSES LASAGNA OVEN-BAKED PASTA MEAT VEAL ROAST PORK ROAST BEEF ROAST FILLET OF BEEF ROASTED LAMB BEEF ROAST ROASTED CHICKEN ROASTED DUCK ROASTED TURKEY BREAST ROASTED RABBIT ... PASTRIES RICE CAKE APPLE CAKE ANGEL CAKE 2 - 3 2 - 3 1 - 2 2 - 3 2 - 3 2 - 3 2 - 3 2 - 3 2 - 3 2 - 3 410 - 450 370 - 400 430 - 470 300 - 340 340 - 380 320 - 340 340 - 360 340 360 320 (*) = PREHEATED OVEN TIME IN MINUTES (*) 40 - 50 25 - 30 65 - 90 70 - 100 65 - 90 35 - 45 100 - 130 40 - 45 70 - 80 100 - 120 90 80...
Owners Manual
Page 20
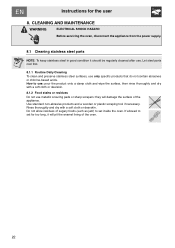
...pads or sharp scrapers: they will pit the enamel lining of the appliance. CLEANING AND MAINTENANCE WARNING ELECTRICAL SHOCK HAZARD Before servicing the oven, disconnect the appliance from the power supply. 8.1 Cleaning stainless steel parts NOTE: To keep stainless steel in good condition it will ...damage the surface of the oven. 22 Instructions for too long, it should be regularly cleaned after use. Let steel parts cool first. 8.1.1 Routine Daily Cleaning To ...
...pads or sharp scrapers: they will pit the enamel lining of the appliance. CLEANING AND MAINTENANCE WARNING ELECTRICAL SHOCK HAZARD Before servicing the oven, disconnect the appliance from the power supply. 8.1 Cleaning stainless steel parts NOTE: To keep stainless steel in good condition it will ...damage the surface of the oven. 22 Instructions for too long, it should be regularly cleaned after use. Let steel parts cool first. 8.1.1 Routine Daily Cleaning To ...

Owners Manual
Page 22
... use abrasive or corrosive cleaners to clean the oven door glass as they can be removed (see paragraph "9.1 Removing the door"). 8.4 Oven door glass The oven door glass should be kept clean. In case of your appliance, the oven should always be cleaned regularly. Use absorbent kitchen...• Take out all removable parts. • Clean the oven racks with a damp sponge using a standard household detergent. powders, spray-on oven cleaners, stain removers or steel wool pads). Instructions for the user 8.3 Cleaning the oven NOTE: To ensure the longevity of tough spots, clean with...
... use abrasive or corrosive cleaners to clean the oven door glass as they can be removed (see paragraph "9.1 Removing the door"). 8.4 Oven door glass The oven door glass should be kept clean. In case of your appliance, the oven should always be cleaned regularly. Use absorbent kitchen...• Take out all removable parts. • Clean the oven racks with a damp sponge using a standard household detergent. powders, spray-on oven cleaners, stain removers or steel wool pads). Instructions for the user 8.3 Cleaning the oven NOTE: To ensure the longevity of tough spots, clean with...
Owners Manual
Page 23
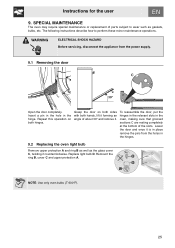
... the power supply. 9.1 Removing the door Open the door completely. Lower the door and once it is in the hinges. 9.2 Replacing the oven light bulb Remove upper protection A and ring B as well as gaskets, bulbs, etc. The following instructions describe how to wear such as... both hands, lift it forming an angle of parts subject to perform these minor maintenance operations. NOTE: Use only oven bulbs (T 600°F). 25 SPECIAL MAINTENANCE The oven may require special maintenance or replacement of about 30° and remove it counterclockwise. Remount the ring B, cover C...
... the power supply. 9.1 Removing the door Open the door completely. Lower the door and once it is in the hinges. 9.2 Replacing the oven light bulb Remove upper protection A and ring B as well as gaskets, bulbs, etc. The following instructions describe how to wear such as... both hands, lift it forming an angle of parts subject to perform these minor maintenance operations. NOTE: Use only oven bulbs (T 600°F). 25 SPECIAL MAINTENANCE The oven may require special maintenance or replacement of about 30° and remove it counterclockwise. Remount the ring B, cover C...