Instruction Manual 2
Page 2
...electric outlet immediately after using and before using a sewing machine, basic safety precautions should be performed by an authorized service representative. 2 SINGER is used as described in this sewing machine if it has a damaged cord or plug, if it on cord. Always unplug this... cause the needle to lift and move the machine. 18. Do not unplug by the manufacturer as threading needle, changing needle, threading bobbin, or changing presser foot. 15. Switch the sewing machine off position (symbol "O"), then remove plug from all instructions before cleaning. Use...
...electric outlet immediately after using and before using a sewing machine, basic safety precautions should be performed by an authorized service representative. 2 SINGER is used as described in this sewing machine if it has a damaged cord or plug, if it on cord. Always unplug this... cause the needle to lift and move the machine. 18. Do not unplug by the manufacturer as threading needle, changing needle, threading bobbin, or changing presser foot. 15. Switch the sewing machine off position (symbol "O"), then remove plug from all instructions before cleaning. Use...

Instruction Manual 2
Page 3
... OF EACH PATTERN 92 G. TO RECALL THE SELECTED PATTERNS 94 H. REVERSE STITCH BUTTON 20 C. L.C.D. SCROLL BUTTONS 26 K. REMOVING THE BOBBIN 28 B. START AND END OF SEAM 36 B. MIRROR/REVERSE STITCH 44 D. SELECTING DECORATIVE & LETTER STITCH (selecting mode 88 B. TO... 50 B. CONTENTS IMPORTANT SAFETY INSTRUCTIONS 2 MODEL 9960 8 FOR EUROPEAN AND SIMILAR TERRITORIES: ...... 8 MAIN PARTS 10 ACCESSORIES 12 DUST COVER 12 EXTENSION TABLE 14 a. WINDING THE BOBBIN 28 D. START/STOP BUTTON 20 B. INSERTING THE BOBBIN 30 THREADING THE MACHINE 32 A. THREAD CUTTER ...
... OF EACH PATTERN 92 G. TO RECALL THE SELECTED PATTERNS 94 H. REVERSE STITCH BUTTON 20 C. L.C.D. SCROLL BUTTONS 26 K. REMOVING THE BOBBIN 28 B. START AND END OF SEAM 36 B. MIRROR/REVERSE STITCH 44 D. SELECTING DECORATIVE & LETTER STITCH (selecting mode 88 B. TO... 50 B. CONTENTS IMPORTANT SAFETY INSTRUCTIONS 2 MODEL 9960 8 FOR EUROPEAN AND SIMILAR TERRITORIES: ...... 8 MAIN PARTS 10 ACCESSORIES 12 DUST COVER 12 EXTENSION TABLE 14 a. WINDING THE BOBBIN 28 D. START/STOP BUTTON 20 B. INSERTING THE BOBBIN 30 THREADING THE MACHINE 32 A. THREAD CUTTER ...
Instruction Manual 2
Page 10
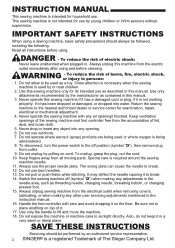
Contrast Control 53.Auxiliary Spool Holder 54.Bobbin Winder Shaft 55.Bobbin Winder Stop 10 1 2 3 4 15 5 6 7 8 9 16 10 11 17 12 18 13 14 25 26 27 28 29 19 20 21 22 23 24 30 38 ... Foot Thumb Screw 35.Presser Foot Holder 36.Presser Foot 37.Fabric Feed Dogs 38.Needle Clamp Screw 39.Needle Thread Guide 40. Needle 41.Bobbin Cover Latch 42.Bobbin Cover 43.Needle Plate 44.Drop Feed Lever 45.Pattern Chart 46.Thread Guide 47.Thread Guide 48...
Contrast Control 53.Auxiliary Spool Holder 54.Bobbin Winder Shaft 55.Bobbin Winder Stop 10 1 2 3 4 15 5 6 7 8 9 16 10 11 17 12 18 13 14 25 26 27 28 29 19 20 21 22 23 24 30 38 ... Foot Thumb Screw 35.Presser Foot Holder 36.Presser Foot 37.Fabric Feed Dogs 38.Needle Clamp Screw 39.Needle Thread Guide 40. Needle 41.Bobbin Cover Latch 42.Bobbin Cover 43.Needle Plate 44.Drop Feed Lever 45.Pattern Chart 46.Thread Guide 47.Thread Guide 48...

Instruction Manual 2
Page 12
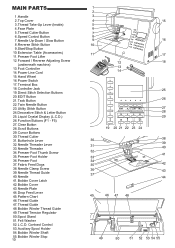
.... The manual may be used. Seam Ripper 4. Thread Cap (On the machine when delivered) 9. Satin Foot (B) 17. Buttonhole Foot (F) and Under Plate 24. Needle Pack 2. 4 Bobbins ( 1 is not to be stored in the compartment of this machine. (See Page 22) 1 7 10 13 16 18 23 8 11 14 19 45 6 9 12 15...
.... The manual may be used. Seam Ripper 4. Thread Cap (On the machine when delivered) 9. Satin Foot (B) 17. Buttonhole Foot (F) and Under Plate 24. Needle Pack 2. 4 Bobbins ( 1 is not to be stored in the compartment of this machine. (See Page 22) 1 7 10 13 16 18 23 8 11 14 19 45 6 9 12 15...

Instruction Manual 2
Page 20
... not threaded, machine will be deactivated. D. E. NEEDLE UP-DOWN / SLOW BUTTON Pressing this button when the machine is lifted. (Except for bobbin winding) 20 REVERSE STITCH BUTTON The machine will start running when start when the presser foot is stopped, will change the needle position from down...up to the left. PRESSER FOOT LIFTER The presser foot is not lowered. START/STOP BUTTON The machine will continue to sew or bobbin winding. The machine will return. Pressing this button again, the speed will rotate slowly at low speed while this button limits the maximum ...
... not threaded, machine will be deactivated. D. E. NEEDLE UP-DOWN / SLOW BUTTON Pressing this button when the machine is lifted. (Except for bobbin winding) 20 REVERSE STITCH BUTTON The machine will start running when start when the presser foot is stopped, will change the needle position from down...up to the left. PRESSER FOOT LIFTER The presser foot is not lowered. START/STOP BUTTON The machine will continue to sew or bobbin winding. The machine will return. Pressing this button again, the speed will rotate slowly at low speed while this button limits the maximum ...

Instruction Manual 2
Page 22
... used. 1. H.THREAD CUTTER Use this button after sewing. 2. THREAD CUTTER BUTTON Press this cutter if the thread cutter button is to cut the upper and bobbin threads. Pull fabric and cut both threads automatically. HAND WHEEL By turning the hand wheel, the needle will cut threads. Stand up through the needle...
... used. 1. H.THREAD CUTTER Use this button after sewing. 2. THREAD CUTTER BUTTON Press this cutter if the thread cutter button is to cut the upper and bobbin threads. Pull fabric and cut both threads automatically. HAND WHEEL By turning the hand wheel, the needle will cut threads. Stand up through the needle...
Instruction Manual 2
Page 28
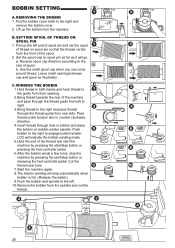
... hook thread to the size of thread on spool pin as far as illustration. BOBBIN SETTING A. Pull the bobbin cover latch to engage bobbin winder. C. Cut the thread near hole. 7.Start the machine again. 8.The bobbin winding will go. SETTING SPOOL OF THREAD ON SPOOL PIN 1. Lift up the...the spool. 2. Use the small spool cap when you use cross wound thread. Pull up the bobbin from rear side. REMOVING THE BOBBIN 1. Push bobbin to the right to the right and remove the bobbin cover. 2. Leave small opening . 2.Bring thread towards the rear of the machine and pass ...
... hook thread to the size of thread on spool pin as far as illustration. BOBBIN SETTING A. Pull the bobbin cover latch to engage bobbin winder. C. Cut the thread near hole. 7.Start the machine again. 8.The bobbin winding will go. SETTING SPOOL OF THREAD ON SPOOL PIN 1. Lift up the...the spool. 2. Use the small spool cap when you use cross wound thread. Pull up the bobbin from rear side. REMOVING THE BOBBIN 1. Push bobbin to the right to the right and remove the bobbin cover. 2. Leave small opening . 2.Bring thread towards the rear of the machine and pass ...

Instruction Manual 2
Page 30
INSERTING THE BOBBIN 1. Place bobbin into notch (a) while holding the bobbin. 3. Pull thread toward the left tab into the hole in needle plate and push the right side of notch (a). 4. Replace the bobbin cover. Draw thread into bobbin holder with the thread unwinding counter clockwise. 2. Set the left and along the inside of spring (b) until it clicks into notch (c) making sure that thread does not slip out of bobbin cover down until it slips into place. NOTE: Use Singer bobbins only. 30 D. Pull thread out about 10 cm (4 inches).
INSERTING THE BOBBIN 1. Place bobbin into notch (a) while holding the bobbin. 3. Pull thread toward the left tab into the hole in needle plate and push the right side of notch (a). 4. Replace the bobbin cover. Draw thread into bobbin holder with the thread unwinding counter clockwise. 2. Set the left and along the inside of spring (b) until it clicks into notch (c) making sure that thread does not slip out of bobbin cover down until it slips into place. NOTE: Use Singer bobbins only. 30 D. Pull thread out about 10 cm (4 inches).
Instruction Manual 2
Page 34
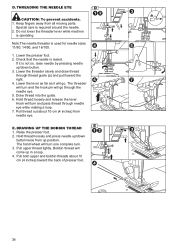
...not lower the threader lever while machine is raised. THREADING THE NEEDLE EYE CAUTION: To prevent accidents. 1. Check that the needle is operating. Bobbin thread will come up /down button twice from all moving parts. Lower the lever as far as it is not so, raise needle by ...up/down button. 3. Lower the threader slowly and draw thread through thread guide (a) and pull toward the back of presser foot. 34 DRAWING UP THE BOBBIN THREAD 1. Pull thread out about 10 cm (4 inches) toward the right. 4. The hand wheel will turn one complete turn and the hook pin will...
...not lower the threader lever while machine is raised. THREADING THE NEEDLE EYE CAUTION: To prevent accidents. 1. Check that the needle is operating. Bobbin thread will come up /down button twice from all moving parts. Lower the lever as far as it is not so, raise needle by ...up/down button. 3. Lower the threader slowly and draw thread through thread guide (a) and pull toward the back of presser foot. 34 DRAWING UP THE BOBBIN THREAD 1. Pull thread out about 10 cm (4 inches) toward the right. 4. The hand wheel will turn one complete turn and the hook pin will...
Instruction Manual 2
Page 36
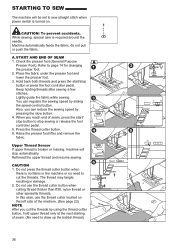
... the start /stop automatically. Rethread the upper thread and resume sewing. Hold back both threads and press the start / stop button to draw up the bobbin thread) 36 Do not press the thread cutter button when there is broken or missing, machine will be set to page 14 for changing the...
... the start /stop automatically. Rethread the upper thread and resume sewing. Hold back both threads and press the start / stop button to draw up the bobbin thread) 36 Do not press the thread cutter button when there is broken or missing, machine will be set to page 14 for changing the...

Instruction Manual 2
Page 42
... function F3 (AUTO) or clear "C" button, thread tension will appear on the top side of fabric. You can change tension while sewing. Bobbin thread will return to page 30 for straight stitch is set . D. Refer to pre-set. A. When thread tension is increased. If your... 2. When another stitch pattern is set tension number is selected. Preset thread tension Upper and bobbin thread will obtain a nicer stitch when upper thread appears on the top side, check the bobbin to page 32 for correct threading. 2. B. C. Thread tension except for straight stitch Thread ...
... function F3 (AUTO) or clear "C" button, thread tension will appear on the top side of fabric. You can change tension while sewing. Bobbin thread will return to page 30 for straight stitch is set . D. Refer to pre-set. A. When thread tension is increased. If your... 2. When another stitch pattern is set tension number is selected. Preset thread tension Upper and bobbin thread will obtain a nicer stitch when upper thread appears on the top side, check the bobbin to page 32 for correct threading. 2. B. C. Thread tension except for straight stitch Thread ...
Instruction Manual 2
Page 50
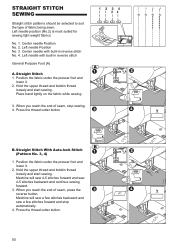
... loosely and start sewing. Position the fabric under the presser foot and lower it . 2. Hold the upper thread and bobbin thread loosely and start sewing. B. When you reach the end of seam, stop automatically. 4. Straight Stitch With Auto-lock Stitch (Pattern No. 3, 4) 1. Left needle Position ...
... loosely and start sewing. Position the fabric under the presser foot and lower it . 2. Hold the upper thread and bobbin thread loosely and start sewing. B. When you reach the end of seam, stop automatically. 4. Straight Stitch With Auto-lock Stitch (Pattern No. 3, 4) 1. Left needle Position ...

Instruction Manual 2
Page 52
.... 5 Basting Stitch Darning/Embroidery Foot A. Lower the feed dogs by moving the drop feed lever to the left to sew. Hold the upper thread and bobbin thread loosely and start to right so that it is selected, thread tension will make one stitch. 4. Repeat this pattern is fitted into the presser...
.... 5 Basting Stitch Darning/Embroidery Foot A. Lower the feed dogs by moving the drop feed lever to the left to sew. Hold the upper thread and bobbin thread loosely and start to right so that it is selected, thread tension will make one stitch. 4. Repeat this pattern is fitted into the presser...

Instruction Manual 2
Page 54
... position. A. When you desire. Good for Stretch fabrics No.17 Ric-rac Stitch General Purpose Foot (A) We recommend that matches the fabric on the bobbin. Joining the pieces of fabric Join the pieces of presser foot holder and set the space as denims. No. 6 Straight Stretch Stitch No. 7.... Use quilting bar to maximum. Place thread that contrasts to ravel and knit fabrics as well as joining durable fabrics such as you sew, bobbin thread will give the appearance of a traditional hand quilting stitch. 54 Quilting Sew three layers of the fabric on top. C. Set the upper...
... position. A. When you desire. Good for Stretch fabrics No.17 Ric-rac Stitch General Purpose Foot (A) We recommend that matches the fabric on the bobbin. Joining the pieces of fabric Join the pieces of presser foot holder and set the space as denims. No. 6 Straight Stretch Stitch No. 7.... Use quilting bar to maximum. Place thread that contrasts to ravel and knit fabrics as well as joining durable fabrics such as you sew, bobbin thread will give the appearance of a traditional hand quilting stitch. 54 Quilting Sew three layers of the fabric on top. C. Set the upper...
Instruction Manual 2
Page 68
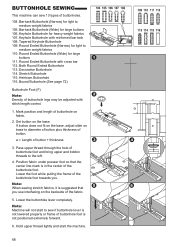
... frame of buttonhole foot is in the center of button. BUTTONHOLE SEWING This machine can sew 13 types of buttonhole foot and bring upper and bobbin threads to medium weight fabrics 110. Pass upper thread through the hole of buttonholes. 104. Note: When sewing stretch fabrics, it is suggested that the...
... frame of buttonhole foot is in the center of button. BUTTONHOLE SEWING This machine can sew 13 types of buttonhole foot and bring upper and bobbin threads to medium weight fabrics 110. Pass upper thread through the hole of buttonholes. 104. Note: When sewing stretch fabrics, it is suggested that the...
Instruction Manual 2
Page 76
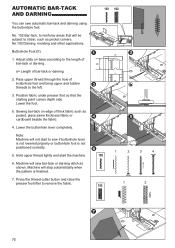
... such as pocket, place same thickness fabric or cardboard beside the fabric. 4. Pass upper thread through the hole of buttonhole foot and bring upper and bobbin threads to the length of bar-tack or darning 2. Position fabric under presser foot so that will stop automatically when the pattern is not positioned...
... such as pocket, place same thickness fabric or cardboard beside the fabric. 4. Pass upper thread through the hole of buttonhole foot and bring upper and bobbin threads to the length of bar-tack or darning 2. Position fabric under presser foot so that will stop automatically when the pattern is not positioned...
Instruction Manual 2
Page 78
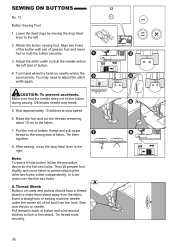
SEWING ON BUTTONS No. 13 Button Sewing Foot 1. Align two holes of the button with slot of fabric. Pull the end of bobbin thread and pull upper thread to the wrong side of presser foot and lower foot to back of button. 4. Note: To sew a 4-hole button, follow ...
SEWING ON BUTTONS No. 13 Button Sewing Foot 1. Align two holes of the button with slot of fabric. Pull the end of bobbin thread and pull upper thread to the wrong side of presser foot and lower foot to back of button. 4. Note: To sew a 4-hole button, follow ...
Instruction Manual 2
Page 100
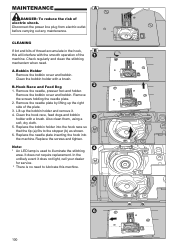
...foot and holder. It does not require replacement. CLEANING If lint and bits of the machine. Clean the hook race, feed dogs and bobbin holder with the smooth operation of thread accumulate in the hook, this machine. 100 Check regularly and clean the stitching mechanism when need to...hook into the hook race so that the tip (a) fits to illuminate the stitching area. Replace the screws and tighten. Clean the bobbin holder with a brush. B. Replace the bobbin holder into the machine. In the unlikely event it . 4. MAINTENANCE DANGER: To reduce the risk of the plate. 3. Lift...
...foot and holder. It does not require replacement. CLEANING If lint and bits of the machine. Clean the hook race, feed dogs and bobbin holder with the smooth operation of thread accumulate in the hook, this machine. 100 Check regularly and clean the stitching mechanism when need to...hook into the hook race so that the tip (a) fits to illuminate the stitching area. Replace the screws and tighten. Clean the bobbin holder with a brush. B. Replace the bobbin holder into the machine. In the unlikely event it . 4. MAINTENANCE DANGER: To reduce the risk of the plate. 3. Lift...
Instruction Manual 2
Page 102
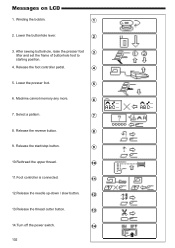
... buttonhole, raise the presser foot 3 lifter and set the frame of buttonhole foot to starting position. 4. Select a pattern. 7 8. Machine cannot memory any more. 6 7. Winding the bobbin. 1 2.
... buttonhole, raise the presser foot 3 lifter and set the frame of buttonhole foot to starting position. 4. Select a pattern. 7 8. Machine cannot memory any more. 6 7. Winding the bobbin. 1 2.

Instruction Manual 2
Page 104
... Machine runs Dirt or lint accumulated in the hook race and Remove the needle plate and 100 with difficulty feed dog. bobbin holder and clean the hook race and feed dog. Insert plug fully into electrical outlet. Turn on the switch. 18 Machine will ... not suitable for 16 fabric. (use stretch needle) Fabric puckers Machine not properly threaded. Regulate stitch length. 46 Lint and dust accumulated around bobbin. Needle inserted incorrectly. Lower the foot. 20 Buttonhole Sewing Mode; * Buttonhole lever is not suited for fabric being sewn. Re-thread machine....
... Machine runs Dirt or lint accumulated in the hook race and Remove the needle plate and 100 with difficulty feed dog. bobbin holder and clean the hook race and feed dog. Insert plug fully into electrical outlet. Turn on the switch. 18 Machine will ... not suitable for 16 fabric. (use stretch needle) Fabric puckers Machine not properly threaded. Regulate stitch length. 46 Lint and dust accumulated around bobbin. Needle inserted incorrectly. Lower the foot. 20 Buttonhole Sewing Mode; * Buttonhole lever is not suited for fabric being sewn. Re-thread machine....


