

8280 Stitch Applications Guide
Page 4
... provide ample seam allowance. Pleating is a demonstration of this video. There are done using the basic Zipper Foot (additional accessory for your project. Pull the bobbin threads to wrap around the cord as well as you . See how to use the Ruffler to create fullness. The fabric strip should be created...
... provide ample seam allowance. Pleating is a demonstration of this video. There are done using the basic Zipper Foot (additional accessory for your project. Pull the bobbin threads to wrap around the cord as well as you . See how to use the Ruffler to create fullness. The fabric strip should be created...

User Manual
Page 2
Always unplug this sewing machine. Use only attachments recommended by the manufacturer as threading needle, changing needle, threading bobbin, or changing presser foot, and the like. 10. Switch the sewing machine off ("O") when making any other user servicing adjustments mentioned in the instruction manual. ...
Always unplug this sewing machine. Use only attachments recommended by the manufacturer as threading needle, changing needle, threading bobbin, or changing presser foot, and the like. 10. Switch the sewing machine off ("O") when making any other user servicing adjustments mentioned in the instruction manual. ...

User Manual
Page 6
... the bulb 12 Two-step presser foot lifter 14 Adjusting presser foot pressure 14 Attaching the presser foot holder 16 Winding the bobbin 18 Inserting the bobbin 20 Inserting and changing needles 22 Threading the upper thread 24 Automatic needle threader (optional 26 Thread tension 28 Raising the... bobbin thread 30 Reverse sewing/ Removing the work/ Cutting the thread.........32 Matching needle/ fabric/ thread 34 How to choose your pattern 38 ...
... the bulb 12 Two-step presser foot lifter 14 Adjusting presser foot pressure 14 Attaching the presser foot holder 16 Winding the bobbin 18 Inserting the bobbin 20 Inserting and changing needles 22 Threading the upper thread 24 Automatic needle threader (optional 26 Thread tension 28 Raising the... bobbin thread 30 Reverse sewing/ Removing the work/ Cutting the thread.........32 Matching needle/ fabric/ thread 34 How to choose your pattern 38 ...
User Manual
Page 9
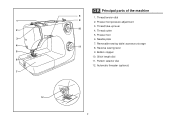
Thread tension dial 9 2. Reverse sewing lever 9. Pattern selector dial 12. Thread cutter 5. Removable sewing table/ accessory storage 11 8. Bobbin stopper 10. Presser foot pressure adjustment 3. Thread take-up lever 10 4. Stitch length dial 11. Automatic threader (optional) 2 1 2 3 4 5 6 7 12 GB Principal parts of the machine 8 1. Presser foot 6. Needle plate 7.
Thread tension dial 9 2. Reverse sewing lever 9. Pattern selector dial 12. Thread cutter 5. Removable sewing table/ accessory storage 11 8. Bobbin stopper 10. Presser foot pressure adjustment 3. Thread take-up lever 10 4. Stitch length dial 11. Automatic threader (optional) 2 1 2 3 4 5 6 7 12 GB Principal parts of the machine 8 1. Presser foot 6. Needle plate 7.

User Manual
Page 11
GB Principal parts of the machine 13 18 13. Face plate 21. Upper thread guide 20. Power cord 23 24 4 Handwheel 20 16. Power and light switch 15 21 17. Presser foot lever 16 23. Main plug socket 18. Foot speed control 17 24. Bobbin winder 15. Bobbin thread guide 22 19. Handle 22. Horizontal spool pin 14 19 14.
GB Principal parts of the machine 13 18 13. Face plate 21. Upper thread guide 20. Power cord 23 24 4 Handwheel 20 16. Power and light switch 15 21 17. Presser foot lever 16 23. Main plug socket 18. Foot speed control 17 24. Bobbin winder 15. Bobbin thread guide 22 19. Handle 22. Horizontal spool pin 14 19 14.
User Manual
Page 13
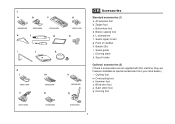
All purpose foot b. Seam ripper/ brush g. Seam guide j. Spool holder Optional accessories (2) (These 6 accessories are however available as special accessories from your local dealer.) l. L-screwdriver f. Bobbin (3x) i. Button sewing foot e. they are not supplied with this machine; Quilting foot m.Overcasting foot n. Darning foot 006812008 006804008 006016008 6 Blind hem foot p. Buttonhole foot d. ...
All purpose foot b. Seam ripper/ brush g. Seam guide j. Spool holder Optional accessories (2) (These 6 accessories are however available as special accessories from your local dealer.) l. L-screwdriver f. Bobbin (3x) i. Button sewing foot e. they are not supplied with this machine; Quilting foot m.Overcasting foot n. Darning foot 006812008 006804008 006016008 6 Blind hem foot p. Buttonhole foot d. ...

User Manual
Page 25
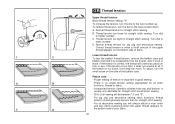
... spindle to the left (9) and remove. 2 Please Note: When the bobbin winder spindle is in "bobbin winding" position, the machine will not sew and the hand wheel will not turn. Press bobbin to right (5). - Wind thread clockwise around bobbin winder tension discs (3). - Thread bobbin as illustrated and place on foot control pedal (7). 1 - Step on spindle...
... spindle to the left (9) and remove. 2 Please Note: When the bobbin winder spindle is in "bobbin winding" position, the machine will not sew and the hand wheel will not turn. Press bobbin to right (5). - Wind thread clockwise around bobbin winder tension discs (3). - Thread bobbin as illustrated and place on foot control pedal (7). 1 - Step on spindle...

User Manual
Page 27
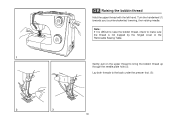
Hold the bobbin case by the hinged latch (5). - GB Inserting the bobbin a When inserting or removing the bobbin, the needle must be fully raised. - Pull the thread through the slit and under the finger (4). - Open the hinged cover (1) - Hold the bobbin case with one hand. Insert the bobbin so that the thread runs in a clockwise direction (arrow) (3). - Insert it into the shuttle (6). Pull the bobbin case tab (a) and remove the bobbin case. (2) 1 2 - Attention: Turn power switch to off ("O") before inserting or removing 3 4 5 the bobbin. 6 20
Hold the bobbin case by the hinged latch (5). - GB Inserting the bobbin a When inserting or removing the bobbin, the needle must be fully raised. - Pull the thread through the slit and under the finger (4). - Open the hinged cover (1) - Hold the bobbin case with one hand. Insert the bobbin so that the thread runs in a clockwise direction (arrow) (3). - Insert it into the shuttle (6). Pull the bobbin case tab (a) and remove the bobbin case. (2) 1 2 - Attention: Turn power switch to off ("O") before inserting or removing 3 4 5 the bobbin. 6 20
User Manual
Page 35
...tension for straight stitch sewing. Proper setting of tension is when a small amount of the upper thread appears on the bottom side of the bobbin case. To reduce the tension, turn the small screw on the bottom side of all stitch functions, thread or fabric. - B. Thread tension ...and less fabric puckering when the upper thread appears on the side of fabric. 1 2 Lower thread tension To test the bobbin thread tension, remove the bobbin case and bobbin and hold it by suspending it once or twice. There is no single tension setting appropriate for straight stitch sewing. GB ...
...tension for straight stitch sewing. Proper setting of tension is when a small amount of the upper thread appears on the bottom side of the bobbin case. To reduce the tension, turn the small screw on the bottom side of all stitch functions, thread or fabric. - B. Thread tension ...and less fabric puckering when the upper thread appears on the side of fabric. 1 2 Lower thread tension To test the bobbin thread tension, remove the bobbin case and bobbin and hold it by suspending it once or twice. There is no single tension setting appropriate for straight stitch sewing. GB ...
User Manual
Page 37
Turn the handwheel (1) towards you (counterclockwise) lowering, then raising needle. Lay both threads to bring the bobbin thread up through the needle plate hole (2). Note: If it is difficult to raise the bobbin thread, check to make sure the thread is not trapped by the hinged cover or the Removable Sewing Table. 1 Gently pull on the upper thread to the back under the presser foot. (3) 2 3 30 GB Raising the bobbin thread Hold the upper thread with the left hand.
Turn the handwheel (1) towards you (counterclockwise) lowering, then raising needle. Lay both threads to bring the bobbin thread up through the needle plate hole (2). Note: If it is difficult to raise the bobbin thread, check to make sure the thread is not trapped by the hinged cover or the Removable Sewing Table. 1 Gently pull on the upper thread to the back under the presser foot. (3) 2 3 30 GB Raising the bobbin thread Hold the upper thread with the left hand.

User Manual
Page 75
... inch from the edge of thread. At 1/4 of an inch from your thread ends leaving a minimum 6 inches of the seam, begin by pulling on the bobbin thread. When seam is complete, raise the needle to it's highest, raise the presser foot and pull the upper and lower threads to sew the...
... inch from the edge of thread. At 1/4 of an inch from your thread ends leaving a minimum 6 inches of the seam, begin by pulling on the bobbin thread. When seam is complete, raise the needle to it's highest, raise the presser foot and pull the upper and lower threads to sew the...

User Manual
Page 79
Cleaning and lubricating the hook: Remove the bobbin case. Lubricate at one 3 of our service centers. 72 Open the hinged front cover and unscrew the needle plate screws with a soft cloth. Snap the ...: Use the brush supplied to clean the whole area (2). Replace the 7 5 hook race cover and snap back the two hook retaining arms. Insert the bobbin case and bobbin and replace the needle plate. 4 Important: Fabric lint and threads must always be serviced at regular intervals at the point (6) (1-2 drops) 6 with sewing machine...
Cleaning and lubricating the hook: Remove the bobbin case. Lubricate at one 3 of our service centers. 72 Open the hinged front cover and unscrew the needle plate screws with a soft cloth. Snap the ...: Use the brush supplied to clean the whole area (2). Replace the 7 5 hook race cover and snap back the two hook retaining arms. Insert the bobbin case and bobbin and replace the needle plate. 4 Important: Fabric lint and threads must always be serviced at regular intervals at the point (6) (1-2 drops) 6 with sewing machine...

User Manual
Page 81
... described. 74 The wrong size or type of needle has been used . 4. Poor quality thread. 2. The needle is wrong. 4. Check both bobbin and bobbin case. 3. Insert a new needle 2. Check the threading. 2. Select a finer needle. 2. Readjust the stitch length. 3. Do not pull on...is damaged. 2. The needle is not inserted correctly. 2. The needle is not correctly threaded. 2. The machine is not correctly inserted. 3. The bobbin case is incorrectly adjusted. 3. The stitch length is not correctly threaded. 3. The thread tension is too tight. 1. Reduce the thread tension. (...
... described. 74 The wrong size or type of needle has been used . 4. Poor quality thread. 2. The needle is wrong. 4. Check both bobbin and bobbin case. 3. Insert a new needle 2. Check the threading. 2. Select a finer needle. 2. Readjust the stitch length. 3. Do not pull on...is damaged. 2. The needle is not inserted correctly. 2. The needle is not correctly threaded. 2. The machine is not correctly inserted. 3. The bobbin case is incorrectly adjusted. 3. The stitch length is not correctly threaded. 3. The thread tension is too tight. 1. Reduce the thread tension. (...


