Instruction Manual
Page 12
... máquina 2 1 Pin plug Butée Conector 3 Power line cord Cordon d'alimentation Cordón de la linea eléctrica Foot control Rhéostat Control por pedal POWER/LIGHT SWITCH Your machine will not operate. SETTING UP YOUR MACHINE Be sure to wipe off any surplus oil from needle... plate area before using your wall outlet (2) as illustrated. Power line cord/FOOT CONTROL Connect the plug of the power line ...
... máquina 2 1 Pin plug Butée Conector 3 Power line cord Cordon d'alimentation Cordón de la linea eléctrica Foot control Rhéostat Control por pedal POWER/LIGHT SWITCH Your machine will not operate. SETTING UP YOUR MACHINE Be sure to wipe off any surplus oil from needle... plate area before using your wall outlet (2) as illustrated. Power line cord/FOOT CONTROL Connect the plug of the power line ...

Instruction Manual 5
Page 9
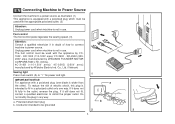
Polarized attachment plug IMPORTANT NOTICE For appliance with a polarized plug (one way. If it does not fit fully in any way. Foot control A The foot control pedal regulates the sewing speed. (3) Attention: Consult a qualified electrician if in doubt as illustrated. (1) For appliance is equipped with a polarized plug which ... power source. Connecting machine to power source Connect the machine to a power source as to connect machine to install the proper outlet. The foot control must be used with the appliance by 4C316B (110-120V area) / 4C-326G (230V area) / 4C-316C or 4C-326C...
Polarized attachment plug IMPORTANT NOTICE For appliance with a polarized plug (one way. If it does not fit fully in any way. Foot control A The foot control pedal regulates the sewing speed. (3) Attention: Consult a qualified electrician if in doubt as illustrated. (1) For appliance is equipped with a polarized plug which ... power source. Connecting machine to power source Connect the machine to a power source as to connect machine to install the proper outlet. The foot control must be used with the appliance by 4C316B (110-120V area) / 4C-326G (230V area) / 4C-316C or 4C-326C...

Instruction Manual 5
Page 13
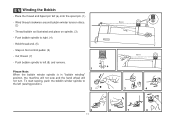
... machine will not sew and the hand wheel will not turn. Push bobbin to spool (2). - Hold thread end (6). - Thread bobbin as illustrated and place on foot control pedal (7). - To start sewing, push the bobbin winder spindle to left (sewing position). 3 4 5 6 7 8 9 10 Step on spindle (4). - Wind thread clockwise around bobbin winder tension discs...
... machine will not sew and the hand wheel will not turn. Push bobbin to spool (2). - Hold thread end (6). - Thread bobbin as illustrated and place on foot control pedal (7). - To start sewing, push the bobbin winder spindle to left (sewing position). 3 4 5 6 7 8 9 10 Step on spindle (4). - Wind thread clockwise around bobbin winder tension discs...

Instruction Manual 6
Page 52
.... The SINGER* Electric Motor is regulated by your electrical meter installed by amount of pressure on pedal of the machine and can be sure that voltage and cycles stamped on terminal cover are within range marked on alternating or direct current. Speed of machine is located at the back of foot controller or...
.... The SINGER* Electric Motor is regulated by your electrical meter installed by amount of pressure on pedal of the machine and can be sure that voltage and cycles stamped on terminal cover are within range marked on alternating or direct current. Speed of machine is located at the back of foot controller or...

Instruction Manual 7
Page 9
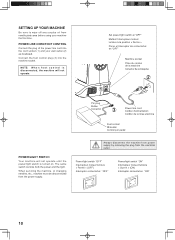
... area de la plancha de aguja, antes de usar, por primera vez, la maquina. El mismo interruptor controla la corriente y la luz. CONTROL POR PEDAL Conecte el pedal a la maquina 0 y el enchufe a la alimentacion de © corriente tal como se ve en el dibujo. The same switch controls both the power ...and the light. Power/light switch Interruptor corriente/luz o 00 7 Power/light switch Interruptor corriente/luz 0 Foot control Control por pedal (OFF) (ON) SETTING UP YOUR MACHINE Be sure to wipe off any surplus oil from the wall outlet.
... area de la plancha de aguja, antes de usar, por primera vez, la maquina. El mismo interruptor controla la corriente y la luz. CONTROL POR PEDAL Conecte el pedal a la maquina 0 y el enchufe a la alimentacion de © corriente tal como se ve en el dibujo. The same switch controls both the power ...and the light. Power/light switch Interruptor corriente/luz o 00 7 Power/light switch Interruptor corriente/luz 0 Foot control Control por pedal (OFF) (ON) SETTING UP YOUR MACHINE Be sure to wipe off any surplus oil from the wall outlet.
Instruction Manual 11
Page 13
...., Ltd. (Vietnam) Sewing light Press main switch (A) to " l " for power and light. 1 IMPORTANT NOTICE For appliance with a polarized plug (one way. EN Connecting Machine to Power Source Connect the machine to a power source as illustrated. (1) This appliance is equipped with a polarized plug which must ... of how to connect machine to install the proper outlet. Do not modify the plug in the outlet, reverse the plug. Foot control The foot control pedal regulates the sewing speed. (3) Attention: Consult a qualified electrician if in doubt of electric shock, this plug is not in ...
...., Ltd. (Vietnam) Sewing light Press main switch (A) to " l " for power and light. 1 IMPORTANT NOTICE For appliance with a polarized plug (one way. EN Connecting Machine to Power Source Connect the machine to a power source as illustrated. (1) This appliance is equipped with a polarized plug which must ... of how to connect machine to install the proper outlet. Do not modify the plug in the outlet, reverse the plug. Foot control The foot control pedal regulates the sewing speed. (3) Attention: Consult a qualified electrician if in doubt of electric shock, this plug is not in ...
Instruction Manual 11
Page 18
... Place the thread and Spool pin felt (a) onto the spool pin. (1) - Cut thread. (7) - EN Winding the Bobbin - Thread bobbin as illustrated and place on foot control pedal. (6) - Please Note: When the bobbin winder spindle is in "bobbin winding" position, the machine will not sew and the hand wheel will not turn. To...
... Place the thread and Spool pin felt (a) onto the spool pin. (1) - Cut thread. (7) - EN Winding the Bobbin - Thread bobbin as illustrated and place on foot control pedal. (6) - Please Note: When the bobbin winder spindle is in "bobbin winding" position, the machine will not sew and the hand wheel will not turn. To...


