M2100 Stitch Applications Guide
Page 1
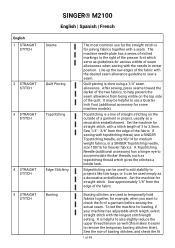
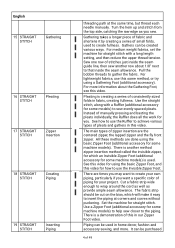
... which gives the stitches a bolder look. English 1 STRAIGHT STITCH 2 STRAIGHT STITCH 3 STRAIGHT STITCH 4 STRAIGHT STITCH 5 STRAIGHT STITCH SINGER® M2100 English | Spanish | French Seams Quilt Piecing Topstitching Edge Stitching Basting The most common use for the straight stitch is for basting, ...decorative embellishment. Line up the raw edges of the fabric. Quilt piecing is helpful to also slightly reduce the upper thread tension as topstitching thread which serve as guidelines for straight stitch, with topstitching thread, use a Quarter Inch Foot (additional accessory ...
... which gives the stitches a bolder look. English 1 STRAIGHT STITCH 2 STRAIGHT STITCH 3 STRAIGHT STITCH 4 STRAIGHT STITCH 5 STRAIGHT STITCH SINGER® M2100 English | Spanish | French Seams Quilt Piecing Topstitching Edge Stitching Basting The most common use for the straight stitch is for basting, ...decorative embellishment. Line up the raw edges of the fabric. Quilt piecing is helpful to also slightly reduce the upper thread tension as topstitching thread which serve as guidelines for straight stitch, with topstitching thread, use a Quarter Inch Foot (additional accessory ...
M2100 Stitch Applications Guide
Page 2
..., first disengage or cover the machine's feed teeth (see this video. Select straight stitch. Multiple thread colors can be sure to put the upper thread tension back to sew decorative designs as you stitch. For more information on the fabric with a removable fabric marking tool, but make sure to draw stitch...
..., first disengage or cover the machine's feed teeth (see this video. Select straight stitch. Multiple thread colors can be sure to put the upper thread tension back to sew decorative designs as you stitch. For more information on the fabric with a removable fabric marking tool, but make sure to draw stitch...
M2100 Stitch Applications Guide
Page 3
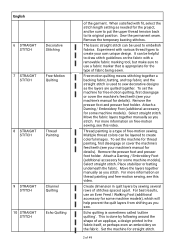
...Foot (additional accoessory for more clear view of the simplest ways to garments. Place one of the stitching area. Increase needle thread tension for some models). Twin needle hems provide a professional finish to do machine applique, providing an organic appearance. Note: If machine ... through the threading path at the same time, but thread each needle manually. Attach ribbons and trims to create interesting texture. Insert a SINGER Universal Twin Needle 1.6mm or 2.0mm (additional accessory). The top side has two parallel rows of "rows" around the applique with a...
...Foot (additional accoessory for more clear view of the simplest ways to garments. Place one of the stitching area. Increase needle thread tension for some models). Twin needle hems provide a professional finish to do machine applique, providing an organic appearance. Note: If machine ... through the threading path at the same time, but thread each needle manually. Attach ribbons and trims to create interesting texture. Insert a SINGER Universal Twin Needle 1.6mm or 2.0mm (additional accessory). The top side has two parallel rows of "rows" around the applique with a...
M2100 Stitch Applications Guide
Page 4
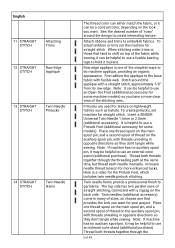
... Inserting Piping threading path at corners and curves without puckering. Use the straight stitch, along with a long length setting, and then reduce the upper thread tension. There are the centered zipper, the lapped zipper and the fly front zipper. Use a Zipper Foot (additional accessory for your project. For lightweight fabrics, use...
... Inserting Piping threading path at corners and curves without puckering. Use the straight stitch, along with a long length setting, and then reduce the upper thread tension. There are the centered zipper, the lapped zipper and the fly front zipper. Use a Zipper Foot (additional accessory for your project. For lightweight fabrics, use...
User Manual
Page 8
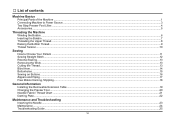
... Source...3 Two Step Presser Foot Lifter...4 Accessories...5 Threading the Machine Winding the Bobbin...6 Inserting the Bobbin...7 Threading the Upper Thread...8 Raising the Bobbin Thread...9 Thread Tension...10 Sewing How to Choose Your Pattern ...11 Sewing Straight Stitch...12 Reverse Sewing...13 Removing the Work...13 Cutting the Thread...13 Blind Hem...
... Source...3 Two Step Presser Foot Lifter...4 Accessories...5 Threading the Machine Winding the Bobbin...6 Inserting the Bobbin...7 Threading the Upper Thread...8 Raising the Bobbin Thread...9 Thread Tension...10 Sewing How to Choose Your Pattern ...11 Sewing Straight Stitch...12 Reverse Sewing...13 Removing the Work...13 Cutting the Thread...13 Blind Hem...

User Manual
Page 9
Machine Basics Principal Parts of the box and remove the outer packaging. - Presser foot 5. Place the box on a steady, flat surface. Thread cutter 4. Bobbin winding stopper 9. Reverse sewing lever Unpacking - Lift your machine out of the Machine 1. Thread tension dial 2. Thread take-up lever 3. Pattern selector dial 8. Remove all other packing material and the plastic bag. 1 Needle plate 6. Removable extension table/ accessory storage 7.
Machine Basics Principal Parts of the box and remove the outer packaging. - Presser foot 5. Place the box on a steady, flat surface. Thread cutter 4. Bobbin winding stopper 9. Reverse sewing lever Unpacking - Lift your machine out of the Machine 1. Thread tension dial 2. Thread take-up lever 3. Pattern selector dial 8. Remove all other packing material and the plastic bag. 1 Needle plate 6. Removable extension table/ accessory storage 7.

User Manual
Page 14
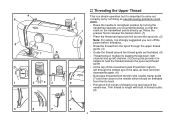
... slowly. Release the pedal after a few turns. Draw the thread from the spool through the upper thread guide. (2) -- Wind the thread clockwise around bobbin winder tension discs. (3) -- Threading the Machine a Winding the Bobbin -- Push bobbin spindle to the left (9) and remove. Place the thread and spool pin felt (a) onto the spool...
... slowly. Release the pedal after a few turns. Draw the thread from the spool through the upper thread guide. (2) -- Wind the thread clockwise around bobbin winder tension discs. (3) -- Threading the Machine a Winding the Bobbin -- Push bobbin spindle to the left (9) and remove. Place the thread and spool pin felt (a) onto the spool...
User Manual
Page 16
... important to left channel. (5) During this movement pass thread from right to carry out correctly as illustrated. (4) -- Trim thread to release the tension discs. (1) -- Now pass thread behind the thin wire needle clamp guide (7) and then down right channel and up left through the upper thread... of thread to back. -- Guide the thread around the thread guide as by not doing so several sewing problems could result. -- Thread tension module by turning the handwheel towards you turn off the power before threading. -- Threading the Upper Thread This is a simple operation but it...
... important to left channel. (5) During this movement pass thread from right to carry out correctly as illustrated. (4) -- Trim thread to release the tension discs. (1) -- Now pass thread behind the thin wire needle clamp guide (7) and then down right channel and up left through the upper thread... of thread to back. -- Guide the thread around the thread guide as by not doing so several sewing problems could result. -- Thread tension module by turning the handwheel towards you turn off the power before threading. -- Threading the Upper Thread This is a simple operation but it...
User Manual
Page 18
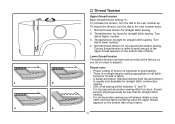
... decorative sewing you do not need to good sewing. -- Normal thread tension for straight stitch sewing. -- Thread tension too tight for zig zag and decorative sewing. Normal thread tension for straight stitch sewing. Lower thread tension The bobbin tension has been set correctly at the factory, so you will be less... than for straight stitch sewing. 2. There is important to adjust it. A balanced tension (identical stitches both top and bottom) is when a small amount of the upper thread appears on the bottom side of all stitch ...
... decorative sewing you do not need to good sewing. -- Normal thread tension for straight stitch sewing. -- Thread tension too tight for zig zag and decorative sewing. Normal thread tension for straight stitch sewing. Lower thread tension The bobbin tension has been set correctly at the factory, so you will be less... than for straight stitch sewing. 2. There is important to adjust it. A balanced tension (identical stitches both top and bottom) is when a small amount of the upper thread appears on the bottom side of all stitch ...

User Manual
Page 23
... the buttonhole process, be sure that marking on the fabric you are using to sew too many stitches in steps 2 and 4. Slightly reducing upper thread tension will produce better results. -- The zig-zag should sew over the heavy thread or cord. (A) 15 Take off the all purpose foot and attach the...
... the buttonhole process, be sure that marking on the fabric you are using to sew too many stitches in steps 2 and 4. Slightly reducing upper thread tension will produce better results. -- The zig-zag should sew over the heavy thread or cord. (A) 15 Take off the all purpose foot and attach the...
User Manual
Page 33
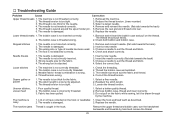
...as described. 2. Readjust the stitch length. 3. The machine is not inserted correctly. 2. The machine is too tight. 1. Reduce the thread tension. (lower number) 3. Check and attach correctly. Wrong needle size for the needle. 4. Insert the needle correctly. (flat side towards the ...back) 2. Seams gather or pucker 1. The thread tension is not threaded correctly. 2. Lint or oil have collected on the thread. The needle is not inserted correctly. 5. Troubleshooting Guide ...
...as described. 2. Readjust the stitch length. 3. The machine is not inserted correctly. 2. The machine is too tight. 1. Reduce the thread tension. (lower number) 3. Check and attach correctly. Wrong needle size for the needle. 4. Insert the needle correctly. (flat side towards the ...back) 2. Seams gather or pucker 1. The thread tension is not threaded correctly. 2. Lint or oil have collected on the thread. The needle is not inserted correctly. 5. Troubleshooting Guide ...


