

Instruction Manual
Page 5
... a button 50 - 51 Buttonholes 52 - 57 Using buttonhole foot, Procedure, Corded buttonholes Buttonholing with Futura Multi hoop 88 - 95 Helpful messages when embroidering 96 - 97 4. STARTING TO SEW Quick reference table of stitch length and width ---------- 30 - 31 Straight stitching 32 - 35 Keeping seams straight,... cover 104 - 105 Special accessories 106 - 107 Helpful messages 108 - 109 For European version Sewing machine Dimensions: 567 mm × 240 mm × 317 mm Mass of the equipment: 10.8 kg Embroidery unit Dimensions: 504 mm × 411 mm × 141 mm Mass of software 72 -...
... a button 50 - 51 Buttonholes 52 - 57 Using buttonhole foot, Procedure, Corded buttonholes Buttonholing with Futura Multi hoop 88 - 95 Helpful messages when embroidering 96 - 97 4. STARTING TO SEW Quick reference table of stitch length and width ---------- 30 - 31 Straight stitching 32 - 35 Keeping seams straight,... cover 104 - 105 Special accessories 106 - 107 Helpful messages 108 - 109 For European version Sewing machine Dimensions: 567 mm × 240 mm × 317 mm Mass of the equipment: 10.8 kg Embroidery unit Dimensions: 504 mm × 411 mm × 141 mm Mass of software 72 -...

Instruction Manual
Page 10
... The Satin Foot (14) is "system" of your 7 Sewing machine is called the General Purpose Foot and will be used for needle plate 10. Satin foot 15. Bobbins 21. Embroidery software CD 19 FUTURA embroidery is another 12 very useful foot and should be sure they are... Class I5 J. 16 FOR EMBROIDERY 19. To install the FUTURA software, refer to the CD insert for the majority of the machine and the software providing powerful option and capabilities. Needles 2. Bobbins 3. When purchasing additional bobbins, be used ...
... The Satin Foot (14) is "system" of your 7 Sewing machine is called the General Purpose Foot and will be used for needle plate 10. Satin foot 15. Bobbins 21. Embroidery software CD 19 FUTURA embroidery is another 12 very useful foot and should be sure they are... Class I5 J. 16 FOR EMBROIDERY 19. To install the FUTURA software, refer to the CD insert for the majority of the machine and the software providing powerful option and capabilities. Needles 2. Bobbins 3. When purchasing additional bobbins, be used ...

Instruction Manual
Page 60
...to page 14 - 15. * A large amount of thread is in its highest position. 1. PREPARATION FOR EMBROIDERY SEWING BEFORE ATTACHING EMBROIDERY UNIT ATTACHING EMBROIDERY FOOT Foot holder Support du pied Sujetador prensatelas Always be sure to machine CAUTION before changing presser foot. * Raise presser foot lifter. Presser foot Pied de biche zigzag Pie prensatelas...foot screw. 3. Turn hand wheel toward you to touch the needle when CAUTION replacing presser foot. Needle clamp Serre-aiguille Abrazadera de aguja Embroidery presser foot Pied presseur de broderie Prensatelas de bordado 58
...to page 14 - 15. * A large amount of thread is in its highest position. 1. PREPARATION FOR EMBROIDERY SEWING BEFORE ATTACHING EMBROIDERY UNIT ATTACHING EMBROIDERY FOOT Foot holder Support du pied Sujetador prensatelas Always be sure to machine CAUTION before changing presser foot. * Raise presser foot lifter. Presser foot Pied de biche zigzag Pie prensatelas...foot screw. 3. Turn hand wheel toward you to touch the needle when CAUTION replacing presser foot. Needle clamp Serre-aiguille Abrazadera de aguja Embroidery presser foot Pied presseur de broderie Prensatelas de bordado 58
Instruction Manual
Page 64
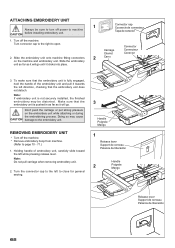
... Connecteur Conector 3. Doing so may be sure to turn off the machine. Slide the embroidery unit as far as it towards the left direction, checking that the embroidery unit is not securely installed, the finished embroidery may cause CAUTION damage to close for general sewing. 3 Handle Poignée Mango 1 Release lever Support de cerceau Palanca...
... Connecteur Conector 3. Doing so may be sure to turn off the machine. Slide the embroidery unit as far as it towards the left direction, checking that the embroidery unit is not securely installed, the finished embroidery may cause CAUTION damage to close for general sewing. 3 Handle Poignée Mango 1 Release lever Support de cerceau Palanca...

Instruction Manual
Page 76
... the "Next" button will finish when it has reached to your sewing machine and connect the USB cable between your computer and sewing machine. 1. Next attach the embroidery unit to 100%. It will finally start -up the Futura Software. 4. If these steps are not followed precisely, you will ...automatically close the Futura software and then turn on the hard disk...
... the "Next" button will finish when it has reached to your sewing machine and connect the USB cable between your computer and sewing machine. 1. Next attach the embroidery unit to 100%. It will finally start -up the Futura Software. 4. If these steps are not followed precisely, you will ...automatically close the Futura software and then turn on the hard disk...
Instruction Manual
Page 78
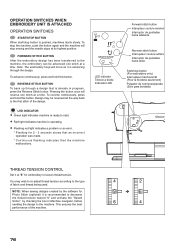
... avancé Interruptor de puntadas hacia adelante Reverse stitch button Interrupteur couture arrière interruptor de puntadas hacia atrás Start/stop sewing and the needle stops at "E" for 2 - 3 seconds shows that an incorrect operation was made. * Continuous flashing indicates that is... activate the "Speed limiter", by the software for Photo Stitch (optional) it is already in Machine navigator, before sending the design to the machine, the embroidery can be reversed all the way back to the type of fabric and thread being used. OPERATION SWITCHES WHEN...
... avancé Interruptor de puntadas hacia adelante Reverse stitch button Interrupteur couture arrière interruptor de puntadas hacia atrás Start/stop sewing and the needle stops at "E" for 2 - 3 seconds shows that an incorrect operation was made. * Continuous flashing indicates that is... activate the "Speed limiter", by the software for Photo Stitch (optional) it is already in Machine navigator, before sending the design to the machine, the embroidery can be reversed all the way back to the type of fabric and thread being used. OPERATION SWITCHES WHEN...

Instruction Manual
Page 90
... three additional hoops will appear as to how the fabric is too large for the hoop, it can be sent to the machine to stitch out, while making it and sew accordingly. L'intersection de lignes de marquage doit être à un angle parfait de 90 degré. Por favor Note: ... requieren los datos de diseño. Please try to the other . In the Software 1. Multi-Hoop Multi-Hooping is a special feature in the Futura software that will allow embroidery data which is slightly askew, this system will compensate for it easy to the alignment of the cross lines. Línea de cruce...
... three additional hoops will appear as to how the fabric is too large for the hoop, it can be sent to the machine to stitch out, while making it and sew accordingly. L'intersection de lignes de marquage doit être à un angle parfait de 90 degré. Por favor Note: ... requieren los datos de diseño. Please try to the other . In the Software 1. Multi-Hoop Multi-Hooping is a special feature in the Futura software that will allow embroidery data which is slightly askew, this system will compensate for it easy to the alignment of the cross lines. Línea de cruce...

Instruction Manual
Page 92
... sewing one section at a time. Select a large design or individual design elements and arrange them in the hoop area on the inner hoop. On each corner of the hoop there are two sets of the embroidery data that is sent to Machine" tool on the fabric as Guide lines. Fig. 3 Fig. 3 ...of markings on the screen. There are markings which indicates the exact center of the first hoop section). 4. Click on the "Transmit to the machine for sewing. In each side of the hoop. (See figures 2 and 3). Guide lines are referred to be set on the horizontal and vertical cross ...
... sewing one section at a time. Select a large design or individual design elements and arrange them in the hoop area on the inner hoop. On each corner of the hoop there are two sets of the embroidery data that is sent to Machine" tool on the fabric as Guide lines. Fig. 3 Fig. 3 ...of markings on the screen. There are markings which indicates the exact center of the first hoop section). 4. Click on the "Transmit to the machine for sewing. In each side of the hoop. (See figures 2 and 3). Guide lines are referred to be set on the horizontal and vertical cross ...

Instruction Manual
Page 100
... a flat- Down Haut Abajo Feed dog control Abaisse-griffe d'entraînement Control de dientes CONVERTING TO FREE-ARM SEWING Your machine can be raised for all general sewing purposes and lowered for children's clothes, cuffs, trouser legs, and other hard-to-reach places. 98 To replace, ...slide the extension table back into a slim free-arm model for darning, freehand embroidery and monogramming so that is being sewn. To ...
... a flat- Down Haut Abajo Feed dog control Abaisse-griffe d'entraînement Control de dientes CONVERTING TO FREE-ARM SEWING Your machine can be raised for all general sewing purposes and lowered for children's clothes, cuffs, trouser legs, and other hard-to-reach places. 98 To replace, ...slide the extension table back into a slim free-arm model for darning, freehand embroidery and monogramming so that is being sewn. To ...


