

Instruction Manual
Page 5
... 98 - 99 Feed dog control 98 - 99 Converting to -sew fabrics 3. TABLE OF CONTENTS 1.GETTING TO KNOW YOUR MACHINE Machine identification 6 - 7 Accessories 8 - 9 Setting up your machine 10 - 11 Spool pins 10 - 11 Winding bobbin 12 - 13 Threading the bobbin thread 14 - 15 Threading ...- 49 Continuous patterns 50 - 51 Sewing on a button 50 - 51 Buttonholes 52 - 57 Using buttonhole foot, Procedure, Corded buttonholes Buttonholing with Futura Multi hoop 88 - 95 Helpful messages when embroidering 96 - 97 4. STARTING TO SEW Quick reference table of stitch length and width ---------- 30 ...
... 98 - 99 Feed dog control 98 - 99 Converting to -sew fabrics 3. TABLE OF CONTENTS 1.GETTING TO KNOW YOUR MACHINE Machine identification 6 - 7 Accessories 8 - 9 Setting up your machine 10 - 11 Spool pins 10 - 11 Winding bobbin 12 - 13 Threading the bobbin thread 14 - 15 Threading ...- 49 Continuous patterns 50 - 51 Sewing on a button 50 - 51 Buttonholes 52 - 57 Using buttonhole foot, Procedure, Corded buttonholes Buttonholing with Futura Multi hoop 88 - 95 Helpful messages when embroidering 96 - 97 4. STARTING TO SEW Quick reference table of stitch length and width ---------- 30 ...
Instruction Manual
Page 8
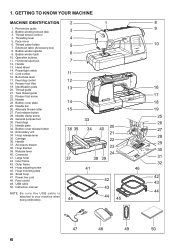
... winder spindle 9. Thread guide 13 16 21. Needle 24. Foot release button 28. Carriage 36. Thread tension control 4. Extension table (Accessory box) 5 10 8. Presser foot lifter 19. Alternate thread cutter 15 19 27. Needle clamp screw 25 29. Embroidery unit 34 Hoop... 49 50 6 GETTING TO KNOW YOUR MACHINE MACHINE IDENTIFICATION 2 1 8 1. Buttonhole lever 17. Twin thread guide 22. Hand wheel 14. Accessory drawer 38. Small hoop 47. 1. Handle 37. Bobbin cover release button 33. Hoop mounting plate 41 46 46. Operation buttons 11. Threading...
... winder spindle 9. Thread guide 13 16 21. Needle 24. Foot release button 28. Carriage 36. Thread tension control 4. Extension table (Accessory box) 5 10 8. Presser foot lifter 19. Alternate thread cutter 15 19 27. Needle clamp screw 25 29. Embroidery unit 34 Hoop... 49 50 6 GETTING TO KNOW YOUR MACHINE MACHINE IDENTIFICATION 2 1 8 1. Buttonhole lever 17. Twin thread guide 22. Hand wheel 14. Accessory drawer 38. Small hoop 47. 1. Handle 37. Bobbin cover release button 33. Hoop mounting plate 41 46 46. Operation buttons 11. Threading...

Instruction Manual
Page 10
...pin cap (large) 8. Button sewing foot 1 16. Scissors 22. Embroidery presser foot 23. Embroidery software CD 19 FUTURA embroidery is called the General Purpose Foot and will be used for the majority of the machine and the software providing powerful...spool pin 4. Screwdriver (small) 12. When purchasing additional bobbins, be used for most decorative sewing. Vinyl bag 20. Spool pin cap (mini) 6. ACCESSORIES FOR SEWING MACHINE 1. Screwdriver (large) 11. Bobbins 21. Thread spool net (short) The Foot that comes on your 7 Sewing machine is "system"...
...pin cap (large) 8. Button sewing foot 1 16. Scissors 22. Embroidery presser foot 23. Embroidery software CD 19 FUTURA embroidery is called the General Purpose Foot and will be used for the majority of the machine and the software providing powerful...spool pin 4. Screwdriver (small) 12. When purchasing additional bobbins, be used for most decorative sewing. Vinyl bag 20. Spool pin cap (mini) 6. ACCESSORIES FOR SEWING MACHINE 1. Screwdriver (large) 11. Bobbins 21. Thread spool net (short) The Foot that comes on your 7 Sewing machine is "system"...

Instruction Manual
Page 84
... fil Puntadas en blanco resultantes de ruptura de hilo 2. Restart the embroidery machine and continue embroidering. HELPFUL INFORMATION FOR EMBROIDERING WITH FUTURA 1. Reverse stitch button Interrupteur couture arrière interruptor de puntadas hacia atrás 82 In such cases, use the following...Rethread upper thread, (see page 16 - 17 "Threading the Top Thread".) Placing the small net that the thread is supplied with the accessories over . 2. Step back through the embroidery data. Upper thread is not broken. If stitches are flashing lights and making a beeping sound...
... fil Puntadas en blanco resultantes de ruptura de hilo 2. Restart the embroidery machine and continue embroidering. HELPFUL INFORMATION FOR EMBROIDERING WITH FUTURA 1. Reverse stitch button Interrupteur couture arrière interruptor de puntadas hacia atrás 82 In such cases, use the following...Rethread upper thread, (see page 16 - 17 "Threading the Top Thread".) Placing the small net that the thread is supplied with the accessories over . 2. Step back through the embroidery data. Upper thread is not broken. If stitches are flashing lights and making a beeping sound...
Instruction Manual
Page 108
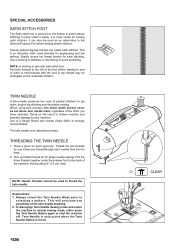
Slightly loosen top thread tension for pin tucks, double top stitching and decorative sewing. Use a backing of a Singer Brand twin needle (Style 2025) is strongly recommended. Draw one . NOTE: Needle threader cannot be set above twin needle mark, regardless of the stitch you ... mode, either press the Twin Needle Button again or shut the machine off. Thread the two threads as one thread through each spool pin. SPECIAL ACCESSORIES SATIN STITCH FOOT The Satin stitch foot is grooved on the bottom to permit dense stitching to pass under the presser foot to the back...
Slightly loosen top thread tension for pin tucks, double top stitching and decorative sewing. Use a backing of a Singer Brand twin needle (Style 2025) is strongly recommended. Draw one . NOTE: Needle threader cannot be set above twin needle mark, regardless of the stitch you ... mode, either press the Twin Needle Button again or shut the machine off. Thread the two threads as one thread through each spool pin. SPECIAL ACCESSORIES SATIN STITCH FOOT The Satin stitch foot is grooved on the bottom to permit dense stitching to pass under the presser foot to the back...

