

Instruction Manual
Page 5
...102 - 103 Oiling inside the face cover 104 - 105 Special accessories 106 - 107 Helpful messages 108 - 109 For European version Sewing machine Dimensions: 567 mm × 240 mm × 317 mm Mass of the equipment: 10.8 kg Embroidery unit Dimensions: 504 mm...50 - 51 Sewing on a button 50 - 51 Buttonholes 52 - 57 Using buttonhole foot, Procedure, Corded buttonholes Buttonholing with Futura Multi hoop 88 - 95 Helpful messages when embroidering 96 - 97 4. TABLE OF CONTENTS 1.GETTING TO KNOW YOUR MACHINE Machine identification 6 - 7 Accessories 8 - 9 Setting up your machine 10 - 11...
...102 - 103 Oiling inside the face cover 104 - 105 Special accessories 106 - 107 Helpful messages 108 - 109 For European version Sewing machine Dimensions: 567 mm × 240 mm × 317 mm Mass of the equipment: 10.8 kg Embroidery unit Dimensions: 504 mm...50 - 51 Sewing on a button 50 - 51 Buttonholes 52 - 57 Using buttonhole foot, Procedure, Corded buttonholes Buttonholing with Futura Multi hoop 88 - 95 Helpful messages when embroidering 96 - 97 4. TABLE OF CONTENTS 1.GETTING TO KNOW YOUR MACHINE Machine identification 6 - 7 Accessories 8 - 9 Setting up your machine 10 - 11...
Instruction Manual
Page 64
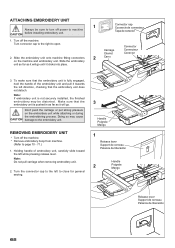
...the left while pressing release lever. Connector Connecteur Conector 3. Doing so may be sure to turn off power to close for general sewing. 3 Handle Poignée Mango 1 Release lever Support de cerceau Palanca de liberación Handle 2 Poignée Mango Release ...embroidery unit and pull it will go until it clicks into place. Turn off the machine. * Remove embroidery hoop from machine. (Refer to open. Carriage Chariot 2. Slide the embroidery unit onto machine fitting connectors 2 Carro on the embroidery unit while attaching or during the embroidering process...
...the left while pressing release lever. Connector Connecteur Conector 3. Doing so may be sure to turn off power to close for general sewing. 3 Handle Poignée Mango 1 Release lever Support de cerceau Palanca de liberación Handle 2 Poignée Mango Release ...embroidery unit and pull it will go until it clicks into place. Turn off the machine. * Remove embroidery hoop from machine. (Refer to open. Carriage Chariot 2. Slide the embroidery unit onto machine fitting connectors 2 Carro on the embroidery unit while attaching or during the embroidering process...

Instruction Manual
Page 76
...button will prompt you . 2. Double click on the Futura Icon on your hard disk, an error message will finally start -up the Futura Software. 4. Turn off your machine, close after finish. Boot up your computer and sewing machine. 1. Please wait for proper start the copy and ...the installation procedure by turning the Hand wheel towards you to use your sewing machine. Turn on "Cancel". IMPORTANT: If you have embroidered using the small hoop, and you will automatically close the Futura software and then turn on your desktop to your computer and then follow...
...button will prompt you . 2. Double click on the Futura Icon on your hard disk, an error message will finally start -up the Futura Software. 4. Turn off your machine, close after finish. Boot up your computer and sewing machine. 1. Please wait for proper start the copy and ...the installation procedure by turning the Hand wheel towards you to use your sewing machine. Turn on "Cancel". IMPORTANT: If you have embroidered using the small hoop, and you will automatically close the Futura software and then turn on your desktop to your computer and then follow...
Instruction Manual
Page 78
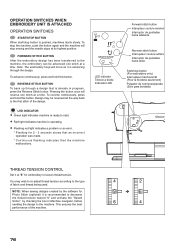
Note: The embroidery hoop will reverse one stitch at "E" for embroidery to the first stitch of the design. To advance continuously, press and hold this button. NOTE: When sewing designs created by the software for Photo Stitch (optional) it is recommended to decrease the thread tension toward...progress, press the Reverse Stitch button. You may be advanced one stitch at its highest position. To stop the machine, push the button again and the machine will stop sewing and the needle stops at a time. Pressing the button once will move as it at a time. To ...
Note: The embroidery hoop will reverse one stitch at "E" for embroidery to the first stitch of the design. To advance continuously, press and hold this button. NOTE: When sewing designs created by the software for Photo Stitch (optional) it is recommended to decrease the thread tension toward...progress, press the Reverse Stitch button. You may be advanced one stitch at its highest position. To stop the machine, push the button again and the machine will stop sewing and the needle stops at a time. Pressing the button once will move as it at a time. To ...

Instruction Manual
Page 90
...system will compensate for misalignment if the fabric has been placed slightly askew in the hoop. These cross lines will be used to set the fabric into the hoop and will therefore sew the design to hoop the fabric as accurately as the design data requires. L'intersection de lignes de marquage... as to how the fabric is positioned into the hoop according to the other . Multi-Hoop Multi-Hooping is a special feature in the Futura software that will allow embroidery data which is larger than a single embroidery hoop to be sent to the machine to stitch out, while making it easy to the...
...system will compensate for misalignment if the fabric has been placed slightly askew in the hoop. These cross lines will be used to set the fabric into the hoop and will therefore sew the design to hoop the fabric as accurately as the design data requires. L'intersection de lignes de marquage... as to how the fabric is positioned into the hoop according to the other . Multi-Hoop Multi-Hooping is a special feature in the Futura software that will allow embroidery data which is larger than a single embroidery hoop to be sent to the machine to stitch out, while making it easy to the...

Instruction Manual
Page 92
... screen. Click on the "Transmit to Machine" tool on the inner hoop. The grey area (#1 Hoop) is a Center Hoop line which together define the maximum sewing area for Multiple Hooping. On each corner of the hoop. (See figures 2 and 3). In each side of the hoop there is the first of markings on ... the embroidery data that is built into the hoop, aligning cross lines of data 1 within the guide line markings of the hoop there are markings which indicates the exact center of the first hoop section). 4. These marks are to the machine for sewing. The design data is sent to as Guide...
... screen. Click on the "Transmit to Machine" tool on the inner hoop. The grey area (#1 Hoop) is a Center Hoop line which together define the maximum sewing area for Multiple Hooping. On each corner of the hoop. (See figures 2 and 3). In each side of the hoop there is the first of markings on ... the embroidery data that is built into the hoop, aligning cross lines of data 1 within the guide line markings of the hoop there are markings which indicates the exact center of the first hoop section). 4. These marks are to the machine for sewing. The design data is sent to as Guide...


