

Instruction Manual
Page 5
...Futura Multi hoop 88 - 95 Helpful messages when embroidering 96 - 97 4. PREPARATION FOR EMBROIDERY SEWING Before attaching embroidery unit 58 - 61 Attaching embroidery foot, Inserting the bobbin, Threading the top thread, Extension table, Attaching embroidery unit 62 - 63 Removing embroidery unit 62 - 63 Securing fabric in embroidery hoop 64 - 65 Using fabric and stabilizer 66 - 69 Preparing the machine... messages 108 - 109 For European version Sewing machine Dimensions: 567 mm × 240 mm × 317 mm Mass of the equipment: 10.8 kg Embroidery unit Dimensions: 504 mm × 411...
...Futura Multi hoop 88 - 95 Helpful messages when embroidering 96 - 97 4. PREPARATION FOR EMBROIDERY SEWING Before attaching embroidery unit 58 - 61 Attaching embroidery foot, Inserting the bobbin, Threading the top thread, Extension table, Attaching embroidery unit 62 - 63 Removing embroidery unit 62 - 63 Securing fabric in embroidery hoop 64 - 65 Using fabric and stabilizer 66 - 69 Preparing the machine... messages 108 - 109 For European version Sewing machine Dimensions: 567 mm × 240 mm × 317 mm Mass of the equipment: 10.8 kg Embroidery unit Dimensions: 504 mm × 411...

Instruction Manual
Page 10
... cap (large) 8. Screwdriver (large) 11. Spool pin cap (small) 7. Buttonhole opener/Brush 9. Scissors 22. Embroidery presser foot 23. Embroidery software CD 19 FUTURA embroidery is "system" of your 7 Sewing machine is another 12 very useful foot and should be used for most decorative sewing. Screwdriver for more information. 8 2 3 4 5 6 8 9 10 11 13 14 15 17 18 20 21...
... cap (large) 8. Screwdriver (large) 11. Spool pin cap (small) 7. Buttonhole opener/Brush 9. Scissors 22. Embroidery presser foot 23. Embroidery software CD 19 FUTURA embroidery is "system" of your 7 Sewing machine is another 12 very useful foot and should be used for most decorative sewing. Screwdriver for more information. 8 2 3 4 5 6 8 9 10 11 13 14 15 17 18 20 21...

Instruction Manual
Page 60
...required for embroidering, so be sure to turn off power to touch the needle when CAUTION replacing presser foot. PREPARATION FOR EMBROIDERY SEWING BEFORE ATTACHING EMBROIDERY UNIT ATTACHING EMBROIDERY FOOT Foot holder Support du pied Sujetador prensatelas Always be sure to move needle up and down, and check that the drive... bar Barre de pied presseur Barra de prensatelas Drive lever Levier d'entraînement Palanca de accionamiento Be careful not to machine CAUTION before changing presser foot. * Raise presser foot lifter. Secure it by tightening presser foot screw. 3. 3.
...required for embroidering, so be sure to turn off power to touch the needle when CAUTION replacing presser foot. PREPARATION FOR EMBROIDERY SEWING BEFORE ATTACHING EMBROIDERY UNIT ATTACHING EMBROIDERY FOOT Foot holder Support du pied Sujetador prensatelas Always be sure to move needle up and down, and check that the drive... bar Barre de pied presseur Barra de prensatelas Drive lever Levier d'entraînement Palanca de accionamiento Be careful not to machine CAUTION before changing presser foot. * Raise presser foot lifter. Secure it by tightening presser foot screw. 3. 3.
Instruction Manual
Page 64
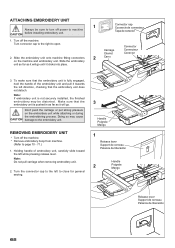
... finished embroidery may cause CAUTION damage to the embroidery unit. REMOVING EMBROIDERY UNIT * Turn off power to page 70 - 71.) 1. Turn the connector cap to the left while pressing release lever. Turn connector cap to the right to close for general sewing. 3...embroidery unit does not detach. Don't push the carriage or put strong pressure on the machine and embroidery unit. ATTACHING EMBROIDERY UNIT 1 Always be distorted. Doing so may be sure to turn off the machine. * Remove embroidery hoop from machine. (Refer to machine CAUTION before installing embroidery ...
... finished embroidery may cause CAUTION damage to the embroidery unit. REMOVING EMBROIDERY UNIT * Turn off power to page 70 - 71.) 1. Turn the connector cap to the left while pressing release lever. Turn connector cap to the right to close for general sewing. 3...embroidery unit does not detach. Don't push the carriage or put strong pressure on the machine and embroidery unit. ATTACHING EMBROIDERY UNIT 1 Always be distorted. Doing so may be sure to turn off the machine. * Remove embroidery hoop from machine. (Refer to machine CAUTION before installing embroidery ...

Instruction Manual
Page 76
...the installation procedure is finalizing all the selections made during the installation set-up the Futura Software. 4. Next attach the embroidery unit to your sewing machine and connect the USB cable between your sewing machine. Attach the hoop that you . 2. You are not followed precisely, you will ...through 4 above. 74 If the installation utility identifies a lack of the FUTURA software files to the given directory on "Cancel". Boot up protocol. Double click on the Futura Icon on your computer and sewing machine. 1. Wait for a short while until this happens. You can always ...
...the installation procedure is finalizing all the selections made during the installation set-up the Futura Software. 4. Next attach the embroidery unit to your sewing machine and connect the USB cable between your sewing machine. Attach the hoop that you . 2. You are not followed precisely, you will ...through 4 above. 74 If the installation utility identifies a lack of the FUTURA software files to the given directory on "Cancel". Boot up protocol. Double click on the Futura Icon on your computer and sewing machine. 1. Wait for a short while until this happens. You can always ...
Instruction Manual
Page 78
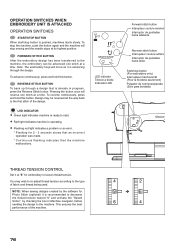
... embroidery to the machine. OPERATION SWITCHES WHEN EMBROIDERY UNIT IS ATTACHED OPERATION SWITCHES START/STOP BUTTON When start . Red light indicates machine is pushed, machines starts slowly. FORWARD STITCH BUTTON After the embroidery design has been transferred to the machine, the embroidery ... flashing indicates that is advancing through a design that the machine malfunctions. To stop sewing and the needle stops at a time. To reverse continuously, press and hold this button. NOTE: When sewing designs created by checking the box in progress, press the...
... embroidery to the machine. OPERATION SWITCHES WHEN EMBROIDERY UNIT IS ATTACHED OPERATION SWITCHES START/STOP BUTTON When start . Red light indicates machine is pushed, machines starts slowly. FORWARD STITCH BUTTON After the embroidery design has been transferred to the machine, the embroidery ... flashing indicates that is advancing through a design that the machine malfunctions. To stop sewing and the needle stops at a time. To reverse continuously, press and hold this button. NOTE: When sewing designs created by checking the box in progress, press the...

Instruction Manual
Page 90
...is positioned into the hoop according to set the fabric into the hoop and will be a single design that is too large for it and sew accordingly. Please try to hoop the fabric as accurately as the design data requires. The vertical and horizontal lines must be at precise right ... aros adicionales si as the"cross lines". Multi-Hoop Multi-Hooping is a special feature in the Futura software that will allow embroidery data which is larger than a single embroidery hoop to be sent to the machine to stitch out, while making it easy to re-hoop the fabric so that when combined together...
...is positioned into the hoop according to set the fabric into the hoop and will be a single design that is too large for it and sew accordingly. Please try to hoop the fabric as accurately as the design data requires. The vertical and horizontal lines must be at precise right ... aros adicionales si as the"cross lines". Multi-Hoop Multi-Hooping is a special feature in the Futura software that will allow embroidery data which is larger than a single embroidery hoop to be sent to the machine to stitch out, while making it easy to re-hoop the fabric so that when combined together...

Instruction Manual
Page 92
There are to the machine for sewing. Select a large design or individual design elements and arrange them in the hoop area on the inner hoop. Click on the "Transmit to the machine for Multiple Hooping. These marks are markings which indicates the exact center of the hoop. Fig. 3 Fig. 3 Fig. 3 Fig. 4 ... that is sent to Machine" tool on the fabric as shown. On each corner of the hoop there are referred to as the design parts flow out of the embroidery data that is a Center Hoop line which together define the maximum sewing area for sewing one section at a time...
There are to the machine for sewing. Select a large design or individual design elements and arrange them in the hoop area on the inner hoop. Click on the "Transmit to the machine for Multiple Hooping. These marks are markings which indicates the exact center of the hoop. Fig. 3 Fig. 3 Fig. 3 Fig. 4 ... that is sent to Machine" tool on the fabric as shown. On each corner of the hoop there are referred to as the design parts flow out of the embroidery data that is a Center Hoop line which together define the maximum sewing area for sewing one section at a time...

Instruction Manual
Page 100
.... 4. Down Haut Abajo Feed dog control Abaisse-griffe d'entraînement Control de dientes CONVERTING TO FREE-ARM SEWING Your machine can be raised for all general sewing purposes and lowered for darning, freehand embroidery and monogramming so that is being sewn. OTHER THINGS YOU SHOULD KNOW PRESSER FOOT LIFTER There are moving the...
.... 4. Down Haut Abajo Feed dog control Abaisse-griffe d'entraînement Control de dientes CONVERTING TO FREE-ARM SEWING Your machine can be raised for all general sewing purposes and lowered for darning, freehand embroidery and monogramming so that is being sewn. OTHER THINGS YOU SHOULD KNOW PRESSER FOOT LIFTER There are moving the...


