

Instruction Manual
Page 5
...Futura Multi hoop 88 - 95 Helpful messages when embroidering 96 - 97 4. PREPARATION FOR EMBROIDERY SEWING Before attaching embroidery unit 58 - 61 Attaching embroidery foot, Inserting the bobbin, Threading the top thread, Extension table, Attaching embroidery unit 62 - 63 Removing embroidery unit 62 - 63 Securing fabric in embroidery hoop 64 - 65 Using fabric and stabilizer 66 - 69 Preparing the machine... messages 108 - 109 For European version Sewing machine Dimensions: 567 mm × 240 mm × 317 mm Mass of the equipment: 10.8 kg Embroidery unit Dimensions: 504 mm × 411...
...Futura Multi hoop 88 - 95 Helpful messages when embroidering 96 - 97 4. PREPARATION FOR EMBROIDERY SEWING Before attaching embroidery unit 58 - 61 Attaching embroidery foot, Inserting the bobbin, Threading the top thread, Extension table, Attaching embroidery unit 62 - 63 Removing embroidery unit 62 - 63 Securing fabric in embroidery hoop 64 - 65 Using fabric and stabilizer 66 - 69 Preparing the machine... messages 108 - 109 For European version Sewing machine Dimensions: 567 mm × 240 mm × 317 mm Mass of the equipment: 10.8 kg Embroidery unit Dimensions: 504 mm × 411...

Instruction Manual
Page 10
... felt discs 5. Spool pin cap (mini) 6. Buttonhole opener/Brush 9. Thread spool net (long) 18. Embroidery presser foot 23. To install the FUTURA software, refer to the CD insert for the majority of your 7 Sewing machine is "system" of the machine and the software providing powerful option and capabilities. Screwdriver (large) 11. Satin foot 15. Buttonhole...
... felt discs 5. Spool pin cap (mini) 6. Buttonhole opener/Brush 9. Thread spool net (long) 18. Embroidery presser foot 23. To install the FUTURA software, refer to the CD insert for the majority of your 7 Sewing machine is "system" of the machine and the software providing powerful option and capabilities. Screwdriver (large) 11. Satin foot 15. Buttonhole...

Instruction Manual
Page 60
...up and down together with the needle. Secure it by tightening presser foot screw. 3. Needle clamp Serre-aiguille Abrazadera de aguja Embroidery presser foot Pied presseur de broderie Prensatelas de bordado 58 INSERTING THE BOBBIN Refer to page 14 - 15. * A large ...down , and check that the drive lever is above the needle clamp. PREPARATION FOR EMBROIDERY SEWING BEFORE ATTACHING EMBROIDERY UNIT ATTACHING EMBROIDERY FOOT Foot holder Support du pied Sujetador prensatelas Always be sure to machine CAUTION before changing presser foot. * Raise presser foot lifter. Screw Vis Guia * ...
...up and down together with the needle. Secure it by tightening presser foot screw. 3. Needle clamp Serre-aiguille Abrazadera de aguja Embroidery presser foot Pied presseur de broderie Prensatelas de bordado 58 INSERTING THE BOBBIN Refer to page 14 - 15. * A large ...down , and check that the drive lever is above the needle clamp. PREPARATION FOR EMBROIDERY SEWING BEFORE ATTACHING EMBROIDERY UNIT ATTACHING EMBROIDERY FOOT Foot holder Support du pied Sujetador prensatelas Always be sure to machine CAUTION before changing presser foot. * Raise presser foot lifter. Screw Vis Guia * ...
Instruction Manual
Page 64
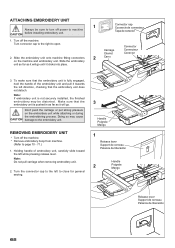
... 70 - 71.) 1. Turn off power to open. Holding handle of the embroidery unit and pull it clicks into place. Slide the embroidery unit as far as it will go . REMOVING EMBROIDERY UNIT * Turn off the machine. * Remove embroidery hoop from machine. (Refer to close for general sewing. 3 Handle Poignée Mango 1 Release lever Support de cerceau Palanca...
... 70 - 71.) 1. Turn off power to open. Holding handle of the embroidery unit and pull it clicks into place. Slide the embroidery unit as far as it will go . REMOVING EMBROIDERY UNIT * Turn off the machine. * Remove embroidery hoop from machine. (Refer to close for general sewing. 3 Handle Poignée Mango 1 Release lever Support de cerceau Palanca...

Instruction Manual
Page 76
... a lack of the FUTURA software files to the given directory on "Next" to continue. You can always abort the installation procedure by turning the Hand wheel towards you will get a "Transmission Pending" error message. Next attach the embroidery unit to your sewing machine and connect the USB... cable between your large hoop. IMPORTANT: If you have embroidered using the small hoop, and you are now ready to use your computer and sewing machine. 1. Now you are prompted to select ...
... a lack of the FUTURA software files to the given directory on "Next" to continue. You can always abort the installation procedure by turning the Hand wheel towards you will get a "Transmission Pending" error message. Next attach the embroidery unit to your sewing machine and connect the USB... cable between your large hoop. IMPORTANT: If you have embroidered using the small hoop, and you are now ready to use your computer and sewing machine. 1. Now you are prompted to select ...
Instruction Manual
Page 78
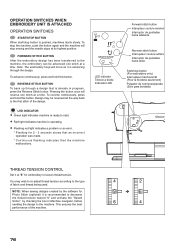
... to start /stop sewing and the needle stops at its highest position. LED INDICATOR Green light indicates machine is already in Machine navigator, before sending the design to loosen thread tension. You may be reversed all the way back to the machine, the embroidery can be advanced one... stitch at a time. Note: The embroidery hoop will move as it is pushed, machines starts slowly. To advance continuously, press and hold this button. This ensures ...
... to start /stop sewing and the needle stops at its highest position. LED INDICATOR Green light indicates machine is already in Machine navigator, before sending the design to loosen thread tension. You may be reversed all the way back to the machine, the embroidery can be advanced one... stitch at a time. Note: The embroidery hoop will move as it is pushed, machines starts slowly. To advance continuously, press and hold this button. This ensures ...

Instruction Manual
Page 90
... n o t e : T h e f a b r i c m u s t b e l a r g e e n o u g h t o accommodate the amount of hoops that will be used to set the fabric into the hoop and will therefore sew the design to the alignment of cross lines must be referred to as the"cross lines". L'intersection de lignes de marquage doit être à... the machine exactly as the design data requires. See Fig. 1. When re-hooping the fabric, the Multihoop feature will compensate for it easy to four different parts; Multi-Hoop Multi-Hooping is a special feature in the Futura software that will allow embroidery data which...
... n o t e : T h e f a b r i c m u s t b e l a r g e e n o u g h t o accommodate the amount of hoops that will be used to set the fabric into the hoop and will therefore sew the design to the alignment of cross lines must be referred to as the"cross lines". L'intersection de lignes de marquage doit être à... the machine exactly as the design data requires. See Fig. 1. When re-hooping the fabric, the Multihoop feature will compensate for it easy to four different parts; Multi-Hoop Multi-Hooping is a special feature in the Futura software that will allow embroidery data which...

Instruction Manual
Page 92
..., aligning cross lines of data 1 within the guide line markings of the first hoop section). 4. The design data is sent to the machine for sewing. These marks are to the machine for Multiple Hooping. Fig. 3 Fig. 3 Fig. 3 Fig. 4 Fig. 4 Fig. 4 Guide line Ligne Guide Línea guía ... tool bar. 5. The grey area (#1 Hoop) is the first of the embroidery data that is a Center Hoop line which together define the maximum sewing area for sewing one section at a time. Guide lines are referred to Machine" tool on the "Transmit to as Guide lines. The example shown uses lettering...
..., aligning cross lines of data 1 within the guide line markings of the first hoop section). 4. The design data is sent to the machine for sewing. These marks are to the machine for Multiple Hooping. Fig. 3 Fig. 3 Fig. 3 Fig. 4 Fig. 4 Fig. 4 Guide line Ligne Guide Línea guía ... tool bar. 5. The grey area (#1 Hoop) is the first of the embroidery data that is a Center Hoop line which together define the maximum sewing area for sewing one section at a time. Guide lines are referred to Machine" tool on the "Transmit to as Guide lines. The example shown uses lettering...

Instruction Manual
Page 100
...fabric. 3. Down Haut Abajo Feed dog control Abaisse-griffe d'entraînement Control de dientes CONVERTING TO FREE-ARM SEWING Your machine can be raised for all general sewing purposes and lowered for children's clothes, cuffs, trouser legs, and other hard-to remove thick fabric. With the..., it clicks. Raise the lifter to the middle position to sew. 2. They should be used either as a freearm model. To replace, slide the extension table back into a slim free-arm model for darning, freehand embroidery and monogramming so that is being sewn. 4. OTHER THINGS YOU...
...fabric. 3. Down Haut Abajo Feed dog control Abaisse-griffe d'entraînement Control de dientes CONVERTING TO FREE-ARM SEWING Your machine can be raised for all general sewing purposes and lowered for children's clothes, cuffs, trouser legs, and other hard-to remove thick fabric. With the..., it clicks. Raise the lifter to the middle position to sew. 2. They should be used either as a freearm model. To replace, slide the extension table back into a slim free-arm model for darning, freehand embroidery and monogramming so that is being sewn. 4. OTHER THINGS YOU...


